
User Guide
Page 5
... or other personal injury. Plastic bag precaution Never place the plastic bags in the area around the prongs of suffocation. Warning Do not affix labels to a container to your head. Immediately perform the following steps if liquid or a foreign object should ever become damaged. 1. Turn off power... your original retailer. Doing so creates the risk of the power cord's plug. The label material contains metal, which the label is required in the USB cable into the computer and the printer as far as it will go. • Before leaving the product unattended for long periods...
... or other personal injury. Plastic bag precaution Never place the plastic bags in the area around the prongs of suffocation. Warning Do not affix labels to a container to your head. Immediately perform the following steps if liquid or a foreign object should ever become damaged. 1. Turn off power... your original retailer. Doing so creates the risk of the power cord's plug. The label material contains metal, which the label is required in the USB cable into the computer and the printer as far as it will go. • Before leaving the product unattended for long periods...
User Guide
Page 7
... light. • You cannot perform disc label printing and tape label printing at the same time. Contents Safety Precautions 1 Operating Precautions 5 Part 1 - Operating Precautions Observe the following precautions to ensure that the printer provides you with the years of trouble...DISC Mode 8 Disc Printing Terms 8 DISC Mode 8 Creating Disc Label Data 8 Creating a New Label 9 Inserting a Logo Into a Label 11 Built In Logos 11 Output Samples 11 To insert a logo into a label 12 Inputting Text into an AUTO Format 12 To input text into the cassette. • Place the printer...
... light. • You cannot perform disc label printing and tape label printing at the same time. Contents Safety Precautions 1 Operating Precautions 5 Part 1 - Operating Precautions Observe the following precautions to ensure that the printer provides you with the years of trouble...DISC Mode 8 Disc Printing Terms 8 DISC Mode 8 Creating Disc Label Data 8 Creating a New Label 9 Inserting a Logo Into a Label 11 Built In Logos 11 Output Samples 11 To insert a logo into a label 12 Inputting Text into an AUTO Format 12 To input text into the cassette. • Place the printer...

User Guide
Page 8
...record 46 Using Copy and Paste 47 User Characters 47 To recall a user character 49 To delete a user character 49 Part 4 - Inputting and Editing Label Text 41 Moving the Cursor 41 Basic Alpha Numeric Input 41 To input alpha-numeric characters 41 About the CODE key 42 Inputting Symbols and... overwrite and insert 44 Using Phrase Memory 45 To recall a phrase 45 To create new phrase memory text 45 To save a label 54 To recall a label 54 To delete a label 54 Controlling the Appearance of Text 50 Selecting a Font 50 SMALL FONT 50 To change the default font setting 51 To change...
...record 46 Using Copy and Paste 47 User Characters 47 To recall a user character 49 To delete a user character 49 Part 4 - Inputting and Editing Label Text 41 Moving the Cursor 41 Basic Alpha Numeric Input 41 To input alpha-numeric characters 41 About the CODE key 42 Inputting Symbols and... overwrite and insert 44 Using Phrase Memory 45 To recall a phrase 45 To create new phrase memory text 45 To save a label 54 To recall a label 54 To delete a label 54 Controlling the Appearance of Text 50 Selecting a Font 50 SMALL FONT 50 To change the default font setting 51 To change...
User Guide
Page 9
Part 6 - Configuring the Printer Setup 55 Demo Printing 55 Reference 57 Power Requirements 57 Caring for the Printer 58 Troubleshooting 59 DISC Mode 60 TAPE Mode 61 Error Messages 63 Illustrations 68 Symbols, Dingbats, and Special Characters 68 Frames 69 Disc Label Formats 70 Numbering Formats 71 Tape Width and the Number of Lines and Character Sizes .. 72 Supported Tape Widths 72 Enlarged Label Printing Tape Widths and Character Sizes .. 73 Specifications 74 7 E
Part 6 - Configuring the Printer Setup 55 Demo Printing 55 Reference 57 Power Requirements 57 Caring for the Printer 58 Troubleshooting 59 DISC Mode 60 TAPE Mode 61 Error Messages 63 Illustrations 68 Symbols, Dingbats, and Special Characters 68 Frames 69 Disc Label Formats 70 Numbering Formats 71 Tape Width and the Number of Lines and Character Sizes .. 72 Supported Tape Widths 72 Enlarged Label Printing Tape Widths and Character Sizes .. 73 Specifications 74 7 E
User Guide
Page 10
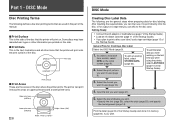
... scratch, select NEW on . Select the text attributes you were using the printer, select LAST DATA (page 10 of the Startup Guide) and store it to print directly onto the disc, or for Creating a Disc Label Select the DISC Mode (page 9). 1. Upper print area (AREA A) E 8 Lower print area (AREA ... Width: 74mm (2 15/16") DISC Mode Creating Disc Label Data The following defines a few disc printing terms that are used in two print areas: an upper print area and a lower printer area. To edit an existing label, select STORED DATA (page 54). 2. The printer can affix to use it in ...
... scratch, select NEW on . Select the text attributes you were using the printer, select LAST DATA (page 10 of the Startup Guide) and store it to print directly onto the disc, or for Creating a Disc Label Select the DISC Mode (page 9). 1. Upper print area (AREA A) E 8 Lower print area (AREA ... Width: 74mm (2 15/16") DISC Mode Creating Disc Label Data The following defines a few disc printing terms that are used in two print areas: an upper print area and a lower printer area. To edit an existing label, select STORED DATA (page 54). 2. The printer can affix to use it in ...

User Guide
Page 11
... section explains how to specify the print area and select a label format for creating new disc printing data. • For information about printing data that you used the printer. If you want . Use and to select NEW, and then press SET. • This displays a print pattern selection screen... data left over from your previous session, use and to memory, see page 54. Use and to select DISC, and then press SET. • You can also press DISC here. 3. Example ■ To create a new disc label 1. Selected print pattern AREA A AREA A Print Pattern AREA B AREA B Example 9 E
... section explains how to specify the print area and select a label format for creating new disc printing data. • For information about printing data that you used the printer. If you want . Use and to select NEW, and then press SET. • This displays a print pattern selection screen... data left over from your previous session, use and to memory, see page 54. Use and to select DISC, and then press SET. • You can also press DISC here. 3. Example ■ To create a new disc label 1. Selected print pattern AREA A AREA A Print Pattern AREA B AREA B Example 9 E
User Guide
Page 12
...FORMAT 18 LOGO 1 through LOGO 4 AUTO 1 or AUTO 2 •See "Disc Label Formats" on page 41 for details about inputting logos. After all the label formats that if you want . Use and to print the label (page 20 of block where you are divided among three groups: standard formats ...; Note that are available. 6. There are a total of 24 different formats, which you want is the currently selected label format. tion. 5. Press SET. bel" on page 11 for each block. Have the printer automatically select text size in step 4, pressing SET will display a screen for specifying the...
...FORMAT 18 LOGO 1 through LOGO 4 AUTO 1 or AUTO 2 •See "Disc Label Formats" on page 41 for details about inputting logos. After all the label formats that if you want . Use and to print the label (page 20 of block where you are divided among three groups: standard formats ...; Note that are available. 6. There are a total of 24 different formats, which you want is the currently selected label format. tion. 5. Press SET. bel" on page 11 for each block. Have the printer automatically select text size in step 4, pressing SET will display a screen for specifying the...

User Guide
Page 13
Output Samples The following shows examples of labels that use logos. LOGO 1 Built-in logos into the graphic block of the format. Inserting a Logo Into a Label When creating a label using a LOGO format (LOGO 1 through LOGO 4), you can insert one of the printer's 10 built-in Logos LOGO 2 LOGO 3 LOGO 4 11 E
Output Samples The following shows examples of labels that use logos. LOGO 1 Built-in logos into the graphic block of the format. Inserting a Logo Into a Label When creating a label using a LOGO format (LOGO 1 through LOGO 4), you can insert one of the printer's 10 built-in Logos LOGO 2 LOGO 3 LOGO 4 11 E

User Guide
Page 14
...through 5 of the procedure under "To create a new disc label" on page 9. 2. Perform steps 1 through the 3. The table below shows how character size is displayed. On the label format selection screen, use and to scroll through the label formats until AUTO1 or AUTO2 is adjusted for each auto .... to scroll through 5 of the procedure under "To create a new disc label" on page 9. 2. On the label format selection screen, use and label formats until one you can perform the other steps under "To create a new disc label" on page 9 to input text. Press SET. • This inserts...
...through 5 of the procedure under "To create a new disc label" on page 9. 2. Perform steps 1 through the 3. The table below shows how character size is displayed. On the label format selection screen, use and to scroll through the label formats until AUTO1 or AUTO2 is adjusted for each auto .... to scroll through 5 of the procedure under "To create a new disc label" on page 9. 2. On the label format selection screen, use and label formats until one you can perform the other steps under "To create a new disc label" on page 9 to input text. Press SET. • This inserts...

User Guide
Page 15
... Alignment Left Alignment Equal Spacing 13 E Specifying Text Alignment You can be spaced: proportional spacing and uniform spacing. Press SET to apply your label text. Use and to turn proportional spacing on and off . • Note that characters can select any one of the following four text... alignments for your setting and return to the text input screen. Centering With uniform spacing, all the text of the label. 4. While inputting text, press FORM. 2. Specifying Character Spacing There are two ways that the setting you select is applied to all characters...
... Alignment Left Alignment Equal Spacing 13 E Specifying Text Alignment You can be spaced: proportional spacing and uniform spacing. Press SET to apply your label text. Use and to turn proportional spacing on and off . • Note that characters can select any one of the following four text... alignments for your setting and return to the text input screen. Centering With uniform spacing, all the text of the label. 4. While inputting text, press FORM. 2. Specifying Character Spacing There are two ways that the setting you select is applied to all characters...

User Guide
Page 16
... page 10 will cause the screen shown below to this text: All of the text in the label All of the procedure under "Creating Disc Label Data" on the printer. 2. On the next screen that can be affixed to turn on page 8 to apply your setting and return to print. 3. Press to... the case of text to which you want to the text input screen. E 14 Printing Disc Case Labels Use the procedures in...
... page 10 will cause the screen shown below to this text: All of the text in the label All of the procedure under "Creating Disc Label Data" on the printer. 2. On the next screen that can be affixed to turn on page 8 to apply your setting and return to print. 3. Press to... the case of text to which you want to the text input screen. E 14 Printing Disc Case Labels Use the procedures in...

User Guide
Page 17
... 38), and then press 9. to select TAPE, and then press SET. • Pressing and DISC and TAPE. Repeat steps 7 through 9 above step is not necessary if your label has data in only one of the label areas. Press and to select EXIT, and then press SET. • Use STORE if you want... to print first, and then press SET. To print this data: Upper label area Lower label area Select this option: AREA A AREA B • The above to select PRINT, and then press SET . 5. In this case, go directly to step 7....
... 38), and then press 9. to select TAPE, and then press SET. • Pressing and DISC and TAPE. Repeat steps 7 through 9 above step is not necessary if your label has data in only one of the label areas. Press and to select EXIT, and then press SET. • Use STORE if you want... to print first, and then press SET. To print this data: Upper label area Lower label area Select this option: AREA A AREA B • The above to select PRINT, and then press SET . 5. In this case, go directly to step 7....

User Guide
Page 18
... the font (page 50) and the style (page 52). If you want to use and to turn on the printer. • A LAST DATA icon will also appear on the label mode you should do next depends on the Main Menu if there is input data left over from your previous session, use... . Use the cursor keys to move the selection boundary to icon for the label mode you want to continue working on the last time you were using the printer, select LAST DATA (page 10 of the Startup Guide). 2. E 16 TAPE Mode Creating a Tape...
... the font (page 50) and the style (page 52). If you want to use and to turn on the printer. • A LAST DATA icon will also appear on the label mode you should do next depends on the Main Menu if there is input data left over from your previous session, use... . Use the cursor keys to move the selection boundary to icon for the label mode you want to continue working on the last time you were using the printer, select LAST DATA (page 10 of the Startup Guide). 2. E 16 TAPE Mode Creating a Tape...

User Guide
Page 19
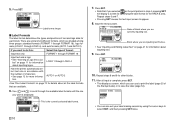
... characters of tape during a print operation, press ESC to cancel the print operation. ■ To create and print sequentially numbered tape labels Example 1. Creating and Printing a Sequentially Numbered Tape Label This label printer gives you a choice of six different numbering formats that you specify. If the tape cartridge runs out of text (COMMENT 2) •...
... characters of tape during a print operation, press ESC to cancel the print operation. ■ To create and print sequentially numbered tape labels Example 1. Creating and Printing a Sequentially Numbered Tape Label This label printer gives you a choice of six different numbering formats that you specify. If the tape cartridge runs out of text (COMMENT 2) •...

User Guide
Page 20
... next number printed is 00000. • If the message "LENGTH OF PRINT IS TOO LONG! appears, see page 54. Controlling the Appearance of Your Labels In steps from 15 through 8 of the basic procedure described above, you can also configure the following settings to control the appearance of 1 to five... number that cut mode (page 38), and then press • Pressing SET starts the print operation and causes a screen like the one set of the printer. • For information about how to do. " " TOO SHORT TO CUT!" Here we will input "File". Here we would input 15 here. • If...
... next number printed is 00000. • If the message "LENGTH OF PRINT IS TOO LONG! appears, see page 54. Controlling the Appearance of Your Labels In steps from 15 through 8 of the basic procedure described above, you can also configure the following settings to control the appearance of 1 to five... number that cut mode (page 38), and then press • Pressing SET starts the print operation and causes a screen like the one set of the printer. • For information about how to do. " " TOO SHORT TO CUT!" Here we will input "File". Here we would input 15 here. • If...

User Guide
Page 21
...operation. Use the cursor keys to select NEW, and then press SET. 4. Use and to perform this by printing the large label in the printer to select the size of the final label (how many pieces of tape will be used), and then press SET. • Since we will select 2 PIECES. Use ...a tape cartridge that you can also press TAPE to print only one part of 12mm tape) 1. Creating and Printing a Large Tape Label Though your printer can print on tapes up the large label. 9. You can also change the DIRECTION setting (page 25) and the MIRROR setting (page 26). 6. Use and to select TAPE...
...operation. Use the cursor keys to select NEW, and then press SET. 4. Use and to perform this by printing the large label in the printer to select the size of the final label (how many pieces of tape will be used), and then press SET. • Since we will select 2 PIECES. Use ...a tape cartridge that you can also press TAPE to print only one part of 12mm tape) 1. Creating and Printing a Large Tape Label Though your printer can print on tapes up the large label. 9. You can also change the DIRECTION setting (page 25) and the MIRROR setting (page 26). 6. Use and to select TAPE...

User Guide
Page 22
...will need to trim off these settings. Creating and Printing a Tape Label with a Logo Your printer comes with margins is com- Built-in logos that you use transparent tape. Controlling the Appearance of... Your Labels In step 5 of the tapes over the other. E 20 ... See page 25 for information about how to use the above , you can incorporate into tape labels that are printed using 18mm or 24mm tape only. You will have blank margins along the bottom ...
...will need to trim off these settings. Creating and Printing a Tape Label with a Logo Your printer comes with margins is com- Built-in logos that you use transparent tape. Controlling the Appearance of... Your Labels In step 5 of the tapes over the other. E 20 ... See page 25 for information about how to use the above , you can incorporate into tape labels that are printed using 18mm or 24mm tape only. You will have blank margins along the bottom ...

User Guide
Page 23
■ To create and print a label with a logo 1. Press to use, and then press SET. 6. Use the cursor keys to select the logo you want to turn on the printer. 2. Use and to select NEW, and then press SET. 4. Use and to select the tape cut mode (page 38), and then press SET...
■ To create and print a label with a logo 1. Press to use, and then press SET. 6. Use the cursor keys to select the logo you want to turn on the printer. 2. Use and to select NEW, and then press SET. 4. Use and to select the tape cut mode (page 38), and then press SET...

User Guide
Page 24
...This inputs a "block mark," which lets you used the printer. 3. Press to the left over from the last time you design your tape label text into blocks and then apply the following settings on the printer. 2. You can divided your own tape labels. E 22 All of text lines (page 23) •... input text. FREE DESIGN: Using Text Blocks In the example label shown below, "Promotion Plan" and "Retail Package Sample Data" are available in the following sections whose titles start with the Free Design mode of the printer, which makes the text to turn on a block-by-block basis. ...
...This inputs a "block mark," which lets you used the printer. 3. Press to the left over from the last time you design your tape label text into blocks and then apply the following settings on the printer. 2. You can divided your own tape labels. E 22 All of text lines (page 23) •... input text. FREE DESIGN: Using Text Blocks In the example label shown below, "Promotion Plan" and "Retail Package Sample Data" are available in the following sections whose titles start with the Free Design mode of the printer, which makes the text to turn on a block-by-block basis. ...

User Guide
Page 25
... Operation soon! Input the text for information about printing the label. • For information about saving tape label data, see page 54. Simply move the cursor to the location where you cannot delete a block mark by the printer automatically in the Free Design Mode. FREE DESIGN: Using Multiple... Lines in a Tape Label This section explains how to 16 blocks inside of a single tape label layout. • See page 24 of the tape you are using....
... Operation soon! Input the text for information about printing the label. • For information about saving tape label data, see page 54. Simply move the cursor to the location where you cannot delete a block mark by the printer automatically in the Free Design Mode. FREE DESIGN: Using Multiple... Lines in a Tape Label This section explains how to 16 blocks inside of a single tape label layout. • See page 24 of the tape you are using....

