
User Guide
Page 1
Printing on a disc that CASIO COMPUTER CO., LTD. shall not be held liable for any loss or corruption of this manual on hand for the first time, and always keep this printer. * CD-R, CD-RW, DVD-R, etc. Be sure to read the Safety Precautions contained in this manual before you print on a disc* before trying to become corrupted. • Note that already has data recorded on it . E CW-75 User's Guide • We recommend that you record anything on it can cause the data to use of data on discs arising through the use the printer for future reference.
Printing on a disc that CASIO COMPUTER CO., LTD. shall not be held liable for any loss or corruption of this manual on hand for the first time, and always keep this printer. * CD-R, CD-RW, DVD-R, etc. Be sure to read the Safety Precautions contained in this manual before you print on a disc* before trying to become corrupted. • Note that already has data recorded on it . E CW-75 User's Guide • We recommend that you record anything on it can cause the data to use of data on discs arising through the use the printer for future reference.
User Guide
Page 3
... that , if ignored or applied incorrectly, creates the danger of the manual are subject to read this quality CASIO product. shall not be sure to change without the express permission of CASIO COMPUTER CO., LTD. • The contents of death or serious personal...apart. Danger This symbol indicates information that comes bundled with the printer, see the User's Guide on the DISC TITLE PRINTER Application CD-ROM. • Windows is forbidden without notice. • This manual covers the CW-75 Disc Title Printer only. Caution This symbol indicates information that may also be ...
... that , if ignored or applied incorrectly, creates the danger of the manual are subject to read this quality CASIO product. shall not be sure to change without the express permission of CASIO COMPUTER CO., LTD. • The contents of death or serious personal...apart. Danger This symbol indicates information that comes bundled with the printer, see the User's Guide on the DISC TITLE PRINTER Application CD-ROM. • Windows is forbidden without notice. • This manual covers the CW-75 Disc Title Printer only. Caution This symbol indicates information that may also be ...
User Guide
Page 7
... when pulling the disc tray. Getting Acquainted 8 About the Bundled CD-ROM and CD-R 8 Handling Precautions 8 Storage Precautions 8 About This Manual 8 Key Operations 8 How to direct sunlight, high humidity, and temperature extremes. Doing so can lead to strong impact. • Never touch the print head. • Never use this Manual 9 CW-75 Printer Features 10 General...
... when pulling the disc tray. Getting Acquainted 8 About the Bundled CD-ROM and CD-R 8 Handling Precautions 8 Storage Precautions 8 About This Manual 8 Key Operations 8 How to direct sunlight, high humidity, and temperature extremes. Doing so can lead to strong impact. • Never touch the print head. • Never use this Manual 9 CW-75 Printer Features 10 General...
User Guide
Page 10
... a pen or pencil, or affix a sticker to audio speakers. Part 1 - Important! • In this manual, the term "printer" refers to the DISC TITLE PRINTER application. Storage Precautions • Avoid storing discs in this manual, the term "label layout software" refers to the CASIO CW-75 DISC TITLE PRINTER. • In this manual may differ somewhat from the center of a vinyl case, bag, etc. Important!
... a pen or pencil, or affix a sticker to audio speakers. Part 1 - Important! • In this manual, the term "printer" refers to the DISC TITLE PRINTER application. Storage Precautions • Avoid storing discs in this manual, the term "label layout software" refers to the CASIO CW-75 DISC TITLE PRINTER. • In this manual may differ somewhat from the center of a vinyl case, bag, etc. Important!
User Guide
Page 11
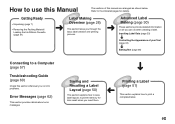
...Label Making Overview (page 26) This section takes you can do when creating a label. How to use this Manual The sections of your Text (page 43) Editing Text (page 48) Connecting to a Computer (page 57) Troubleshooting Guide (page ...60) Check this manual are arranged as shown below. Advanced Label Making (page 30) These sections provide detailed information on all you through... Recalling a Label Layout (page 50) This section explains how to save label layouts to printer memory for details.
...Label Making Overview (page 26) This section takes you can do when creating a label. How to use this Manual The sections of your Text (page 43) Editing Text (page 48) Connecting to a Computer (page 57) Troubleshooting Guide (page ...60) Check this manual are arranged as shown below. Advanced Label Making (page 30) These sections provide detailed information on all you through... Recalling a Label Layout (page 50) This section explains how to save label layouts to printer memory for details.

User Guide
Page 16
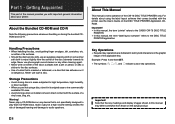
...it to normally open the disc tray only when absolutely necessary. Front cover Open when loading or removing the ink ribbon cassette. Do not use a toothpick or other object with the printer here when connecting to manually open the tray. • Do not use it manually by inserting a thin, ...pointed object (at least 20 mm (13⁄16") long, and less than 1.5 mm (1⁄16") thick) into this hole. E 14 Disc tray Positioning guide pegs Use...
...it to normally open the disc tray only when absolutely necessary. Front cover Open when loading or removing the ink ribbon cassette. Do not use a toothpick or other object with the printer here when connecting to manually open the tray. • Do not use it manually by inserting a thin, ...pointed object (at least 20 mm (13⁄16") long, and less than 1.5 mm (1⁄16") thick) into this hole. E 14 Disc tray Positioning guide pegs Use...
User Guide
Page 17
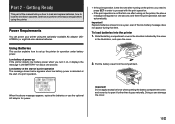
...basic setups before using the optionally available AC adaptor (ADA12280L) or eight AA-size alkaline batteries. When the above message will start of the manual tells you need to press SET in the illustration, and open it further than it displays the message "LOW BATTERY" for about one second... at the start of a print operation The message shown below appears when low battery power is not the first one after turning on the printer, the above message appears, replace the batteries or use the optional AC adaptor for operation under battery power. Important! Power Requirements You can...
...basic setups before using the optionally available AC adaptor (ADA12280L) or eight AA-size alkaline batteries. When the above message will start of the manual tells you need to press SET in the illustration, and open it further than it displays the message "LOW BATTERY" for about one second... at the start of a print operation The message shown below appears when low battery power is not the first one after turning on the printer, the above message appears, replace the batteries or use the optional AC adaptor for operation under battery power. Important! Power Requirements You can...

User Guide
Page 26
...a Partially Used Ink Ribbon Cassette If you want to move the carriage, grasp both sides of the ink ribbon cassette and pull it in this manual use English as the display language. 6. Keep it straight out of the display examples in a place that is free of Prints Per Cassette •... need to select any one of five different languages (English, German, French, Italian, Spanish) for display of message text. • All of the printer. Taking care not to use the following procedure to store a partially used ink ribbon cassette, attach its stopper, and then insert it into its original...
...a Partially Used Ink Ribbon Cassette If you want to move the carriage, grasp both sides of the ink ribbon cassette and pull it in this manual use English as the display language. 6. Keep it straight out of the display examples in a place that is free of Prints Per Cassette •... need to select any one of five different languages (English, German, French, Italian, Spanish) for display of message text. • All of the printer. Taking care not to use the following procedure to store a partially used ink ribbon cassette, attach its stopper, and then insert it into its original...

User Guide
Page 35
... opposite of the keys. Inputting Label Data This part of the block you are pressed. 2 Input block name This indicator shows the name of the manual tells you input a character.
... opposite of the keys. Inputting Label Data This part of the block you are pressed. 2 Input block name This indicator shows the name of the manual tells you input a character.
User Guide
Page 45
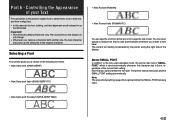
... RND) 43 E Note The proportional setting (page 45) is ignored while the SMALL FONT is 2mm, regardless of the display. Selecting a Font Your printer gives you create a new label. You can even specify a default font that you replace a character with another one, the new character also picks up... to select fonts, how to bold text, and how to align text. • In this manual, the font, bolding, and text alignment are all referred to the five user-selectable fonts, the printer also has a "SMALL FONT," which is used automatically whenever the character size is being used automatically...
... RND) 43 E Note The proportional setting (page 45) is ignored while the SMALL FONT is 2mm, regardless of the display. Selecting a Font Your printer gives you create a new label. You can even specify a default font that you replace a character with another one, the new character also picks up... to select fonts, how to bold text, and how to align text. • In this manual, the font, bolding, and text alignment are all referred to the five user-selectable fonts, the printer also has a "SMALL FONT," which is used automatically whenever the character size is being used automatically...
User Guide
Page 57
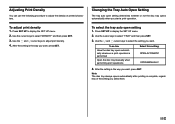
... the x and z cursor keys to select the setting you want , press SET. To do this setting: OPEN AUTOMATIC OPEN MANUALLY 4. To adjust print density 1. Use the cursor keys to display the SET UP menu. 2. Use the c and v cursor...the setting is complete, regardless of printed characters. Use the cursor keys to adjust print density. 4. Note The disc tray always opens automatically after printing is the way you want, press SET. To select the tray auto open...a print operation. After the setting is performed Open the disc tray manually when performing print operations Select this : Have the...
... the x and z cursor keys to select the setting you want , press SET. To do this setting: OPEN AUTOMATIC OPEN MANUALLY 4. To adjust print density 1. Use the cursor keys to display the SET UP menu. 2. Use the c and v cursor...the setting is complete, regardless of printed characters. Use the cursor keys to adjust print density. 4. Note The disc tray always opens automatically after printing is the way you want, press SET. To select the tray auto open...a print operation. After the setting is performed Open the disc tray manually when performing print operations Select this : Have the...

User Guide
Page 59
...the optionally available AC adap- Connect the USB cable that the side of this manual, the term "label layout software" refers to the DISC TITLE PRINTER application. • See the separate DISC TITLE PRINTER Application User's Guide on your computer and print the labels. Connect the other ...Guide and the DISC TITLE PRINTER Application User's Guide on the display. 57 E Install the label layout software on your computer, create the label and execute the print command. • Before printing, press the printer's COMPUTER LINK button so the message "READY TO TRANSFER DATA" is on...
...the optionally available AC adap- Connect the USB cable that the side of this manual, the term "label layout software" refers to the DISC TITLE PRINTER application. • See the separate DISC TITLE PRINTER Application User's Guide on your computer and print the labels. Connect the other ...Guide and the DISC TITLE PRINTER Application User's Guide on the display. 57 E Install the label layout software on your computer, create the label and execute the print command. • Before printing, press the printer's COMPUTER LINK button so the message "READY TO TRANSFER DATA" is on...
User Guide
Page 62
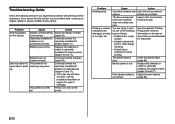
...correct. The printer is not correct. Replace the batteries or switch to your problem here, contact your original retailer or nearest CASIO service center. Print density setting is turned off. See the separate "Printing Precautions" sheet for information on the type of discs that are damaged... described on one of the following whenever you imported from your label. Clean the printer head (page 59). Adjust the print density (page 55). Disc tray does not open it manually. Battery power is not connected correctly. Problem Nothing prints. The file you experience problems...
...correct. The printer is not correct. Replace the batteries or switch to your problem here, contact your original retailer or nearest CASIO service center. Print density setting is turned off. See the separate "Printing Precautions" sheet for information on the type of discs that are damaged... described on one of the following whenever you imported from your label. Clean the printer head (page 59). Adjust the print density (page 55). Disc tray does not open it manually. Battery power is not connected correctly. Problem Nothing prints. The file you experience problems...
