
User Guide
Page 7
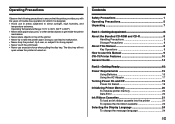
...Turning Power On and Off 19 Power On Recall 19 Initializing Printer Memory 20 To initialize printer memory 20 Data Error 20 Ink Ribbon Cassettes 21 To load an ink ribbon cassette into the printer 21 To replace the ink ribbon cassette 23 Selecting the Display Language 24 To change the ...operation for which it to strong impact. • Never touch the print head. • Never use this Manual 9 CW-75 Printer Features 10 General Guide 14 Part 2 - The disc tray will not open unless the printer is designed. • Avoid use in areas subjected to use excessive force when pulling the...
...Turning Power On and Off 19 Power On Recall 19 Initializing Printer Memory 20 To initialize printer memory 20 Data Error 20 Ink Ribbon Cassettes 21 To load an ink ribbon cassette into the printer 21 To replace the ink ribbon cassette 23 Selecting the Display Language 24 To change the ...operation for which it to strong impact. • Never touch the print head. • Never use this Manual 9 CW-75 Printer Features 10 General Guide 14 Part 2 - The disc tray will not open unless the printer is designed. • Avoid use in areas subjected to use excessive force when pulling the...
User Guide
Page 9
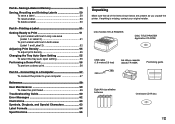
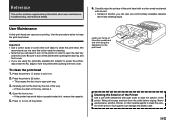
Part 8 - CW-75 DISC TITLE PRINTER DISC TITLE PRINTER Application CD-ROM USB cable (1.8 meters/5.9 feet) Ink ribbon cassette (black) TR-18BK Positioning guide Eight AA-size alkaline batteries One blank CD-R disc 7 E Saving Labels in both areas (Label 1 and Label 2 52 Adjusting Print Density 55 To adjust print density 55...Formats 64 Specifications 66 Unpacking Make sure that all of the items shown below are present as you unpack the printer. Connecting to a Computer 57 To connect the printer to Print 51 To print a label with text in only one area (Label 1 or Label 2 51 ...
Part 8 - CW-75 DISC TITLE PRINTER DISC TITLE PRINTER Application CD-ROM USB cable (1.8 meters/5.9 feet) Ink ribbon cassette (black) TR-18BK Positioning guide Eight AA-size alkaline batteries One blank CD-R disc 7 E Saving Labels in both areas (Label 1 and Label 2 52 Adjusting Print Density 55 To adjust print density 55...Formats 64 Specifications 66 Unpacking Make sure that all of the items shown below are present as you unpack the printer. Connecting to a Computer 57 To connect the printer to Print 51 To print a label with text in only one area (Label 1 or Label 2 51 ...
User Guide
Page 11
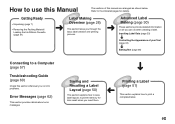
...62) This section provides details about error messages Saving and Recalling a Label Layout (page 50) This section explains how to save label layouts to printer memory for details. Printing a Label (page 51) This section explains how to a Computer (page 57) Troubleshooting Guide (page 60) Check this ...manual are arranged as shown below. Getting Ready • Unpacking (page 7) • Removing the Packing Material/ Loading the Ink Ribbon Cassette (page 21) Label Making Overview (page 26) This section takes you can do when creating a label. How to use this Manual The ...
...62) This section provides details about error messages Saving and Recalling a Label Layout (page 50) This section explains how to save label layouts to printer memory for details. Printing a Label (page 51) This section explains how to a Computer (page 57) Troubleshooting Guide (page 60) Check this ...manual are arranged as shown below. Getting Ready • Unpacking (page 7) • Removing the Packing Material/ Loading the Ink Ribbon Cassette (page 21) Label Making Overview (page 26) This section takes you can do when creating a label. How to use this Manual The ...

User Guide
Page 16
.... Front cover Open when loading or removing the ink ribbon cassette. Use this hole. AC adapter terminal Connect the optionally available AC adaptor here. Carriage Printer head Back Battery compartment If the disc tray will not open due to printer malfunction, you place the disc onto the disc tray. General Guide Front Press to open the...
.... Front cover Open when loading or removing the ink ribbon cassette. Use this hole. AC adapter terminal Connect the optionally available AC adaptor here. Carriage Printer head Back Battery compartment If the disc tray will not open due to printer malfunction, you place the disc onto the disc tray. General Guide Front Press to open the...
User Guide
Page 17
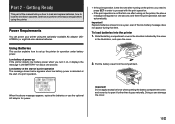
...shown below appears when low battery power is the first one second. Low battery at the start automatically. Important! Doing so can power your printer using the printer. Power Requirements You can damage the cover. 15 E When the above message will start of a print operation. • If the ...not appear during that time. Using Batteries This section explains how to set up If the printer detects low battery power when you how to load and replace batteries, how to load the ink ribbon cassette, and how to proceed with the print operation. • If the print operation...
...shown below appears when low battery power is the first one second. Low battery at the start automatically. Important! Doing so can power your printer using the printer. Power Requirements You can damage the cover. 15 E When the above message will start of a print operation. • If the ...not appear during that time. Using Batteries This section explains how to set up If the printer detects low battery power when you how to load and replace batteries, how to load the ink ribbon cassette, and how to proceed with the print operation. • If the print operation...

User Guide
Page 23
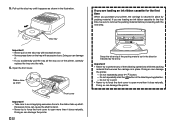
... print, you must first load an ink ribbon cassette into the printer. Insert a pen or other similar object into the printer 1. Press the [ button to turn on the top of the printer. This causes the disc tray to interfere with the movement of the disc tray. Important! Ink Ribbon Cassettes Note that you will have to remove...
... print, you must first load an ink ribbon cassette into the printer. Insert a pen or other similar object into the printer 1. Press the [ button to turn on the top of the printer. This causes the disc tray to interfere with the movement of the disc tray. Important! Ink Ribbon Cassettes Note that you will have to remove...
User Guide
Page 24
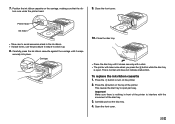
... try to force the front cover to open more than it does naturally. Disc tray Important! • Never pull on the disc tray with excessive force. • Never press down on the tray with the next step. Ribbon take up shaft Front cover Important! • Take care to avoid applying excessive...damage the printer. If you purchase your printer, the carriage is in place by the arrow. 5. If you are loading an ink ribbon cassette for the first time When you are loading an ink ribbon cassette for the first time, be sure to the ribbon take up shaft. Pull out the disc tray until...
... try to force the front cover to open more than it does naturally. Disc tray Important! • Never pull on the disc tray with excessive force. • Never press down on the tray with the next step. Ribbon take up shaft Front cover Important! • Take care to avoid applying excessive...damage the printer. If you purchase your printer, the carriage is in place by the arrow. 5. If you are loading an ink ribbon cassette for the first time When you are loading an ink ribbon cassette for the first time, be sure to the ribbon take up shaft. Pull out the disc tray until...
User Guide
Page 25
...step 2 to open . Important! To replace the ink ribbon cassette 1. Close the disc tray. • Press the disc tray until it up. 8. Open the front cover. 23 E Position the ink ribbon cassette on the printer. 2. Carefully pull out the disc tray. 4. Press the [ button to interfere with ...a click. • The printer will make noise when you press the button while the disc tray is normal and does not indicate malfunction...
...step 2 to open . Important! To replace the ink ribbon cassette 1. Close the disc tray. • Press the disc tray until it up. 8. Open the front cover. 23 E Position the ink ribbon cassette on the printer. 2. Carefully pull out the disc tray. 4. Press the [ button to interfere with ...a click. • The printer will make noise when you press the button while the disc tray is normal and does not indicate malfunction...

User Guide
Page 26
... of dirt and dust. Use x and z to select the language you need to use English as the display language. 6. 5. Number of the ink ribbon cassette and pull it into its original plastic bag and box. Selecting the Display Language You can use the following procedure to move the carriage...different languages (English, German, French, Italian, Spanish) for display of message text. • All of the display examples in a place that is free of the printer. Press SET UP to select LANGUAGE and then press SET. 3. E 24 Use x and z to display the SET UP menu. 2. Keep it in this ...
... of dirt and dust. Use x and z to select the language you need to use English as the display language. 6. 5. Number of the ink ribbon cassette and pull it into its original plastic bag and box. Selecting the Display Language You can use the following procedure to move the carriage...different languages (English, German, French, Italian, Spanish) for display of message text. • All of the display examples in a place that is free of the printer. Press SET UP to select LANGUAGE and then press SET. 3. E 24 Use x and z to display the SET UP menu. 2. Keep it in this ...
User Guide
Page 32
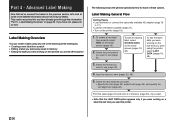
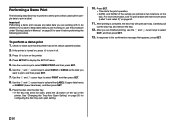
...NEW on a label the last time you were working on the initial screen (page 19). 2. Label Making Overview You can create a label using the printer, select LAST DATA (pages 19, 48). 3. Label Making General Flow Getting Ready • Load batteries or connect the optionally available AC adaptor (page ...section, let's look at some more detailed information about how to 17). • Load an ink ribbon cassette (page 21). • Turn on the last time you were working on the printer (page 19). 1. This section assumes that the LAST DATA option appears only if you were using any...
...NEW on a label the last time you were working on the initial screen (page 19). 2. Label Making Overview You can create a label using the printer, select LAST DATA (pages 19, 48). 3. Label Making General Flow Getting Ready • Load batteries or connect the optionally available AC adaptor (page ...section, let's look at some more detailed information about how to 17). • Load an ink ribbon cassette (page 21). • Turn on the last time you were working on the printer (page 19). 1. This section assumes that the LAST DATA option appears only if you were using any...
User Guide
Page 53
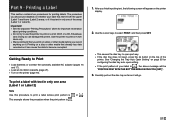
...pages 15 and 17). • Load an ink ribbon cassette (page 21). • Turn on a mini CD-R or a CD-R business card. Carefully pull out the disc tray as far as it has text in only...the upper (Label 1) and lower (Label 2) areas, or if it will appear on it can damage the printer. Printing a Label This section contains two procedures for important information about printing conditions. • Do not try...text in only one of the printer. Use the cursor keys to select PRINT, and then press SET. • This causes the disc tray to print on 12cm discs only. • We recommend that...
...pages 15 and 17). • Load an ink ribbon cassette (page 21). • Turn on a mini CD-R or a CD-R business card. Carefully pull out the disc tray as far as it has text in only...the upper (Label 1) and lower (Label 2) areas, or if it will appear on it can damage the printer. Printing a Label This section contains two procedures for important information about printing conditions. • Do not try...text in only one of the printer. Use the cursor keys to select PRINT, and then press SET. • This causes the disc tray to print on 12cm discs only. • We recommend that...
User Guide
Page 58
To perform a demo print 1. Use the c and v cursor keys to the confirmation message that the printer has an ink ribbon cassette loaded. 2. Carefully pull out the disc tray and remove the disc. 12. In response to select either LABEL1 (upper label area) or LABEL2 (lower label area), and then press ...SET. • This starts the print operation. • DATA1 and DATA2 of the printer. E 56 If the printer is complete, the disc tray will open setting. 10. Place the disc onto the disc tray. • If the disc tray does not open, press the button on page 55 for configuring the...
To perform a demo print 1. Use the c and v cursor keys to the confirmation message that the printer has an ink ribbon cassette loaded. 2. Carefully pull out the disc tray and remove the disc. 12. In response to select either LABEL1 (upper label area) or LABEL2 (lower label area), and then press ...SET. • This starts the print operation. • DATA1 and DATA2 of the printer. E 56 If the printer is complete, the disc tray will open setting. 10. Place the disc onto the disc tray. • If the disc tray does not open, press the button on page 55 for configuring the...
User Guide
Page 61
.... Never use of the printer. We recommend use benzene, alcohol, thinner, or other soft object to open part way. 3. Press the printer's button. • This causes the disc tray to turn off the printer. Open the front cover. • If the printer has an ink ribbon cassette loaded in the print... head. Lightly run the tip of the printer. Such agents can cause poor printing. Be...
.... Never use of the printer. We recommend use benzene, alcohol, thinner, or other soft object to open part way. 3. Press the printer's button. • This causes the disc tray to turn off the printer. Open the front cover. • If the printer has an ink ribbon cassette loaded in the print... head. Lightly run the tip of the printer. Such agents can cause poor printing. Be...

User Guide
Page 63
... on light colored discs and use a dark color ink ribbon cassette. Replace the ink ribbon cassette (page 21). color of the ink combining with the ribbon cassette. Label contents are printing on is low. Cannot input text. You pressed the FUNCTION key, and the printer is not misaligned. Cannot print. Problem Cause Color of printed The color of the disc text...
... on light colored discs and use a dark color ink ribbon cassette. Replace the ink ribbon cassette (page 21). color of the ink combining with the ribbon cassette. Label contents are printing on is low. Cannot input text. You pressed the FUNCTION key, and the printer is not misaligned. Cannot print. Problem Cause Color of printed The color of the disc text...
User Guide
Page 64
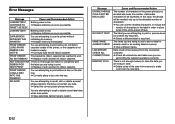
...! NOT ENOUGH INK There is not loaded correctly. ➔ Correctly load the ink ribbon cassette. NEXT PRINT ➔ Replace it with another ink ribbon cassette. You are attempting to use the printer without a disc on the disc tray. ➔ Correctly place a disc onto the tray. Message ENTIRE PHRASE COULD NOT BE RECALLED! Cause and Recommended Action...
...! NOT ENOUGH INK There is not loaded correctly. ➔ Correctly load the ink ribbon cassette. NEXT PRINT ➔ Replace it with another ink ribbon cassette. You are attempting to use the printer without a disc on the disc tray. ➔ Correctly place a disc onto the tray. Message ENTIRE PHRASE COULD NOT BE RECALLED! Cause and Recommended Action...
User Guide
Page 68
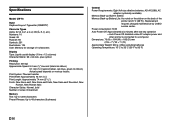
...Printing Resolution: 200 dpi Approximate Speed: 9.0 mm (3⁄8")/second (black ink ribbon) 5.1 mm (3⁄16")/second (silver, red, blue, green ink ribbon) Actual speed depends on various factors. Print System: Thermal transfer Print Width: Approximately 16 mm (5⁄8") Print Length: Approximately 74 mm ... when printer is connected to z); 99 etc.) Numbers: 10 Greek: 48 Russian: 66 Symbols: 251 Illustrations: 124 User: Memory for storage of the printer (at 20°C (68°F)). Replacement requires charged maintenance by CASIO service center. Specifications Model: CW-75 Input ...
...Printing Resolution: 200 dpi Approximate Speed: 9.0 mm (3⁄8")/second (black ink ribbon) 5.1 mm (3⁄16")/second (silver, red, blue, green ink ribbon) Actual speed depends on various factors. Print System: Thermal transfer Print Width: Approximately 16 mm (5⁄8") Print Length: Approximately 74 mm ... when printer is connected to z); 99 etc.) Numbers: 10 Greek: 48 Russian: 66 Symbols: 251 Illustrations: 124 User: Memory for storage of the printer (at 20°C (68°F)). Replacement requires charged maintenance by CASIO service center. Specifications Model: CW-75 Input ...
