User Guide
Page 2
... before using the label printer for the first time. Never try to take the unit apart • Never try to take the unit apart ...servicing from your original dealer. Caution Avoid unstable areas • Never place the unit on the unit. Location • Avoid leaving the unit in a microwave oven can cause it in this manual...used in any other drinks, or flower vases to spill on a kitchen table, next to direct heat or dispose of fire and electrical shock. Should liquid ever spill onto the unit, immediately turn power off power. Immediately turn off . Packaging • Keep...
... before using the label printer for the first time. Never try to take the unit apart • Never try to take the unit apart ...servicing from your original dealer. Caution Avoid unstable areas • Never place the unit on the unit. Location • Avoid leaving the unit in a microwave oven can cause it in this manual...used in any other drinks, or flower vases to spill on a kitchen table, next to direct heat or dispose of fire and electrical shock. Should liquid ever spill onto the unit, immediately turn power off power. Immediately turn off . Packaging • Keep...
User Guide
Page 3
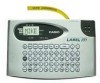
... data. • Keep this manual on your selection of the CASIO KL-60 Label Printer. E-2 Loading and replacing batteries • Do not touch the springs inside the battery compartment cover with your fingers. Data stored in memory can be held liable for any loss or claims by malfunctions, repairs, or interruption of power supply. • It is up to the user to keep separate written copies...
... data. • Keep this manual on your selection of the CASIO KL-60 Label Printer. E-2 Loading and replacing batteries • Do not touch the springs inside the battery compartment cover with your fingers. Data stored in memory can be held liable for any loss or claims by malfunctions, repairs, or interruption of power supply. • It is up to the user to keep separate written copies...

User Guide
Page 4
... Part 6 Printing E-12 Printing a Tape E-12 To print a tape E-12 Mirror Image Printing E-12 To turn mirror image printing on and off E-12 Other Printing Features and Operations E-12 Print Density E-12 To adjust the print density E-13 Manual Feed E-13 To manually feed tape E-13 Part 7 Memory E-13 To store text into memory E-13 To recall text from memory E-13 Part 8 Reference E-14 Cleaning the Printer Head and Roller E-14 To clean the printer head and roller E-14 Initial Power On Settings...
... Part 6 Printing E-12 Printing a Tape E-12 To print a tape E-12 Mirror Image Printing E-12 To turn mirror image printing on and off E-12 Other Printing Features and Operations E-12 Print Density E-12 To adjust the print density E-13 Manual Feed E-13 To manually feed tape E-13 Part 7 Memory E-13 To store text into memory E-13 To recall text from memory E-13 Part 8 Reference E-14 Cleaning the Printer Head and Roller E-14 To clean the printer head and roller E-14 Initial Power On Settings...
User Guide
Page 5
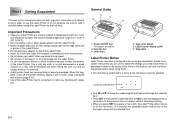
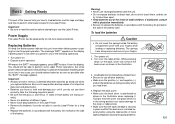
.... General Guide 1 5 2 4 3 6 1 Power ON/OFF Key Turn power on to the next menu, or it with a cotton swab moistened with alcohol (page E-14). • Use of the Label Printer next to clean the exterior of the Label Printer. Each menu is described in detail in the sections that follow in this happens, clean off . 2 Function key 3 Letter keys 4 Tape cutter button 5 Liquid crystal display...
.... General Guide 1 5 2 4 3 6 1 Power ON/OFF Key Turn power on to the next menu, or it with a cotton swab moistened with alcohol (page E-14). • Use of the Label Printer next to clean the exterior of the Label Printer. Each menu is described in detail in the sections that follow in this happens, clean off . 2 Function key 3 Letter keys 4 Tape cutter button 5 Liquid crystal display...
User Guide
Page 6
... Label Printer for proper operation. Be sure to keep written backup copies of all important data (text and documents). • Batteries can cause damage to clear it is in the illustration. 3. Turn over the label printer. The message "BATT" appears on the display if battery power is securely in the Label Printer. • Remove the batteries if you replace batteries. Warning! • Never use the Label Printer. Load...
... Label Printer for proper operation. Be sure to keep written backup copies of all important data (text and documents). • Batteries can cause damage to clear it is in the illustration. 3. Turn over the label printer. The message "BATT" appears on the display if battery power is securely in the Label Printer. • Remove the batteries if you replace batteries. Warning! • Never use the Label Printer. Load...
User Guide
Page 7
... Label Printer before using it does, cut off . Trying to wind it for about six minutes, the Label Printer automatically turns power off. Remove the stopper from a new tape cartridge and check to see that Label Printer power is turned off . 2. Resetting the Memory You should reset the memory of the cassette, there is ready to turn power on page E-7 to push the tape back into the Label Printer. Make sure...
... Label Printer before using it does, cut off . Trying to wind it for about six minutes, the Label Printer automatically turns power off. Remove the stopper from a new tape cartridge and check to see that Label Printer power is turned off . 2. Resetting the Memory You should reset the memory of the cassette, there is ready to turn power on page E-7 to push the tape back into the Label Printer. Make sure...
User Guide
Page 8
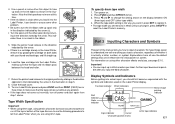
... the direction noted by grasping the cartridge on both sides with the symbols and indicators used on screen. Part 3 Inputting Characters and Symbols This part of the tape. For information on Label Printer power and press FUNC and then PRINT (FEED) two or three times to input characters. Further input becomes impossi- Head Roller 7. Close the back cover. 9. Turn on using other tape width). 4. Turn power on the display...
... the direction noted by grasping the cartridge on both sides with the symbols and indicators used on screen. Part 3 Inputting Characters and Symbols This part of the tape. For information on Label Printer power and press FUNC and then PRINT (FEED) two or three times to input characters. Further input becomes impossi- Head Roller 7. Close the back cover. 9. Turn on using other tape width). 4. Turn power on the display...
User Guide
Page 9
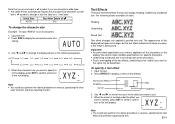
...using 6mm tape. You can use the procedure on page E-7 to input a newline mark. • A newline operation is indicated on the display by inputting the following operation shows you can select between shading, underline, and box. • Mirror image printing indicator This indicator appears when the Label Printer is on the display, the keyboard is always blank...using 6mm tape. 4. Input the first line of text, press B (the SET key) to specify you changed lines. • You cannot input a newline mark when using the default initial power-on the display...
...using 6mm tape. You can use the procedure on page E-7 to input a newline mark. • A newline operation is indicated on the display by inputting the following operation shows you can select between shading, underline, and box. • Mirror image printing indicator This indicator appears when the Label Printer is on the display, the keyboard is always blank...using 6mm tape. 4. Input the first line of text, press B (the SET key) to specify you changed lines. • You cannot input a newline mark when using the default initial power-on the display...
User Guide
Page 10
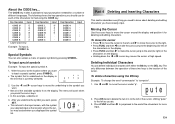
... the location where you selected input at high speed. IO# Part 4 Deleting and Inserting Characters This section describes everything you need to know about deleting and editing characters you press the cursor keys. • In this example, underline #. 3. Deleting Individual Characters You can also access a menu of special symbols by pressing SYMBOL. Key Operation CODE L CODE Z CODE C CODE N CODE 1 CODE 2 CODE 3 Input J W Key Operation CODE 4 CODE 5 CODE 6 CODE 7 CODE 8 CODE 9 CODE...
... the location where you selected input at high speed. IO# Part 4 Deleting and Inserting Characters This section describes everything you need to know about deleting and editing characters you press the cursor keys. • In this example, underline #. 3. Deleting Individual Characters You can also access a menu of special symbols by pressing SYMBOL. Key Operation CODE L CODE Z CODE C CODE N CODE 1 CODE 2 CODE 3 Input J W Key Operation CODE 4 CODE 5 CODE 6 CODE 7 CODE 8 CODE 9 CODE...
User Guide
Page 11
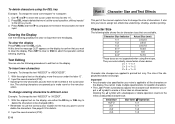
... under the letter "D". 2. You cannot make is applied to assign text effects like underlining, shading, and box printing. Initial Size AUTO 2×1 2×2 2×3 Size After B Operation 1×1 1×1 1×2 1×3 Clearing the Display Use the following procedure to "XYZDEF". 1. To clear the display Press FUNC and then DEL (CLS). appears on the display to create a 2-line label as shown below . Input the...
... under the letter "D". 2. You cannot make is applied to assign text effects like underlining, shading, and box printing. Initial Size AUTO 2×1 2×2 2×3 Size After B Operation 1×1 1×1 1×2 1×3 Clearing the Display Use the following procedure to "XYZDEF". 1. To clear the display Press FUNC and then DEL (CLS). appears on the display to create a 2-line label as shown below . Input the...
User Guide
Page 12
... printed text only. acter size first and then inputting the text. Input the text. 2. Underline 3. Initial Size AUTO Size After Delete of the two effects, underlining is on the display. Press SIZE to change the displayed size in reverse, specifying the char- Use H and J to change a two-line label to specify is not visible if you use . 4. Important! • Any text effect specification you make multiple specifications for specific...
... printed text only. acter size first and then inputting the text. Input the text. 2. Underline 3. Initial Size AUTO Size After Delete of the two effects, underlining is on the display. Press SIZE to change the displayed size in reverse, specifying the char- Use H and J to change a two-line label to specify is not visible if you use . 4. Important! • Any text effect specification you make multiple specifications for specific...
User Guide
Page 13
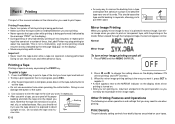
... message "P R N T" on the display between ON (mirror printing) and OFF (normal). 3. ing of the same text a number of its paper backing and stick the tape onto the object you want , if necessary. • After you print a tape, you normally do to bend the tape near one of times, the Label Printer may need to the size you want . After the print operation...
... message "P R N T" on the display between ON (mirror printing) and OFF (normal). 3. ing of the same text a number of its paper backing and stick the tape onto the object you want , if necessary. • After you print a tape, you normally do to bend the tape near one of times, the Label Printer may need to the size you want . After the print operation...
User Guide
Page 14
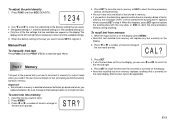
... the new data, or ESC to overwrite the existing text?") appears when you press SET in memory is currently on the input display. Press SET. • If all of the available settings. 3. E-13 To adjust the print density 1. Press SET to store. 2. Memory text cannot be appended. . To store text into memory 1. STR? 4. Press H or J a number of times to change to keep written backup copies of the manual...
... the new data, or ESC to overwrite the existing text?") appears when you press SET in memory is currently on the input display. Press SET. • If all of the available settings. 3. E-13 To adjust the print density 1. Press SET to store. 2. Memory text cannot be appended. . To store text into memory 1. STR? 4. Press H or J a number of times to change to keep written backup copies of the manual...
User Guide
Page 15
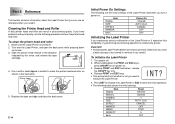
... turn power on its lock. 3. Item Display Memory SYMBOL SIZE EFFECT Reset Cleared , Cleared AUTO (2×2) CANCEL MIRROR MEMO OFF STR? Replace the tape cartridge and close the back cover. Make sure you have problems with print quality, use as shown in memory if you have a back-up copy of the Label Printer or if operation fails completely, try performing the following table shows the initial settings. Cleaning the Printer Head and Roller A dirty printer head and roller...
... turn power on its lock. 3. Item Display Memory SYMBOL SIZE EFFECT Reset Cleared , Cleared AUTO (2×2) CANCEL MIRROR MEMO OFF STR? Replace the tape cartridge and close the back cover. Make sure you have problems with print quality, use as shown in memory if you have a back-up copy of the Label Printer or if operation fails completely, try performing the following table shows the initial settings. Cleaning the Printer Head and Roller A dirty printer head and roller...
User Guide
Page 16
... carefully replace the cartridge into the label printer, always make sure the ink ribbon is being fed during printing. Improper loading of the cartridge Remove the tape cartridge and reload it correctly. roller Ink ribbon is not broken. Securely close the back cover. Dirty print head or rubber Clean the printer head and roller. Remove the tape cartridge and check to another tape cartridge. Troubleshooting • Power Supply Nothing appears on it. Batteries loaded incorrectly Remove batteries...
... carefully replace the cartridge into the label printer, always make sure the ink ribbon is being fed during printing. Improper loading of the cartridge Remove the tape cartridge and reload it correctly. roller Ink ribbon is not broken. Securely close the back cover. Dirty print head or rubber Clean the printer head and roller. Remove the tape cartridge and check to another tape cartridge. Troubleshooting • Power Supply Nothing appears on it. Batteries loaded incorrectly Remove batteries...
User Guide
Page 17
... you clear the tape jam, request servicing from memory when memory is specified as the tape width. • Label text containing a B mark was input and then tape width specification was changed to surfaces that are affixing a tape. If the printer error message reappears after you try to perform a print operation.) • Attempt to recall call text from your original dealer. E-16 Error Messages Message Possible...
... you clear the tape jam, request servicing from memory when memory is specified as the tape width. • Label text containing a B mark was input and then tape width specification was changed to surfaces that are affixing a tape. If the printer error message reappears after you try to perform a print operation.) • Attempt to recall call text from your original dealer. E-16 Error Messages Message Possible...
User Guide
Page 19
...;C (50°F~95°F) E-18 Specifications Model: KL-60 Input Keyboard Layout: Typewriter (QWERTY) Character Types Alpha (English and other languages): 151 Numbers: 10 Symbols: 46 Display Type: Liquid crystal display Columns: 4 Character matrix: 5×7-dot Printing Type: Thermal transfer Width: 5mm Character Matrix: 16×16-dot Character font: Sans-serif Character effects: Shade, underline, box Character sizes: 1×1, 1×2, 1×3 (6mm tape...
...;C (50°F~95°F) E-18 Specifications Model: KL-60 Input Keyboard Layout: Typewriter (QWERTY) Character Types Alpha (English and other languages): 151 Numbers: 10 Symbols: 46 Display Type: Liquid crystal display Columns: 4 Character matrix: 5×7-dot Printing Type: Thermal transfer Width: 5mm Character Matrix: 16×16-dot Character font: Sans-serif Character effects: Shade, underline, box Character sizes: 1×1, 1×2, 1×3 (6mm tape...

User Guide
Page 20
CASIO COMPUTER CO., LTD. 6-2, Hon-machi 1-chome Shibuya-ku, Tokyo 151-8543, Japan MO0105-A Printed in China/Imprimé en Chine A344043-1
CASIO COMPUTER CO., LTD. 6-2, Hon-machi 1-chome Shibuya-ku, Tokyo 151-8543, Japan MO0105-A Printed in China/Imprimé en Chine A344043-1

