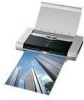
Quick Start Guide
Page 5
...When Printing Becomes Faint or Colors are Incorrect 41 Printing the Nozzle Check Pattern 42 Print Head Cleaning 47 Print Head Deep Cleaning 52 Aligning the Print Head 57 Replacing an Ink Tank 61 Troubleshooting Cannot Install the Printer Driver 70 Print Quality ...Digital Camera 82 Appendix Printing Photographs Directly from Canon Bubble Jet Direct Compatible Digital Cameras 84 User's Guide Table of Contents 86 Accessory Options 87 Traveling Abroad with the Printer 89 Specifications 91 Safety Precautions 94 Regulatory Information 96 CANON U.S.A., INC. LIMITED WARRANTY --- (USA Only...
...When Printing Becomes Faint or Colors are Incorrect 41 Printing the Nozzle Check Pattern 42 Print Head Cleaning 47 Print Head Deep Cleaning 52 Aligning the Print Head 57 Replacing an Ink Tank 61 Troubleshooting Cannot Install the Printer Driver 70 Print Quality ...Digital Camera 82 Appendix Printing Photographs Directly from Canon Bubble Jet Direct Compatible Digital Cameras 84 User's Guide Table of Contents 86 Accessory Options 87 Traveling Abroad with the Printer 89 Specifications 91 Safety Precautions 94 Regulatory Information 96 CANON U.S.A., INC. LIMITED WARRANTY --- (USA Only...
Quick Start Guide
Page 10
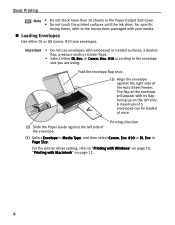
... Printing Note • Do not stack more than 10 sheets in the Paper Output Slot Cover. • Do not touch the printed surfaces until the ink dries. For the printer driver setting, refer to the envelope size you are using.
... Printing Note • Do not stack more than 10 sheets in the Paper Output Slot Cover. • Do not touch the printed surfaces until the ink dries. For the printer driver setting, refer to the envelope size you are using.
Quick Start Guide
Page 34
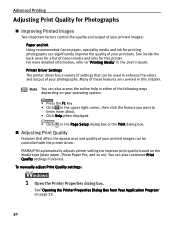
Many of Canon media and inks for this chapter. To manually adjust Print Quality settings: 1 Open the Printer Properties dialog box. PIXMA iP90 automatically adjusts printer settings to "Printing Media" in the User's Guide. See inside the back cover for a list of these features are covered in ...about. • Click Help when displayed. • Click in the upper right corner, then click the feature you want to enhance the colors and output of your printouts. Adjusting Print Quality Features that affect the appearance and quality of your printed images can also access the online help...
Many of Canon media and inks for this chapter. To manually adjust Print Quality settings: 1 Open the Printer Properties dialog box. PIXMA iP90 automatically adjusts printer settings to "Printing Media" in the User's Guide. See inside the back cover for a list of these features are covered in ...about. • Click Help when displayed. • Click in the upper right corner, then click the feature you want to enhance the colors and output of your printouts. Adjusting Print Quality Features that affect the appearance and quality of your printed images can also access the online help...
Quick Start Guide
Page 45
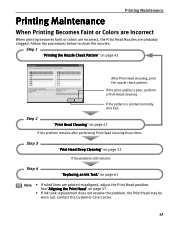
... Print Head cleaning three times Step 3 "Print Head Deep Cleaning" on page 52 If the problem still remains Step 4 "Replacing an Ink Tank" on page 61 Note • If ruled lines are probably clogged. Step 1 "Printing the Nozzle Check Pattern" on page 57. •...; If ink tank replacement does not resolve the problem, the Print Head may be worn out. Printing Maintenance Printing Maintenance When Printing Becomes Faint or Colors are Incorrect When printing becomes faint or colors are incorrect, the Print Head Nozzles are printed misaligned,...
... Print Head cleaning three times Step 3 "Print Head Deep Cleaning" on page 52 If the problem still remains Step 4 "Replacing an Ink Tank" on page 61 Note • If ruled lines are probably clogged. Step 1 "Printing the Nozzle Check Pattern" on page 57. •...; If ink tank replacement does not resolve the problem, the Print Head may be worn out. Printing Maintenance Printing Maintenance When Printing Becomes Faint or Colors are Incorrect When printing becomes faint or colors are incorrect, the Print Head Nozzles are printed misaligned,...
Quick Start Guide
Page 46
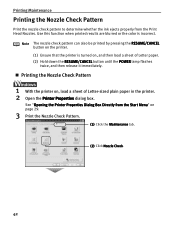
...Nozzles. Use this function when printed results are blurred or the color is turned on, and then load a sheet of Letter-sized plain paper in the printer. 2 Open the Printer Properties dialog box. Printing the Nozzle Check Pattern 1 With the printer on, load a sheet of Letter paper. (2) Hold down...pattern can also be printed by pressing the RESUME/CANCEL button on the printer. (1) Ensure that the printer is incorrect. Printing Maintenance Printing the Nozzle Check Pattern Print the nozzle check pattern to determine whether the ink ejects properly from the Start Menu" on page 29. 3 Print ...
...Nozzles. Use this function when printed results are blurred or the color is turned on, and then load a sheet of Letter-sized plain paper in the printer. 2 Open the Printer Properties dialog box. Printing the Nozzle Check Pattern 1 With the printer on, load a sheet of Letter paper. (2) Hold down...pattern can also be printed by pressing the RESUME/CANCEL button on the printer. (1) Ensure that the printer is incorrect. Printing Maintenance Printing the Nozzle Check Pattern Print the nozzle check pattern to determine whether the ink ejects properly from the Start Menu" on page 29. 3 Print ...
Quick Start Guide
Page 49
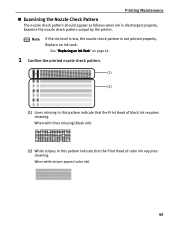
Examine the nozzle check pattern output by the printer. When with lines missing (black ink) (2) White stripes in this pattern indicate that the Print Head of color ink requires cleaning. When white stripes appear (color ink) 45 See "Replacing an Ink Tank" on page 61. 1 Confirm the printed nozzle check pattern. (1) (2) (1) Lines missing in this pattern indicate that...
Examine the nozzle check pattern output by the printer. When with lines missing (black ink) (2) White stripes in this pattern indicate that the Print Head of color ink requires cleaning. When white stripes appear (color ink) 45 See "Replacing an Ink Tank" on page 61. 1 Confirm the printed nozzle check pattern. (1) (2) (1) Lines missing in this pattern indicate that...
Quick Start Guide
Page 51
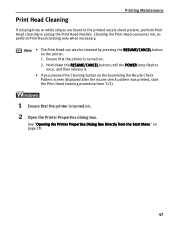
... Head can also be cleaned by pressing the RESUME/CANCEL button on . 2 Open the Printer Properties dialog box. See "Opening the Printer Properties Dialog Box Directly from 3-(3). 1 Ensure that the printer is turned on the printer. 1. Hold down the RESUME/CANCEL button until the POWER lamp flashes once, and then release...displayed after the nozzle check pattern was printed, start the Print Head cleaning procedure from the Start Menu" on . 2. Ensure that the printer is turned on page 29. 47 Cleaning the Print Head consumes ink, so perform Print Head cleaning only when necessary.
... Head can also be cleaned by pressing the RESUME/CANCEL button on . 2 Open the Printer Properties dialog box. See "Opening the Printer Properties Dialog Box Directly from 3-(3). 1 Ensure that the printer is turned on the printer. 1. Hold down the RESUME/CANCEL button until the POWER lamp flashes once, and then release...displayed after the nozzle check pattern was printed, start the Print Head cleaning procedure from the Start Menu" on . 2. Ensure that the printer is turned on page 29. 47 Cleaning the Print Head consumes ink, so perform Print Head cleaning only when necessary.
Quick Start Guide
Page 52
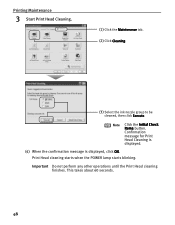
Important Do not perform any other operations until the Print Head cleaning finishes. Print Head cleaning starts when the POWER lamp starts blinking. Printing Maintenance 3 Start Print Head Cleaning. (1) Click the Maintenance tab. (2) Click Cleaning. (3) Select the ink nozzle group to be cleaned, then click Execute. This takes about 60 seconds. 48 Confirmation message for Print Head Cleaning is displayed. (4) When the confirmation message is displayed, click OK. Note Click the Initial Check Items button.
Important Do not perform any other operations until the Print Head cleaning finishes. Print Head cleaning starts when the POWER lamp starts blinking. Printing Maintenance 3 Start Print Head Cleaning. (1) Click the Maintenance tab. (2) Click Cleaning. (3) Select the ink nozzle group to be cleaned, then click Execute. This takes about 60 seconds. 48 Confirmation message for Print Head Cleaning is displayed. (4) When the confirmation message is displayed, click OK. Note Click the Initial Check Items button.
Quick Start Guide
Page 54
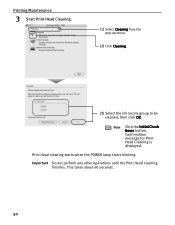
Note Click the Initial Check Items button. Important Do not perform any other operations until the Print Head cleaning finishes. Confirmation message for Print Head Cleaning is displayed. This takes about 60 seconds. 50 Printing Maintenance 3 Start Print Head Cleaning. (1) Select Cleaning from the pop-up menu. (2) Click Cleaning. (3) Select the ink nozzle group to be cleaned, then click OK. Print Head cleaning starts when the POWER lamp starts blinking.
Note Click the Initial Check Items button. Important Do not perform any other operations until the Print Head cleaning finishes. Confirmation message for Print Head Cleaning is displayed. This takes about 60 seconds. 50 Printing Maintenance 3 Start Print Head Cleaning. (1) Select Cleaning from the pop-up menu. (2) Click Cleaning. (3) Select the ink nozzle group to be cleaned, then click OK. Print Head cleaning starts when the POWER lamp starts blinking.
Quick Start Guide
Page 56
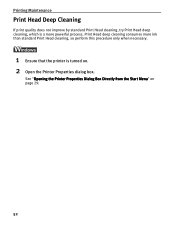
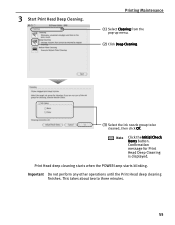
Print Head deep cleaning consumes more ink than standard Print Head cleaning, so perform this procedure only when necessary. 1 Ensure that the printer is a more powerful process. See "Opening the Printer Properties Dialog Box Directly from the Start Menu" on . 2 Open the Printer Properties dialog box. Printing Maintenance Print Head Deep Cleaning If print quality does not improve by standard Print Head cleaning, try Print Head deep cleaning, which is turned on page 29. 52
Print Head deep cleaning consumes more ink than standard Print Head cleaning, so perform this procedure only when necessary. 1 Ensure that the printer is a more powerful process. See "Opening the Printer Properties Dialog Box Directly from the Start Menu" on . 2 Open the Printer Properties dialog box. Printing Maintenance Print Head Deep Cleaning If print quality does not improve by standard Print Head cleaning, try Print Head deep cleaning, which is turned on page 29. 52
Quick Start Guide
Page 57
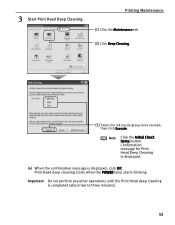
Printing Maintenance (1) Click the Maintenance tab. (2) Click Deep Cleaning. (3) Select the ink nozzle group to three minutes). 53 Note Click the Initial Check Items button. Important Do not perform any other operations until the Print Head deep cleaning is displayed, click OK. Print Head deep cleaning starts when the POWER lamp starts blinking. 3 Start Print Head Deep Cleaning. Confirmation message for Print Head Deep Cleaning is displayed. (4) When the confirmation message is completed (about two to be cleaned, then click Execute.
Printing Maintenance (1) Click the Maintenance tab. (2) Click Deep Cleaning. (3) Select the ink nozzle group to three minutes). 53 Note Click the Initial Check Items button. Important Do not perform any other operations until the Print Head deep cleaning is displayed, click OK. Print Head deep cleaning starts when the POWER lamp starts blinking. 3 Start Print Head Deep Cleaning. Confirmation message for Print Head Deep Cleaning is displayed. (4) When the confirmation message is completed (about two to be cleaned, then click Execute.
Quick Start Guide
Page 58
...persists, the printer may be used with Bluetooth communication. (1) Double-click the hard disk icon where the printer driver was ...installed, the Applications folder, and then the Utilities folder. (2) Double-click the Printer ...Setup Utility icon. If you are using the OS other than Mac OS X v.10.3, double-click the Print Center icon. (3) Select iP90 from the Name list and click Utility or Configure. (4) Select iP90 from the Product list and click Maintenance. 54 Contact the Canon... Customer Care Center. 1 Ensure that the printer is turned on page 61...
...persists, the printer may be used with Bluetooth communication. (1) Double-click the hard disk icon where the printer driver was ...installed, the Applications folder, and then the Utilities folder. (2) Double-click the Printer ...Setup Utility icon. If you are using the OS other than Mac OS X v.10.3, double-click the Print Center icon. (3) Select iP90 from the Name list and click Utility or Configure. (4) Select iP90 from the Product list and click Maintenance. 54 Contact the Canon... Customer Care Center. 1 Ensure that the printer is turned on page 61...
Quick Start Guide
Page 59
Confirmation message for Print Head Deep Cleaning is displayed. Print Head deep cleaning starts when the POWER lamp starts blinking. Printing Maintenance (1) Select Cleaning from the pop-up menu. (2) Click Deep Cleaning. (3) Select the ink nozzle group to three minutes. 55 3 Start Print Head Deep Cleaning. Important Do not perform any other operations until the Print Head deep cleaning finishes. This takes about two to be cleaned, then click OK. Note Click the Initial Check Items button.
Confirmation message for Print Head Deep Cleaning is displayed. Print Head deep cleaning starts when the POWER lamp starts blinking. Printing Maintenance (1) Select Cleaning from the pop-up menu. (2) Click Deep Cleaning. (3) Select the ink nozzle group to three minutes. 55 3 Start Print Head Deep Cleaning. Important Do not perform any other operations until the Print Head deep cleaning finishes. This takes about two to be cleaned, then click OK. Note Click the Initial Check Items button.
Quick Start Guide
Page 60
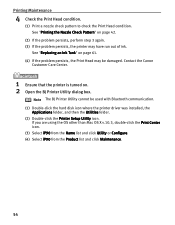
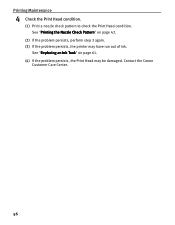
Contact the Canon Customer Care Center. 56 See "Replacing an Ink Tank" on page 42. (2) If the problem persists, perform step 3 again. (3) If the problem persists, the printer may be damaged. See "Printing the Nozzle Check Pattern" on page 61. (4) If the problem persists, the Print Head may have run out of ink. Printing Maintenance 4 Check the Print Head condition. (1) Print a nozzle check pattern to check the Print Head condition.
Contact the Canon Customer Care Center. 56 See "Replacing an Ink Tank" on page 42. (2) If the problem persists, perform step 3 again. (3) If the problem persists, the printer may be damaged. See "Printing the Nozzle Check Pattern" on page 61. (4) If the problem persists, the Print Head may have run out of ink. Printing Maintenance 4 Check the Print Head condition. (1) Print a nozzle check pattern to check the Print Head condition.
Quick Start Guide
Page 65
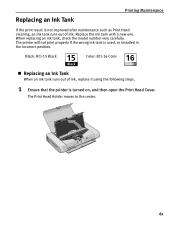
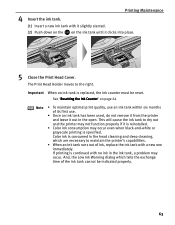
... the printer is turned on, and then open the Print Head Cover. Replacing an Ink Tank Printing Maintenance If the print result is used, or installed in the incorrect position. When replacing an ink tank, check the model number very carefully. Black: BCI-15 Black Color: BCI-16 Color Replacing an Ink Tank When an ink tank...
... the printer is turned on, and then open the Print Head Cover. Replacing an Ink Tank Printing Maintenance If the print result is used, or installed in the incorrect position. When replacing an ink tank, check the model number very carefully. Black: BCI-15 Black Color: BCI-16 Color Replacing an Ink Tank When an ink tank...
Quick Start Guide
Page 66
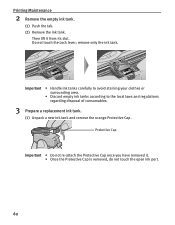
... carefully to avoid staining your clothes or surrounding area. • Discard empty ink tanks according to the local laws and regulations regarding disposal of consumables. 3 Prepare a replacement ink tank. (1) Unpack a new ink tank and remove the orange Protective Cap. Do not touch the Lock lever; Protective Cap Important • Do not re-attach... Protective Cap once you have removed it from its slot. Then lift it . • Once the Protective Cap is removed, do not touch the open ink port. 62 Printing Maintenance 2 Remove the empty ink tank. (1) Push the tab. (2) Remove the...
... carefully to avoid staining your clothes or surrounding area. • Discard empty ink tanks according to the local laws and regulations regarding disposal of consumables. 3 Prepare a replacement ink tank. (1) Unpack a new ink tank and remove the orange Protective Cap. Do not touch the Lock lever; Protective Cap Important • Do not re-attach... Protective Cap once you have removed it from its slot. Then lift it . • Once the Protective Cap is removed, do not touch the open ink port. 62 Printing Maintenance 2 Remove the empty ink tank. (1) Push the tab. (2) Remove the...
Quick Start Guide
Page 67
... use . • Once an ink tank has been used, do not remove it from the printer and leave it is reinstalled. • Color ink consumption may occur. And, the Low Ink Warning dialog which are necessary to maintain the printer's capabilities. • When an ink tank runs out of its first ...use an ink tank within six months of ink, replace the ink tank with it...
... use . • Once an ink tank has been used, do not remove it from the printer and leave it is reinstalled. • Color ink consumption may occur. And, the Low Ink Warning dialog which are necessary to maintain the printer's capabilities. • When an ink tank runs out of its first ...use an ink tank within six months of ink, replace the ink tank with it...
Quick Start Guide
Page 68
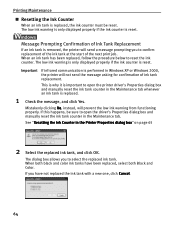
... has been replaced, follow the procedure below to select the replaced ink tank. When both Black and Color. The low ink warning is only displayed properly if the ink counter is removed, the printer will send a message prompting you to reset the ink counter. If this happens, be reset. The dialog box allows you to open...
... has been replaced, follow the procedure below to select the replaced ink tank. When both Black and Color. The low ink warning is only displayed properly if the ink counter is removed, the printer will send a message prompting you to reset the ink counter. If this happens, be reset. The dialog box allows you to open...
Quick Start Guide
Page 69
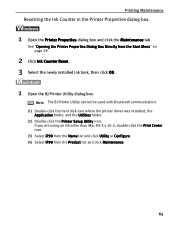
... (4) Select iP90 from the Start Menu" on page 29 2 Click Ink Counter Reset. 3 Select the newly installed ink tank, then click OK. 1 Open the BJ Printer Utility dialog box. See "Opening the Printer Properties Dialog Box Directly from the Product list and click Maintenance. 65 ...-click the hard disk icon where the printer driver was installed, the Application folder, and the Utilities folder. (2) Double-click the Printer Setup Utility icon. Printing Maintenance Resetting the Ink Counter in the Printer Properties dialog box 1 Open the Printer Properties dialog box and click the Maintenance tab...
... (4) Select iP90 from the Start Menu" on page 29 2 Click Ink Counter Reset. 3 Select the newly installed ink tank, then click OK. 1 Open the BJ Printer Utility dialog box. See "Opening the Printer Properties Dialog Box Directly from the Product list and click Maintenance. 65 ...-click the hard disk icon where the printer driver was installed, the Application folder, and the Utilities folder. (2) Double-click the Printer Setup Utility icon. Printing Maintenance Resetting the Ink Counter in the Printer Properties dialog box 1 Open the Printer Properties dialog box and click the Maintenance tab...
Quick Start Guide
Page 70
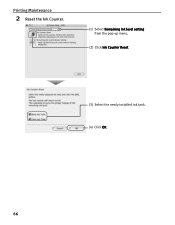
Printing Maintenance 2 Reset the Ink Counter. (1) Select Remaining ink level setting from the pop-up menu. (2) Click Ink Counter Reset. (3) Select the newly installed ink tank. (4) Click OK. 66
Printing Maintenance 2 Reset the Ink Counter. (1) Select Remaining ink level setting from the pop-up menu. (2) Click Ink Counter Reset. (3) Select the newly installed ink tank. (4) Click OK. 66


