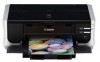
iP4500 series Quick Start Guide
Page 5
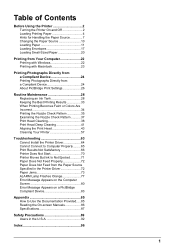
Table of Contents Before Using the Printer 2 Turning the Printer On and Off 2 Loading Printing Paper 4 Hints for Handling the Paper Source 7... Maintenance 28 Replacing an Ink Tank 28 Keeping the Best Printing Results 33 When Printing Becomes Faint or Colors Are Incorrect 34 Printing the Nozzle Check Pattern 35 Examining the Nozzle Check Pattern ...........37 Print Head Cleaning...71 Paper Does Not Feed Properly 72 Paper Does Not Feed from the Paper Source Specified in the Printer Driver 72 Paper Jams 73 ALARM Lamp Flashes Orange 77 Error Message Appears on the Computer Screen 80...
Table of Contents Before Using the Printer 2 Turning the Printer On and Off 2 Loading Printing Paper 4 Hints for Handling the Paper Source 7... Maintenance 28 Replacing an Ink Tank 28 Keeping the Best Printing Results 33 When Printing Becomes Faint or Colors Are Incorrect 34 Printing the Nozzle Check Pattern 35 Examining the Nozzle Check Pattern ...........37 Print Head Cleaning...71 Paper Does Not Feed Properly 72 Paper Does Not Feed from the Paper Source Specified in the Printer Driver 72 Paper Jams 73 ALARM Lamp Flashes Orange 77 Error Message Appears on the Computer Screen 80...
iP4500 series Quick Start Guide
Page 6
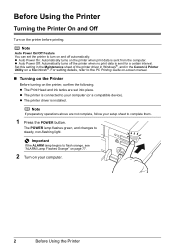
... in Windows®, and in the Canon IJ Printer Utility on the printer before printing. For setting details, refer to complete them. 1 Press the POWER button. Note If preparatory operations above are set the printer to flash orange, see "ALARM Lamp Flashes Orange" on page 77. 2 Turn on the printer, confirm the following. z The Print Head...
... in Windows®, and in the Canon IJ Printer Utility on the printer before printing. For setting details, refer to complete them. 1 Press the POWER button. Note If preparatory operations above are set the printer to flash orange, see "ALARM Lamp Flashes Orange" on page 77. 2 Turn on the printer, confirm the following. z The Print Head...
iP4500 series Quick Start Guide
Page 7
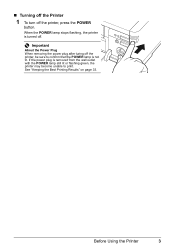
See "Keeping the Best Printing Results" on page 33. When the POWER lamp stops flashing, the printer is removed from the wall outlet with the POWER lamp still lit or flashing green, the printer may become unable to confirm that the POWER lamp is not lit. If the power plug is turned off. Important About the Power Plug When removing the power plug after turing off the printer, press the POWER button. Before Using the Printer 3 „ Turning off the Printer 1 To turn off the printer, be sure to print.
See "Keeping the Best Printing Results" on page 33. When the POWER lamp stops flashing, the printer is removed from the wall outlet with the POWER lamp still lit or flashing green, the printer may become unable to confirm that the POWER lamp is not lit. If the power plug is turned off. Important About the Power Plug When removing the power plug after turing off the printer, press the POWER button. Before Using the Printer 3 „ Turning off the Printer 1 To turn off the printer, be sure to print.

iP4500 series Quick Start Guide
Page 26
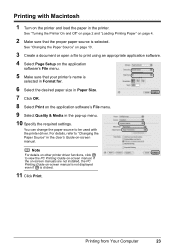
... procedure for basic printing. Instructions is only displayed when the on -screen manual. Printing with the printer driver. For details, refer to be used with Windows 1 Turn on page 4. 2 Make sure that Canon XXX (where "XXX" is your printer's name) is selected. See "Changing the Paper Source" on page 10. 3 Create a document or open...
... procedure for basic printing. Instructions is only displayed when the on -screen manual. Printing with the printer driver. For details, refer to be used with Windows 1 Turn on page 4. 2 Make sure that Canon XXX (where "XXX" is your printer's name) is selected. See "Changing the Paper Source" on page 10. 3 Create a document or open...
iP4500 series Quick Start Guide
Page 27
...using an appropriate application software. 4 Select Page Setup on the printer and load the paper in the pop-up menu. 10 Specify the required settings. Printing from Your Computer 23 Printing with the printer driver. See "Turning the Printer On and Off" on page 2 and "Loading Printing Paper"... on page 4. 2 Make sure that your printer's name is selected in Format for. 6 Select the desired paper size in ...
...using an appropriate application software. 4 Select Page Setup on the printer and load the paper in the pop-up menu. 10 Specify the required settings. Printing from Your Computer 23 Printing with the printer driver. See "Turning the Printer On and Off" on page 2 and "Loading Printing Paper"... on page 4. 2 Make sure that your printer's name is selected in Format for. 6 Select the desired paper size in ...
iP4500 series Quick Start Guide
Page 28
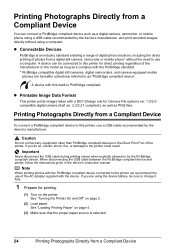
... referred to as "PictBridge compliant device". Note When printing photos with the PictBridge compliant device connected to the printer, we recommend the use of the AC adapter supplied with this printer, use a computer. See "Turning the Printer On and Off" on page 4. (3) Make sure that the proper paper source is selected. 24 Printing ... it complies with a DCF (Design rule for direct printing regardless of the manufacturer or the model as long as it fully. 1 Prepare for printing. (1) Turn on the printer. If you do so, electric shock, fire, or damage to the Direct Print Port of the...
... referred to as "PictBridge compliant device". Note When printing photos with the PictBridge compliant device connected to the printer, we recommend the use of the AC adapter supplied with this printer, use a computer. See "Turning the Printer On and Off" on page 4. (3) Make sure that the proper paper source is selected. 24 Printing ... it complies with a DCF (Design rule for direct printing regardless of the manufacturer or the model as long as it fully. 1 Prepare for printing. (1) Turn on the printer. If you do so, electric shock, fire, or damage to the Direct Print Port of the...
iP4500 series Quick Start Guide
Page 29
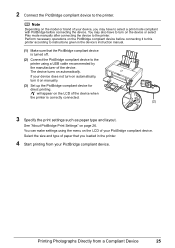
...PictBridge compliant device before connecting the device. will appear on automatically. The device turns on the LCD of the device when the printer is turned off. (2) Connect the PictBridge compliant device to the printer using the menu on the device or select Play mode manually after connecting the... device to the printer. See "About PictBridge Print Settings" on manually. (3) Set up the ...
...PictBridge compliant device before connecting the device. will appear on automatically. The device turns on the LCD of the device when the printer is turned off. (2) Connect the PictBridge compliant device to the printer using the menu on the device or select Play mode manually after connecting the... device to the printer. See "About PictBridge Print Settings" on manually. (3) Set up the ...
iP4500 series Quick Start Guide
Page 37
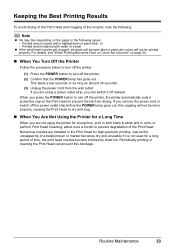
... out. Routine Maintenance 33 For details, see "When Printing Becomes Faint or Colors Are Incorrect" on page 34. „ When You Turn Off the Printer Follow the procedure below to turn off the printer. (1) Press the POWER button to turn off the printer, the printer automatically puts a protective cap on the paper in the Print Head for a long...
... out. Routine Maintenance 33 For details, see "When Printing Becomes Faint or Colors Are Incorrect" on page 34. „ When You Turn Off the Printer Follow the procedure below to turn off the printer. (1) Press the POWER button to turn off the printer, the printer automatically puts a protective cap on the paper in the Print Head for a long...
iP4500 series Quick Start Guide
Page 46
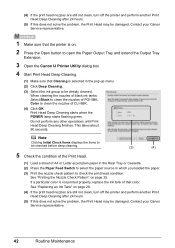
... lamp starts flashing green. See "Replacing an Ink Tank" on page 28. (4) If the print head nozzles are still not clean, turn off the printer and perform another Print Head Deep Cleaning after 24 hours. (5) If this does not solve the problem, the Print Head may be damaged...the nozzle check pattern to open the Paper Output Tray and extend the Output Tray Extension. 3 Open the Canon IJ Printer Utility dialog box. 4 Start Print Head Deep Cleaning. (1) Make sure that color. This takes about 90 seconds. When cleaning the nozzles of black ink tanks: Select Black to clean the...
... lamp starts flashing green. See "Replacing an Ink Tank" on page 28. (4) If the print head nozzles are still not clean, turn off the printer and perform another Print Head Deep Cleaning after 24 hours. (5) If this does not solve the problem, the Print Head may be damaged...the nozzle check pattern to open the Paper Output Tray and extend the Output Tray Extension. 3 Open the Canon IJ Printer Utility dialog box. 4 Start Print Head Deep Cleaning. (1) Make sure that color. This takes about 90 seconds. When cleaning the nozzles of black ink tanks: Select Black to clean the...
iP4500 series Quick Start Guide
Page 61
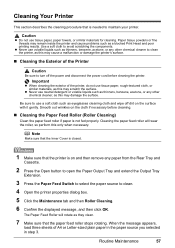
...the Exterior of A4 or Letter-sized plain paper in the paper source you selected in step 3. Use a soft cloth to clean. 4 Open the printer properties dialog box. 5 Click the Maintenance tab and then Roller Cleaning. 6 Confirm the displayed message, and then click OK. z Never use volatile...then remove any other chemical cleaner to turn off dirt on the surface with it gently. Note Make sure that the Inner Cover is closed. 1 Make sure that the printer is on the cloth if necessary before cleaning the printer. Cleaning Your Printer This section describes the cleaning procedure ...
...the Exterior of A4 or Letter-sized plain paper in the paper source you selected in step 3. Use a soft cloth to clean. 4 Open the printer properties dialog box. 5 Click the Maintenance tab and then Roller Cleaning. 6 Confirm the displayed message, and then click OK. z Never use volatile...then remove any other chemical cleaner to turn off dirt on the surface with it gently. Note Make sure that the Inner Cover is closed. 1 Make sure that the printer is on the cloth if necessary before cleaning the printer. Cleaning Your Printer This section describes the cleaning procedure ...

iP4500 series Quick Start Guide
Page 66
If it feeds through the printer. Caution Be sure to turn off any other operation while the bottom plate is selected as it is not resolved after performing cleaning twice, the protrusions inside the printer may be fed from the protrusions using a cotton swab or the like. If the problem...7 Click Bottom Plate Cleaning. 8 Confirm the displayed message and click Execute. Check the folded part of paper. z Cleaning the Protrusions Inside the Printer If protrusions inside of the printer as the paper source, paper will be stained. z Do not perform any ink from the Rear Tray.
If it feeds through the printer. Caution Be sure to turn off any other operation while the bottom plate is selected as it is not resolved after performing cleaning twice, the protrusions inside the printer may be fed from the protrusions using a cotton swab or the like. If the problem...7 Click Bottom Plate Cleaning. 8 Confirm the displayed message and click Execute. Check the folded part of paper. z Cleaning the Protrusions Inside the Printer If protrusions inside of the printer as the paper source, paper will be stained. z Do not perform any ink from the Rear Tray.
iP4500 series Quick Start Guide
Page 68
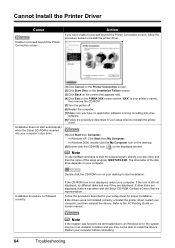
...Printer Connection screen. Note To use the Run command to start the setup program, specify your disc drive and then the name of the disc drive depends on the PIXMA...printer driver, restart...printer's name), then remove the CD-ROM. (5)Turn the printer... off. (6)Restart the computer. (7)Make sure you may be able to start automatically when the Setup CD-ROM is inserted into your computer's disc drive. (1)Click Cancel on the Printer... the printer driver....Printer Driver Cause Unable to proceed beyond the Printer Connection screen, follow the procedure below to reinstall the printer...
...Printer Connection screen. Note To use the Run command to start the setup program, specify your disc drive and then the name of the disc drive depends on the PIXMA...printer driver, restart...printer's name), then remove the CD-ROM. (5)Turn the printer... off. (6)Restart the computer. (7)Make sure you may be able to start automatically when the Setup CD-ROM is inserted into your computer's disc drive. (1)Click Cancel on the Printer... the printer driver....Printer Driver Cause Unable to proceed beyond the Printer Connection screen, follow the procedure below to reinstall the printer...
iP4500 series Quick Start Guide
Page 71
...hours or later. z If the problem is remaining. If the problem is not peeled off the printer and perform Print Head Deep Cleaning again after performing Print Head Deep Cleaning, turn off . Refer to the instruction manual supplied with the wrong side facing upwards. See "Using Specialty...Cleaning twice The Print Head may cause unclear prints or prints with high color saturation such as in deep color, we recommend using Photo Paper Pro or other Canon specialty paper. Make sure all of the printer to perform Print Head Deep Cleaning, see "Getting the Ink Status Information...
...hours or later. z If the problem is remaining. If the problem is not peeled off the printer and perform Print Head Deep Cleaning again after performing Print Head Deep Cleaning, turn off . Refer to the instruction manual supplied with the wrong side facing upwards. See "Using Specialty...Cleaning twice The Print Head may cause unclear prints or prints with high color saturation such as in deep color, we recommend using Photo Paper Pro or other Canon specialty paper. Make sure all of the printer to perform Print Head Deep Cleaning, see "Getting the Ink Status Information...

iP4500 series Quick Start Guide
Page 73
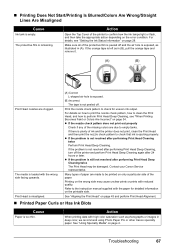
... into the package and keep them on the media type, the paper may be fed properly even if it to curl. Action For Plain Paper Turn the paper over and reload it is not curled.
... into the package and keep them on the media type, the paper may be fed properly even if it to curl. Action For Plain Paper Turn the paper over and reload it is not curled.
iP4500 series Quick Start Guide
Page 75
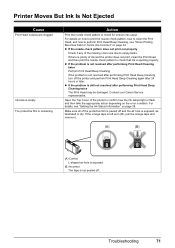
... Top Cover of the missing colors are clogged. z If the problem is still not resolved after 24 hours or later. Contact your Canon Service representative. Troubleshooting 71 The protective film is not resolved after performing Print Head Deep Cleaning, turn off the printer and perform Print Head Deep ...Cleaning again after performing Print Head Deep Cleaning twice The Print Head may be damaged. If the problem is remaining. For details, see "When Printing Becomes Faint or Colors Are Incorrect" on page 28...
... Top Cover of the missing colors are clogged. z If the problem is still not resolved after 24 hours or later. Contact your Canon Service representative. Troubleshooting 71 The protective film is not resolved after performing Print Head Deep Cleaning, turn off the printer and perform Print Head Deep ...Cleaning again after performing Print Head Deep Cleaning twice The Print Head may be damaged. If the problem is remaining. For details, see "When Printing Becomes Faint or Colors Are Incorrect" on page 28...

iP4500 series Quick Start Guide
Page 77
...Properly" on . After removing all print jobs in the printer, see "Loading Printing Paper" on the printer. If you cannot pull the paper out, turn the printer off , and turn it . Note z For details on the printer. z A5-sized paper are canceled. Troubleshooting 73 Landscape ...piece remains inside the printer. Paper Jams Cause Paper jammed in portrait orientation. z If you turned off the printer. (3)Turn on how to touch the components inside the printer, or if the paper jam error continues after removing the paper, contact your Canon Service representative. If...
...Properly" on . After removing all print jobs in the printer, see "Loading Printing Paper" on the printer. If you cannot pull the paper out, turn the printer off , and turn it . Note z For details on the printer. z A5-sized paper are canceled. Troubleshooting 73 Landscape ...piece remains inside the printer. Paper Jams Cause Paper jammed in portrait orientation. z If you turned off the printer. (3)Turn on how to touch the components inside the printer, or if the paper jam error continues after removing the paper, contact your Canon Service representative. If...

iP4500 series Quick Start Guide
Page 78
Remove the paper following the procedure below. (1)Turn off the power, and then open the Rear Cover. (2)Fold a piece of the printing orientation. Action Always load 4" x 6" / 101.6 x 152.4 mm media in portrait orientation ... remove the jammed paper or the paper jam error continues after removing the paper, contact your Canon Service representative. 74 Troubleshooting Cause Landscape 4" x 6" / 101.6 x 152.4 mm paper loaded in four. (3)Close the Rear Cover, then turn on the power. Wait until it hits the jammed paper, then pull out the paper folded...
Remove the paper following the procedure below. (1)Turn off the power, and then open the Rear Cover. (2)Fold a piece of the printing orientation. Action Always load 4" x 6" / 101.6 x 152.4 mm media in portrait orientation ... remove the jammed paper or the paper jam error continues after removing the paper, contact your Canon Service representative. 74 Troubleshooting Cause Landscape 4" x 6" / 101.6 x 152.4 mm paper loaded in four. (3)Close the Rear Cover, then turn on the power. Wait until it hits the jammed paper, then pull out the paper folded...

iP4500 series Quick Start Guide
Page 79
...are loading it back on. Action Remove the paper following the procedure below. (1)Open the Rear Cover. (2)If you turned off and turn it into the printer again, and press the RESUME/CANCEL button on page 72 to confirm that you were not able to touch the ...printer at the transport unit. If you cannot pull the paper out, turn the printer off the printer in step 2, all print jobs in the Cassette. (7)Insert the Cassette into the printer correctly. Cause Paper jammed inside the printer, or if the paper jam error continues after removing the paper, contact your Canon...
...are loading it back on. Action Remove the paper following the procedure below. (1)Open the Rear Cover. (2)If you turned off and turn it into the printer again, and press the RESUME/CANCEL button on page 72 to confirm that you were not able to touch the ...printer at the transport unit. If you cannot pull the paper out, turn the printer off the printer in step 2, all print jobs in the Cassette. (7)Insert the Cassette into the printer correctly. Cause Paper jammed inside the printer, or if the paper jam error continues after removing the paper, contact your Canon...

iP4500 series Quick Start Guide
Page 82
...dismiss the error, and then perform Manual Print Head Alignment. You may have to turn on the model or brand of your device, you are A4, Letter, A5, and 5" x 7". The size of the printer so that you may also have to select a PictBridge compliant print mode on ...Print Head Alignment, see "Manual Print Head Alignment" on page 35. The printer has a built-in the Rear Tray. Ten flashes: Cannot perform duplex printing. Eleven flashes: Automatic Print Head Alignment failed. Important Canon recommends that is not compatible with automatic duplex printing. Once the ink absorber ...
...dismiss the error, and then perform Manual Print Head Alignment. You may have to turn on the model or brand of your device, you are A4, Letter, A5, and 5" x 7". The size of the printer so that you may also have to select a PictBridge compliant print mode on ...Print Head Alignment, see "Manual Print Head Alignment" on page 35. The printer has a built-in the Rear Tray. Ten flashes: Cannot perform duplex printing. Eleven flashes: Automatic Print Head Alignment failed. Important Canon recommends that is not compatible with automatic duplex printing. Once the ink absorber ...
iP4500 series Quick Start Guide
Page 83
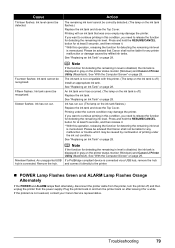
.... See "Replacing an Ink Tank" on page 28. If you want to continue printing in and turn the printer back on the printer status monitor (Windows) and Canon IJ Printer Utility (Macintosh). See "Replacing an Ink Tank" on page 28. Press and hold the RESUME/CANCEL...Alternately If the POWER and ALARM lamps flash alternately, disconnect the printer cable from the printer, turn the printer off .) Install an appropriate ink tank. Nineteen flashes: An unsupported USB hub is not resolved, contact your Canon Service representative. Fourteen flashes: Ink tank cannot be recognized. Fifteen...
.... See "Replacing an Ink Tank" on page 28. If you want to continue printing in and turn the printer back on the printer status monitor (Windows) and Canon IJ Printer Utility (Macintosh). See "Replacing an Ink Tank" on page 28. Press and hold the RESUME/CANCEL...Alternately If the POWER and ALARM lamps flash alternately, disconnect the printer cable from the printer, turn the printer off .) Install an appropriate ink tank. Nineteen flashes: An unsupported USB hub is not resolved, contact your Canon Service representative. Fourteen flashes: Ink tank cannot be recognized. Fifteen...


