
iP4500 series Quick Start Guide
Page 2
...of the product Setup CD-ROM number (located on the CD-ROM Purchase Date Customer Technical Support Sequence* 1. www.canonesp.com Canon CarePAK Extended Service Plan is a cost-attractive and easy-to-use extended service program that provides up...be purchased during your product's warranty period. Email Tech Support - CarePAK offers toll-free Canon technical support and includes Canon's superb InstantExchange product replacement program. Telephone Device for the Deaf (TDD) support is our helpful tech support web site. For more information and updated program specifics,...
...of the product Setup CD-ROM number (located on the CD-ROM Purchase Date Customer Technical Support Sequence* 1. www.canonesp.com Canon CarePAK Extended Service Plan is a cost-attractive and easy-to-use extended service program that provides up...be purchased during your product's warranty period. Email Tech Support - CarePAK offers toll-free Canon technical support and includes Canon's superb InstantExchange product replacement program. Telephone Device for the Deaf (TDD) support is our helpful tech support web site. For more information and updated program specifics,...
iP4500 series Quick Start Guide
Page 9
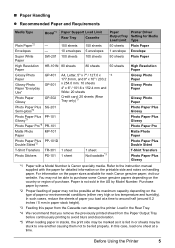
...in the US by name. *2 Proper feeding of paper may be stuck to purchase some Canon genuine papers depending on the type of purchase. Paper is Canon specialty media. Before Using the Printer 5 Load in the Rear Tray. *4 We recommend that you load at the maximum ...and humidity). „ Paper Handling z Recommended Paper and Requirements Media Type Plain Paper*2 Model*1 Paper Support Load Limit Rear Tray Cassette - 150 sheets 150 sheets Paper Printer Driver Output Tray Setting for Media Load Limit Type 50 sheets Plain Paper Envelopes - 10 envelopes 5 envelopes...
...in the US by name. *2 Proper feeding of paper may be stuck to purchase some Canon genuine papers depending on the type of purchase. Paper is Canon specialty media. Before Using the Printer 5 Load in the Rear Tray. *4 We recommend that you load at the maximum ...and humidity). „ Paper Handling z Recommended Paper and Requirements Media Type Plain Paper*2 Model*1 Paper Support Load Limit Rear Tray Cassette - 150 sheets 150 sheets Paper Printer Driver Output Tray Setting for Media Load Limit Type 50 sheets Plain Paper Envelopes - 10 envelopes 5 envelopes...
iP4500 series Quick Start Guide
Page 16
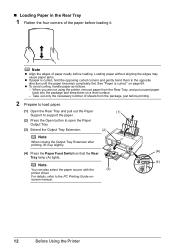
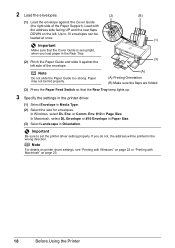
...(A) (4) Press the Paper Feed Switch so that the Rear Tray lamp (A) lights. (4) Note You can also select the paper source with the (3) printer driver. For details, refer to open the Paper Output Tray. (3) Extend the Output Tray Extension. (2) Note When closing the Output Tray Extension after ...as follows. - screen manual. 12 Before Using the Printer When you are not using the printer, remove paper from the package, just before printing. 2 Prepare to load paper. (1) Open the Rear Tray and pull out the Paper (1) Support to support the paper. (2) Press the Open button to the PC...
...(A) (4) Press the Paper Feed Switch so that the Rear Tray lamp (A) lights. (4) Note You can also select the paper source with the (3) printer driver. For details, refer to open the Paper Output Tray. (3) Extend the Output Tray Extension. (2) Note When closing the Output Tray Extension after ...as follows. - screen manual. 12 Before Using the Printer When you are not using the printer, remove paper from the package, just before printing. 2 Prepare to load paper. (1) Open the Rear Tray and pull out the Paper (1) Support to support the paper. (2) Press the Open button to the PC...
iP4500 series Quick Start Guide
Page 17
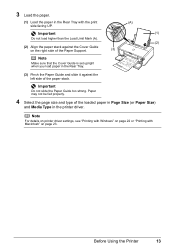
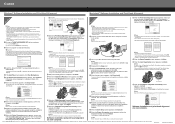
3 Load the paper. (1) Load the paper in the printer driver. Note For details on printer driver settings, see "Printing with Windows" on the right side of the Paper Support. (3) Note Make sure that the Cover Guide is set upright when you load paper in the Rear Tray. (3) Pinch the Paper Guide ...Mark (A). (2) (2) Align the paper stack against the Cover Guide on page 22 or "Printing with the print (A) side facing UP. . Before Using the Printer 13 Important Do not slide the Paper Guide too strong. Paper may not be fed properly. 4 Select the page size and type of the paper...
3 Load the paper. (1) Load the paper in the printer driver. Note For details on printer driver settings, see "Printing with Windows" on the right side of the Paper Support. (3) Note Make sure that the Cover Guide is set upright when you load paper in the Rear Tray. (3) Pinch the Paper Guide ...Mark (A). (2) (2) Align the paper stack against the Cover Guide on page 22 or "Printing with the print (A) side facing UP. . Before Using the Printer 13 Important Do not slide the Paper Guide too strong. Paper may not be fed properly. 4 Select the page size and type of the paper...
iP4500 series Quick Start Guide
Page 22
Load with Macintosh" on the left side of the Paper Support). Important Be sure to 10 envelopes can be printed in the wrong direction.... In Windows, select DL Env. Note (A) Do not slide the Paper Guide too strong. Note For details on printer driver settings, see "Printing with Windows" on page 22 or "Printing with the address side facing UP and the... (B) Make sure the flaps are folded. (3) Press the Paper Feed Switch so that the Cover Guide is set the printer driver setting properly. Env. #10 in Media Type. (2) Select the size for envelopes. Up to set upright, when...
Load with Macintosh" on the left side of the Paper Support). Important Be sure to 10 envelopes can be printed in the wrong direction.... In Windows, select DL Env. Note (A) Do not slide the Paper Guide too strong. Note For details on printer driver settings, see "Printing with Windows" on page 22 or "Printing with the address side facing UP and the... (B) Make sure the flaps are folded. (3) Press the Paper Feed Switch so that the Cover Guide is set the printer driver setting properly. Env. #10 in Media Type. (2) Select the size for envelopes. Up to set upright, when...
iP4500 series Quick Start Guide
Page 24
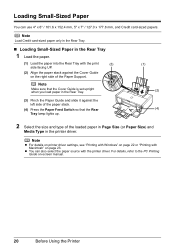
.... For details, refer to the PC Printing Guide on-screen manual. 20 Before Using the Printer Note Load Credit card-sized paper only in the Rear Tray. „ Loading Small-Sized Paper in the printer driver. . Note Make sure that the Cover Guide is set upright when you load paper in the... into the Rear Tray with the print (3) side facing UP. (2) Align the paper stack against the Cover Guide on the right side of the Paper Support. . Loading Small-Sized Paper You can also select the paper source with Macintosh" on page 23.
.... For details, refer to the PC Printing Guide on-screen manual. 20 Before Using the Printer Note Load Credit card-sized paper only in the Rear Tray. „ Loading Small-Sized Paper in the printer driver. . Note Make sure that the Cover Guide is set upright when you load paper in the... into the Rear Tray with the print (3) side facing UP. (2) Align the paper stack against the Cover Guide on the right side of the Paper Support. . Loading Small-Sized Paper You can also select the paper source with Macintosh" on page 23.

iP4500 series Quick Start Guide
Page 69
...Speed connection. We recommend the cable to use a certified USB 2.0 Hi-Speed cable. Obtain and install the latest update for your computer supports USB 2.0 Hi-Speed connection. Obtain the latest version of the USB 2.0 Hi-Speed driver compatible with your system environment is not fully ... system of your computer supports USB 2.0 Hi-Speed connection. Important For details on your computer, USB cable, or USB hub. „ "This Device Can Perform Faster" Message Is Displayed Cause Your system environment is not fully compatible with USB 2.0 Hi-Speed, the printer will operate at a ...
...Speed connection. We recommend the cable to use a certified USB 2.0 Hi-Speed cable. Obtain and install the latest update for your computer supports USB 2.0 Hi-Speed connection. Obtain the latest version of the USB 2.0 Hi-Speed driver compatible with your system environment is not fully ... system of your computer supports USB 2.0 Hi-Speed connection. Important For details on your computer, USB cable, or USB hub. „ "This Device Can Perform Faster" Message Is Displayed Cause Your system environment is not fully compatible with USB 2.0 Hi-Speed, the printer will operate at a ...

iP4500 series Quick Start Guide
Page 80
... transport section. Note When reloading the paper into the printer, see "Paper Does Not Feed Properly" on the printer. Reload paper in the Rear Tray, remove the paper from the Rear Tray and close the Paper Support. (2)Set the printer upright with the rear side down. (3)Slowly pull the...removing the jammed paper. (4)If any paper is loaded in the Rear Tray, if necessary. (5)Insert the Cassette into the printer. (6)Press the RESUME/CANCEL button on page 72 to its original position immediately after removing the paper, contact your Canon Service representative. 76 Troubleshooting
... transport section. Note When reloading the paper into the printer, see "Paper Does Not Feed Properly" on the printer. Reload paper in the Rear Tray, remove the paper from the Rear Tray and close the Paper Support. (2)Set the printer upright with the rear side down. (3)Slowly pull the...removing the jammed paper. (4)If any paper is loaded in the Rear Tray, if necessary. (5)Insert the Cassette into the printer. (6)Press the RESUME/CANCEL button on page 72 to its original position immediately after removing the paper, contact your Canon Service representative. 76 Troubleshooting

iP4500 series Quick Start Guide
Page 82
...Connected digital camera or video camcorder is not supported by this printer. You may also have to select a PictBridge compliant print mode on the device before reconnecting it to the printer. Press the RESUME/CANCEL button on the printer to dismiss the error, then load two ... above measures, if the problem continues after connecting the device to the printer. Before the ink absorber becomes completely full, contact a Canon Service representative. (You will need to replace a particular part of the printer.) Nine flashes: No response from a PictBridge compliant device, depending on ...
...Connected digital camera or video camcorder is not supported by this printer. You may also have to select a PictBridge compliant print mode on the device before reconnecting it to the printer. Press the RESUME/CANCEL button on the printer to dismiss the error, then load two ... above measures, if the problem continues after connecting the device to the printer. Before the ink absorber becomes completely full, contact a Canon Service representative. (You will need to replace a particular part of the printer.) Nine flashes: No response from a PictBridge compliant device, depending on ...

iP4500 series Quick Start Guide
Page 91
... Default (Exif Print), On, Off, VIVID*, NR (Noise Reduction)*, Face*, Red eye* * If using a Canon PictBridge compliant device, you can select it can damage the printer. USB 2.0 High Speed* * A computer that complies with USB 2.0 Hi-Speed standard is only available with a...Standby: Approx. 1.2 W OFF: Approx. 1.0 W Approx. 17.5 (W) x 11.9 (D) x 6.3 (H) inches / Approx. 445 (W) x 303 (D) x 160 (H) mm * With the Paper Support and Paper Output Tray retracted. Default (Photo Paper Plus Glossy), Photo (Photo Paper Plus Glossy, Glossy Photo Paper, Glossy Photo Paper "Everyday use", Photo Paper...
... Default (Exif Print), On, Off, VIVID*, NR (Noise Reduction)*, Face*, Red eye* * If using a Canon PictBridge compliant device, you can select it can damage the printer. USB 2.0 High Speed* * A computer that complies with USB 2.0 Hi-Speed standard is only available with a...Standby: Approx. 1.2 W OFF: Approx. 1.0 W Approx. 17.5 (W) x 11.9 (D) x 6.3 (H) inches / Approx. 445 (W) x 303 (D) x 160 (H) mm * With the Paper Support and Paper Output Tray retracted. Default (Photo Paper Plus Glossy), Photo (Photo Paper Plus Glossy, Glossy Photo Paper, Glossy Photo Paper "Everyday use", Photo Paper...
iP4500 series Quick Start Guide
Page 98
... AS A GIFT, AND STATES YOUR EXCLUSIVE REMEDY. If the problem cannot be obtained from state to state. * Support program specifics are subject to the Canon USA repair facility. After receipt of the problem. Your Product must include street address). InstantExchange Service exchanges your Product ...and only in the continental United States, Alaska and Hawaii during the limited warranty period, Canon USA offers two hardware support options: Authorized Service Facility Carry-In / Mail-In Service Canon USA's Carry-In/Mail-In Service provides repair or exchange, at 1-800828-4040, or...
... AS A GIFT, AND STATES YOUR EXCLUSIVE REMEDY. If the problem cannot be obtained from state to state. * Support program specifics are subject to the Canon USA repair facility. After receipt of the problem. Your Product must include street address). InstantExchange Service exchanges your Product ...and only in the continental United States, Alaska and Hawaii during the limited warranty period, Canon USA offers two hardware support options: Authorized Service Facility Carry-In / Mail-In Service Canon USA's Carry-In/Mail-In Service provides repair or exchange, at 1-800828-4040, or...
iP4500 series Easy Setup Instructions
Page 1
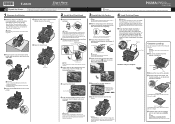
Open the Rear Tray and extend the Paper Support Extension. Be careful not to "Cleaning Your Printer" in order from the Rear Tray. Photo Printer Important When cleaning the exterior of the ink tank. Protective Cap Ink Port Electrical Contacts Important • Do not touch the electrical ... Top Cover e Open the Inner Cover. 2 Install the Print Head a Remove the Print Head from the bottom of the cassette. this printer, refer to the colored label. c Insert the ink tank into the cassette with the print side facing DOWN. Load two sheets of supplied paper (MP-101) ...
Open the Rear Tray and extend the Paper Support Extension. Be careful not to "Cleaning Your Printer" in order from the Rear Tray. Photo Printer Important When cleaning the exterior of the ink tank. Protective Cap Ink Port Electrical Contacts Important • Do not touch the electrical ... Top Cover e Open the Inner Cover. 2 Install the Print Head a Remove the Print Head from the bottom of the cassette. this printer, refer to the colored label. c Insert the ink tank into the cassette with the print side facing DOWN. Load two sheets of supplied paper (MP-101) ...
iP4500 series Easy Setup Instructions
Page 2
... m When the User Registration screen appears, click Next. The printer driver, On-screen Manuals, and application software are not supported, do not know your product. Note • The pattern ...the software. k When the Setup Complete screen appears, click Next. Serial Number n When the PIXMA Extended Survey Program screen appears, confirm the message. "Windows Vista" is turned on the inside...other countries. and other countries. a Be sure to display explanations of Canon printers. USB b Turn on the desktop . h Read the License Agreement carefully and click Yes. ...
... m When the User Registration screen appears, click Next. The printer driver, On-screen Manuals, and application software are not supported, do not know your product. Note • The pattern ...the software. k When the Setup Complete screen appears, click Next. Serial Number n When the PIXMA Extended Survey Program screen appears, confirm the message. "Windows Vista" is turned on the inside...other countries. and other countries. a Be sure to display explanations of Canon printers. USB b Turn on the desktop . h Read the License Agreement carefully and click Yes. ...


