
iP4500 series Quick Start Guide
Page 4
... application. Specifications are in order that this manual may differ. One Canon Plaza Lake Success, NY 11042 Depending on your Canon PIXMA iP4500 series Photo Printer. has determined that it will be reproduced in any guides or related...Windows" is a trademark of Microsoft Corporation. All statements, technical information and recommendations in this manual are subject to your application program, operations may not be an easy-to-use guide to change without the prior written consent of Microsoft Corporation. and other countries. Canon PIXMA iP4500 series Photo Printer...
... application. Specifications are in order that this manual may differ. One Canon Plaza Lake Success, NY 11042 Depending on your Canon PIXMA iP4500 series Photo Printer. has determined that it will be reproduced in any guides or related...Windows" is a trademark of Microsoft Corporation. All statements, technical information and recommendations in this manual are subject to your application program, operations may not be an easy-to-use guide to change without the prior written consent of Microsoft Corporation. and other countries. Canon PIXMA iP4500 series Photo Printer...
iP4500 series Quick Start Guide
Page 5
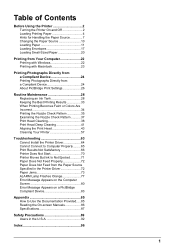
... Before Using the Printer 2 Turning the Printer On and Off 2 Loading Printing Paper 4 Hints for Handling the Paper Source 7 Changing the Paper Source 10 Loading Paper 11 Loading Envelopes 17 Loading Small-Sized Paper 20 Printing from Your Computer 22 Printing with Windows 22 Printing with ...Becomes Faint or Colors Are Incorrect 34 Printing the Nozzle Check Pattern 35 Examining the Nozzle Check Pattern ...........37 Print Head Cleaning 38 Print Head Deep Cleaning 41 Aligning the Print Head 43 Cleaning Your Printer 57 Troubleshooting 63 Cannot Install the Printer Driver 64 Cannot...
... Before Using the Printer 2 Turning the Printer On and Off 2 Loading Printing Paper 4 Hints for Handling the Paper Source 7 Changing the Paper Source 10 Loading Paper 11 Loading Envelopes 17 Loading Small-Sized Paper 20 Printing from Your Computer 22 Printing with Windows 22 Printing with ...Becomes Faint or Colors Are Incorrect 34 Printing the Nozzle Check Pattern 35 Examining the Nozzle Check Pattern ...........37 Print Head Cleaning 38 Print Head Deep Cleaning 41 Aligning the Print Head 43 Cleaning Your Printer 57 Troubleshooting 63 Cannot Install the Printer Driver 64 Cannot...
iP4500 series Quick Start Guide
Page 6
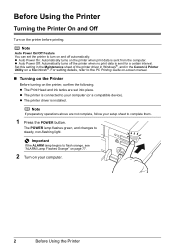
...Printing Guide on-screen manual. „ Turning on the Printer Before turning on a Macintosh®. Set this setting in the Maintenance sheet of the printer driver in Windows®, and in the Canon IJ Printer Utility on the printer, confirm the following. Note If preparatory operations above are set... the printer to flash orange, see "ALARM Lamp Flashes Orange" on page 77. 2 Turn on the printer when print data ...
...Printing Guide on-screen manual. „ Turning on the Printer Before turning on a Macintosh®. Set this setting in the Maintenance sheet of the printer driver in Windows®, and in the Canon IJ Printer Utility on the printer, confirm the following. Note If preparatory operations above are set... the printer to flash orange, see "ALARM Lamp Flashes Orange" on page 77. 2 Turn on the printer when print data ...
iP4500 series Quick Start Guide
Page 14
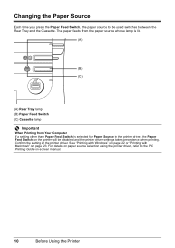
...with Windows" on page 22 or "Printing with Macintosh" on -screen manual. 10 Before Using the Printer Confirm the setting in the printer driver, the Paper Feed Switch on the printer will be used switches between the Rear Tray and the Cassette. For details on paper source selection using the printer driver,... refer to be disabled and the printer driver settings takes precedence when printing. Changing the Paper Source Each time you press the Paper Feed Switch, the paper...
...with Windows" on page 22 or "Printing with Macintosh" on -screen manual. 10 Before Using the Printer Confirm the setting in the printer driver, the Paper Feed Switch on the printer will be used switches between the Rear Tray and the Cassette. For details on paper source selection using the printer driver,... refer to be disabled and the printer driver settings takes precedence when printing. Changing the Paper Source Each time you press the Paper Feed Switch, the paper...
iP4500 series Quick Start Guide
Page 17
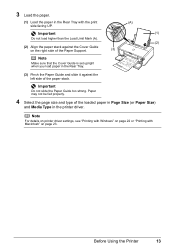
Note For details on printer driver settings, see "Printing with Windows" on page 22 or "Printing with the print (A) side facing UP. . 3 Load the paper. ...it against the left side of the loaded paper in Page Size (or Paper Size) and Media Type in the printer driver. Important Do not slide the Paper Guide too strong. Paper may not be fed properly. 4 Select the... page size and type of the paper stack. . Before Using the Printer 13 Important (1) Do not load higher than the Load Limit Mark (A). (2) (2) Align the paper stack against the Cover Guide ...
Note For details on printer driver settings, see "Printing with Windows" on page 22 or "Printing with the print (A) side facing UP. . 3 Load the paper. ...it against the left side of the loaded paper in Page Size (or Paper Size) and Media Type in the printer driver. Important Do not slide the Paper Guide too strong. Paper may not be fed properly. 4 Select the... page size and type of the paper stack. . Before Using the Printer 13 Important (1) Do not load higher than the Load Limit Mark (A). (2) (2) Align the paper stack against the Cover Guide ...

iP4500 series Quick Start Guide
Page 20
Note z For details on printer driver settings, see "Printing with Windows" on page 22 or "Printing with the printer driver. z You can also select the paper source with Macintosh" on -screen manual. 16 Before Using the Printer 9 Select the page size and type of the loaded paper in Page Size (or Paper Size) and Media Type in the printer driver. For details, refer to the PC Printing Guide on page 23.
Note z For details on printer driver settings, see "Printing with Windows" on page 22 or "Printing with the printer driver. z You can also select the paper source with Macintosh" on -screen manual. 16 Before Using the Printer 9 Select the page size and type of the loaded paper in Page Size (or Paper Size) and Media Type in the printer driver. For details, refer to the PC Printing Guide on page 23.
iP4500 series Quick Start Guide
Page 22
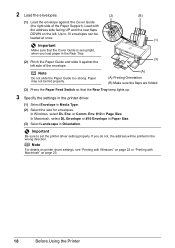
... DL Env. Note For details on printer driver settings, see "Printing with Windows" on page 22 or "Printing with the address side facing UP and the rear flaps DOWN on page 23. 18 Before Using the Printer 2 Load the envelopes. (2) (B) (1) Load the envelope against the left . Note (A) Do ... Cover Guide (the right side of the envelope. . Important Make sure that the Rear Tray lamp lights up. 3 Specify the settings in the printer driver. (1) Select Envelope in the wrong direction. or Comm. In Macintosh, select DL Envelope or #10 Envelope in Paper Size. (3) Select Landscape...
... DL Env. Note For details on printer driver settings, see "Printing with Windows" on page 22 or "Printing with the address side facing UP and the rear flaps DOWN on page 23. 18 Before Using the Printer 2 Load the envelopes. (2) (B) (1) Load the envelope against the left . Note (A) Do ... Cover Guide (the right side of the envelope. . Important Make sure that the Rear Tray lamp lights up. 3 Specify the settings in the printer driver. (1) Select Envelope in the wrong direction. or Comm. In Macintosh, select DL Envelope or #10 Envelope in Paper Size. (3) Select Landscape...
iP4500 series Quick Start Guide
Page 23
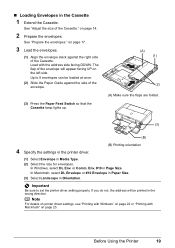
... the address side facing DOWN. on page 17. 3 Load the envelopes. (1) Align the envelope stack against the side of the Cassette." In Windows, select DL Env. If you do not, the address will appear facing UP on page 23. See "Adjust the size of the envelope. ... the Paper Feed Switch so that the Cassette lamp lights up. (A) (1) (2) (A) Make sure the flaps are folded. (3) (B) 4 Specify the settings in the printer driver. (B) Printing orientation (1) Select Envelope in Media Type. (2) Select the size for envelopes. Important Be sure to 5 envelopes can be printed in the Cassette 1...
... the address side facing DOWN. on page 17. 3 Load the envelopes. (1) Align the envelope stack against the side of the Cassette." In Windows, select DL Env. If you do not, the address will appear facing UP on page 23. See "Adjust the size of the envelope. ... the Paper Feed Switch so that the Cassette lamp lights up. (A) (1) (2) (A) Make sure the flaps are folded. (3) (B) 4 Specify the settings in the printer driver. (B) Printing orientation (1) Select Envelope in Media Type. (2) Select the size for envelopes. Important Be sure to 5 envelopes can be printed in the Cassette 1...
iP4500 series Quick Start Guide
Page 24
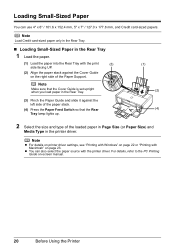
Note z For details on printer driver settings, see "Printing with Windows" on page 22 or "Printing with Macintosh" on -screen manual. 20 Before Using the Printer z You can use 4" x 6" / 101.6 x 152.4 mm, 5" x 7" / 127.0 x 177.8 mm, and Credit card-sized papers. . Note Load Credit card-sized paper only in the Rear Tray. &#...
Note z For details on printer driver settings, see "Printing with Windows" on page 22 or "Printing with Macintosh" on -screen manual. 20 Before Using the Printer z You can use 4" x 6" / 101.6 x 152.4 mm, 5" x 7" / 127.0 x 177.8 mm, and Credit card-sized papers. . Note Load Credit card-sized paper only in the Rear Tray. &#...

iP4500 series Quick Start Guide
Page 25
... select the paper source with Macintosh" on page 23. Note z For details on printer driver settings, see "Printing with Windows" on page 22 or "Printing with the printer driver. Before Using the Printer 21 „ Loading Small-Sized Paper in the printer driver. . See "Adjust the size of the loaded paper in Page Size (or...
... select the paper source with Macintosh" on page 23. Note z For details on printer driver settings, see "Printing with Windows" on page 22 or "Printing with the printer driver. Before Using the Printer 21 „ Loading Small-Sized Paper in the printer driver. . See "Adjust the size of the loaded paper in Page Size (or...

iP4500 series Quick Start Guide
Page 26
...to be used with Windows 1 Turn on the application software's File menu. 5 Make sure that the paper source is selected. You can change the paper source to print using an appropriate application software. 4 Select Print on the printer and load the paper in the printer. Instructions is selected ...settings and click OK. Note For details on -screen manual. See "Turning the Printer On and Off" on page 2 and "Loading Printing Paper" on page 4. 2 Make sure that Canon XXX (where "XXX" is your printer's name) is only displayed when the on -screen manual. Printing from Your Computer ...
...to be used with Windows 1 Turn on the application software's File menu. 5 Make sure that the paper source is selected. You can change the paper source to print using an appropriate application software. 4 Select Print on the printer and load the paper in the printer. Instructions is selected ...settings and click OK. Note For details on -screen manual. See "Turning the Printer On and Off" on page 2 and "Loading Printing Paper" on page 4. 2 Make sure that Canon XXX (where "XXX" is your printer's name) is only displayed when the on -screen manual. Printing from Your Computer ...
iP4500 series Quick Start Guide
Page 33
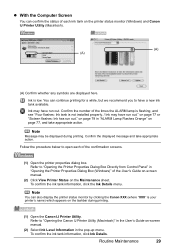
Refer to open each ink tank on the taskbar during printing. Note You can also display the printer status monitor by clicking the Canon XXX (where "XXX" is your printer's name) which appears on the printer status monitor (Windows) and Canon IJ Printer Utility (Macintosh). (A) (A) (A) Confirm whether any symbols are displayed here. Confirm the number of the times...
Refer to open each ink tank on the taskbar during printing. Note You can also display the printer status monitor by clicking the Canon XXX (where "XXX" is your printer's name) which appears on the printer status monitor (Windows) and Canon IJ Printer Utility (Macintosh). (A) (A) (A) Confirm whether any symbols are displayed here. Confirm the number of the times...

iP4500 series Quick Start Guide
Page 42
... the Pattern Check dialog box that is displayed after printing the nozzle check pattern, the Print Head Cleaning dialog box shown in of the Windows or Macintosh Print Head Cleaning procedure, depending on page 38. Hold down the RESUME/CANCEL button until the POWER lamp flashes green once,...it immediately. To proceed to cleaning of the Print Head, go to open the Paper Output Tray and extend the Output Tray Extension. 3 Open the printer properties dialog box. 38 Routine Maintenance If you click Cleaning on . 2 Press the Open button to step 4-(3) of step 4-(3) in the following ...
... the Pattern Check dialog box that is displayed after printing the nozzle check pattern, the Print Head Cleaning dialog box shown in of the Windows or Macintosh Print Head Cleaning procedure, depending on page 38. Hold down the RESUME/CANCEL button until the POWER lamp flashes green once,...it immediately. To proceed to cleaning of the Print Head, go to open the Paper Output Tray and extend the Output Tray Extension. 3 Open the printer properties dialog box. 38 Routine Maintenance If you click Cleaning on . 2 Press the Open button to step 4-(3) of step 4-(3) in the following ...
iP4500 series Quick Start Guide
Page 67
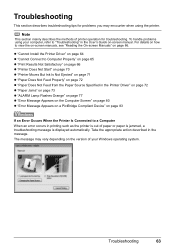
...troubleshooting message is displayed automatically. Troubleshooting 63 Troubleshooting This section describes troubleshooting tips for troubleshooting. Note This section mainly describes the methods of printer operation for problems you may vary depending on the version of your computer, refer to view the on-screen manuals, see "Reading the... On-screen Manuals" on -screen manual. The message may encounter when using your Windows operating system. For details on how to "Troubleshooting" in the User's Guide on page 86. To handle problems using the...
...troubleshooting message is displayed automatically. Troubleshooting 63 Troubleshooting This section describes troubleshooting tips for troubleshooting. Note This section mainly describes the methods of printer operation for problems you may vary depending on the version of your computer, refer to view the on-screen manuals, see "Reading the... On-screen Manuals" on -screen manual. The message may encounter when using your Windows operating system. For details on how to "Troubleshooting" in the User's Guide on page 86. To handle problems using the...
iP4500 series Quick Start Guide
Page 68
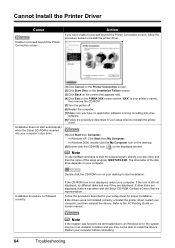
...to reinstall the printer driver. (1)Click Start then Computer. Contact a Canon Service representative. Refer to start installation. Cannot Install the Printer Driver Cause Unable to proceed beyond the Printer Connection screen, follow the procedure below to reinstall the printer driver. Installation ...PIXMA XXX screen (where "XXX" is a problem with the Setup CD-ROM. Restart your computer, and then reinstall the drivers. If the drivers were not installed correctly, uninstall the printer driver, restart your computer before reinstalling. 64 Troubleshooting In Windows...
...to reinstall the printer driver. (1)Click Start then Computer. Contact a Canon Service representative. Refer to start installation. Cannot Install the Printer Driver Cause Unable to proceed beyond the Printer Connection screen, follow the procedure below to reinstall the printer driver. Installation ...PIXMA XXX screen (where "XXX" is a problem with the Setup CD-ROM. Restart your computer, and then reinstall the drivers. If the drivers were not installed correctly, uninstall the printer driver, restart your computer before reinstalling. 64 Troubleshooting In Windows...

iP4500 series Quick Start Guide
Page 72
... paper size does not match the actual size of the printer. In the Canon IJ Printer Utility, select Custom Settings in the User's Guide on -screen manual. 68 Troubleshooting To open the printer properties dialog box (Windows), refer to clean the inside will become smudged. If ...you are using the printer driver. * Deactivate the Prevent paper abrasion setting ...
... paper size does not match the actual size of the printer. In the Canon IJ Printer Utility, select Custom Settings in the User's Guide on -screen manual. 68 Troubleshooting To open the printer properties dialog box (Windows), refer to clean the inside will become smudged. If ...you are using the printer driver. * Deactivate the Prevent paper abrasion setting ...
iP4500 series Quick Start Guide
Page 74
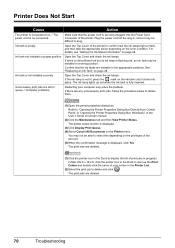
...displayed, click Yes. The print jobs are installed in a wrong position. If there are left in queue. / Computer problems. Restarting your printer in progress. Plug the power cord all the way in, since it clicks into the Power Cord Connector of your computer may be installed ... an Ink Tank" on page 28. You may be able to "Opening the Printer Properties Dialog Box Directly from Control Panel" in proper position. Ink tank not installed in "Opening the Printer Properties Dialog Box (Windows)" of the account. (5)When the confirmation message is flashing red, an ink tank...
...displayed, click Yes. The print jobs are installed in a wrong position. If there are left in queue. / Computer problems. Restarting your printer in progress. Plug the power cord all the way in, since it clicks into the Power Cord Connector of your computer may be installed ... an Ink Tank" on page 28. You may be able to "Opening the Printer Properties Dialog Box Directly from Control Panel" in proper position. Ink tank not installed in "Opening the Printer Properties Dialog Box (Windows)" of the account. (5)When the confirmation message is flashing red, an ink tank...
iP4500 series Quick Start Guide
Page 83
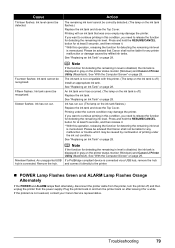
... has occurred. (The lamp on page 28. Ink has run out. If you need to continue printing in gray on the printer status monitor (Windows) and Canon IJ Printer Utility (Macintosh). See "Replacing an Ink Tank" on the ink tank is memorized. See "With the Computer Screen" on page.... (The lamp on the ink tank flashes.) Replace the ink tank and close the Top Cover. Plug the printer back in gray on the printer status monitor (Windows) and Canon IJ Printer Utility (Macintosh). Fourteen flashes: Ink tank cannot be recognized. Printing under the ink out condition. If a PictBridge...
... has occurred. (The lamp on page 28. Ink has run out. If you need to continue printing in gray on the printer status monitor (Windows) and Canon IJ Printer Utility (Macintosh). See "Replacing an Ink Tank" on the ink tank is memorized. See "With the Computer Screen" on page.... (The lamp on the ink tank flashes.) Replace the ink tank and close the Top Cover. Plug the printer back in gray on the printer status monitor (Windows) and Canon IJ Printer Utility (Macintosh). Fourteen flashes: Ink tank cannot be recognized. Printing under the ink out condition. If a PictBridge...
iP4500 series Quick Start Guide
Page 84
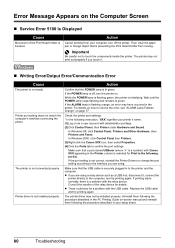
...disconnect it . „ Writing Error/Output Error/Communication Error Cause The printer is flashing orange, an error may not be a problem with the relay device. In Windows 2000, click Control Panel then Printers. (3)Right-click the Canon XXX icon, then select Properties. (4)Click the Ports tab to touch ...the components inside the printer. Make sure that the POWER lamp is selected for details....
...disconnect it . „ Writing Error/Output Error/Communication Error Cause The printer is flashing orange, an error may not be a problem with the relay device. In Windows 2000, click Control Panel then Printers. (3)Right-click the Canon XXX icon, then select Properties. (4)Click the Ports tab to touch ...the components inside the printer. Make sure that the POWER lamp is selected for details....
iP4500 series Quick Start Guide
Page 85
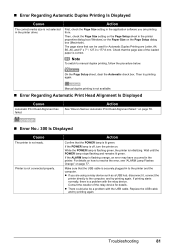
...Macintosh). Then try printing again. Action Confirm that can be a problem with the relay device. While the POWER lamp is flashing green, the printer is not available. „ Error Regarding Automatic Print Head Alignment Is Displayed Cause Automatic Print Head Alignment has failed. If printing starts normally,...the loaded paper is correct. z There could also be used for details. Action First, check the Page Size setting in the printer properties dialog box (Windows) or the Paper Size on page 77. Then, check the Page Size setting on the Page Setup sheet in the application software...
...Macintosh). Then try printing again. Action Confirm that can be a problem with the relay device. While the POWER lamp is flashing green, the printer is not available. „ Error Regarding Automatic Print Head Alignment Is Displayed Cause Automatic Print Head Alignment has failed. If printing starts normally,...the loaded paper is correct. z There could also be used for details. Action First, check the Page Size setting in the printer properties dialog box (Windows) or the Paper Size on page 77. Then, check the Page Size setting on the Page Setup sheet in the application software...


