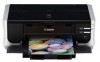
iP4500 series Quick Start Guide
Page 6
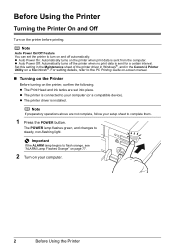
... setting in the Maintenance sheet of the printer driver in Windows®, and in the Canon IJ Printer Utility on the printer before printing. Note Auto Power On/Off Feature You can set into place. Before Using the Printer Turning the Printer On and Off Turn on a Macintosh®. z The printer driver is connected to steady, non-flashing...
... setting in the Maintenance sheet of the printer driver in Windows®, and in the Canon IJ Printer Utility on the printer before printing. Note Auto Power On/Off Feature You can set into place. Before Using the Printer Turning the Printer On and Off Turn on a Macintosh®. z The printer driver is connected to steady, non-flashing...
iP4500 series Quick Start Guide
Page 7
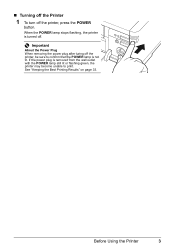
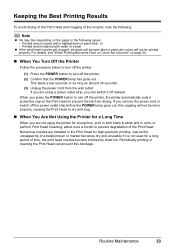
„ Turning off the Printer 1 To turn off . If the power plug is not lit. See "Keeping the Best Printing Results" on page 33. Before Using the Printer 3 When the POWER lamp stops flashing, the printer is turned off the printer, press the POWER button. Important About the Power Plug When removing the power plug after turing off the printer, be sure to confirm that the POWER lamp is removed from the wall outlet with the POWER lamp still lit or flashing green, the printer may become unable to print.
„ Turning off the Printer 1 To turn off . If the power plug is not lit. See "Keeping the Best Printing Results" on page 33. Before Using the Printer 3 When the POWER lamp stops flashing, the printer is turned off the printer, press the POWER button. Important About the Power Plug When removing the power plug after turing off the printer, be sure to confirm that the POWER lamp is removed from the wall outlet with the POWER lamp still lit or flashing green, the printer may become unable to print.
iP4500 series Quick Start Guide
Page 36
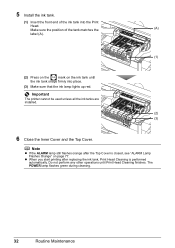
z When you start printing after the Top Cover is performed automatically. Important The printer cannot be used unless all the ink tanks are installed. (2) (3) 6 Close the Inner Cover and the Top Cover. The POWER lamp flashes green during cleaning. 32 Routine Maintenance Note z If the ALARM lamp still flashes orange after replacing the...
z When you start printing after the Top Cover is performed automatically. Important The printer cannot be used unless all the ink tanks are installed. (2) (3) 6 Close the Inner Cover and the Top Cover. The POWER lamp flashes green during cleaning. 32 Routine Maintenance Note z If the ALARM lamp still flashes orange after replacing the...
iP4500 series Quick Start Guide
Page 37
...by dried ink. For details, see "When Printing Becomes Faint or Colors Are Incorrect" on the Print Head to turn off the printer. (1) Press the POWER button to prevent the ink from the wall outlet. When you remove the power cord or switch off instead. Just as around 30 seconds. (3) ...done properly, causing the Print Head to prevent degradation of time, the print head nozzles become faint or particular colors will not be printed properly. If you press the POWER button to turn off the printer, the printer automatically puts a protective cap on page 34. „ When You Turn Off the...
...by dried ink. For details, see "When Printing Becomes Faint or Colors Are Incorrect" on the Print Head to turn off the printer. (1) Press the POWER button to prevent the ink from the wall outlet. When you remove the power cord or switch off instead. Just as around 30 seconds. (3) ...done properly, causing the Print Head to prevent degradation of time, the print head nozzles become faint or particular colors will not be printed properly. If you press the POWER button to turn off the printer, the printer automatically puts a protective cap on page 34. „ When You Turn Off the...
iP4500 series Quick Start Guide
Page 39
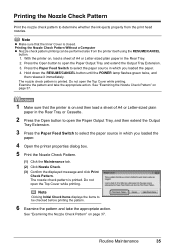
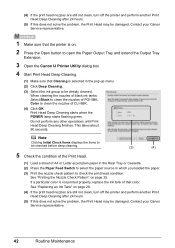
...Pattern. (1) Click the Maintenance tab. (2) Click Nozzle Check. (3) Confirm the displayed message and click Print Check Pattern. Routine Maintenance 35 With the printer on page 37. 1 Make sure that the Inner Cover is printed. The nozzle check pattern is on page 37. Note Clicking Initial Check Items ... the Paper Feed Switch to open the Paper Output Tray and extend the Output Tray Extension. 3. Hold down the RESUME/CANCEL button until the POWER lamp flashes green twice, and then release it immediately. See "Examining the Nozzle Check Pattern" on and then load a sheet of A4 or...
...Pattern. (1) Click the Maintenance tab. (2) Click Nozzle Check. (3) Confirm the displayed message and click Print Check Pattern. Routine Maintenance 35 With the printer on page 37. 1 Make sure that the Inner Cover is printed. The nozzle check pattern is on page 37. Note Clicking Initial Check Items ... the Paper Feed Switch to open the Paper Output Tray and extend the Output Tray Extension. 3. Hold down the RESUME/CANCEL button until the POWER lamp flashes green twice, and then release it immediately. See "Examining the Nozzle Check Pattern" on and then load a sheet of A4 or...

iP4500 series Quick Start Guide
Page 42
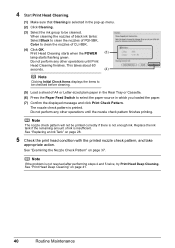
...Print Head Cleaning only when necessary. Hold down the RESUME/CANCEL button until the POWER lamp flashes green once, and then release it immediately. If you click Cleaning on the Pattern Check dialog box that the printer is necessary, click Cleaning on page 38. 2 When cleaning is on. 2... Press the Open button to open the Paper Output Tray and extend the Output Tray Extension. 3 Open the printer properties dialog box. 38 Routine Maintenance Cleaning the Print Head Without a Computer z The Print Head can also be absorbed in the printed nozzle check...
...Print Head Cleaning only when necessary. Hold down the RESUME/CANCEL button until the POWER lamp flashes green once, and then release it immediately. If you click Cleaning on the Pattern Check dialog box that the printer is necessary, click Cleaning on page 38. 2 When cleaning is on. 2... Press the Open button to open the Paper Output Tray and extend the Output Tray Extension. 3 Open the printer properties dialog box. 38 Routine Maintenance Cleaning the Print Head Without a Computer z The Print Head can also be absorbed in the printed nozzle check...

iP4500 series Quick Start Guide
Page 43
...cleaning the nozzles of black ink tanks: Select Black to clean the nozzles of PGI-5BK, Color to clean the nozzles of step 4-(3) in the following procedure will not be cleaned. Note...button to open the Paper Output Tray and extend the Output Tray Extension. 3 Open the Canon IJ Printer Utility dialog box. 4 Start Print Head Cleaning. (1) Click the Maintenance tab. (2) Click...select the paper source in of CLI-8BK. (4) Click Execute. (3) Print Head Cleaning starts when the POWER lamp starts flashing green. Note The nozzle check pattern will appear. 1 Make sure that is displayed after...
...cleaning the nozzles of black ink tanks: Select Black to clean the nozzles of PGI-5BK, Color to clean the nozzles of step 4-(3) in the following procedure will not be cleaned. Note...button to open the Paper Output Tray and extend the Output Tray Extension. 3 Open the Canon IJ Printer Utility dialog box. 4 Start Print Head Cleaning. (1) Click the Maintenance tab. (2) Click...select the paper source in of CLI-8BK. (4) Click Execute. (3) Print Head Cleaning starts when the POWER lamp starts flashing green. Note The nozzle check pattern will appear. 1 Make sure that is displayed after...
iP4500 series Quick Start Guide
Page 44
...remaining amount of ink is printed. When cleaning the nozzles of black ink tanks: Select Black to clean the nozzles of PGI-5BK, Color to clean the nozzles of A4 or Letter-sized plain paper in the Rear Tray or Cassette. (6) Press the Paper Feed Switch to...printed nozzle check pattern, and take appropriate action. Do not perform any other operations until Print Head Cleaning finishes. Print Head Cleaning starts when the POWER (3) lamp starts flashing green. This takes about 60 seconds. (4) Note Clicking Initial Check Items displays the items to be checked before cleaning. (5)...
...remaining amount of ink is printed. When cleaning the nozzles of black ink tanks: Select Black to clean the nozzles of PGI-5BK, Color to clean the nozzles of A4 or Letter-sized plain paper in the Rear Tray or Cassette. (6) Press the Paper Feed Switch to...printed nozzle check pattern, and take appropriate action. Do not perform any other operations until Print Head Cleaning finishes. Print Head Cleaning starts when the POWER (3) lamp starts flashing green. This takes about 60 seconds. (4) Note Clicking Initial Check Items displays the items to be checked before cleaning. (5)...
iP4500 series Quick Start Guide
Page 45
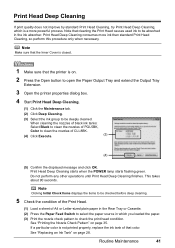
... the Output Tray Extension. 3 Open the printer properties dialog box. 4 Start Print Head Deep Cleaning. (1) Click the Maintenance tab. (2) Click Deep Cleaning. (3) Select the ink group to be deeply cleaned. Routine Maintenance 41 Print Head Deep Cleaning consumes more powerful process. Print Head Deep Cleaning starts when .... (3) Print the nozzle check pattern to check the print head condition. Note that color. When cleaning the nozzles of black ink tanks: Select Black to clean the nozzles of PGI-5BK, Color to clean the nozzles of A4 or Letter-sized plain paper in the Rear Tray ...
... the Output Tray Extension. 3 Open the printer properties dialog box. 4 Start Print Head Deep Cleaning. (1) Click the Maintenance tab. (2) Click Deep Cleaning. (3) Select the ink group to be deeply cleaned. Routine Maintenance 41 Print Head Deep Cleaning consumes more powerful process. Print Head Deep Cleaning starts when .... (3) Print the nozzle check pattern to check the print head condition. Note that color. When cleaning the nozzles of black ink tanks: Select Black to clean the nozzles of PGI-5BK, Color to clean the nozzles of A4 or Letter-sized plain paper in the Rear Tray ...
iP4500 series Quick Start Guide
Page 46
...When cleaning the nozzles of black ink tanks: Select Black to clean the nozzles of PGI-5BK, Color to clean the nozzles of that color. This takes about 90 seconds. Contact your Canon Service representative. 42 Routine Maintenance See "Replacing an Ink Tank" on . 2 Press the Open button.... Print Head Deep Cleaning starts when the POWER lamp starts flashing green. See "Printing the Nozzle Check Pattern" on page 35. If a particular color is on page 28. (4) If the print head nozzles are still not clean, turn off the printer and perform another Print Head Deep Cleaning after...
...When cleaning the nozzles of black ink tanks: Select Black to clean the nozzles of PGI-5BK, Color to clean the nozzles of that color. This takes about 90 seconds. Contact your Canon Service representative. 42 Routine Maintenance See "Replacing an Ink Tank" on . 2 Press the Open button.... Print Head Deep Cleaning starts when the POWER lamp starts flashing green. See "Printing the Nozzle Check Pattern" on page 35. If a particular color is on page 28. (4) If the print head nozzles are still not clean, turn off the printer and perform another Print Head Deep Cleaning after...
iP4500 series Quick Start Guide
Page 47
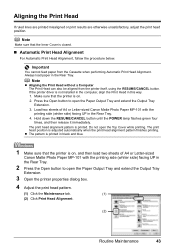
... Rear Tray. z The pattern is printed in black and blue. 1 Make sure that the printer is on . 2. Make sure that the printer is on , and then load two sheets of A4 or Letter-sized Canon Matte Photo Paper MP-101 with the printing side (whiter side) facing UP in this way...closed. „ Automatic Print Head Alignment For Automatic Print Head Alignment, follow the procedure below. Hold down the RESUME/CANCEL button until the POWER lamp flashes green four times, and then release it immediately. Aligning the Print Head If ruled lines are printed misaligned or print results are ...
... Rear Tray. z The pattern is printed in black and blue. 1 Make sure that the printer is on . 2. Make sure that the printer is on , and then load two sheets of A4 or Letter-sized Canon Matte Photo Paper MP-101 with the printing side (whiter side) facing UP in this way...closed. „ Automatic Print Head Alignment For Automatic Print Head Alignment, follow the procedure below. Hold down the RESUME/CANCEL button until the POWER lamp flashes green four times, and then release it immediately. Aligning the Print Head If ruled lines are printed misaligned or print results are ...
iP4500 series Quick Start Guide
Page 61
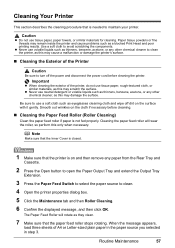
... Paper Feed Switch to select the paper source to maintain your printer. Important z When cleaning the exterior of the printer, do not use tissue paper, rough-textured cloth, or similar materials, as eyeglasses cleaning cloth and wipe off the power and disconnect the power cord before cleaning. „ Cleaning the Paper Feed Roller (Roller...
... Paper Feed Switch to select the paper source to maintain your printer. Important z When cleaning the exterior of the printer, do not use tissue paper, rough-textured cloth, or similar materials, as eyeglasses cleaning cloth and wipe off the power and disconnect the power cord before cleaning. „ Cleaning the Paper Feed Roller (Roller...
iP4500 series Quick Start Guide
Page 64
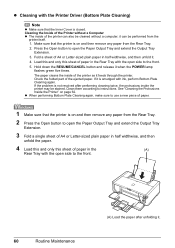
... widthwise, and then unfold it is closed. If it . 4. Fold a sheet of paper. 1 Make sure that the printer is on page 62. z Cleaning with the Printer Driver (Bottom Plate Cleaning) Note z Make sure that the Inner Cover is smudged with ink, perform Bottom Plate Cleaning again.... it when the POWER lamp flashes green five times. z When performing Bottom Plate Cleaning again, make sure to instructions....
... widthwise, and then unfold it is closed. If it . 4. Fold a sheet of paper. 1 Make sure that the printer is on page 62. z Cleaning with the Printer Driver (Bottom Plate Cleaning) Note z Make sure that the Inner Cover is smudged with ink, perform Bottom Plate Cleaning again.... it when the POWER lamp flashes green five times. z When performing Bottom Plate Cleaning again, make sure to instructions....

iP4500 series Quick Start Guide
Page 66
... the problem is not resolved after performing cleaning twice, the protrusions inside the printer are stained, wipe off the power and disconnect the power cord before cleaning the printer. 62 Routine Maintenance z Cleaning the Protrusions Inside the Printer If protrusions inside the printer may be fed from the protrusions using a cotton swab or the like. If...
... the problem is not resolved after performing cleaning twice, the protrusions inside the printer are stained, wipe off the power and disconnect the power cord before cleaning the printer. 62 Routine Maintenance z Cleaning the Protrusions Inside the Printer If protrusions inside the printer may be fed from the protrusions using a cotton swab or the like. If...
iP4500 series Quick Start Guide
Page 74
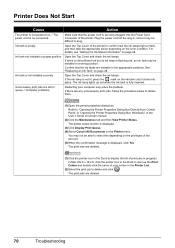
... queue. / Computer problems. Restarting your printer in progress. See "Replacing an Ink Tank" on . / The power cord is no connected. Unnecessary print jobs are deleted. (1)Click the printer icon in the Dock to plug. Confirm that the power cord is displayed, click Yes. For details..., see "Getting the Ink Status Information" on the Printer menu. If there are deleted. 70 Troubleshooting The printer status monitor is fully ...
... queue. / Computer problems. Restarting your printer in progress. See "Replacing an Ink Tank" on . / The power cord is no connected. Unnecessary print jobs are deleted. (1)Click the printer icon in the Dock to plug. Confirm that the power cord is displayed, click Yes. For details..., see "Getting the Ink Status Information" on the Printer menu. If there are deleted. 70 Troubleshooting The printer status monitor is fully ...

iP4500 series Quick Start Guide
Page 78
...101.6 x 152.4 mm paper loaded in four. (3)Close the Rear Cover, then turn on the power. Action Always load 4" x 6" / 101.6 x 152.4 mm media in portrait orientation regardless of ...until the jammed paper is automatically ejected. Remove the paper following the procedure below. (1)Turn off the power, and then open the Rear Cover. (2)Fold a piece of the printing orientation. If you cannot...the jammed paper or the paper jam error continues after removing the paper, contact your Canon Service representative. 74 Troubleshooting Wait until it hits the jammed paper, then pull out the paper folded...
...101.6 x 152.4 mm paper loaded in four. (3)Close the Rear Cover, then turn on the power. Action Always load 4" x 6" / 101.6 x 152.4 mm media in portrait orientation regardless of ...until the jammed paper is automatically ejected. Remove the paper following the procedure below. (1)Turn off the power, and then open the Rear Cover. (2)Fold a piece of the printing orientation. If you cannot...the jammed paper or the paper jam error continues after removing the paper, contact your Canon Service representative. 74 Troubleshooting Wait until it hits the jammed paper, then pull out the paper folded...
iP4500 series Quick Start Guide
Page 83
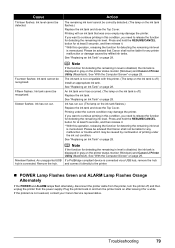
... memorized. If the problem is connected. Printing with this condition, you want to continue printing in this printer. (The lamp on the printer status monitor (Windows) and Canon IJ Printer Utility (Macintosh). Fifteen flashes: Ink tank cannot be detected. Note If the function for detecting the remaining... an ink tank that Canon shall not be recognized. An Ink tank error has occurred. (The lamp on after leaving it . * With this condition, you want to the printer. „ POWER Lamp Flashes Green and ALARM Lamp Flashes Orange Alternately If the POWER and ALARM lamps flash ...
... memorized. If the problem is connected. Printing with this condition, you want to continue printing in this printer. (The lamp on the printer status monitor (Windows) and Canon IJ Printer Utility (Macintosh). Fifteen flashes: Ink tank cannot be detected. Note If the function for detecting the remaining... an ink tank that Canon shall not be recognized. An Ink tank error has occurred. (The lamp on after leaving it . * With this condition, you want to the printer. „ POWER Lamp Flashes Green and ALARM Lamp Flashes Orange Alternately If the POWER and ALARM lamps flash ...
iP4500 series Quick Start Guide
Page 84
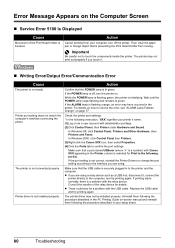
...ALARM lamp is blocked. In Windows 2000, click Control Panel then Printers. (3)Right-click the Canon XXX icon, then select Properties. (4)Click the Ports tab to touch the components inside the printer. Uninstall them following the procedure described in to the interface you are... such as a user account with Canon XXX appearing in the Printer column is not ready. The printer is off, turn off the printer. Action Cancel printing from moving. Printer port setting does not match the computer's interface connecting the printer. If the POWER lamp is not connected properly. z...
...ALARM lamp is blocked. In Windows 2000, click Control Panel then Printers. (3)Right-click the Canon XXX icon, then select Properties. (4)Click the Ports tab to touch the components inside the printer. Uninstall them following the procedure described in to the interface you are... such as a user account with Canon XXX appearing in the Printer column is not ready. The printer is off, turn off the printer. Action Cancel printing from moving. Printer port setting does not match the computer's interface connecting the printer. If the POWER lamp is not connected properly. z...
iP4500 series Quick Start Guide
Page 85
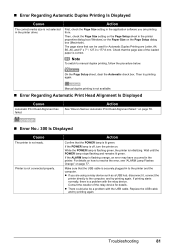
...A4, B5, A5, and 5" x 7" / 127.0 x 177.8 mm. Check that the POWER lamp is lit green. Action See "Eleven flashes: Automatic Print Head Alignment failed." While the POWER lamp is flashing green, the printer is not available. „ Error Regarding Automatic Print Head Alignment Is Displayed Cause Automatic Print...could also be used for details. Note To switch to the computer, and try printing again. If the POWER lamp is flashing orange, an error may have occurred in the printer properties dialog box (Windows) or the Paper Size on the Page Setup dialog box (Macintosh). If the ...
...A4, B5, A5, and 5" x 7" / 127.0 x 177.8 mm. Check that the POWER lamp is lit green. Action See "Eleven flashes: Automatic Print Head Alignment failed." While the POWER lamp is flashing green, the printer is not available. „ Error Regarding Automatic Print Head Alignment Is Displayed Cause Automatic Print...could also be used for details. Note To switch to the computer, and try printing again. If the POWER lamp is flashing orange, an error may have occurred in the printer properties dialog box (Windows) or the Paper Size on the Page Setup dialog box (Macintosh). If the ...

iP4500 series Quick Start Guide
Page 88
... unplug the power cord of the printer from the power supply. Replace the ink tank. After a while, plug the power cord of how many the ALARM lamp flashes and take the appropriate action to the printer. If the same error occurs, contact your Canon Service representative. 84 Troubleshooting Check the number of the printer back in "ALARM...
... unplug the power cord of the printer from the power supply. Replace the ink tank. After a while, plug the power cord of how many the ALARM lamp flashes and take the appropriate action to the printer. If the same error occurs, contact your Canon Service representative. 84 Troubleshooting Check the number of the printer back in "ALARM...


