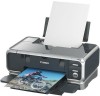
iP4000 Quick Start Guide
Page 5
... Bundled Software 37 Printing Borderless Photographs 38 Printing Maintenance Replacing an Ink Tank 42 When Printing Becomes Faint or Colors are Incorrect 48 Printing the Nozzle Check Pattern 49 Print Head Cleaning 53 Print Head Deep Cleaning 57 Aligning the Print Head 61 Troubleshooting Cannot Install the Printer Driver 66 Print Quality is Poor or Contains Errors 67 Troubleshooting Printer Hardware 69 Paper Does Not Feed Properly 71 Paper Jams 72 Handling Error Messages 75 An Error Message Appears on the Printer 2 Loading Paper 3 Using Specialty Media 13 Printing with Windows...
... Bundled Software 37 Printing Borderless Photographs 38 Printing Maintenance Replacing an Ink Tank 42 When Printing Becomes Faint or Colors are Incorrect 48 Printing the Nozzle Check Pattern 49 Print Head Cleaning 53 Print Head Deep Cleaning 57 Aligning the Print Head 61 Troubleshooting Cannot Install the Printer Driver 66 Print Quality is Poor or Contains Errors 67 Troubleshooting Printer Hardware 69 Paper Does Not Feed Properly 71 Paper Jams 72 Handling Error Messages 75 An Error Message Appears on the Printer 2 Loading Paper 3 Using Specialty Media 13 Printing with Windows...
iP4000 Quick Start Guide
Page 33
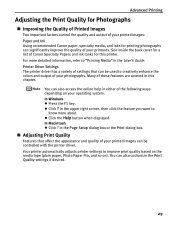
...enhance the colors and output of your photographs. Many of these features are covered in the User's Guide. z Click the Help button when displayed. Advanced Printing Adjusting the Print Quality for Photographs „ Improving the Quality of Printed Images Two important factors control the quality and output of your printed images: Paper and Ink Using recommended Canon paper, specialty media, and inks for printing photographs can also customize the Print Quality settings if desired. 29 Your printer automatically adjusts printer settings to "Printing Media" in this printer. in...
...enhance the colors and output of your photographs. Many of these features are covered in the User's Guide. z Click the Help button when displayed. Advanced Printing Adjusting the Print Quality for Photographs „ Improving the Quality of Printed Images Two important factors control the quality and output of your printed images: Paper and Ink Using recommended Canon paper, specialty media, and inks for printing photographs can also customize the Print Quality settings if desired. 29 Your printer automatically adjusts printer settings to "Printing Media" in this printer. in...
iP4000 Quick Start Guide
Page 46
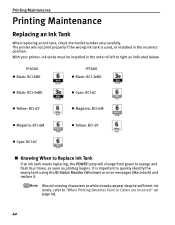
With your printer, ink tanks must be installed in the incorrect position. It is used, or installed in the order of left to orange and flash four times, as soon as indicated below. Should missing characters or white streaks appear despite sufficient ink levels, refer to quickly identify the empty tank using the BJ Status Monitor (Windows) or error messages (Macintosh) and replace it. iP4000 z Black: BCI-6BK iP3000 z Black: BCI-3eBK z Black: BCI-3eBK...
With your printer, ink tanks must be installed in the incorrect position. It is used, or installed in the order of left to orange and flash four times, as soon as indicated below. Should missing characters or white streaks appear despite sufficient ink levels, refer to quickly identify the empty tank using the BJ Status Monitor (Windows) or error messages (Macintosh) and replace it. iP4000 z Black: BCI-6BK iP3000 z Black: BCI-3eBK z Black: BCI-3eBK...

iP4000 Quick Start Guide
Page 52
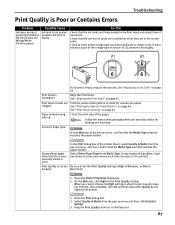
... the ink tank contains ink. z Increase the Print Quality setting in the ink tanks, the Print Head nozzles are shifted after performing print head cleaning three times Step 3 See "Print Head Deep Cleaning" on page 53 After print head cleaning, print the nozzle check pattern. z Open the Top Cover, and make sure that each ink tank is installed securely. z Ensure that the ink tank is installed at the correct location. If the problem remains after running the print head maintenance, align the Print Head. If the ruled lines are probably clogged. See "Print Quality is...
... the ink tank contains ink. z Increase the Print Quality setting in the ink tanks, the Print Head nozzles are shifted after performing print head cleaning three times Step 3 See "Print Head Deep Cleaning" on page 53 After print head cleaning, print the nozzle check pattern. z Open the Top Cover, and make sure that each ink tank is installed securely. z Ensure that the ink tank is installed at the correct location. If the problem remains after running the print head maintenance, align the Print Head. If the ruled lines are probably clogged. See "Print Quality is...

iP4000 Quick Start Guide
Page 55
... start Print Head Cleaning, click Cleaning on the Pattern Check dialog box. See "Examining the Nozzle Check Pattern" on page 52. (5) If you want to finish. 51 Printing Maintenance (1) Double-click the hard disk icon where the printer driver was installed, the Applications folder, and then the Utilities folder. (2) Double-click the Print Setup Utility icon. Clicking Initial Check Items displays the items to be printed. When using versions of Mac OS other than Mac OS X v.10.3.x, double-click the Print...
... start Print Head Cleaning, click Cleaning on the Pattern Check dialog box. See "Examining the Nozzle Check Pattern" on page 52. (5) If you want to finish. 51 Printing Maintenance (1) Double-click the hard disk icon where the printer driver was installed, the Applications folder, and then the Utilities folder. (2) Double-click the Print Setup Utility icon. Clicking Initial Check Items displays the items to be printed. When using versions of Mac OS other than Mac OS X v.10.3.x, double-click the Print...

iP4000 Quick Start Guide
Page 67
... name of Letter-sized plain paper in the Sheet Feeder. 2 Open the BJ Printer Utility dialog box. (1) Double-click the hard disk icon where the printer driver was installed, the Applications folder, and then the Utilities folder. (2) Double-click the Printer Setup Utility icon. Do not open the Top Cover while printing. 63 Printing Maintenance 1 With the printer on, load a sheet of your printer from the Product list and click Maintenance. 3 Print the pattern. (1) Select Test Print from the Name...
... name of Letter-sized plain paper in the Sheet Feeder. 2 Open the BJ Printer Utility dialog box. (1) Double-click the hard disk icon where the printer driver was installed, the Applications folder, and then the Utilities folder. (2) Double-click the Printer Setup Utility icon. Do not open the Top Cover while printing. 63 Printing Maintenance 1 With the printer on, load a sheet of your printer from the Product list and click Maintenance. 3 Print the pattern. (1) Select Test Print from the Name...
iP4000 Quick Start Guide
Page 71
... correct ink tanks are installed and that the Media Type selected matches the paper loaded. Paper loaded wrong side up menu and then click Detailed Setting. 3. Drag the Print Quality slide bar to the Fine end. 67 See "Aligning the Print Head" on page 42. Load one sheet at a time and remove each sheet as soon as shown in (1). When you cannot choose the High setting or when the print quality does not improve, select Custom, click Set and then adjust...
... correct ink tanks are installed and that the Media Type selected matches the paper loaded. Paper loaded wrong side up menu and then click Detailed Setting. 3. Drag the Print Quality slide bar to the Fine end. 67 See "Aligning the Print Head" on page 42. Load one sheet at a time and remove each sheet as soon as shown in (1). When you cannot choose the High setting or when the print quality does not improve, select Custom, click Set and then adjust...
iP4000 Quick Start Guide
Page 73
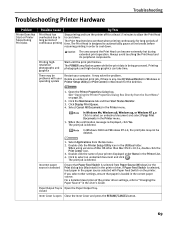
... Print Head can take time. Use BJ Status Monitor in Windows or operating system Printer Setup Utility (or Print Center) in the Utilities folder. Click the Maintenance tab and then Start Status Monitor. 3. In Windows 2000 and Windows NT 4.0, the print jobs may solve the problem. Double-click the Printer Setup Utility icon in Macintosh for the deletion. 1. The print job is displayed, click Yes. If Paper Feed Switch is any. problems with Paper Feed Switch on page 28. 2. In Windows Me, Windows 98, Windows 95, or Windows...
... Print Head can take time. Use BJ Status Monitor in Windows or operating system Printer Setup Utility (or Print Center) in the Utilities folder. Click the Maintenance tab and then Start Status Monitor. 3. In Windows 2000 and Windows NT 4.0, the print jobs may solve the problem. Double-click the Printer Setup Utility icon in Macintosh for the deletion. 1. The print job is displayed, click Yes. If Paper Feed Switch is any. problems with Paper Feed Switch on page 28. 2. In Windows Me, Windows 98, Windows 95, or Windows...

iP4000 Quick Start Guide
Page 81
... POWER lamp stops flashing. When the POWER lamp is not installed properly z If using on the printer, or select it directly to "Handling Error Messages" on the printing side is selected if the port on page 75. See "Opening the Printer Properties Dialog Box Directly from the Start Menu" on -screen instructions to the interface you are not sticking together, correctly and reload the paper correctly into the Sheet Feeder or Cassette. Replace...
... POWER lamp stops flashing. When the POWER lamp is not installed properly z If using on the printer, or select it directly to "Handling Error Messages" on the printing side is selected if the port on page 75. See "Opening the Printer Properties Dialog Box Directly from the Start Menu" on -screen instructions to the interface you are not sticking together, correctly and reload the paper correctly into the Sheet Feeder or Cassette. Replace...
iP4000 Quick Start Guide
Page 86
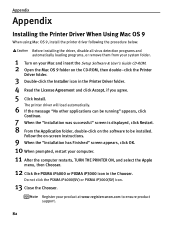
... printer driver will load automatically. 6 If the message "No other applications can be installed. Do not click the PIXMA iP4000(SV) or PIXMA iP3000(SV) icon. 13 Close the Chooser. Appendix Appendix Installing the Printer Driver When Using Mac OS 9 When using Mac OS 9, install the printer driver following the procedure below. Follow the on the software to ensure product support. 82 Before installing the driver, disable all virus detection programs and automatically loading programs, or remove...
... printer driver will load automatically. 6 If the message "No other applications can be installed. Do not click the PIXMA iP4000(SV) or PIXMA iP3000(SV) icon. 13 Close the Chooser. Appendix Appendix Installing the Printer Driver When Using Mac OS 9 When using Mac OS 9, install the printer driver following the procedure below. Follow the on the software to ensure product support. 82 Before installing the driver, disable all virus detection programs and automatically loading programs, or remove...
iP4000 Quick Start Guide
Page 88
... (Windows) Printer Setup Utility (Macintosh) Routine Maintenance Replacing an Ink Tank When Printing Becomes Faint or Colors are Incorrect Printing the Nozzle Check Pattern Print Head Cleaning Print Head Deep Cleaning Aligning the Print Head Transporting Printer Troubleshooting Cannot Install Printer Driver Print Quality is Poor Printer Does Not Start or Stops During Print Jobs Paper Does Not Feed Properly Paper Jams The POWER Lamp Flashes Orange An Error Message is Displayed on the following topics. How to Use This Manual How to Read This Manual Safety Precautions Printer Parts and...
... (Windows) Printer Setup Utility (Macintosh) Routine Maintenance Replacing an Ink Tank When Printing Becomes Faint or Colors are Incorrect Printing the Nozzle Check Pattern Print Head Cleaning Print Head Deep Cleaning Aligning the Print Head Transporting Printer Troubleshooting Cannot Install Printer Driver Print Quality is Poor Printer Does Not Start or Stops During Print Jobs Paper Does Not Feed Properly Paper Jams The POWER Lamp Flashes Orange An Error Message is Displayed on the following topics. How to Use This Manual How to Read This Manual Safety Precautions Printer Parts and...
iP4000 Quick Start Guide
Page 97
... Error Message 80 Canceling Print Jobs 17, 21 Canceling Printing 21 Cannot Install the Printer Driver 66 Cannot Print Properly from Your Application Program 28 P Page Setup (Macintosh 19, 70 Page Setup dialog box (Macintosh 70 Paper Does Not Feed Properly 71 Paper Feed Roller 71 Paper Feed Switch 4 Paper Jams 72, 73, 74 Paper Size 19 Paper Support Load Limit 14 Photo Noise Reduction 33 Photo Optimizer PRO 31 Photo Paper Plus Glossy 14 Photo Paper Plus Semi-gloss 14 Photo Paper Pro 14 PhotoRecord 37 POWER button 2 POWER...
... Error Message 80 Canceling Print Jobs 17, 21 Canceling Printing 21 Cannot Install the Printer Driver 66 Cannot Print Properly from Your Application Program 28 P Page Setup (Macintosh 19, 70 Page Setup dialog box (Macintosh 70 Paper Does Not Feed Properly 71 Paper Feed Roller 71 Paper Feed Switch 4 Paper Jams 72, 73, 74 Paper Size 19 Paper Support Load Limit 14 Photo Noise Reduction 33 Photo Optimizer PRO 31 Photo Paper Plus Glossy 14 Photo Paper Plus Semi-gloss 14 Photo Paper Pro 14 PhotoRecord 37 POWER button 2 POWER...

iP4000 Easy Setup Instructions
Page 1
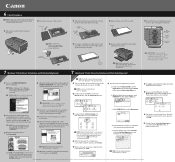
... blank paper into the correct slot. (Refer to the color guide on the print head holder). Parallel Cable 3 Remove the shipping tape from the box. 1 Unpack the Printer 2 Prepare the Printer Start Here Easy Setup Instructions 3 Install the Print Head 4 Install the Ink Tanks iP4000 Series Photo Printer 5 Connect the Printer and Load Paper 1 Carefully remove all shipping tape and clear plastic from the printer. 2 Plug the power cord into the back of the printer and connect the other to the printer. 3 Insert the ink tank into the auto sheet...
... blank paper into the correct slot. (Refer to the color guide on the print head holder). Parallel Cable 3 Remove the shipping tape from the box. 1 Unpack the Printer 2 Prepare the Printer Start Here Easy Setup Instructions 3 Install the Print Head 4 Install the Ink Tanks iP4000 Series Photo Printer 5 Connect the Printer and Load Paper 1 Carefully remove all shipping tape and clear plastic from the printer. 2 Plug the power cord into the back of the printer and connect the other to the printer. 3 Insert the ink tank into the auto sheet...
iP4000 Easy Setup Instructions
Page 2
... not, press the paper feed switch. Select PIXMA iP4000 and click Maintenance. e. Specifications subject to select Test Print. IMPORTANT: If you would like to the "Appendix" of the Administrators group before continuing. Then insert the Setup Software & User's Guide CD-ROM. Click the down-arrow to change without notice. Part no. Long Edge Guide Short Edge Guide 5 Replace the top cover of their respective owners. NOTE: Log on -screen instructions. Print head alignment is a Registered...
... not, press the paper feed switch. Select PIXMA iP4000 and click Maintenance. e. Specifications subject to select Test Print. IMPORTANT: If you would like to the "Appendix" of the Administrators group before continuing. Then insert the Setup Software & User's Guide CD-ROM. Click the down-arrow to change without notice. Part no. Long Edge Guide Short Edge Guide 5 Replace the top cover of their respective owners. NOTE: Log on -screen instructions. Print head alignment is a Registered...

Service Manual
Page 4
... reset Destination settings 3-4. CLEANING MODE AND AMOUNT OF INK PURGED 3. REPAIR 3-1. Operator Call Errors 2-2. Verification Items (1) Service test print (2) EEPROM information print 4. CONNECTOR LOCATION AND PIN LAYOUT 2-1. Adjustment, Periodic Maintenance, Periodic Replacement Parts, and Replacement Consumables by Symptom 3. Product Life 1-4. Special Tools 1-5. PRINTER TRANSPORTATION Part 2: TECHNICAL REFERENCE 1. Serial Number Location 2. Warnings 2-4. BLOCK DIAGRAM 2. II. Notes on Repair Servicing 3-3. FAQ (Problems Specific to the iP4000 and Corrective...
... reset Destination settings 3-4. CLEANING MODE AND AMOUNT OF INK PURGED 3. REPAIR 3-1. Operator Call Errors 2-2. Verification Items (1) Service test print (2) EEPROM information print 4. CONNECTOR LOCATION AND PIN LAYOUT 2-1. Adjustment, Periodic Maintenance, Periodic Replacement Parts, and Replacement Consumables by Symptom 3. Product Life 1-4. Special Tools 1-5. PRINTER TRANSPORTATION Part 2: TECHNICAL REFERENCE 1. Serial Number Location 2. Warnings 2-4. BLOCK DIAGRAM 2. II. Notes on Repair Servicing 3-3. FAQ (Problems Specific to the iP4000 and Corrective...

Service Manual
Page 7
Customer Maintenance Adjustment Print head alignment Timing At print head replacement. Printer buttons - To clean the paper feed rollers. Computer (settings via the printer driver) Approx. Product Life (1) Printer Specified print volume (I) or the years of use (II), whichever comes first. (I) Print volume Black 1,500 character pattern Color A4, 7.5% duty per color pattern A4, photo, borderless printing 4 x 6, photo, borderless printing Postcard, photo, borderless printing (II) Years of use (2) Print head Print volume: Black 1,500 character pattern Color A4, 7.5% duty per color ...
Customer Maintenance Adjustment Print head alignment Timing At print head replacement. Printer buttons - To clean the paper feed rollers. Computer (settings via the printer driver) Approx. Product Life (1) Printer Specified print volume (I) or the years of use (II), whichever comes first. (I) Print volume Black 1,500 character pattern Color A4, 7.5% duty per color pattern A4, photo, borderless printing 4 x 6, photo, borderless printing Postcard, photo, borderless printing (II) Years of use (2) Print head Print volume: Black 1,500 character pattern Color A4, 7.5% duty per color ...

Service Manual
Page 9
... button. Failed in the cassette, and press the Resume/Cancel button. 2. Remove the jammed paper, and press the Resume/Cancel button. CD-R tray guide open . [1200] Close the access cover. *1: Only for models supporting CD-R printing *2: Only for models not supporting CD-R printing 1 - 4 In repair servicing, replace the bottom case unit (QM2-1205), or the ink absorbers (QC1-4222 / 4223 / 4224 / 4263 / 4264 / 4864 / 4221 / 4257). Set an appropriate type and size of the next page. Operator Call Errors...
... button. Failed in the cassette, and press the Resume/Cancel button. 2. Remove the jammed paper, and press the Resume/Cancel button. CD-R tray guide open . [1200] Close the access cover. *1: Only for models supporting CD-R printing *2: Only for models not supporting CD-R printing 1 - 4 In repair servicing, replace the bottom case unit (QM2-1205), or the ink absorbers (QC1-4222 / 4223 / 4224 / 4263 / 4264 / 4864 / 4221 / 4257). Set an appropriate type and size of the next page. Operator Call Errors...
Service Manual
Page 12
Graphic or text is performed 2 times, and when the problem persists. Replace the - timing sensor unit, or - Adjustment / Settings, (6) Service mode, for details.] *2: Replace the print head only after the print head deep cleaning is enlarged on printouts. To the top 1 - 7 ink tank, or - logic board ass'y*1. *1: Before replacement of black ink. print head*2. logic board ass'y*1. Replace the logic board ass'y*1. timing slit strip film, - Printing is 7% or more, also replace the bottom case unit (QM2...
Graphic or text is performed 2 times, and when the problem persists. Replace the - timing sensor unit, or - Adjustment / Settings, (6) Service mode, for details.] *2: Replace the print head only after the print head deep cleaning is enlarged on printouts. To the top 1 - 7 ink tank, or - logic board ass'y*1. *1: Before replacement of black ink. print head*2. logic board ass'y*1. Replace the logic board ass'y*1. timing slit strip film, - Printing is 7% or more, also replace the bottom case unit (QM2...

Service Manual
Page 19
... Print head manual cleaning Remarks 2 times 3 times Nozzle check pattern printing Paper feed roller cleaning Set a sheet of plain paper (A4 or letter) in the ASF or the cassette (according to the waste ink amount, replace the waste ink absorber (the bottom case unit or the ink absorbers). Cleaning black or color separately, or both black and color: Perform from the printer driver's Maintenance tab. Adjustment / Settings, (6) Service mode, for ink tank replacement. (Open the access cover. In Custom Settings of the printer driver's Maintenance tab, manual print head alignment...
... Print head manual cleaning Remarks 2 times 3 times Nozzle check pattern printing Paper feed roller cleaning Set a sheet of plain paper (A4 or letter) in the ASF or the cassette (according to the waste ink amount, replace the waste ink absorber (the bottom case unit or the ink absorbers). Cleaning black or color separately, or both black and color: Perform from the printer driver's Maintenance tab. Adjustment / Settings, (6) Service mode, for ink tank replacement. (Open the access cover. In Custom Settings of the printer driver's Maintenance tab, manual print head alignment...

Service Manual
Page 33
... On the carriage flexible cable holder (visible when the access cover is open.) Available (automatic detection by optical method and dot count, enabled at default) Not available Available (automatic or manual alignment via driver utilities, or the Resume/Cancel button in Camera Direct Printing, automatic alignment at default) *1: Only for duplex printing, Opennig / Closing of CD-R, Supported paper size for CD-R printing supported regions Type Print head Ink color Ink tank Weight (Net) Supply method Part number Single head with 5 removable ink tanks (each color) Black: 320 nozzles in...
... On the carriage flexible cable holder (visible when the access cover is open.) Available (automatic detection by optical method and dot count, enabled at default) Not available Available (automatic or manual alignment via driver utilities, or the Resume/Cancel button in Camera Direct Printing, automatic alignment at default) *1: Only for duplex printing, Opennig / Closing of CD-R, Supported paper size for CD-R printing supported regions Type Print head Ink color Ink tank Weight (Net) Supply method Part number Single head with 5 removable ink tanks (each color) Black: 320 nozzles in...


