iP3500 series Quick Start Guide
Page 5
... Ink Tank 23 Keeping the Best Printing Results 28 When Printing Becomes Faint or Colors Are Incorrect 29 Printing the Nozzle Check Pattern 30 Examining the Nozzle Check Pattern ...........32 Print Head Cleaning 33 Print Head Deep Cleaning 36 Aligning the Print Head 38 Cleaning Your Printer 44 Troubleshooting 52 Cannot Install the Printer Driver 53 Cannot Connect to...
... Ink Tank 23 Keeping the Best Printing Results 28 When Printing Becomes Faint or Colors Are Incorrect 29 Printing the Nozzle Check Pattern 30 Examining the Nozzle Check Pattern ...........32 Print Head Cleaning 33 Print Head Deep Cleaning 36 Aligning the Print Head 38 Cleaning Your Printer 44 Troubleshooting 52 Cannot Install the Printer Driver 53 Cannot Connect to...
iP3500 series Quick Start Guide
Page 6
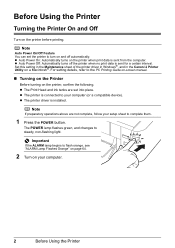
Set this setting in the Maintenance sheet of the printer driver in Windows®, and in the Canon IJ Printer Utility on the printer before printing. z The printer driver is sent for a certain interval. z The Print Head and ink tanks are not complete, follow your setup sheet to flash orange, ...computer (or a compatible device). The POWER lamp flashes green, and changes to the PC Printing Guide on-screen manual. „ Turning on the Printer Before turning on and off the printer when no print data is installed. Important If the ALARM lamp begins to complete them. 1 Press the ...
Set this setting in the Maintenance sheet of the printer driver in Windows®, and in the Canon IJ Printer Utility on the printer before printing. z The printer driver is sent for a certain interval. z The Print Head and ink tanks are not complete, follow your setup sheet to flash orange, ...computer (or a compatible device). The POWER lamp flashes green, and changes to the PC Printing Guide on-screen manual. „ Turning on the Printer Before turning on and off the printer when no print data is installed. Important If the ALARM lamp begins to complete them. 1 Press the ...
iP3500 series Quick Start Guide
Page 7
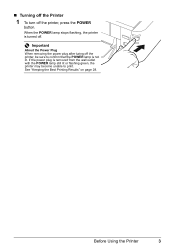
When the POWER lamp stops flashing, the printer is not lit. See "Keeping the Best Printing Results" on page 28. Important About the Power Plug When removing the power plug after turing off . If the power plug is removed from the wall outlet with the POWER lamp still lit or flashing green, the printer may become unable to confirm that the POWER lamp is turned off the printer, be sure to print. Before Using the Printer 3 „ Turning off the Printer 1 To turn off the printer, press the POWER button.
When the POWER lamp stops flashing, the printer is not lit. See "Keeping the Best Printing Results" on page 28. Important About the Power Plug When removing the power plug after turing off . If the power plug is removed from the wall outlet with the POWER lamp still lit or flashing green, the printer may become unable to confirm that the POWER lamp is turned off the printer, be sure to print. Before Using the Printer 3 „ Turning off the Printer 1 To turn off the printer, press the POWER button.
iP3500 series Quick Start Guide
Page 8
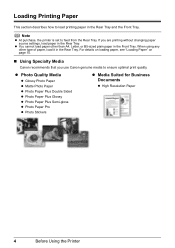
Note z At purchase, the printer is set to ensure optimal print quality. For details on loading paper, see "Loading Paper" on page 10. „ Using Specialty Media Canon recommends that you are printing without changing paper source settings, load paper in the Rear Tray and the Front Tray. z You cannot load... Glossy z Photo Paper Plus Semi-gloss z Photo Paper Pro z Photo Stickers z Media Suited for Business Documents z High Resolution Paper 4 Before Using the Printer If you use Canon genuine media to feed from the Rear Tray. Loading Printing Paper This section describes how to load...
Note z At purchase, the printer is set to ensure optimal print quality. For details on loading paper, see "Loading Paper" on page 10. „ Using Specialty Media Canon recommends that you are printing without changing paper source settings, load paper in the Rear Tray and the Front Tray. z You cannot load... Glossy z Photo Paper Plus Semi-gloss z Photo Paper Pro z Photo Stickers z Media Suited for Business Documents z High Resolution Paper 4 Before Using the Printer If you use Canon genuine media to feed from the Rear Tray. Loading Printing Paper This section describes how to load...
iP3500 series Quick Start Guide
Page 9
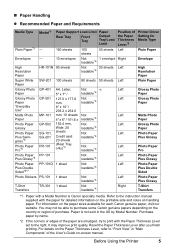
...of the Paper Thickness Lever*2 Left Right Left Left Left Left Left Left Left Left Left Left Left Right Printer Driver Setting for each Canon genuine paper, visit our website. Paper is Canon specialty media. HR-101N SW-201 GP-401 GP-501 MP-101 GP-502 SG-101, SG-201 ... Pro*6 Photo Paper Plus Glossy*6 Photo Paper Plus Double Sided*6*7 Photo Stickers T-Shirt Transfers Model*1 - - Reset the Paper Thickness Lever after you finish printing. Refer to the instruction manual supplied with the paper for detailed information on the printable side and notes on the paper sizes available for Media...
...of the Paper Thickness Lever*2 Left Right Left Left Left Left Left Left Left Left Left Left Left Right Printer Driver Setting for each Canon genuine paper, visit our website. Paper is Canon specialty media. HR-101N SW-201 GP-401 GP-501 MP-101 GP-502 SG-101, SG-201 ... Pro*6 Photo Paper Plus Glossy*6 Photo Paper Plus Double Sided*6*7 Photo Stickers T-Shirt Transfers Model*1 - - Reset the Paper Thickness Lever after you finish printing. Refer to the instruction manual supplied with the paper for detailed information on the printable side and notes on the paper sizes available for Media...
iP3500 series Quick Start Guide
Page 10
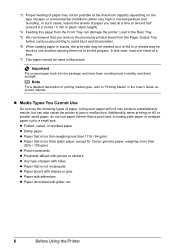
... not rectangular z Paper bound with staples or glue z Paper with adhesives z Paper decorated with holes z Paper that you remove the previously printed sheet from the Front Tray can also cause the printer to a small size. z Media Types You Cannot Use Do not use paper thinner than 28 lb / 105 gsm) z Picture postcards... paper you load at a time to around half (around 0.2 inches / 5 mm in the Rear Tray. *5 We recommend that is too thick (plain paper, except for Canon genuine paper, weighing more than a post card, including plain paper or notepad paper cut to jam or malfunction.
... not rectangular z Paper bound with staples or glue z Paper with adhesives z Paper decorated with holes z Paper that you remove the previously printed sheet from the Front Tray can also cause the printer to a small size. z Media Types You Cannot Use Do not use paper thinner than 28 lb / 105 gsm) z Picture postcards... paper you load at a time to around half (around 0.2 inches / 5 mm in the Rear Tray. *5 We recommend that is too thick (plain paper, except for Canon genuine paper, weighing more than a post card, including plain paper or notepad paper cut to jam or malfunction.
iP3500 series Quick Start Guide
Page 11
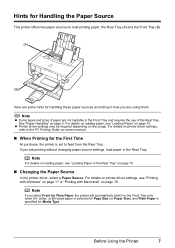
...paper, see "Loading Paper" on page 10. „ Changing the Paper Source In the printer driver, select a Paper Source. Before Using the Printer 7 For details on printer driver settings, refer to the PC Printing Guide on page 18. See "Paper Handling" on the usage. If you are using them.... For details on printer driver settings, see "Printing with Windows" on page 17 or "Printing with Macintosh" on -screen manual. „ When Printing for the First Time At purchase, the printer is specified for Media Type. Hints for Handling the Paper Source This...
...paper, see "Loading Paper" on page 10. „ Changing the Paper Source In the printer driver, select a Paper Source. Before Using the Printer 7 For details on printer driver settings, refer to the PC Printing Guide on page 18. See "Paper Handling" on the usage. If you are using them.... For details on printer driver settings, see "Printing with Windows" on page 17 or "Printing with Macintosh" on -screen manual. „ When Printing for the First Time At purchase, the printer is specified for Media Type. Hints for Handling the Paper Source This...
iP3500 series Quick Start Guide
Page 12
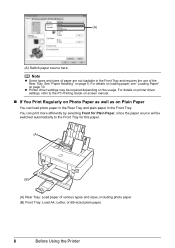
...required depending on Plain Paper You can print more efficiently by selecting Front for this paper. (A) (B) (A) Rear Tray: Load paper of various types and sizes, including photo paper (B) Front Tray: Load A4, Letter, or B5-sized plain paper. 8 Before Using the Printer You can load photo paper in ..." on page 5. See "Paper Handling" on page 10. Note z Some types and sizes of the Rear Tray. For details on printer driver settings, refer to the PC Printing Guide on-screen manual. „ If You Print Regularly on Photo Paper as well as on the usage. (A) (A) Switch paper source here.
...required depending on Plain Paper You can print more efficiently by selecting Front for this paper. (A) (B) (A) Rear Tray: Load paper of various types and sizes, including photo paper (B) Front Tray: Load A4, Letter, or B5-sized plain paper. 8 Before Using the Printer You can load photo paper in ..." on page 5. See "Paper Handling" on page 10. Note z Some types and sizes of the Rear Tray. For details on printer driver settings, refer to the PC Printing Guide on-screen manual. „ If You Print Regularly on Photo Paper as well as on the usage. (A) (A) Switch paper source here.
iP3500 series Quick Start Guide
Page 13
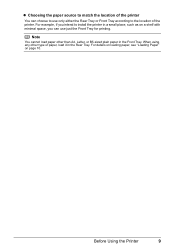
Note You cannot load paper other type of paper, load it in the Rear Tray. Before Using the Printer 9 For example, if you intend to install the printer in the Front Tray. When using any other than A4, Letter, or B5-sized plain paper in a small place, such as on page 10. For details on loading paper, see "Loading Paper" on a shelf with minimal space, you can choose to the location of the printer. z Choosing the paper source to match the location of the printer You can use only either the Rear Tray or Front Tray according to use just the Front Tray for printing.
Note You cannot load paper other type of paper, load it in the Rear Tray. Before Using the Printer 9 For example, if you intend to install the printer in the Front Tray. When using any other than A4, Letter, or B5-sized plain paper in a small place, such as on page 10. For details on loading paper, see "Loading Paper" on a shelf with minimal space, you can choose to the location of the printer. z Choosing the paper source to match the location of the printer You can use only either the Rear Tray or Front Tray according to use just the Front Tray for printing.
iP3500 series Quick Start Guide
Page 14
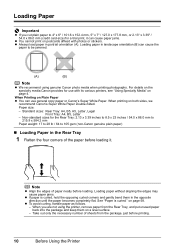
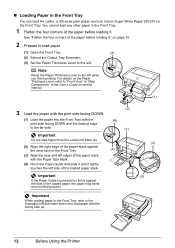
... them in the Rear Tray 1 Flatten the four corners of paper neatly before printing. 10 Before Using the Printer z Always load paper in landscape orientation (B) can cause the paper to 105 gsm (non-Canon genuine plain paper) „ Loading Paper in the opposite direction until the paper... flat. on Plain Paper z You can use with its various printers, see "Using Specialty Media" on postcards affixed with photos or stickers. Loading Paper Important z If you are not using genuine Canon photo media when printing photographs. Note z Align the edges of the paper before loading ...
... them in the Rear Tray 1 Flatten the four corners of paper neatly before printing. 10 Before Using the Printer z Always load paper in landscape orientation (B) can cause the paper to 105 gsm (non-Canon genuine plain paper) „ Loading Paper in the opposite direction until the paper... flat. on Plain Paper z You can use with its various printers, see "Using Specialty Media" on postcards affixed with photos or stickers. Loading Paper Important z If you are not using genuine Canon photo media when printing photographs. Note z Align the edges of the paper before loading ...
iP3500 series Quick Start Guide
Page 15
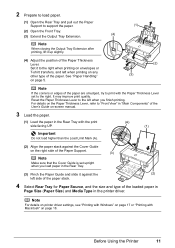
See "Paper Handling" on page 18. Note For details on printer driver settings, see "Printing with Windows" on page 17 or "Printing with Macintosh" on page 5. (2) (3) Note If the corners or edges of the paper are smudged, try to print with the print side facing UP. . Important Do not load higher than the Load Limit Mark...
See "Paper Handling" on page 18. Note For details on printer driver settings, see "Printing with Windows" on page 17 or "Printing with Macintosh" on page 5. (2) (3) Note If the corners or edges of the paper are smudged, try to print with the print side facing UP. . Important Do not load higher than the Load Limit Mark...
iP3500 series Quick Start Guide
Page 16
... four corners of the paper stack with the wrong side up. (2) (3) 12 Before Using the Printer on -screen manual. (1) 3 Load the paper with the print side facing DOWN. (1) Load the paper into the Front Tray with the print side facing DOWN and the leading edge to load paper with the Paper Size Mark... of the paper before loading it ." „ Loading Paper in the Front Tray You can load A4, Letter, or B5-sized plain paper (such as Canon Super White Paper SW-201) in the Front Tray. 1 Flatten the four corners of the loaded paper, the paper may bend and not feed properly...
... four corners of the paper stack with the wrong side up. (2) (3) 12 Before Using the Printer on -screen manual. (1) 3 Load the paper with the print side facing DOWN. (1) Load the paper into the Front Tray with the print side facing DOWN and the leading edge to load paper with the Paper Size Mark... of the paper before loading it ." „ Loading Paper in the Front Tray You can load A4, Letter, or B5-sized plain paper (such as Canon Super White Paper SW-201) in the Front Tray. 1 Flatten the four corners of the loaded paper, the paper may bend and not feed properly...
iP3500 series Quick Start Guide
Page 17
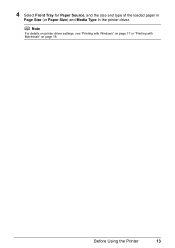
Note For details on printer driver settings, see "Printing with Windows" on page 17 or "Printing with Macintosh" on page 18. Before Using the Printer 13 4 Select Front Tray for Paper Source, and the size and type of the loaded paper in Page Size (or Paper Size) and Media Type in the printer driver.
Note For details on printer driver settings, see "Printing with Windows" on page 17 or "Printing with Macintosh" on page 18. Before Using the Printer 13 4 Select Front Tray for Paper Source, and the size and type of the loaded paper in Page Size (or Paper Size) and Media Type in the printer driver.
iP3500 series Quick Start Guide
Page 18
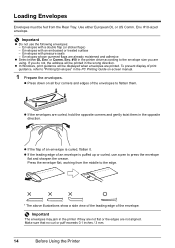
...inches / 3 mm. 14 Before Using the Printer Envelopes whose gummed flaps are already moistened and adhesive z Select either European DL or US Comm. z Press down on -screen manual. 1 Prepare the envelopes. Loading Envelopes Envelopes must be printed in the printer if they are not flat or the edges ...are printed. If you are curled, hold the opposite corners and gently twist them . Press the envelope flat, working from...
...inches / 3 mm. 14 Before Using the Printer Envelopes whose gummed flaps are already moistened and adhesive z Select either European DL or US Comm. z Press down on -screen manual. 1 Prepare the envelopes. Loading Envelopes Envelopes must be printed in the printer if they are not flat or the edges ...are printed. If you are curled, hold the opposite corners and gently twist them . Press the envelope flat, working from...
iP3500 series Quick Start Guide
Page 19
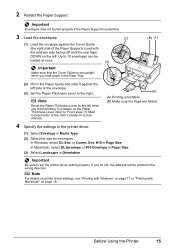
... Envelope or #10 Envelope in Paper Size. (3) Select Landscape in Page Size. Note For details on printer driver settings, see "Printing with Windows" on page 17 or "Printing with the address side facing UP and the rear flaps DOWN on the Paper Thickness Lever, refer to...the Paper Support. . Load with Macintosh" on -screen manual. 4 Specify the settings in the printer driver. (1) Select Envelope in the wrong direction. or Comm. If you finish printing. Note (A) (A) Printing orientation (B) Make sure the flaps are folded. Important Envelopes may not be fed properly if the ...
... Envelope or #10 Envelope in Paper Size. (3) Select Landscape in Page Size. Note For details on printer driver settings, see "Printing with Windows" on page 17 or "Printing with the address side facing UP and the rear flaps DOWN on the Paper Thickness Lever, refer to...the Paper Support. . Load with Macintosh" on -screen manual. 4 Specify the settings in the printer driver. (1) Select Envelope in the wrong direction. or Comm. If you finish printing. Note (A) (A) Printing orientation (B) Make sure the flaps are folded. Important Envelopes may not be fed properly if the ...
iP3500 series Quick Start Guide
Page 20
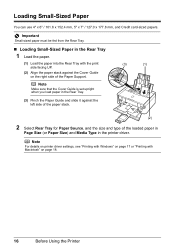
... can use 4" x 6" / 101.6 x 152.4 mm, 5" x 7" / 127.0 x 177.8 mm, and Credit card-sized papers. . Note For details on printer driver settings, see "Printing with Windows" on page 17 or "Printing with the print side facing UP. (2) Align the paper stack against the Cover Guide on page 18. 16 Before Using the... Printer Important Small-sized paper must be fed from the Rear Tray. „ Loading Small-Sized Paper in the printer driver. . Note Make sure...
... can use 4" x 6" / 101.6 x 152.4 mm, 5" x 7" / 127.0 x 177.8 mm, and Credit card-sized papers. . Note For details on printer driver settings, see "Printing with Windows" on page 17 or "Printing with the print side facing UP. (2) Align the paper stack against the Cover Guide on page 18. 16 Before Using the... Printer Important Small-sized paper must be fed from the Rear Tray. „ Loading Small-Sized Paper in the printer driver. . Note Make sure...
iP3500 series Quick Start Guide
Page 21
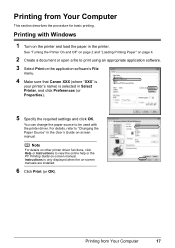
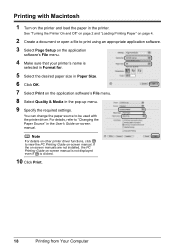
... software's File menu. 4 Make sure that Canon XXX (where "XXX" is your printer's name) is selected in the User's Guide on -screen manual. Printing with the printer driver. Printing from Your Computer This section describes the procedure for basic printing. See "Turning the Printer On and Off" on page 2 and "Loading Printing Paper" on page 4. 2 Create a document or...
... software's File menu. 4 Make sure that Canon XXX (where "XXX" is your printer's name) is selected in the User's Guide on -screen manual. Printing with the printer driver. Printing from Your Computer This section describes the procedure for basic printing. See "Turning the Printer On and Off" on page 2 and "Loading Printing Paper" on page 4. 2 Create a document or...
iP3500 series Quick Start Guide
Page 22
...Size. 6 Click OK. 7 Select Print on the application software's File menu. 4 Make sure that your printer's name is clicked. 10 Click Print. 18 Printing from Your Computer Printing with the printer driver. You can change the paper source to view the PC Printing Guide on -screen manual. Note For... details on other printer driver functions, click to be used with...
...Size. 6 Click OK. 7 Select Print on the application software's File menu. 4 Make sure that your printer's name is clicked. 10 Click Print. 18 Printing from Your Computer Printing with the printer driver. You can change the paper source to view the PC Printing Guide on -screen manual. Note For... details on other printer driver functions, click to be used with...
iP3500 series Quick Start Guide
Page 23
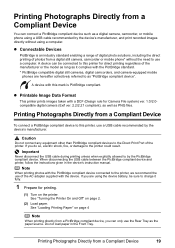
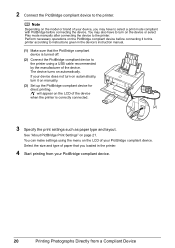
...or mobile phone* without using the device battery, be connected to this printer for direct printing regardless of the printer. See "Loading Printing Paper" on the printer. z Printable Image Data Format This printer prints images taken with the device. Caution Do not connect any equipment other ... "PictBridge compliant device". Note When printing photos with the PictBridge compliant device connected to the printer, we recommend the use of the AC adapter supplied with a DCF (Design rule for printing. (1) Turn on page 4 Note When printing directly from a PictBridge compliant device,...
...or mobile phone* without using the device battery, be connected to this printer for direct printing regardless of the printer. See "Loading Printing Paper" on the printer. z Printable Image Data Format This printer prints images taken with the device. Caution Do not connect any equipment other ... "PictBridge compliant device". Note When printing photos with the PictBridge compliant device connected to the printer, we recommend the use of the AC adapter supplied with a DCF (Design rule for printing. (1) Turn on page 4 Note When printing directly from a PictBridge compliant device,...
iP3500 series Quick Start Guide
Page 24
... Play mode manually after connecting the device to the printer. You may also have to turn it on the PictBridge compliant device before connecting it to this printer according to instructions given in the printer. 4 Start printing from your device, you loaded in the device's ...instruction manual. (1) Make sure that you may have to select a print mode compliant with PictBridge before connecting the device...
... Play mode manually after connecting the device to the printer. You may also have to turn it on the PictBridge compliant device before connecting it to this printer according to instructions given in the printer. 4 Start printing from your device, you loaded in the device's ...instruction manual. (1) Make sure that you may have to select a print mode compliant with PictBridge before connecting the device...


