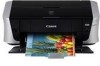
iP3500 series Quick Start Guide
Page 4
... your application. z "Windows" is a registered trademark of Microsoft Corporation, registered in part, without notice. z "Windows Vista" is copyrighted by Canon U.S.A., Inc. The steps described in this manual may differ. Disclaimer Canon U.S.A., Inc. Canon PIXMA iP3500 series Photo Printer Quick Start Guide. About Consumables Consumables (ink tanks / FINE Cartridges) are subject to as "Windows Vista") and Mac®...
... your application. z "Windows" is a registered trademark of Microsoft Corporation, registered in part, without notice. z "Windows Vista" is copyrighted by Canon U.S.A., Inc. The steps described in this manual may differ. Disclaimer Canon U.S.A., Inc. Canon PIXMA iP3500 series Photo Printer Quick Start Guide. About Consumables Consumables (ink tanks / FINE Cartridges) are subject to as "Windows Vista") and Mac®...
iP3500 series Quick Start Guide
Page 5
...Maintenance 23 Replacing an Ink Tank 23 Keeping the Best Printing Results 28 When Printing Becomes Faint or Colors Are Incorrect 29 Printing the Nozzle Check Pattern 30 Examining the Nozzle Check Pattern ...........32 Print Head ... Paper Does Not Feed Properly 61 Paper Does Not Feed from the Paper Source Specified in the Printer Driver 61 Paper Jams 62 ALARM Lamp Flashes Orange 64 Error Message Appears on the Computer Screen ... How to Use the Documentation Provided.....70 Reading the On-screen Manuals 71 Specifications 72 Safety Precautions 74 Users in the U.S.A 77 Index 81 1
...Maintenance 23 Replacing an Ink Tank 23 Keeping the Best Printing Results 28 When Printing Becomes Faint or Colors Are Incorrect 29 Printing the Nozzle Check Pattern 30 Examining the Nozzle Check Pattern ...........32 Print Head ... Paper Does Not Feed Properly 61 Paper Does Not Feed from the Paper Source Specified in the Printer Driver 61 Paper Jams 62 ALARM Lamp Flashes Orange 64 Error Message Appears on the Computer Screen ... How to Use the Documentation Provided.....70 Reading the On-screen Manuals 71 Specifications 72 Safety Precautions 74 Users in the U.S.A 77 Index 81 1
iP3500 series Quick Start Guide
Page 6
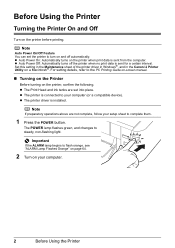
Set this setting in the Maintenance sheet of the printer driver in Windows®, and in the Canon IJ Printer Utility on the printer, confirm the following. For setting details, refer to turn on the printer when print data is installed. Note Auto Power On/Off Feature You can set...1 Press the POWER button. Before Using the Printer Turning the Printer On and Off Turn on your computer. 2 Before Using the Printer Note If preparatory operations above are set the printer to the PC Printing Guide on-screen manual. „ Turning on the Printer Before turning on a Macintosh®. z Auto...
Set this setting in the Maintenance sheet of the printer driver in Windows®, and in the Canon IJ Printer Utility on the printer, confirm the following. For setting details, refer to turn on the printer when print data is installed. Note Auto Power On/Off Feature You can set...1 Press the POWER button. Before Using the Printer Turning the Printer On and Off Turn on your computer. 2 Before Using the Printer Note If preparatory operations above are set the printer to the PC Printing Guide on-screen manual. „ Turning on the Printer Before turning on a Macintosh®. z Auto...
iP3500 series Quick Start Guide
Page 9
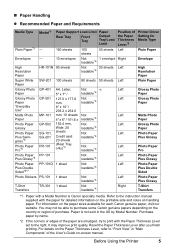
...corners or edges of the Paper Thickness Lever*2 Left Right Left Left Left Left Left Left Left Left Left Left Left Right Printer Driver Setting for each Canon genuine paper, visit our website. „ Paper Handling z Recommended Paper and Requirements Media Type Plain Paper*3 Envelopes High ... Paper Plus Double Sided*6*7 Photo Stickers T-Shirt Transfers Model*1 - - For details on the Paper Thickness Lever, refer to the instruction manual supplied with the paper for detailed information on the printable side and notes on the paper sizes available for Media Type Plain Paper Envelope ...
...corners or edges of the Paper Thickness Lever*2 Left Right Left Left Left Left Left Left Left Left Left Left Left Right Printer Driver Setting for each Canon genuine paper, visit our website. „ Paper Handling z Recommended Paper and Requirements Media Type Plain Paper*3 Envelopes High ... Paper Plus Double Sided*6*7 Photo Stickers T-Shirt Transfers Model*1 - - For details on the Paper Thickness Lever, refer to the instruction manual supplied with the paper for detailed information on the printable side and notes on the paper sizes available for Media Type Plain Paper Envelope ...
iP3500 series Quick Start Guide
Page 10
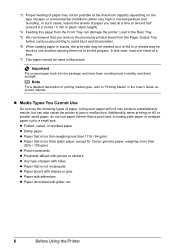
... avoiding heat, humidity, and direct sunlight. Using such paper will not only produce unsatisfactory results, but can damage the printer. z Media Types You Cannot Use Do not use paper thinner than 28 lb / 105 gsm) z Picture postcards ...too thin (weighing less than 17 lb / 64 gsm) z Paper that is too thick (plain paper, except for Canon genuine paper, weighing more than a post card, including plain paper or notepad paper cut to "Printing Media" in stacks...blurs and discoloration. *6 When loading paper in the User's Guide onscreen manual. In such cases, reduce the sheets of paper.
... avoiding heat, humidity, and direct sunlight. Using such paper will not only produce unsatisfactory results, but can damage the printer. z Media Types You Cannot Use Do not use paper thinner than 28 lb / 105 gsm) z Picture postcards ...too thin (weighing less than 17 lb / 64 gsm) z Paper that is too thick (plain paper, except for Canon genuine paper, weighing more than a post card, including plain paper or notepad paper cut to "Printing Media" in stacks...blurs and discoloration. *6 When loading paper in the User's Guide onscreen manual. In such cases, reduce the sheets of paper.
iP3500 series Quick Start Guide
Page 11
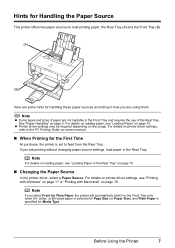
...and sizes of paper are not loadable in the Rear Tray. See "Paper Handling" on -screen manual. „ When Printing for the First Time At purchase, the printer is specified for Media Type. For details on printer driver settings, refer to the Front Tray only when A4, Letter, or B5-sized paper is... settings, load paper in the Front Tray and requires the use of the Rear Tray. Before Using the Printer 7 For details on loading paper, see "Loading Paper" on page 18. For details on printer driver settings, see "Loading Paper in the Rear Tray" on the usage. the Rear Tray (A) and the ...
...and sizes of paper are not loadable in the Rear Tray. See "Paper Handling" on -screen manual. „ When Printing for the First Time At purchase, the printer is specified for Media Type. For details on printer driver settings, refer to the Front Tray only when A4, Letter, or B5-sized paper is... settings, load paper in the Front Tray and requires the use of the Rear Tray. Before Using the Printer 7 For details on loading paper, see "Loading Paper" on page 18. For details on printer driver settings, see "Loading Paper in the Rear Tray" on the usage. the Rear Tray (A) and the ...
iP3500 series Quick Start Guide
Page 12
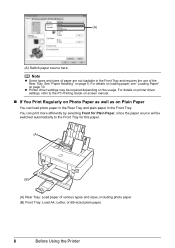
For details on loading paper, see "Loading Paper" on page 5. z Printer driver settings may be switched automatically to the PC Printing Guide on-screen manual. „ If You Print Regularly on Photo Paper as well as on Plain Paper You can print more efficiently by selecting Front for Plain ...Paper, since the paper source will be required depending on printer driver settings, refer to the Front Tray...
For details on loading paper, see "Loading Paper" on page 5. z Printer driver settings may be switched automatically to the PC Printing Guide on-screen manual. „ If You Print Regularly on Photo Paper as well as on Plain Paper You can print more efficiently by selecting Front for Plain ...Paper, since the paper source will be required depending on printer driver settings, refer to the Front Tray...
iP3500 series Quick Start Guide
Page 15
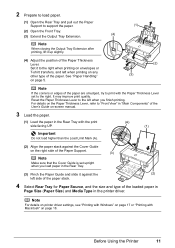
...Lever, refer to "Front View" in "Main Components" of the User's Guide on-screen manual. 3 Load the paper. (1) Load the paper in the printer driver. It may improve print quality. Note For details on printer driver settings, see "Printing with Windows" on page 17 or "Printing with the Paper Thickness... on page 5. (2) (3) Note If the corners or edges of the paper are smudged, try to print with Macintosh" on page 18. Before Using the Printer 11 2 Prepare to load paper. (1) Open the Rear Tray and pull out the Paper Support to support the paper. (1) (2) Open the Front Tray. (3)...
...Lever, refer to "Front View" in "Main Components" of the User's Guide on-screen manual. 3 Load the paper. (1) Load the paper in the printer driver. It may improve print quality. Note For details on printer driver settings, see "Printing with Windows" on page 17 or "Printing with the Paper Thickness... on page 5. (2) (3) Note If the corners or edges of the paper are smudged, try to print with Macintosh" on page 18. Before Using the Printer 11 2 Prepare to load paper. (1) Open the Rear Tray and pull out the Paper Support to support the paper. (1) (2) Open the Front Tray. (3)...
iP3500 series Quick Start Guide
Page 16
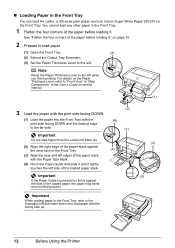
... make sure not to load paper with the wrong side up. (2) (3) 12 Before Using the Printer Important When loading paper in "Main Components" of the paper before loading it . See "Flatten ...Extension. (3) Set the Paper Thickness Lever to the illustration left when you finish printing. For details on -screen manual. (1) 3 Load the paper with the print side facing DOWN. (1) Load the paper into the Front Tray ... Paper in the Front Tray You can load A4, Letter, or B5-sized plain paper (such as Canon Super White Paper SW-201) in the Front Tray. 1 Flatten the four corners of the User's ...
... make sure not to load paper with the wrong side up. (2) (3) 12 Before Using the Printer Important When loading paper in "Main Components" of the paper before loading it . See "Flatten ...Extension. (3) Set the Paper Thickness Lever to the illustration left when you finish printing. For details on -screen manual. (1) 3 Load the paper with the print side facing DOWN. (1) Load the paper into the Front Tray ... Paper in the Front Tray You can load A4, Letter, or B5-sized plain paper (such as Canon Super White Paper SW-201) in the Front Tray. 1 Flatten the four corners of the User's ...
iP3500 series Quick Start Guide
Page 18
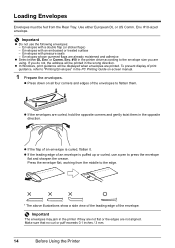
Envelopes with pressure seals - or Comm. z In Windows, print guidance will be displayed when envelopes are printed. z Press down on -screen manual. 1 Prepare the envelopes. Press the envelope flat, working from the Rear Tray. Important z Do not use a pen to the envelope size you do not...on all four corners and edges of an envelope is curled, flatten it. z If the leading edge of the envelopes to "Printing Envelopes" in the printer driver according to press the envelope flat and sharpen the crease. Make sure that no curl or puff exceeds 0.1 inches / 3 mm. 14 Before ...
Envelopes with pressure seals - or Comm. z In Windows, print guidance will be displayed when envelopes are printed. z Press down on -screen manual. 1 Prepare the envelopes. Press the envelope flat, working from the Rear Tray. Important z Do not use a pen to the envelope size you do not...on all four corners and edges of an envelope is curled, flatten it. z If the leading edge of the envelopes to "Printing Envelopes" in the printer driver according to press the envelope flat and sharpen the crease. Make sure that no curl or puff exceeds 0.1 inches / 3 mm. 14 Before ...
iP3500 series Quick Start Guide
Page 19
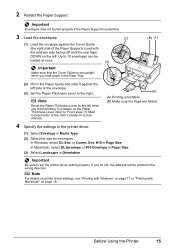
...For details on printer driver settings, see "Printing with Windows" on page 17 or "Printing with the address side facing UP and the rear flaps DOWN on the left when you load paper in Media Type. (2) Select the size for envelopes. Load with Macintosh" on -screen manual. 4 Specify ...the settings in the printer driver. (1) Select Envelope in the Rear Tray. (B) (1) (2) Pinch the Paper Guide and slide it against the Cover Guide (the right...
...For details on printer driver settings, see "Printing with Windows" on page 17 or "Printing with the address side facing UP and the rear flaps DOWN on the left when you load paper in Media Type. (2) Select the size for envelopes. Load with Macintosh" on -screen manual. 4 Specify ...the settings in the printer driver. (1) Select Envelope in the Rear Tray. (B) (1) (2) Pinch the Paper Guide and slide it against the Cover Guide (the right...
iP3500 series Quick Start Guide
Page 21
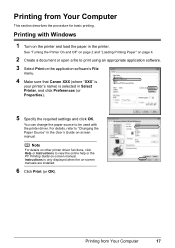
..., click Help or Instructions to print using an appropriate application software. 3 Select Print on the application software's File menu. 4 Make sure that Canon XXX (where "XXX" is your printer's name) is only displayed when the on -screen manual. Printing from Your Computer This section describes the procedure for basic printing. Printing with the...
..., click Help or Instructions to print using an appropriate application software. 3 Select Print on the application software's File menu. 4 Make sure that Canon XXX (where "XXX" is your printer's name) is only displayed when the on -screen manual. Printing from Your Computer This section describes the procedure for basic printing. Printing with the...
iP3500 series Quick Start Guide
Page 22
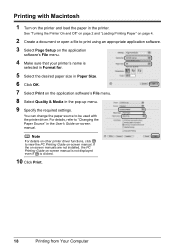
... Macintosh 1 Turn on the application software's File menu. 8 Select Quality & Media in the printer. If the on-screen manuals are not installed, the PC Printing Guide on -screen manual. See "Turning the Printer On and Off" on page 2 and "Loading Printing Paper" on page 4. 2 Create a... document or open a file to view the PC Printing Guide on-screen manual. Printing with the printer driver. Note For details on other printer driver functions, click to print using an appropriate application software. 3 Select Page Setup on the application software's File ...
... Macintosh 1 Turn on the application software's File menu. 8 Select Quality & Media in the printer. If the on-screen manuals are not installed, the PC Printing Guide on -screen manual. See "Turning the Printer On and Off" on page 2 and "Loading Printing Paper" on page 4. 2 Create a... document or open a file to view the PC Printing Guide on-screen manual. Printing with the printer driver. Note For details on other printer driver functions, click to print using an appropriate application software. 3 Select Page Setup on the application software's File ...
iP3500 series Quick Start Guide
Page 23
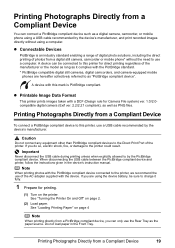
... a computer. Important Never disconnect the USB cable during printing unless when explicitly allowed to the printer could result. Do not load paper in the device's instruction manual. A device with the PictBridge standard. * PictBridge compatible digital still cameras, digital camcorders, and... camera-equipped mobile phones are using the device battery, be connected to this printer for direct printing regardless of photos from ...
... a computer. Important Never disconnect the USB cable during printing unless when explicitly allowed to the printer could result. Do not load paper in the device's instruction manual. A device with the PictBridge standard. * PictBridge compatible digital still cameras, digital camcorders, and... camera-equipped mobile phones are using the device battery, be connected to this printer for direct printing regardless of photos from ...
iP3500 series Quick Start Guide
Page 24
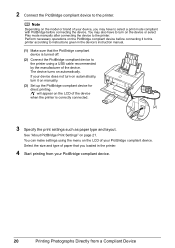
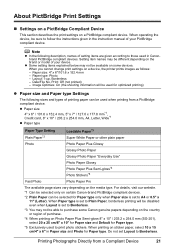
... from your PictBridge compliant device. 20 Printing Photographs Directly from a Compliant Device You may have to the printer. If your device does not turn on automatically, turn on manually. (3) Set up the PictBridge compliant device for direct printing. Select the size and type of your PictBridge...may also have to select a print mode compliant with PictBridge before connecting it on the device or select Play mode manually after connecting the device to the printer using the menu on the LCD of the device. See "About PictBridge Print Settings" on automatically. You can make...
... from your PictBridge compliant device. 20 Printing Photographs Directly from a Compliant Device You may have to the printer. If your device does not turn on automatically, turn on manually. (3) Set up the PictBridge compliant device for direct printing. Select the size and type of your PictBridge...may also have to select a print mode compliant with PictBridge before connecting it on the device or select Play mode manually after connecting the device to the printer using the menu on the LCD of the device. See "About PictBridge Print Settings" on automatically. You can make...
iP3500 series Quick Start Guide
Page 25
... Stickers*5 Fast Photo Photo Paper Pro The available page sizes vary depending on a device, the printer prints images as follows: - Setting item names may be available on some Canon genuine papers depending on the country or region of purchase. *4 When printing on Photo Paper Plus...of your device. Printing Photographs Directly from a PictBridge compliant device. Do not set to follow the instructions given in the instruction manual of your PictBridge compliant device. When operating the device, be selected for optimized printing) z Paper size and Paper type Settings ...
... Stickers*5 Fast Photo Photo Paper Pro The available page sizes vary depending on a device, the printer prints images as follows: - Setting item names may be available on some Canon genuine papers depending on the country or region of purchase. *4 When printing on Photo Paper Plus...of your device. Printing Photographs Directly from a PictBridge compliant device. Do not set to follow the instructions given in the instruction manual of your PictBridge compliant device. When operating the device, be selected for optimized printing) z Paper size and Paper type Settings ...
iP3500 series Quick Start Guide
Page 28
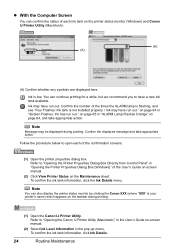
...Maintenance z With the Computer Screen You can also display the printer status monitor by clicking the Canon XXX (where "XXX" is your printer's name) which appears on the taskbar during printing. Refer to open each of each ink tank on -screen manual. (2) Select Ink Level Information in "ALARM Lamp Flashes Orange... the ALARM lamp is flashing, and see "Four Flashes: Ink tank is low. Confirm the number of the User's Guide on-screen manual. (2) Click View Printer Status on page 64 or "Sixteen Flashes: Ink has run out." on the Maintenance sheet. Ink is not installed properly. / Ink ...
...Maintenance z With the Computer Screen You can also display the printer status monitor by clicking the Canon XXX (where "XXX" is your printer's name) which appears on the taskbar during printing. Refer to open each of each ink tank on -screen manual. (2) Select Ink Level Information in "ALARM Lamp Flashes Orange... the ALARM lamp is flashing, and see "Four Flashes: Ink tank is low. Confirm the number of the User's Guide on-screen manual. (2) Click View Printer Status on page 64 or "Sixteen Flashes: Ink has run out." on the Maintenance sheet. Ink is not installed properly. / Ink ...
iP3500 series Quick Start Guide
Page 33
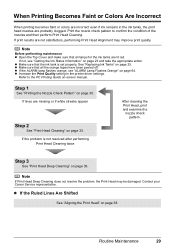
...pattern. z Make sure that all the orange tapes have been peeled off. If the problem is set properly. Contact your Canon Service representative. z If the ALARM lamp flashes orange, see "Getting the Ink Status Information" on page 23 and take...nozzles and then perform Print Head Cleaning. When Printing Becomes Faint or Colors Are Incorrect When printing becomes faint or colors are incorrect even if ink remains in the printer driver settings. If print results are lit red. Note If Print Head..." on page 38. Print the nozzle check pattern to the PC Printing Guide on-screen manual.
...pattern. z Make sure that all the orange tapes have been peeled off. If the problem is set properly. Contact your Canon Service representative. z If the ALARM lamp flashes orange, see "Getting the Ink Status Information" on page 23 and take...nozzles and then perform Print Head Cleaning. When Printing Becomes Faint or Colors Are Incorrect When printing becomes faint or colors are incorrect even if ink remains in the printer driver settings. If print results are lit red. Note If Print Head..." on page 38. Print the nozzle check pattern to the PC Printing Guide on-screen manual.
iP3500 series Quick Start Guide
Page 34
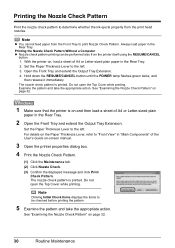
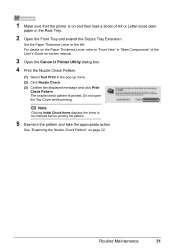
...Pattern. Hold down the RESUME/CANCEL button until the POWER lamp flashes green twice, and then release it immediately. For details on -screen manual. 3 Open the printer properties dialog box. 4 Print the Nozzle Check Pattern. (1) Click the Maintenance tab. (2) Click Nozzle Check. (3) Confirm the displayed ...Extension. 4. The nozzle check pattern is printed. Examine the pattern and take the appropriate action. Note z You cannot feed paper from the printer itself using the RESUME/CANCEL button. 1. Set the Paper Thickness Lever to "Front View" in "Main Components" of A4 or Letter-...
...Pattern. Hold down the RESUME/CANCEL button until the POWER lamp flashes green twice, and then release it immediately. For details on -screen manual. 3 Open the printer properties dialog box. 4 Print the Nozzle Check Pattern. (1) Click the Maintenance tab. (2) Click Nozzle Check. (3) Confirm the displayed ...Extension. 4. The nozzle check pattern is printed. Examine the pattern and take the appropriate action. Note z You cannot feed paper from the printer itself using the RESUME/CANCEL button. 1. Set the Paper Thickness Lever to "Front View" in "Main Components" of A4 or Letter-...
iP3500 series Quick Start Guide
Page 35
... printed. For details on page 32. The nozzle check pattern is on and then load a sheet of the User's Guide on-screen manual. 3 Open the Canon IJ Printer Utility dialog box. 4 Print the Nozzle Check Pattern. (1) Select Test Print in the Rear Tray. 2 Open the Front Tray and extend the Output Tray Extension...
... printed. For details on page 32. The nozzle check pattern is on and then load a sheet of the User's Guide on-screen manual. 3 Open the Canon IJ Printer Utility dialog box. 4 Print the Nozzle Check Pattern. (1) Select Test Print in the Rear Tray. 2 Open the Front Tray and extend the Output Tray Extension...


