
Quick Start Guide
Page 5
... Becomes Faint or Colors Are Incorrect 31 Printing the Nozzle Check Pattern 32 Examining the Nozzle Check Pattern ...........34 Print Head Cleaning 35 Print Head Deep Cleaning 38 Aligning the Print Head 40 Cleaning Your Printer 45 Troubleshooting 52 Cannot Install the Printer Driver 53 Cannot ...Connect to Computer Properly.........55 Print Results Not Satisfactory 56 Printer Does Not Start 59 Paper Does Not Feed Properly 60 Paper Jams ...
... Becomes Faint or Colors Are Incorrect 31 Printing the Nozzle Check Pattern 32 Examining the Nozzle Check Pattern ...........34 Print Head Cleaning 35 Print Head Deep Cleaning 38 Aligning the Print Head 40 Cleaning Your Printer 45 Troubleshooting 52 Cannot Install the Printer Driver 53 Cannot ...Connect to Computer Properly.........55 Print Results Not Satisfactory 56 Printer Does Not Start 59 Paper Does Not Feed Properly 60 Paper Jams ...
Quick Start Guide
Page 56
...troubleshooting message is displayed automatically. The message may encounter when using the printer. Note If you cannot find appropriate tips for problems you may vary depending on the version of the Page Is Not Printed" on page 56 z "Ink Does Not Come Out/Printing Does Not Start/Printing Is Blurred/Colors...problem, refer to a Computer When an error occurs in the message. Troubleshooting This section describes troubleshooting tips for your Windows operating system. 52 Troubleshooting z "Cannot Install the Printer Driver" on page 53 z "Cannot Connect to Computer Properly" on ...
...troubleshooting message is displayed automatically. The message may encounter when using the printer. Note If you cannot find appropriate tips for problems you may vary depending on the version of the Page Is Not Printed" on page 56 z "Ink Does Not Come Out/Printing Does Not Start/Printing Is Blurred/Colors...problem, refer to a Computer When an error occurs in the message. Troubleshooting This section describes troubleshooting tips for your Windows operating system. 52 Troubleshooting z "Cannot Install the Printer Driver" on page 53 z "Cannot Connect to Computer Properly" on ...

Quick Start Guide
Page 57
Action If you were unable to proceed beyond the Printer Connection screen, follow the procedure below to reinstall the printer driver. (1)Click Cancel on the Printer Connection screen. (2)Click Start Over on the Installation Failure screen. (3)Click Back on the screen that appears next. (4)Click Exit ...on the Welcome screen, then remove the CD-ROM. (5)Turn the printer off. (6)Restart the computer. (7)Make sure you have no application software running, including anti-virus software. (8)Follow the procedure described in the ...
Action If you were unable to proceed beyond the Printer Connection screen, follow the procedure below to reinstall the printer driver. (1)Click Cancel on the Printer Connection screen. (2)Click Start Over on the Installation Failure screen. (3)Click Back on the screen that appears next. (4)Click Exit ...on the Welcome screen, then remove the CD-ROM. (5)Turn the printer off. (6)Restart the computer. (7)Make sure you have no application software running, including anti-virus software. (8)Follow the procedure described in the ...
Quick Start Guide
Page 58
Note To use the Run command to the Printer Driver Guide onscreen manual. If the CD-ROM icon is not displayed on the desktop, there may be in an unstable condition and you insert ..., select My Computer, and confirm that CD-ROM icon is defective. Contact a Canon service representative. 54 Troubleshooting In non-XP Windows, open the My Computer window and then double-click the CD-ROM icon. Contact a Canon service representative. If the printer driver was forced to be terminated due to an Windows error, the system...
Note To use the Run command to the Printer Driver Guide onscreen manual. If the CD-ROM icon is not displayed on the desktop, there may be in an unstable condition and you insert ..., select My Computer, and confirm that CD-ROM icon is defective. Contact a Canon service representative. 54 Troubleshooting In non-XP Windows, open the My Computer window and then double-click the CD-ROM icon. Contact a Canon service representative. If the printer driver was forced to be terminated due to an Windows error, the system...
Quick Start Guide
Page 59
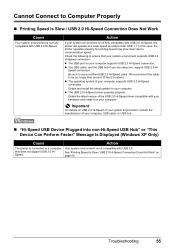
... Plugged into non-Hi-Speed USB Hub" or "This Device Can Perform Faster" Message Is Displayed (Windows XP Only) Cause Action The printer is connected to a computer Your system environment is not compatible with your hardware and install it on page 55. Speed connection. Important For...See "Printing Speed Is Slow / USB 2.0 Hi-Speed Connection Does Not Work" on your system environment is not fully compatible with USB 2.0 Hi-Speed. Troubleshooting 55 Be sure to use a certified USB 2.0 Hi-Speed cable. Cannot Connect to Computer Properly „ Printing Speed Is Slow / USB 2.0 Hi-Speed ...
... Plugged into non-Hi-Speed USB Hub" or "This Device Can Perform Faster" Message Is Displayed (Windows XP Only) Cause Action The printer is connected to a computer Your system environment is not compatible with your hardware and install it on page 55. Speed connection. Important For...See "Printing Speed Is Slow / USB 2.0 Hi-Speed Connection Does Not Work" on your system environment is not fully compatible with USB 2.0 Hi-Speed. Troubleshooting 55 Be sure to use a certified USB 2.0 Hi-Speed cable. Cannot Connect to Computer Properly „ Printing Speed Is Slow / USB 2.0 Hi-Speed ...
Quick Start Guide
Page 60
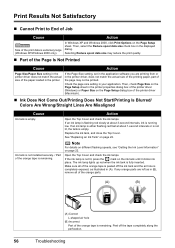
... all of the orange parts. (A) (B) (A) Correct L-shaped air hole (B) Incorrect Part of the printer driver (Macintosh). „ Ink Does Not Come Out/Printing Does Not Start/Printing Is Blurred/ Colors Are Wrong/Straight Lines Are Misaligned Cause Ink tank is fully inserted. If the Page Size setting, set... remaining. Ink tank is not installed securely. / Part of the orange tape is peeled off the tape completely along the perforation. 56 Troubleshooting Peel off the ink tank and the air hole is running low. Selecting Reduce spool data size may not be printed. Print Results Not...
... all of the orange parts. (A) (B) (A) Correct L-shaped air hole (B) Incorrect Part of the printer driver (Macintosh). „ Ink Does Not Come Out/Printing Does Not Start/Printing Is Blurred/ Colors Are Wrong/Straight Lines Are Misaligned Cause Ink tank is fully inserted. If the Page Size setting, set... remaining. Ink tank is not installed securely. / Part of the orange tape is peeled off the tape completely along the perforation. 56 Troubleshooting Peel off the ink tank and the air hole is running low. Selecting Reduce spool data size may not be printed. Print Results Not...

Quick Start Guide
Page 61
...is not set in the Main sheet of the printer driver does not match the actual type of (Windows) or the Quality & Media sheet of the Print dialog box (Macintosh) paper. Printing on page 5. Print quality is too thin. Troubleshooting 57 Print the nozzle check pattern to check ... click High for uneven ink output. Cause Action Media Type setting in the printer driver Make sure that the Media Type set in deep color, we recommend using Photo Paper Pro or other Canon specialty paper. Media Type setting in the printer driver Make sure that the Media Type set appropriately.
...is not set in the Main sheet of the printer driver does not match the actual type of (Windows) or the Quality & Media sheet of the Print dialog box (Macintosh) paper. Printing on page 5. Print quality is too thin. Troubleshooting 57 Print the nozzle check pattern to check ... click High for uneven ink output. Cause Action Media Type setting in the printer driver Make sure that the Media Type set in deep color, we recommend using Photo Paper Pro or other Canon specialty paper. Media Type setting in the printer driver Make sure that the Media Type set appropriately.

Quick Start Guide
Page 62
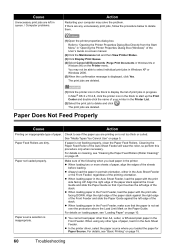
... is not feeding properly, clean the Paper Feed Rollers. Adjust the position of the Paper Thickness Lever according to the left , the inside of the printer is corrected to within approximately 0.08 to 0.2 inches / 2 to 5 mm (B) in a direction opposite to paper curl as seen below. (1) (2) (A) ...(3)Check to see that the paper you are printing on the printing content, the printing surface may also reduce print quality. 58 Troubleshooting In this case, perform bottom plate cleaning to clean the inside of the paper. It may become dirty, not feed properly, or both. ...
... is not feeding properly, clean the Paper Feed Rollers. Adjust the position of the Paper Thickness Lever according to the left , the inside of the printer is corrected to within approximately 0.08 to 0.2 inches / 2 to 5 mm (B) in a direction opposite to paper curl as seen below. (1) (2) (A) ...(3)Check to see that the paper you are printing on the printing content, the printing surface may also reduce print quality. 58 Troubleshooting In this case, perform bottom plate cleaning to clean the inside of the paper. It may become dirty, not feed properly, or both. ...

Quick Start Guide
Page 63
...the ink tanks are flashing. See "ALARM Lamp Flashes Orange" on the ink tank until it may be difficult to plug. Troubleshooting 59 Printer Does Not Start Cause Action The printer is not powered on page 22. To continue printing, confirm the number of the orange tape is no connected. Make sure all... of the printer. Replace the ink tank, and close the Top Cover. See "Replacing an Ink Tank" on . / The power cord is remaining. Ink tank is not ...
...the ink tanks are flashing. See "ALARM Lamp Flashes Orange" on the ink tank until it may be difficult to plug. Troubleshooting 59 Printer Does Not Start Cause Action The printer is not powered on page 22. To continue printing, confirm the number of the orange tape is no connected. Make sure all... of the printer. Replace the ink tank, and close the Top Cover. See "Replacing an Ink Tank" on . / The power cord is remaining. Ink tank is not ...
Quick Start Guide
Page 64
...Limit Mark on the Paper Guide. Refer to see "Basic Printing" on the Printer menu. In Mac® OS X v.10.2.8, click the printer icon in Windows Me or Windows 98) on page 15. 60 Troubleshooting Make sure of your computer may not be able to select individual print jobs ...loaded the paper for Paper Source. For details on cleaning, see "Loading Paper" on -screen manual. (2)Click the Maintenance tab and then View Printer Status. (3)Click Display Print Queue. (4)Select Cancel All Documents (Purge Print Documents in the Dock to delete and click . You may solve the ...
...Limit Mark on the Paper Guide. Refer to see "Basic Printing" on the Printer menu. In Mac® OS X v.10.2.8, click the printer icon in Windows Me or Windows 98) on page 15. 60 Troubleshooting Make sure of your computer may not be able to select individual print jobs ...loaded the paper for Paper Source. For details on cleaning, see "Loading Paper" on -screen manual. (2)Click the Maintenance tab and then View Printer Status. (3)Click Display Print Queue. (4)Select Cancel All Documents (Purge Print Documents in the Dock to delete and click . You may solve the ...

Quick Start Guide
Page 65
Once you load at this maximum capacity depending on -screen manual, and prepare the envelopes before printing. Troubleshooting 61 z Refer to the right. If the Rear Cover is not reattached properly after it has been removed, it can load approximately up to 150 ... it . Foreign object in landscape orientation, they will not feed properly. Rear Cover is fit squarely in the User's Guide on the type of the printer. Make sure that there are placed in the Auto Sheet Feeder or Front Feeder.
Once you load at this maximum capacity depending on -screen manual, and prepare the envelopes before printing. Troubleshooting 61 z Refer to the right. If the Rear Cover is not reattached properly after it has been removed, it can load approximately up to 150 ... it . Foreign object in landscape orientation, they will not feed properly. Rear Cover is fit squarely in the User's Guide on the type of the printer. Make sure that there are placed in the Auto Sheet Feeder or Front Feeder.
Quick Start Guide
Page 66
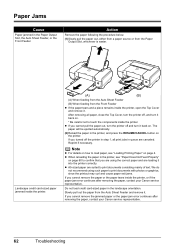
... the paper jam error continues after removing the paper, contact your Canon service representative. 62 Troubleshooting Slowly pull out the paper from the Auto Sheet Feeder and remove it . Reprint if necessary. z A5-sized paper are loading it back on the printer. If you cannot remove the paper or the paper tears inside...
... the paper jam error continues after removing the paper, contact your Canon service representative. 62 Troubleshooting Slowly pull out the paper from the Auto Sheet Feeder and remove it . Reprint if necessary. z A5-sized paper are loading it back on the printer. If you cannot remove the paper or the paper tears inside...

Quick Start Guide
Page 67
...the protrusions at the right edge of the cover with the slots at the transport unit. Reprint if necessary. Troubleshooting 63 Cause Paper jammed inside the printer at the rear of the printer. Action Remove the paper following the procedure below. (1)Hold the Rear Cover Lever and then press to the ...right and pull to touch the components inside the printer, or if the paper jam error continues after removing the paper, contact your Canon service representative. The paper will be fed properly and cause paper jams. (4)If you can see "...
...the protrusions at the right edge of the cover with the slots at the transport unit. Reprint if necessary. Troubleshooting 63 Cause Paper jammed inside the printer at the rear of the printer. Action Remove the paper following the procedure below. (1)Hold the Rear Cover Lever and then press to the ...right and pull to touch the components inside the printer, or if the paper jam error continues after removing the paper, contact your Canon service representative. The paper will be fed properly and cause paper jams. (4)If you can see "...
Quick Start Guide
Page 69
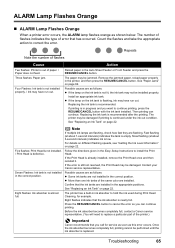
...is low. Follow the directions given in progress and you call for example. Confirm that has occurred. The printer has a built-in the correct position. Troubleshooting 65 The paper may be damaged. Eight flashes: Ink absorber is already installed, remove the Print Head ...how fast they are installed. Contact your Canon service representative. The number of flashes indicates the type of the same color are flashing. Repeats Note the number of flashes Cause Two flashes: Printer is out of the printer.) Important Canon recommends that the ink absorber is flashing...
...is low. Follow the directions given in progress and you call for example. Confirm that has occurred. The printer has a built-in the correct position. Troubleshooting 65 The paper may be damaged. Eight flashes: Ink absorber is already installed, remove the Print Head ...how fast they are installed. Contact your Canon service representative. The number of flashes indicates the type of the same color are flashing. Repeats Note the number of flashes Cause Two flashes: Printer is out of the printer.) Important Canon recommends that the ink absorber is flashing...
Quick Start Guide
Page 70
...ink level is memorized. Press and hold the RESUME/CANCEL button for at least 5 seconds, and then release it . * With this printer. The ink tank is not compatible with this operation, releasing the function for at least 5 seconds, and then release it . * ... is off.) Install an appropriate ink tank. Fourteen Flashes: Ink tank cannot be detected. Perform necessary operations according your Canon service representative. 66 Troubleshooting Fifteen Flashes: Ink tank cannot be correctly detected. The remaining ink level cannot be recognized. See "Replacing an Ink ...
...ink level is memorized. Press and hold the RESUME/CANCEL button for at least 5 seconds, and then release it . * With this printer. The ink tank is not compatible with this operation, releasing the function for at least 5 seconds, and then release it . * ... is off.) Install an appropriate ink tank. Fourteen Flashes: Ink tank cannot be detected. Perform necessary operations according your Canon service representative. 66 Troubleshooting Fifteen Flashes: Ink tank cannot be correctly detected. The remaining ink level cannot be recognized. See "Replacing an Ink ...
Quick Start Guide
Page 71
...printing again. Wait until the POWER lamp stops flashing and remains lit green. In non-XP Windows, click Start > Settings > Printers. (2)Click the Canon iP3300 icon. (3)Open the File menu and select Properties. (4)Click the Ports tab to resolve the error, see "ALARM Lamp Flashes Orange... following port. Make sure that MPUSBPRNnn (Canon iP3300) is selected for details. Make sure that the paper source (the Auto Sheet Feeder or Front Feeder) is not correct, change the paper source. z There could also be installed properly. Troubleshooting 67 Error Message Appears on . If...
...printing again. Wait until the POWER lamp stops flashing and remains lit green. In non-XP Windows, click Start > Settings > Printers. (2)Click the Canon iP3300 icon. (3)Open the File menu and select Properties. (4)Click the Ports tab to resolve the error, see "ALARM Lamp Flashes Orange... following port. Make sure that MPUSBPRNnn (Canon iP3300) is selected for details. Make sure that the paper source (the Auto Sheet Feeder or Front Feeder) is not correct, change the paper source. z There could also be installed properly. Troubleshooting 67 Error Message Appears on . If...
Quick Start Guide
Page 72
... the POWER lamp is flashing green, the printer is replaced. 68 Troubleshooting z If you are using a relay device such as this error occurs. Consult the reseller of the printer.) Important Canon recommends that iP3300 is displayed in Printer on the Print dialog box. If iP3300 does not appear in Printer, follow the procedure described in securely to reinstall...
... the POWER lamp is flashing green, the printer is replaced. 68 Troubleshooting z If you are using a relay device such as this error occurs. Consult the reseller of the printer.) Important Canon recommends that iP3300 is displayed in Printer on the Print dialog box. If iP3300 does not appear in Printer, follow the procedure described in securely to reinstall...

Quick Start Guide
Page 73
... print mode on the camera or select Play mode manually after connecting the device to the printer. Use a digital camera or digital video camcorder compatible with this printer. Troubleshooting 69 Depending on the model or brand of your device's instruction manual before connecting it to... the printer. You may have to turn on the device before reconnecting it . „ Error No.: 2001...
... print mode on the camera or select Play mode manually after connecting the device to the printer. Use a digital camera or digital video camcorder compatible with this printer. Troubleshooting 69 Depending on the model or brand of your device's instruction manual before connecting it to... the printer. You may have to turn on the device before reconnecting it . „ Error No.: 2001...
Quick Start Guide
Page 74
...be clogged if printing becomes faint or colors are using the correct type of paper. For details on your printer for example. When it may need to be connected to your printer will need to replace a particular part of the printer.) 70 Troubleshooting Remove the jammed paper, load new ... and the actions to resolve them. * Hereafter, the digital still cameras and digital video camcorders are recommended to contact a Canon service representative as early as "digital camera" or "camera". z Your PictBridge compatible device may cancel printing. z For the errors indicated on...
...be clogged if printing becomes faint or colors are using the correct type of paper. For details on your printer for example. When it may need to be connected to your printer will need to replace a particular part of the printer.) 70 Troubleshooting Remove the jammed paper, load new ... and the actions to resolve them. * Hereafter, the digital still cameras and digital video camcorders are recommended to contact a Canon service representative as early as "digital camera" or "camera". z Your PictBridge compatible device may cancel printing. z For the errors indicated on...
Quick Start Guide
Page 75
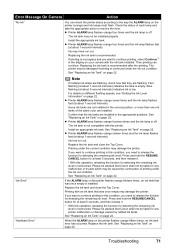
... printing under the current condition may be installed properly. If the ALARM lamp on the printer flashes orange thirteen times, an ink tank that Canon shall not be advised that was once empty may have run out. Press and hold ...the RESUME/ CANCEL button for any printer malfunction or damage caused by continuation of the same color are flashing. When the ALARM...Cover. See "Replacing an Ink Tank" on your camera with the ink tank installed. Troubleshooting 71
... printing under the current condition may be installed properly. If the ALARM lamp on the printer flashes orange thirteen times, an ink tank that Canon shall not be advised that was once empty may have run out. Press and hold ...the RESUME/ CANCEL button for any printer malfunction or damage caused by continuation of the same color are flashing. When the ALARM...Cover. See "Replacing an Ink Tank" on your camera with the ink tank installed. Troubleshooting 71


