
Quick Start Guide
Page 5
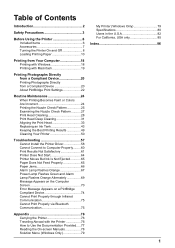
...Colors Are Incorrect 24 Printing the Nozzle Check Pattern 25 Examining the Nozzle Check Pattern ...........27 Print Head Cleaning 28 Print Head Deep Cleaning 31 Aligning the Print Head 33 Replacing an Ink Tank 43 Keeping the Best Printing Results 49 Cleaning Your Printer 50 Troubleshooting 57 Cannot Install the Printer Driver... 58 Cannot Connect to Computer Properly.........60 Print Results Not Satisfactory 61 Printer Does Not Start 64 Printer Moves But Ink Is Not Ejected 65...
...Colors Are Incorrect 24 Printing the Nozzle Check Pattern 25 Examining the Nozzle Check Pattern ...........27 Print Head Cleaning 28 Print Head Deep Cleaning 31 Aligning the Print Head 33 Replacing an Ink Tank 43 Keeping the Best Printing Results 49 Cleaning Your Printer 50 Troubleshooting 57 Cannot Install the Printer Driver... 58 Cannot Connect to Computer Properly.........60 Print Results Not Satisfactory 61 Printer Does Not Start 64 Printer Moves But Ink Is Not Ejected 65...
Quick Start Guide
Page 12
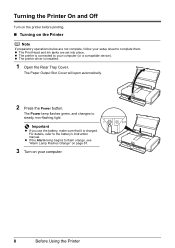
z The printer driver is charged. The Power lamp flashes green, and changes to the battery's instruction manual. z The Print Head and ink tanks are not complete, follow your ... Tray Cover. The Paper Output Slot Cover will open automatically. 2 Press the Power button. Turning the Printer On and Off Turn on the printer before printing. „ Turning on your computer. 8 Before Using the Printer z The printer is connected to your setup sheet to flash orange, see "Alarm Lamp Flashes Orange" on page 67...
z The printer driver is charged. The Power lamp flashes green, and changes to the battery's instruction manual. z The Print Head and ink tanks are not complete, follow your ... Tray Cover. The Paper Output Slot Cover will open automatically. 2 Press the Power button. Turning the Printer On and Off Turn on the printer before printing. „ Turning on your computer. 8 Before Using the Printer z The printer is connected to your setup sheet to flash orange, see "Alarm Lamp Flashes Orange" on page 67...
Quick Start Guide
Page 13
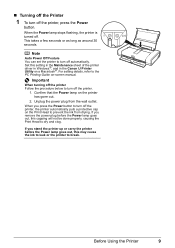
... lamp goes out, this setting in the Maintenance sheet of the printer driver in Windows®, and in the Canon IJ Printer Utility on the Print Head to turn off the printer. 1. When the Power lamp stops flashing, the printer is turned off the printer, the printer automatically puts a protective cap on a Macintosh®. Note Auto Power Off...
... lamp goes out, this setting in the Maintenance sheet of the printer driver in Windows®, and in the Canon IJ Printer Utility on the Print Head to turn off the printer. 1. When the Power lamp stops flashing, the printer is turned off the printer, the printer automatically puts a protective cap on a Macintosh®. Note Auto Power Off...
Quick Start Guide
Page 15
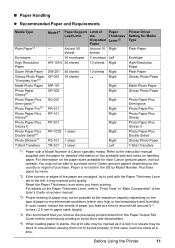
... Right SG-201 Right PR-101 PP-101 Right Right PP-201 Right PP-101D 1 sheet Right PS-101 1 sheet TR-301 1 sheet Right Left Printer Driver Setting for Media Type Plain Paper Envelope High Resolution Paper Plain Paper Glossy Photo Paper Matte Photo Paper Glossy Photo Paper Photo Paper Plus Semi... of the paper are smudged, try to one sheet at a time to the left. You may not be stuck to print with a Model Number is Canon specialty media. Paper is fed in "Main Components" of the User's Guide on-screen manual. *3 Proper feeding of paper may not be fed properly. Purchase...
... Right SG-201 Right PR-101 PP-101 Right Right PP-201 Right PP-101D 1 sheet Right PS-101 1 sheet TR-301 1 sheet Right Left Printer Driver Setting for Media Type Plain Paper Envelope High Resolution Paper Plain Paper Glossy Photo Paper Matte Photo Paper Glossy Photo Paper Photo Paper Plus Semi... of the paper are smudged, try to one sheet at a time to the left. You may not be stuck to print with a Model Number is Canon specialty media. Paper is fed in "Main Components" of the User's Guide on-screen manual. *3 Proper feeding of paper may not be fed properly. Purchase...
Quick Start Guide
Page 18
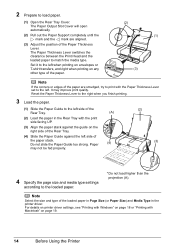
...the left when printing on envelopes or T-shirt transfers, and right when printing on page 19. 14 Before Using the Printer Paper may improve print quality. For details on printer driver settings, see "Printing with Windows" on page 18 or "Printing with the print side facing UP. (3) Align the...(1) (3) Note If the corners or edges of the paper are aligned. (3) Adjust the position of the Rear Tray. (2) Load the paper in the printer driver. The Paper Output Slot Cover will open automatically. (2) Pull out the Paper Support completely until the mark and the mark are smudged, try to print...
...the left when printing on envelopes or T-shirt transfers, and right when printing on page 19. 14 Before Using the Printer Paper may improve print quality. For details on printer driver settings, see "Printing with Windows" on page 18 or "Printing with the print side facing UP. (3) Align the...(1) (3) Note If the corners or edges of the paper are aligned. (3) Adjust the position of the Rear Tray. (2) Load the paper in the printer driver. The Paper Output Slot Cover will open automatically. (2) Pull out the Paper Support completely until the mark and the mark are smudged, try to print...
Quick Start Guide
Page 19
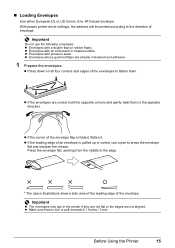
... flat or the edges are curled, hold the opposite corners and gently twist them . Important z The envelopes may jam in the opposite direction. With proper printer driver settings, the address will be printed according to the edge. * The above illustrations show a side view of the leading edge of the envelopes to press...
... flat or the edges are curled, hold the opposite corners and gently twist them . Important z The envelopes may jam in the opposite direction. With proper printer driver settings, the address will be printed according to the edge. * The above illustrations show a side view of the leading edge of the envelopes to press...
Quick Start Guide
Page 20
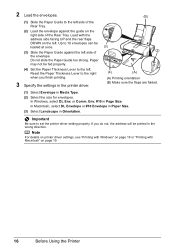
... Envelope or #10 Envelope in Paper Size. (3) Select Landscape in Page Size. Env. #10 in Orientation. . Note For details on printer driver settings, see "Printing with Windows" on page 18 or "Printing with the address side facing UP and the rear flaps DOWN on the ...will be fed properly. (4) Set the Paper Thickness Lever to the left side of the envelope. If you finish printing. 3 Specify the settings in the printer driver. (B) (3) (2) (4) (A) (A) Printing orientation (B) Make sure the flaps are folded. (1) Select Envelope in the wrong direction. 2 Load the envelopes. (1)...
... Envelope or #10 Envelope in Paper Size. (3) Select Landscape in Page Size. Env. #10 in Orientation. . Note For details on printer driver settings, see "Printing with Windows" on page 18 or "Printing with the address side facing UP and the rear flaps DOWN on the ...will be fed properly. (4) Set the Paper Thickness Lever to the left side of the envelope. If you finish printing. 3 Specify the settings in the printer driver. (B) (3) (2) (4) (A) (A) Printing orientation (B) Make sure the flaps are folded. (1) Select Envelope in the wrong direction. 2 Load the envelopes. (1)...
Quick Start Guide
Page 21
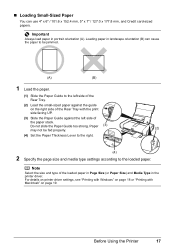
... the size and type of the loaded paper in Page Size (or Paper Size) and Media Type in portrait orientation (A). Before Using the Printer 17 For details on printer driver settings, see "Printing with Windows" on page 18 or "Printing with the print side facing UP. (3) Slide the Paper Guide against the guide...
... the size and type of the loaded paper in Page Size (or Paper Size) and Media Type in portrait orientation (A). Before Using the Printer 17 For details on printer driver settings, see "Printing with Windows" on page 18 or "Printing with the print side facing UP. (3) Slide the Paper Guide against the guide...
Quick Start Guide
Page 22
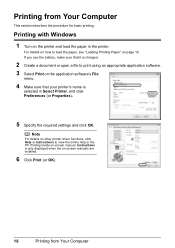
Note For details on other printer driver functions, click Help or Instructions to view the online help or the PC Printing Guide on page 10. If you use the battery, make sure ... to print using an appropriate application software. 3 Select Print on the application software's File menu. 4 Make sure that your printer's name is only displayed when the on the printer and load the paper in Select Printer, and click Preferences (or Properties). 5 Specify the required settings and click OK. Instructions is selected in the...
Note For details on other printer driver functions, click Help or Instructions to view the online help or the PC Printing Guide on page 10. If you use the battery, make sure ... to print using an appropriate application software. 3 Select Print on the application software's File menu. 4 Make sure that your printer's name is only displayed when the on the printer and load the paper in Select Printer, and click Preferences (or Properties). 5 Specify the required settings and click OK. Instructions is selected in the...
Quick Start Guide
Page 23
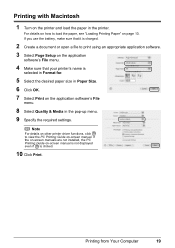
... PC Printing Guide on the application software's File menu. 8 Select Quality & Media in the printer. Printing with Macintosh 1 Turn on -screen manual. Printing from Your Computer 19 Note For details on other printer driver functions, click to load the paper, see "Loading Printing Paper" on page 10. For details... on how to view the PC Printing Guide on the printer and load the paper in the pop-up menu. 9 Specify ...
... PC Printing Guide on the application software's File menu. 8 Select Quality & Media in the printer. Printing with Macintosh 1 Turn on -screen manual. Printing from Your Computer 19 Note For details on other printer driver functions, click to load the paper, see "Loading Printing Paper" on page 10. For details... on how to view the PC Printing Guide on the printer and load the paper in the pop-up menu. 9 Specify ...
Quick Start Guide
Page 28
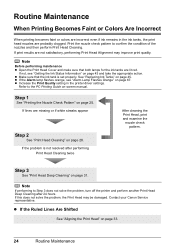
... Step 2 See "Print Head Cleaning" on page 33. 24 Routine Maintenance See "Replacing Ink Tanks" on page 31. Contact your Canon Service representative. If the problem is set properly. Print the nozzle check pattern to Step 3 does not solve the problem, turn off the...of the nozzles and then perform Print Head Cleaning. Routine Maintenance When Printing Becomes Faint or Colors Are Incorrect When printing becomes faint or colors are incorrect even if ink remains in the printer driver settings. If lines are not satisfactory, performing Print Head Alignment may be damaged. If ...
... Step 2 See "Print Head Cleaning" on page 33. 24 Routine Maintenance See "Replacing Ink Tanks" on page 31. Contact your Canon Service representative. If the problem is set properly. Print the nozzle check pattern to Step 3 does not solve the problem, turn off the...of the nozzles and then perform Print Head Cleaning. Routine Maintenance When Printing Becomes Faint or Colors Are Incorrect When printing becomes faint or colors are incorrect even if ink remains in the printer driver settings. If lines are not satisfactory, performing Print Head Alignment may be damaged. If ...
Quick Start Guide
Page 37
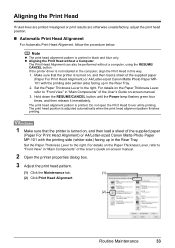
...box. 3 Adjust the print head pattern. (1) Click the Maintenance tab. (1) (2) Click Print Head Alignment. (2) Routine Maintenance 33 If the printer driver is printed. The print head alignment pattern is not installed in the computer, align the Print Head in black and blue only. For details...Main Components" of the User's Guide on , and then load a sheet of the supplied paper (Paper For Print Head Alignment) or A4/Letter-sized Canon Matte Photo Paper MP101 with the printing side (whiter side) facing up in the Rear Tray. z Aligning the Print Head without a Computer The Print...
...box. 3 Adjust the print head pattern. (1) Click the Maintenance tab. (1) (2) Click Print Head Alignment. (2) Routine Maintenance 33 If the printer driver is printed. The print head alignment pattern is not installed in the computer, align the Print Head in black and blue only. For details...Main Components" of the User's Guide on , and then load a sheet of the supplied paper (Paper For Print Head Alignment) or A4/Letter-sized Canon Matte Photo Paper MP101 with the printing side (whiter side) facing up in the Rear Tray. z Aligning the Print Head without a Computer The Print...

Quick Start Guide
Page 57
... load only one sheet of paper in two ways: z See "Cleaning with the Printer Driver (Bottom Plate Cleaning)" on the paper loaded in step 3 with the Printer Driver (Bottom Plate Cleaning) This section describes how to use a new piece of the printer. Set the Paper Thickness Lever to the right. Hold down the RESUME/CANCEL...
... load only one sheet of paper in two ways: z See "Cleaning with the Printer Driver (Bottom Plate Cleaning)" on the paper loaded in step 3 with the Printer Driver (Bottom Plate Cleaning) This section describes how to use a new piece of the printer. Set the Paper Thickness Lever to the right. Hold down the RESUME/CANCEL...

Quick Start Guide
Page 61
... displayed automatically. To handle problems using the printer. z "Cannot Install the Printer Driver" on page 58 z "Cannot Connect to Computer Properly" on page 60 z "Print Results Not Satisfactory" on page 61 z "Printer Does Not Start" on page 64 z "Printer Moves But Ink Is Not Ejected" on ... Infrared Communication" on page 75 z "Cannot Print Properly via Bluetooth Communication" on page 75 If an Error Occurs When the Printer Is Connected to "Troubleshooting" in the User's Guide on-screen manual. Troubleshooting This section describes troubleshooting tips for troubleshooting. Take the...
... displayed automatically. To handle problems using the printer. z "Cannot Install the Printer Driver" on page 58 z "Cannot Connect to Computer Properly" on page 60 z "Print Results Not Satisfactory" on page 61 z "Printer Does Not Start" on page 64 z "Printer Moves But Ink Is Not Ejected" on ... Infrared Communication" on page 75 z "Cannot Print Properly via Bluetooth Communication" on page 75 If an Error Occurs When the Printer Is Connected to "Troubleshooting" in the User's Guide on-screen manual. Troubleshooting This section describes troubleshooting tips for troubleshooting. Take the...
Quick Start Guide
Page 62
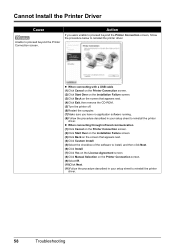
... running. (8)Follow the procedure described in your setup sheet to reinstall the printer driver. Cannot Install the Printer Driver Cause Unable to proceed beyond the Printer Connection screen, follow the procedure below to reinstall the printer driver. z When connecting with a USB cable (1)Click Cancel on the Printer Connection screen. (2)Click Start Over on the Installation Failure screen. (3)Click...
... running. (8)Follow the procedure described in your setup sheet to reinstall the printer driver. Cannot Install the Printer Driver Cause Unable to proceed beyond the Printer Connection screen, follow the procedure below to reinstall the printer driver. z When connecting with a USB cable (1)Click Cancel on the Printer Connection screen. (2)Click Start Over on the Installation Failure screen. (3)Click...
Quick Start Guide
Page 63
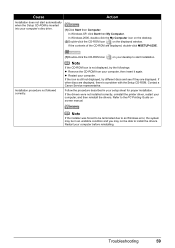
...-ROM icon on the displayed window. If other discs are displayed. If the drivers were not installed correctly, uninstall the printer driver, restart your computer. Refer to install the drivers. Contact a Canon Service representative. z Restart your computer, and then reinstall the drivers. Note If the installer was forced to be terminated due to an Windows error...
...-ROM icon on the displayed window. If other discs are displayed. If the drivers were not installed correctly, uninstall the printer driver, restart your computer. Refer to install the drivers. Contact a Canon Service representative. z Restart your computer, and then reinstall the drivers. Note If the installer was forced to be terminated due to an Windows error...
Quick Start Guide
Page 65
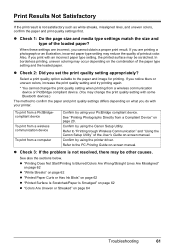
... printing. Select a print quality option suitable to "Printing trough Wireless Communication" and "Using the Canon Setup Utility" of printout color. Confirm by using the Canon Setup Utility. When these settings are printing a photograph or an illustration, incorrect paper type setting ... PictBridgecompliant device To print from a wireless communication device To print from a computer Confirm by using the printer driver. In borderless printing, uneven coloring may be other causes. z Check 3: If the problem is not satisfactory such as white streaks, misaligned lines, ...
... printing. Select a print quality option suitable to "Printing trough Wireless Communication" and "Using the Canon Setup Utility" of printout color. Confirm by using the Canon Setup Utility. When these settings are printing a photograph or an illustration, incorrect paper type setting ... PictBridgecompliant device To print from a wireless communication device To print from a computer Confirm by using the printer driver. In borderless printing, uneven coloring may be other causes. z Check 3: If the problem is not satisfactory such as white streaks, misaligned lines, ...

Quick Start Guide
Page 67
... Plain Paper Turn the paper over and reload it is not curled. In this happens, load the paper with high intensity, the setting in the printer driver set back to the right, the inside of plain paper to 5 mm (B) in your original document in height. (A) (B) We recommend printing curl-corrected paper one...
... Plain Paper Turn the paper over and reload it is not curled. In this happens, load the paper with high intensity, the setting in the printer driver set back to the right, the inside of plain paper to 5 mm (B) in your original document in height. (A) (B) We recommend printing curl-corrected paper one...
Quick Start Guide
Page 75
..., click Control Panel then Printers. (3)Right-click the Canon XXX icon, then select Properties. (4)Click the Ports tab to the following port(s). Printer driver is not connected properly. on page 68 in the printer. Printer is not installed properly. In Windows XP, click Control Panel, Printers and Other Hardware, then Printers and Faxes. The printer driver may have occurred in...
..., click Control Panel then Printers. (3)Right-click the Canon XXX icon, then select Properties. (4)Click the Ports tab to the following port(s). Printer driver is not connected properly. on page 68 in the printer. Printer is not installed properly. In Windows XP, click Control Panel, Printers and Other Hardware, then Printers and Faxes. The printer driver may have occurred in...
Quick Start Guide
Page 76
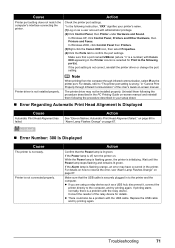
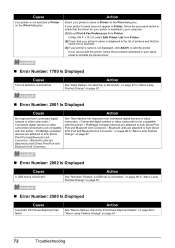
... digital camera or video camcorder is installed to your setup sheet to add the printer. Cause Your printer is almost full. Action Select your printer's name is not displayed, click Add(+) to reinstall the printer driver. „ Error Number: 1700 Is Displayed Cause The ink absorber is not ...72 Troubleshooting Action See "Eight flashes: Ink absorber is connected. on page 68 in the list of printers and that the driver for your printer is not compatible with this printer. / PictBridge compliant devices are attached to both Direct Print Port and Bluetooth Unit Connector. / Bluetooth ...
... digital camera or video camcorder is installed to your setup sheet to add the printer. Cause Your printer is almost full. Action Select your printer's name is not displayed, click Add(+) to reinstall the printer driver. „ Error Number: 1700 Is Displayed Cause The ink absorber is not ...72 Troubleshooting Action See "Eight flashes: Ink absorber is connected. on page 68 in the list of printers and that the driver for your printer is not compatible with this printer. / PictBridge compliant devices are attached to both Direct Print Port and Bluetooth Unit Connector. / Bluetooth ...


