
Quick Start Guide
Page 5
... Device 20 About PictBridge Print Settings 22 Routine Maintenance 24 When Printing Becomes Faint or Colors Are Incorrect 24 Printing the Nozzle Check Pattern 25 Examining the Nozzle Check Pattern ...........27 Print Head Cleaning 28 Print Head Deep Cleaning 31 Aligning the Print Head 33 Replacing an Ink Tank 43 Keeping the Best Printing Results 49 Cleaning Your Printer 50 Troubleshooting 57...
... Device 20 About PictBridge Print Settings 22 Routine Maintenance 24 When Printing Becomes Faint or Colors Are Incorrect 24 Printing the Nozzle Check Pattern 25 Examining the Nozzle Check Pattern ...........27 Print Head Cleaning 28 Print Head Deep Cleaning 31 Aligning the Print Head 33 Replacing an Ink Tank 43 Keeping the Best Printing Results 49 Cleaning Your Printer 50 Troubleshooting 57...
Quick Start Guide
Page 9
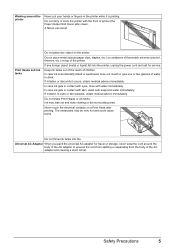
...gets in contact with eyes, rinse with water immediately. Safety Precautions 5 Do not carry or store the printer with soap and water immediately. Never touch the electrical contacts on the printer. Print Heads and ink tanks Do not place any foreign object (metal or liquid) fall into fire. Do not ... thinners, etc.) on top of children. If any object on a Print Head after printing. In case ink gets in contact with skin, wash with the front of printer (the Paper Output Slot Cover side) down. Do not shake Print Heads or ink tanks. Working around the body of the AC adapter to ...
...gets in contact with eyes, rinse with water immediately. Safety Precautions 5 Do not carry or store the printer with soap and water immediately. Never touch the electrical contacts on the printer. Print Heads and ink tanks Do not place any foreign object (metal or liquid) fall into fire. Do not ... thinners, etc.) on top of children. If any object on a Print Head after printing. In case ink gets in contact with skin, wash with the front of printer (the Paper Output Slot Cover side) down. Do not shake Print Heads or ink tanks. Working around the body of the AC adapter to ...
Quick Start Guide
Page 10
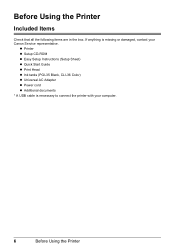
Before Using the Printer Included Items Check that all the following items are in the box. z Printer z Setup CD-ROM z Easy Setup Instructions (Setup Sheet) z Quick Start Guide z Print Head z Ink tanks (PGI-35 Black, CLI-36 Color) z Universal AC Adapter z Power cord z Additional documents * A USB cable is missing or damaged, contact your computer. 6 Before Using the Printer If anything is necessary to connect the printer with your Canon Service representative.
Before Using the Printer Included Items Check that all the following items are in the box. z Printer z Setup CD-ROM z Easy Setup Instructions (Setup Sheet) z Quick Start Guide z Print Head z Ink tanks (PGI-35 Black, CLI-36 Color) z Universal AC Adapter z Power cord z Additional documents * A USB cable is missing or damaged, contact your computer. 6 Before Using the Printer If anything is necessary to connect the printer with your Canon Service representative.
Quick Start Guide
Page 12
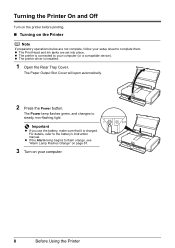
... connected to complete them. For details, refer to steady, non-flashing light. z The printer driver is charged. z The Print Head and ink tanks are not complete, follow your setup sheet to your computer. 8 Before Using the Printer Turning the Printer On and Off Turn on the printer before printing. „ Turning on your computer (or a compatible device).
... connected to complete them. For details, refer to steady, non-flashing light. z The printer driver is charged. z The Print Head and ink tanks are not complete, follow your setup sheet to your computer. 8 Before Using the Printer Turning the Printer On and Off Turn on the printer before printing. „ Turning on your computer (or a compatible device).
Quick Start Guide
Page 13
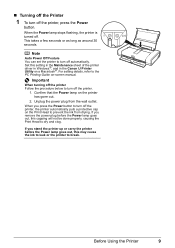
... out, this setting in the Maintenance sheet of the printer driver in Windows®, and in the Canon IJ Printer Utility on the Print Head to turn off the printer, press the Power button. „ Turning off the Printer 1 To turn off the printer. 1. This takes a few seconds or as long... as around 30 seconds. Important When turning off the printer Follow the procedure below...
... out, this setting in the Maintenance sheet of the printer driver in Windows®, and in the Canon IJ Printer Utility on the Print Head to turn off the printer, press the Power button. „ Turning off the Printer 1 To turn off the printer. 1. This takes a few seconds or as long... as around 30 seconds. Important When turning off the printer Follow the procedure below...
Quick Start Guide
Page 18
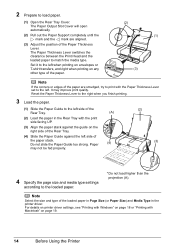
... the size and type of the paper are aligned. (3) Adjust the position of the paper stack. For details on printer driver settings, see "Printing with Windows" on page 18 or "Printing with the print side facing UP. (3) Align the paper stack against the guide on page 19. 14 Before Using the... left . The Paper Thickness Lever switches the clearance between the Print Head and the loaded paper to the left side of the Rear Tray. (2) Load the paper in the printer driver. Reset the Paper Thickness Lever to the right when you finish printing. 3 Load the paper. (1) Slide the Paper Guide to...
... the size and type of the paper are aligned. (3) Adjust the position of the paper stack. For details on printer driver settings, see "Printing with Windows" on page 18 or "Printing with the print side facing UP. (3) Align the paper stack against the guide on page 19. 14 Before Using the... left . The Paper Thickness Lever switches the clearance between the Print Head and the loaded paper to the left side of the Rear Tray. (2) Load the paper in the printer driver. Reset the Paper Thickness Lever to the right when you finish printing. 3 Load the paper. (1) Slide the Paper Guide to...
Quick Start Guide
Page 28
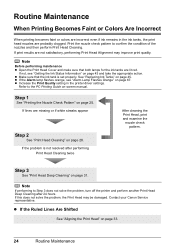
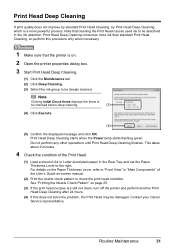
... 31. If the problem is set properly. Routine Maintenance When Printing Becomes Faint or Colors Are Incorrect When printing becomes faint or colors are incorrect even if ink remains in the printer driver settings. Step 3 See "Print Head Deep Cleaning" on -screen manual. z If the Alarm lamp... performing Print Head Alignment may be damaged. z Increase the Print Quality setting in the ink tanks, the print head nozzles are lit red. Note Before performing maintenance z Open the Print Head Cover and make sure that the ink tank is not resolved after 24 hours. Contact your Canon Service...
... 31. If the problem is set properly. Routine Maintenance When Printing Becomes Faint or Colors Are Incorrect When printing becomes faint or colors are incorrect even if ink remains in the printer driver settings. Step 3 See "Print Head Deep Cleaning" on -screen manual. z If the Alarm lamp... performing Print Head Alignment may be damaged. z Increase the Print Quality setting in the ink tanks, the print head nozzles are lit red. Note Before performing maintenance z Open the Print Head Cover and make sure that the ink tank is not resolved after 24 hours. Contact your Canon Service...
Quick Start Guide
Page 29
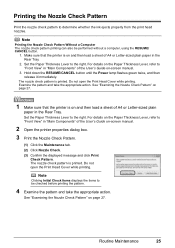
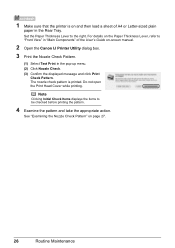
... the pattern and take the appropriate action. For details on page 27. 1 Make sure that the printer is printed. Examine the pattern and take the appropriate action. Do not open the Print Head Cover while printing. Printing the Nozzle Check Pattern Print the nozzle check pattern to be performed without a computer, using the RESUME/ CANCEL button. 1. Do...
... the pattern and take the appropriate action. For details on page 27. 1 Make sure that the printer is printed. Examine the pattern and take the appropriate action. Do not open the Print Head Cover while printing. Printing the Nozzle Check Pattern Print the nozzle check pattern to be performed without a computer, using the RESUME/ CANCEL button. 1. Do...
Quick Start Guide
Page 30
... Nozzle Check. (3) Confirm the displayed message and click Print Check Pattern. 1 Make sure that the printer is printed. Do not open the Print Head Cover while printing. The nozzle check pattern is on -screen manual. 2 Open the Canon IJ Printer Utility dialog box. 3 Print the Nozzle Check Pattern. (1) Select Test Print in the Rear Tray. See "Examining the Nozzle Check...
... Nozzle Check. (3) Confirm the displayed message and click Print Check Pattern. 1 Make sure that the printer is printed. Do not open the Print Head Cover while printing. The nozzle check pattern is on -screen manual. 2 Open the Canon IJ Printer Utility dialog box. 3 Print the Nozzle Check Pattern. (1) Select Test Print in the Rear Tray. See "Examining the Nozzle Check...
Quick Start Guide
Page 31
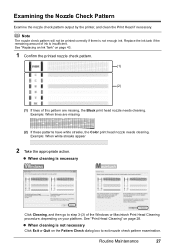
...: When lines are missing, the Black print head nozzle needs cleaning. See "Print Head Cleaning" on page 43. 1 Confirm the printed nozzle check pattern. (1) (2) (1) If lines of this pattern are missing (2) If these patterns have white streaks, the Color print head nozzle needs cleaning. Note The nozzle check...is insufficient. Replace the ink tank if the remaining amount of the Windows or Macintosh Print Head Cleaning procedure, depending on your platform. Examining the Nozzle Check Pattern Examine the nozzle check pattern output by the printer, and clean the Print Head if necessary.
...: When lines are missing, the Black print head nozzle needs cleaning. See "Print Head Cleaning" on page 43. 1 Confirm the printed nozzle check pattern. (1) (2) (1) If lines of this pattern are missing (2) If these patterns have white streaks, the Color print head nozzle needs cleaning. Note The nozzle check...is insufficient. Replace the ink tank if the remaining amount of the Windows or Macintosh Print Head Cleaning procedure, depending on your platform. Examining the Nozzle Check Pattern Examine the nozzle check pattern output by the printer, and clean the Print Head if necessary.
Quick Start Guide
Page 32
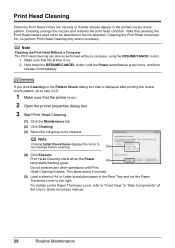
... Print Head consumes ink, so perform Print Head Cleaning only when necessary. Cleaning unclogs the nozzles and restores the print head condition. Hold down the RESUME/CANCEL button until Print Head Cleaning finishes. Note Clicking Initial Check Items displays the items to be absorbed in the printed nozzle check pattern. For details on . 2 Open the printer properties dialog box. 3 Start Print Head...
... Print Head consumes ink, so perform Print Head Cleaning only when necessary. Cleaning unclogs the nozzles and restores the print head condition. Hold down the RESUME/CANCEL button until Print Head Cleaning finishes. Note Clicking Initial Check Items displays the items to be absorbed in the printed nozzle check pattern. For details on . 2 Open the printer properties dialog box. 3 Start Print Head...
Quick Start Guide
Page 33
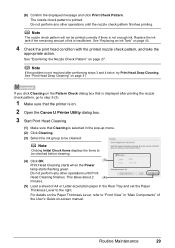
... Cleaning. Note Clicking Initial Check Items displays the items to "Front View" in "Main Components" of the User's Guide on . 2 Open the Canon IJ Printer Utility dialog box. 3 Start Print Head Cleaning. (1) Make sure that is selected in the Rear Tray and set the Paper Thickness Lever to be cleaned. Note If the problem...
... Cleaning. Note Clicking Initial Check Items displays the items to "Front View" in "Main Components" of the User's Guide on . 2 Open the Canon IJ Printer Utility dialog box. 3 Start Print Head Cleaning. (1) Make sure that is selected in the Rear Tray and set the Paper Thickness Lever to be cleaned. Note If the problem...

Quick Start Guide
Page 34
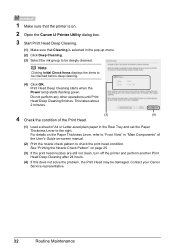
... ink. Note If the problem is printed. The nozzle check pattern is not resolved after performing steps 3 and 4 twice, try Print Head Deep Cleaning. See "Examining the Nozzle Check Pattern" on page 43. 4 Check the print head condition with the printed nozzle check pattern, and take the appropriate action. See "Print Head Deep Cleaning" on page 31. 30...
... ink. Note If the problem is printed. The nozzle check pattern is not resolved after performing steps 3 and 4 twice, try Print Head Deep Cleaning. See "Examining the Nozzle Check Pattern" on page 43. 4 Check the print head condition with the printed nozzle check pattern, and take the appropriate action. See "Print Head Deep Cleaning" on page 31. 30...
Quick Start Guide
Page 35
... and click OK. Do not perform any other operations until Print Head Deep Cleaning finishes. Contact your Canon Service representative. Note Clicking Initial Check Items displays the items to "Front View" in the ink absorber. For details on . 2 Open the printer properties dialog box. 3 Start Print Head Deep Cleaning. (1) Click the Maintenance tab. (2) Click Deep Cleaning...
... and click OK. Do not perform any other operations until Print Head Deep Cleaning finishes. Contact your Canon Service representative. Note Clicking Initial Check Items displays the items to "Front View" in the ink absorber. For details on . 2 Open the printer properties dialog box. 3 Start Print Head Deep Cleaning. (1) Click the Maintenance tab. (2) Click Deep Cleaning...
Quick Start Guide
Page 36
.... Note Clicking Initial Check Items displays the items to be damaged. For details on . 2 Open the Canon IJ Printer Utility dialog box. 3 Start Print Head Deep Cleaning. (1) Make sure that the printer is on the Paper Thickness Lever, refer to "Front View" in the Rear Tray and set the Paper Thickness Lever to the right...
.... Note Clicking Initial Check Items displays the items to be damaged. For details on . 2 Open the Canon IJ Printer Utility dialog box. 3 Start Print Head Deep Cleaning. (1) Make sure that the printer is on the Paper Thickness Lever, refer to "Front View" in the Rear Tray and set the Paper Thickness Lever to the right...
Quick Start Guide
Page 37
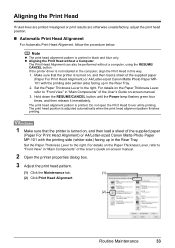
.../Letter-sized Canon Matte Photo Paper MP101 with the printing side (whiter side) facing up in black and blue only. For details on -screen manual. 2 Open the printer properties dialog box. 3 Adjust the print head pattern. (1) Click the Maintenance tab. (1) (2) Click Print Head Alignment. (2) Routine Maintenance 33 Aligning the Print Head If ruled lines are printed misaligned or print results are...
.../Letter-sized Canon Matte Photo Paper MP101 with the printing side (whiter side) facing up in black and blue only. For details on -screen manual. 2 Open the printer properties dialog box. 3 Adjust the print head pattern. (1) Click the Maintenance tab. (1) (2) Click Print Head Alignment. (2) Routine Maintenance 33 Aligning the Print Head If ruled lines are printed misaligned or print results are...
Quick Start Guide
Page 38
... "Main Components" of the User's Guide on-screen manual. 2 Open the Canon IJ Printer Utility dialog box. 3 Adjust the print head pattern. 34 Routine Maintenance Set the Paper Thickness Lever to complete. If the pattern is printed as shown right, the Print Head is printed. The print head alignment pattern is aligned automatically. For details on the Paper Thickness Lever...
... "Main Components" of the User's Guide on-screen manual. 2 Open the Canon IJ Printer Utility dialog box. 3 Adjust the print head pattern. 34 Routine Maintenance Set the Paper Thickness Lever to complete. If the pattern is printed as shown right, the Print Head is printed. The print head alignment pattern is aligned automatically. For details on the Paper Thickness Lever...
Quick Start Guide
Page 39
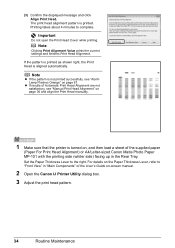
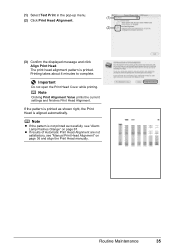
... Print Head Cover while printing. Note z If the pattern is not printed successfully, see "Manual Print Head Alignment" on page 67. (1) Select Test Print in the pop-up menu. (1) (2) Click Print Head Alignment. (2) (3) Confirm the displayed message and click Align Print Head. Printing takes about 4 minutes to complete. Note Clicking Print Alignment Value prints the current settings and finishes Print Head Alignment. z If results of Automatic Print Head...
... Print Head Cover while printing. Note z If the pattern is not printed successfully, see "Manual Print Head Alignment" on page 67. (1) Select Test Print in the pop-up menu. (1) (2) Click Print Head Alignment. (2) (3) Confirm the displayed message and click Align Print Head. Printing takes about 4 minutes to complete. Note Clicking Print Alignment Value prints the current settings and finishes Print Head Alignment. z If results of Automatic Print Head...
Quick Start Guide
Page 40
... message and click OK. (5) In the Maintenance sheet click Print Head Alignment. (6) Confirm the displayed message and click Align Print Head. Important Do not open the Print Head Cover while printing. For details on performing Automatic Print Head Alignment, see "Automatic Print Head Alignment" on page 33. 1 Make sure that the printer is on the Paper Thickness Lever, refer to the right...
... message and click OK. (5) In the Maintenance sheet click Print Head Alignment. (6) Confirm the displayed message and click Align Print Head. Important Do not open the Print Head Cover while printing. For details on performing Automatic Print Head Alignment, see "Automatic Print Head Alignment" on page 33. 1 Make sure that the printer is on the Paper Thickness Lever, refer to the right...
Quick Start Guide
Page 41
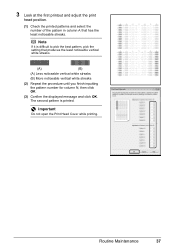
... the best pattern, pick the setting that has the least noticeable streaks. Important Do not open the Print Head Cover while printing. Note If it is printed. 3 Look at the first printout and adjust the print head position. (1) Check the printed patterns and select the number of the pattern in column A that produces the least noticeable vertical...
... the best pattern, pick the setting that has the least noticeable streaks. Important Do not open the Print Head Cover while printing. Note If it is printed. 3 Look at the first printout and adjust the print head position. (1) Check the printed patterns and select the number of the pattern in column A that produces the least noticeable vertical...


