User Guide
Page 3
... Uninstalling Printer Drivers 65 Routine Maintenance 66 When to Replace Ink Tank and Maintain Print Head 67 Replacing an Ink Tank 68 Printing the Nozzle Check Pattern 73 Print Head Cleaning 77 Print Head Deep Cleaning 80 Cleaning the Paper Feed Roller 83 Transporting the Printer 84 Printing Media 88 Compatible Media Types 89 Envelopes ...91 High Resolution Paper HR-101N...
... Uninstalling Printer Drivers 65 Routine Maintenance 66 When to Replace Ink Tank and Maintain Print Head 67 Replacing an Ink Tank 68 Printing the Nozzle Check Pattern 73 Print Head Cleaning 77 Print Head Deep Cleaning 80 Cleaning the Paper Feed Roller 83 Transporting the Printer 84 Printing Media 88 Compatible Media Types 89 Envelopes ...91 High Resolution Paper HR-101N...
User Guide
Page 21
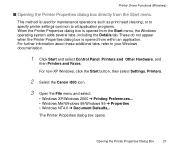
.... For non-XP Windows, click the Start button, then select Settings, Printers. 2 Select the Canon i850 icon. 3 Open the File menu and select: • Windows XP/Windows 2000 Printing Preferences... • Windows Me/Windows 98/Windows 95 Properties • Windows NT4.0 Document Defaults... ... (Windows) s Opening the Printer Properties dialog box directly from the Start menu This method is used for maintenance operations such as print head cleaning, or to specify printer settings common to your Windows documentation. 1 Click Start and select Control Panel, Printers and Other Hardware,...
.... For non-XP Windows, click the Start button, then select Settings, Printers. 2 Select the Canon i850 icon. 3 Open the File menu and select: • Windows XP/Windows 2000 Printing Preferences... • Windows Me/Windows 98/Windows 95 Properties • Windows NT4.0 Document Defaults... ... (Windows) s Opening the Printer Properties dialog box directly from the Start menu This method is used for maintenance operations such as print head cleaning, or to specify printer settings common to your Windows documentation. 1 Click Start and select Control Panel, Printers and Other Hardware,...
User Guide
Page 34
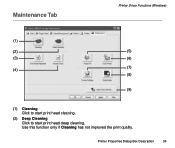
Use this function only if Cleaning has not improved the print quality. Printer Properties Dialog Box Description 34 Maintenance Tab Printer Driver Functions (Windows) (1) (2) (5) (3) (6) (4) (7) (8) (9) (1) Cleaning Click to start print head cleaning. (2) Deep Cleaning Click to start print head deep cleaning.
Use this function only if Cleaning has not improved the print quality. Printer Properties Dialog Box Description 34 Maintenance Tab Printer Driver Functions (Windows) (1) (2) (5) (3) (6) (4) (7) (8) (9) (1) Cleaning Click to start print head cleaning. (2) Deep Cleaning Click to start print head deep cleaning.
User Guide
Page 44
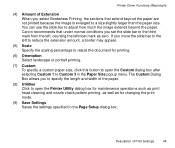
...Save Settings Saves the settings specified in the Paper Size popup menu. Description of Print Settings 44 Canon recommends that extend beyond the paper. If you select Borderless Printing, the sections that under normal conditions you to specify the length and width of the ...printed because the image is enlarged to a size slightly larger than the paper size. Printer Driver Functions (Macintosh) (4) Amount of Extension When you move the slide bar to the left , counting the leftmost mark as for maintenance operations such as print head cleaning and nozzle check pattern printing...
...Save Settings Saves the settings specified in the Paper Size popup menu. Description of Print Settings 44 Canon recommends that extend beyond the paper. If you select Borderless Printing, the sections that under normal conditions you to specify the length and width of the ...printed because the image is enlarged to a size slightly larger than the paper size. Printer Driver Functions (Macintosh) (4) Amount of Extension When you move the slide bar to the left , counting the leftmost mark as for maintenance operations such as print head cleaning and nozzle check pattern printing...
User Guide
Page 46
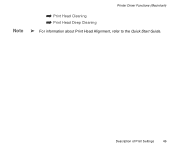
Note Printer Driver Functions (Macintosh) ¬ Print Head Cleaning ¬ Print Head Deep Cleaning ® For information about Print Head Alignment, refer to the Quick Start Guide. Description of Print Settings 46
Note Printer Driver Functions (Macintosh) ¬ Print Head Cleaning ¬ Print Head Deep Cleaning ® For information about Print Head Alignment, refer to the Quick Start Guide. Description of Print Settings 46
User Guide
Page 66
Routine Maintenance • When to Replace Ink Tank and Maintain Print Head • Replacing an Ink Tank • Printing the Nozzle Check Pattern • Print Head Cleaning • Print Head Deep Cleaning • Cleaning the Paper Feed Roller • Transporting the Printer Routine Maintenance 66
Routine Maintenance • When to Replace Ink Tank and Maintain Print Head • Replacing an Ink Tank • Printing the Nozzle Check Pattern • Print Head Cleaning • Print Head Deep Cleaning • Cleaning the Paper Feed Roller • Transporting the Printer Routine Maintenance 66
User Guide
Page 67
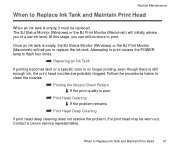
...procedures below to clean the nozzles. ¬ Printing the Nozzle Check Pattern If the print quality is poor ¬ Print Head Cleaning If the problem remains ¬ Print Head Deep Cleaning If print head deep cleaning does not resolve the problem, the print head may be ...Print Monitor (Macintosh) will tell you can still continue to replace the ink tank. When to flash four times. ¬ Replacing an Ink Tank If printing becomes faint or a specific color is no longer printing, even though there is still enough ink, the print head nozzles are probably clogged. Contact a Canon...
...procedures below to clean the nozzles. ¬ Printing the Nozzle Check Pattern If the print quality is poor ¬ Print Head Cleaning If the problem remains ¬ Print Head Deep Cleaning If print head deep cleaning does not resolve the problem, the print head may be ...Print Monitor (Macintosh) will tell you can still continue to replace the ink tank. When to flash four times. ¬ Replacing an Ink Tank If printing becomes faint or a specific color is no longer printing, even though there is still enough ink, the print head nozzles are probably clogged. Contact a Canon...
User Guide
Page 72
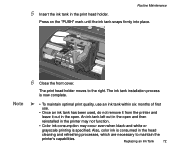
The ink tank installation process is now complete. ® • To maintain optimal print quality, use an ink tank within six months of first use. • Once an ink tank has been used, do not remove it from ... not function. • Color ink consumption may occur even when black-and-white or grayscale printing is consumed in the print head holder. The print head holder moves to maintain the printer's capabilities. Routine Maintenance 5 Insert the ink tank in the head cleaning and refreshing processes, which are necessary to the right. Press on the "PUSH" mark...
The ink tank installation process is now complete. ® • To maintain optimal print quality, use an ink tank within six months of first use. • Once an ink tank has been used, do not remove it from ... not function. • Color ink consumption may occur even when black-and-white or grayscale printing is consumed in the print head holder. The print head holder moves to maintain the printer's capabilities. Routine Maintenance 5 Insert the ink tank in the head cleaning and refreshing processes, which are necessary to the right. Press on the "PUSH" mark...

User Guide
Page 76
Unevenness in these patterns indicates the print head requires alignment. Examine the nozzle check pattern output by the printer. Lines missing here indicate the print head requires cleaning. Horizontal stripes in these patterns indicate the print head requires alignment. Printing the Nozzle Check Pattern 76 Routine Maintenance s Examining the Nozzle Check Pattern The nozzle check pattern should appear as follows when ink is discharged properly.
Unevenness in these patterns indicates the print head requires alignment. Examine the nozzle check pattern output by the printer. Lines missing here indicate the print head requires cleaning. Horizontal stripes in these patterns indicate the print head requires alignment. Printing the Nozzle Check Pattern 76 Routine Maintenance s Examining the Nozzle Check Pattern The nozzle check pattern should appear as follows when ink is discharged properly.
User Guide
Page 77
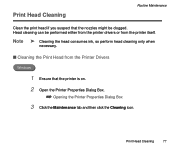
Note ® Cleaning the head consumes ink, so perform head cleaning only when necessary. Print Head Cleaning 77 Print Head Cleaning Routine Maintenance Clean the print head if you suspect that the nozzles might be performed either from the printer drivers or from the Printer Drivers Windows 1 Ensure that the printer is on. 2 Open the Printer Properties Dialog Box. ¬ Opening the Printer Properties Dialog Box 3 Click the Maintenance tab and then click the Cleaning icon. s Cleaning the Print Head from the printer itself. Head cleaning can be clogged.
Note ® Cleaning the head consumes ink, so perform head cleaning only when necessary. Print Head Cleaning 77 Print Head Cleaning Routine Maintenance Clean the print head if you suspect that the nozzles might be performed either from the printer drivers or from the Printer Drivers Windows 1 Ensure that the printer is on. 2 Open the Printer Properties Dialog Box. ¬ Opening the Printer Properties Dialog Box 3 Click the Maintenance tab and then click the Cleaning icon. s Cleaning the Print Head from the printer itself. Head cleaning can be clogged.

User Guide
Page 78
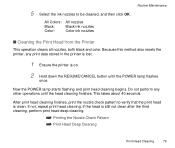
Print Head Cleaning 78 All Colors: All nozzles Black: Black ink nozzles Color: Color ink nozzles 5 Macintosh When the confirmation message is displayed, click OK. 1 Ensure the printer is on. 2 Open the Page Setup dialog box. Routine Maintenance 4 Select the ink nozzles to open the Printer Utility dialog box. 4 Select Cleaning from the pull-down menu, and then click the Cleaning icon. The Page Setup dialog box can normally be cleaned, and then click Execute. in the File menu. 3 Click the Utilities button to be opened by selecting Page Setup...
Print Head Cleaning 78 All Colors: All nozzles Black: Black ink nozzles Color: Color ink nozzles 5 Macintosh When the confirmation message is displayed, click OK. 1 Ensure the printer is on. 2 Open the Page Setup dialog box. Routine Maintenance 4 Select the ink nozzles to open the Printer Utility dialog box. 4 Select Cleaning from the pull-down menu, and then click the Cleaning icon. The Page Setup dialog box can normally be cleaned, and then click Execute. in the File menu. 3 Click the Utilities button to be opened by selecting Page Setup...
User Guide
Page 79
... and color. This takes about 40 seconds. Routine Maintenance 5 Select the ink nozzles to verify that the print head is still not clean after the third cleaning, perform print head deep cleaning. ¬ Printing the Nozzle Check Pattern ¬ Print Head Deep Cleaning Print Head Cleaning 79 Because this method also resets the printer, any other operations until the POWER lamp flashes once...
... and color. This takes about 40 seconds. Routine Maintenance 5 Select the ink nozzles to verify that the print head is still not clean after the third cleaning, perform print head deep cleaning. ¬ Printing the Nozzle Check Pattern ¬ Print Head Deep Cleaning Print Head Cleaning 79 Because this method also resets the printer, any other operations until the POWER lamp flashes once...

User Guide
Page 80
... the printer driver. Windows 1 Ensure the printer is a more ink than standard print head cleaning, so perform this procedure only when necessary. Print Head Deep Cleaning Routine Maintenance If print quality does not improve by standard print head cleaning, try deep cleaning, which is on. 2 Open the Printer Properties dialog box. ¬ Opening the Printer Properties Dialog Box 3 Click the Maintenance...
... the printer driver. Windows 1 Ensure the printer is a more ink than standard print head cleaning, so perform this procedure only when necessary. Print Head Deep Cleaning Routine Maintenance If print quality does not improve by standard print head cleaning, try deep cleaning, which is on. 2 Open the Printer Properties dialog box. ¬ Opening the Printer Properties Dialog Box 3 Click the Maintenance...

User Guide
Page 81
Print Head Deep Cleaning 81 in the File menu. 3 Click the Utilities button to open the Printer Utility dialog box. 4 Select Cleaning from the pull-down menu, and then click the Deep Cleaning icon. 5 Select the ink nozzles to complete, so simply wait until the POWER lamp stops &#... All nozzles Black: Black ink nozzles Color: Color ink nozzles Now the POWER lamp starts flashing and print head deep cleaning begins. The Page Setup dialog box can normally be cleaned, and click OK. Routine Maintenance Macintosh 1 Ensure the printer is on. 2 Open the Page Setup dialog ...
Print Head Deep Cleaning 81 in the File menu. 3 Click the Utilities button to open the Printer Utility dialog box. 4 Select Cleaning from the pull-down menu, and then click the Deep Cleaning icon. 5 Select the ink nozzles to complete, so simply wait until the POWER lamp stops &#... All nozzles Black: Black ink nozzles Color: Color ink nozzles Now the POWER lamp starts flashing and print head deep cleaning begins. The Page Setup dialog box can normally be cleaned, and click OK. Routine Maintenance Macintosh 1 Ensure the printer is on. 2 Open the Page Setup dialog ...

User Guide
Page 82
Routine Maintenance After print head deep cleaning finishes, print the nozzle check pattern to perform another print head deep cleaning 24 hours after turning off printer. Be sure to verify that there are sufficient ink levels in all ink tanks before turning off printer. Contact a Canon service representative. ¬ Printing the Nozzle Check Pattern Print Head Deep Cleaning 82 If the head is clean. If not, check that the head is still not clean, the print head may be worn out.
Routine Maintenance After print head deep cleaning finishes, print the nozzle check pattern to perform another print head deep cleaning 24 hours after turning off printer. Be sure to verify that there are sufficient ink levels in all ink tanks before turning off printer. Contact a Canon service representative. ¬ Printing the Nozzle Check Pattern Print Head Deep Cleaning 82 If the head is clean. If not, check that the head is still not clean, the print head may be worn out.
User Guide
Page 127
Contact a Canon service representative. s If a specific color does not print, check whether the corresponding ink tank is not resolved after cleaning the print head several times, the print head may be worn out. If the nozzle check pattern does not print correctly, clean the print head. ¬ Printing the Nozzle Check Pattern ¬ Print Head Cleaning If the problem is empty. Note ® Always ensure...
Contact a Canon service representative. s If a specific color does not print, check whether the corresponding ink tank is not resolved after cleaning the print head several times, the print head may be worn out. If the nozzle check pattern does not print correctly, clean the print head. ¬ Printing the Nozzle Check Pattern ¬ Print Head Cleaning If the problem is empty. Note ® Always ensure...

User Guide
Page 135
... not be curled. If you are using . With Borderless Printing, the print quality may decrease or smudging may scratch the printed surface. Clean the print head first and print with the correct paper. • The paper must be ...resolved by simply turning the paper over. s When printing on plain paper, also try printing again. This widens a gap between the print head and the paper. s Before starting Borderless Printing, check the paper that you use non-Canon...
... not be curled. If you are using . With Borderless Printing, the print quality may decrease or smudging may scratch the printed surface. Clean the print head first and print with the correct paper. • The paper must be ...resolved by simply turning the paper over. s When printing on plain paper, also try printing again. This widens a gap between the print head and the paper. s Before starting Borderless Printing, check the paper that you use non-Canon...
User Guide
Page 137
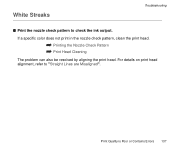
Print Quality is Poor or Contains Errors 137 If a specific color does not print in the nozzle check pattern, clean the print head. ¬ Printing the Nozzle Check Pattern ¬ Print Head Cleaning The problem can also be resolved by aligning the print head. For details on print head alignment, refer to check the ink output. White Streaks Troubleshooting s Print the nozzle check pattern to "Straight Lines are Misaligned".
Print Quality is Poor or Contains Errors 137 If a specific color does not print in the nozzle check pattern, clean the print head. ¬ Printing the Nozzle Check Pattern ¬ Print Head Cleaning The problem can also be resolved by aligning the print head. For details on print head alignment, refer to check the ink output. White Streaks Troubleshooting s Print the nozzle check pattern to "Straight Lines are Misaligned".
User Guide
Page 145
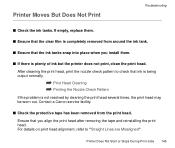
... 145 Ensure that ink is being output normally. ¬ Print Head Cleaning ¬ Printing the Nozzle Check Pattern If the problem is plenty of ink but the printer does not print, clean the print head. Printer Moves But Does Not Print Troubleshooting s Check the ink tanks. Contact a Canon service facility. s Check the protective tape has been removed from around the...
... 145 Ensure that ink is being output normally. ¬ Print Head Cleaning ¬ Printing the Nozzle Check Pattern If the problem is plenty of ink but the printer does not print, clean the print head. Printer Moves But Does Not Print Troubleshooting s Check the ink tanks. Contact a Canon service facility. s Check the protective tape has been removed from around the...
User Guide
Page 152
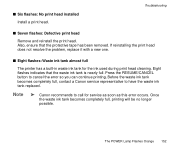
Eight flashes indicates that the protective tape has been removed. Note ® Canon recommends to call for the ink used during print head cleaning. s Eight flashes: Waste ink tank almost full The printer has a built-in waste ink tank for service as soon as this error... occurs. Also, ensure that the waste ink tank is nearly full. Before the waste ink tank becomes completely full, contact a Canon service ...
Eight flashes indicates that the protective tape has been removed. Note ® Canon recommends to call for the ink used during print head cleaning. s Eight flashes: Waste ink tank almost full The printer has a built-in waste ink tank for service as soon as this error... occurs. Also, ensure that the waste ink tank is nearly full. Before the waste ink tank becomes completely full, contact a Canon service ...


