XL H1S / XL H1A Instruction Manual
Page 2
...TO QUALIFIED SERVICE PERSONNEL. One Canon Plaza, Lake Success, NY 11042, U.S.A. Important Introduction Usage Instructions WARNING: TO REDUCE THE RISK OF FIRE OR ELECTRIC SHOCK, DO NOT EXPOSE THIS PRODUCT TO RAIN OR MOISTURE. HD Video Camera Recorder, XL H1S A / XL H1A A Systems. This device complies...such changes or modifications should be made, you could be contrary to the equipment unless otherwise specified in a residential installation. Canon U.S.A. NO USER-SERVICEABLE PARTS INSIDE. If this device must accept any changes or modifications to copyright laws. WARNING: TO ...
...TO QUALIFIED SERVICE PERSONNEL. One Canon Plaza, Lake Success, NY 11042, U.S.A. Important Introduction Usage Instructions WARNING: TO REDUCE THE RISK OF FIRE OR ELECTRIC SHOCK, DO NOT EXPOSE THIS PRODUCT TO RAIN OR MOISTURE. HD Video Camera Recorder, XL H1S A / XL H1A A Systems. This device complies...such changes or modifications should be made, you could be contrary to the equipment unless otherwise specified in a residential installation. Canon U.S.A. NO USER-SERVICEABLE PARTS INSIDE. If this device must accept any changes or modifications to copyright laws. WARNING: TO ...

XL H1S / XL H1A Instruction Manual
Page 3
...safety and operating instructions should be moved with them . Accessories - Placing or Moving - If you are unable to the Canon HD Video Camera Recorder XL H1S A / XL H1A A and all servicing to the product. If an outside antenna is grounded so as contact with care. NATIONAL ELECTRICAL CODE ... source indicated on an unstable cart, stand, tripod, bracket or table. Avoid magnetic or electric fields - Do not use the camera close to instructions in rainy/moist situations. 9. Regarding other electric light or power circuits, or where it from the wall outlet before...
...safety and operating instructions should be moved with them . Accessories - Placing or Moving - If you are unable to the Canon HD Video Camera Recorder XL H1S A / XL H1A A and all servicing to the product. If an outside antenna is grounded so as contact with care. NATIONAL ELECTRICAL CODE ... source indicated on an unstable cart, stand, tripod, bracket or table. Avoid magnetic or electric fields - Do not use the camera close to instructions in rainy/moist situations. 9. Regarding other electric light or power circuits, or where it from the wall outlet before...

XL H1S / XL H1A Instruction Manual
Page 5
...cameras. DIGIC DV II image processor The next generation of Canon's video processing engine ensures optimal video quality and color reproduction for video recordings compliant with two sets of the camcorder's operation. you can easily save and exchange as TC-IN and TC-OUT terminals, allow the XL... phantom power supply. Custom presets Enjoy unparalleled image control to control many aspects of XLR audio input terminals with the XL H1S / XL H1A. Introduction The XL H1S / XL H1A - You can shoot it the functionality of 800 TV lines, the highest in 0.5 dB increments ( 70) &#...
...cameras. DIGIC DV II image processor The next generation of Canon's video processing engine ensures optimal video quality and color reproduction for video recordings compliant with two sets of the camcorder's operation. you can easily save and exchange as TC-IN and TC-OUT terminals, allow the XL... phantom power supply. Custom presets Enjoy unparalleled image control to control many aspects of XLR audio input terminals with the XL H1S / XL H1A. Introduction The XL H1S / XL H1A - You can shoot it the functionality of 800 TV lines, the highest in 0.5 dB increments ( 70) &#...

XL H1S / XL H1A Instruction Manual
Page 6
...with a still camera. : Text that matches your time zone and press the SET button. To adjust for purchasing the Canon XL H1S / XL H1A. Menu item shown at its default position Date/Time and Language Settings Set the time zone, date and time when you first start using your camcorder fail to ... States and/or other countries. • Other names and products not mentioned above may be used in this manual carefully before you use the camcorder and retain it for future reference. Setting the Date and Time MENU ( 32) SYSTEM SETUP/ D/TIME SET DATE/TIME••• ...
...with a still camera. : Text that matches your time zone and press the SET button. To adjust for purchasing the Canon XL H1S / XL H1A. Menu item shown at its default position Date/Time and Language Settings Set the time zone, date and time when you first start using your camcorder fail to ... States and/or other countries. • Other names and products not mentioned above may be used in this manual carefully before you use the camcorder and retain it for future reference. Setting the Date and Time MENU ( 32) SYSTEM SETUP/ D/TIME SET DATE/TIME••• ...

XL H1S / XL H1A Instruction Manual
Page 7
The video signal can be HDV or DV, respectively. About the HD/HDV and SD/DV Specifications In the manual, a distinction is made between video signal standards (camera section) and recording standards (recorder section). the recording standard on the tape will be set to HD (high definition) or SD (standard definition) specifications; Camera Section HD/SD Recorder Section HDV/DV HD/SD SDI Terminal HD/SD ( HDV/DV Terminal HDV/DV only) Playback Signal HDV/DV Introduction 7
The video signal can be HDV or DV, respectively. About the HD/HDV and SD/DV Specifications In the manual, a distinction is made between video signal standards (camera section) and recording standards (recorder section). the recording standard on the tape will be set to HD (high definition) or SD (standard definition) specifications; Camera Section HD/SD Recorder Section HDV/DV HD/SD SDI Terminal HD/SD ( HDV/DV Terminal HDV/DV only) Playback Signal HDV/DV Introduction 7
XL H1S / XL H1A Instruction Manual
Page 29
...back adjustment selection screen. - Select [YES] and press the SET button. 5. Press the MENU button to close the menu. The camcorder cannot focus in to select [CAMERA SETUP] and press the SET button. 3. Select [FB] and then select [ AF ADJUST]. 4. MF Adjustment 1. Select [FB...confirmation screen appears, press the SET button to select [CAMERA SETUP] and press the SET button. 3. Press the MENU button. 2. Turn the SELECT dial to full telephoto. The camcorder will return to close the menu. The camcorder will reset the stored flange back adjustment value for ...
...back adjustment selection screen. - Select [YES] and press the SET button. 5. Press the MENU button to close the menu. The camcorder cannot focus in to select [CAMERA SETUP] and press the SET button. 3. Select [FB] and then select [ AF ADJUST]. 4. MF Adjustment 1. Select [FB...confirmation screen appears, press the SET button to select [CAMERA SETUP] and press the SET button. 3. Press the MENU button. 2. Turn the SELECT dial to full telephoto. The camcorder will return to close the menu. The camcorder will reset the stored flange back adjustment value for ...
XL H1S / XL H1A Instruction Manual
Page 37
...STANDBY Button Press the STANDBY button and hold it pressed down to either custom key ( 79). In VCR stop mode the camcorder is only partially turned off: The camera section is powered normally while the recorder section is equipped with [SYSTEM SETUP] [POWER SAVE] setting ( 136) if you... can assign the [VCR STOP] function to the camera and recorder sections but camera settings (including exposure lock and color bars settings) will enter the power save function. Once the camcorder entered the power save mode, press the Start/Stop button to start recording or ...
...STANDBY Button Press the STANDBY button and hold it pressed down to either custom key ( 79). In VCR stop mode the camcorder is only partially turned off: The camera section is powered normally while the recorder section is equipped with [SYSTEM SETUP] [POWER SAVE] setting ( 136) if you... can assign the [VCR STOP] function to the camera and recorder sections but camera settings (including exposure lock and color bars settings) will enter the power save function. Once the camcorder entered the power save mode, press the Start/Stop button to start recording or ...

XL H1S / XL H1A Instruction Manual
Page 40
...standard/aspect ratio will not change immediately; Select the aspect ratio as a standard-definition (SD) camera. Selecting the Signal Standard and Aspect Ratio You can attach the optional RC-72 Ratio Converter ...tape in HDV standard or to use the camcorder as a high-definition (HD) camera. • SD 16:9, SD 4:3: To record on the tape in DV standard or to use the camcorder as desired. If the custom ...will appear in 4:3, you play back on a standard TV set with the RC-72.) 40 Since the camcorder's screen has an aspect ratio of 16:9, when you set to [ON] ( 133). When ...
...standard/aspect ratio will not change immediately; Select the aspect ratio as a standard-definition (SD) camera. Selecting the Signal Standard and Aspect Ratio You can attach the optional RC-72 Ratio Converter ...tape in HDV standard or to use the camcorder as a high-definition (HD) camera. • SD 16:9, SD 4:3: To record on the tape in DV standard or to use the camcorder as desired. If the custom ...will appear in 4:3, you play back on a standard TV set with the RC-72.) 40 Since the camcorder's screen has an aspect ratio of 16:9, when you set to [ON] ( 133). When ...
XL H1S / XL H1A Instruction Manual
Page 47
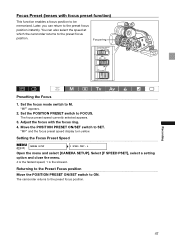
...is the fastest speed; 1 is the slowest. Focus ring Recording Presetting the Focus 1. The focus preset speed currently selected appears. 3. The camcorder returns to the preset focus position. You can return to M. Set the POSITION PRESET switch to SET. Move the POSITION PRESET ON/SET switch.... Later, you can also select the speed at which the camcorder returns to the preset focus position. 47 Setting the Focus Preset Speed MENU ( 33) CAMERA SETUP F SPEED PSET• 4 Open the menu and select [CAMERA SETUP]. Set the focus mode switch to the preset focus position...
...is the fastest speed; 1 is the slowest. Focus ring Recording Presetting the Focus 1. The focus preset speed currently selected appears. 3. The camcorder returns to the preset focus position. You can return to M. Set the POSITION PRESET switch to SET. Move the POSITION PRESET ON/SET switch.... Later, you can also select the speed at which the camcorder returns to the preset focus position. 47 Setting the Focus Preset Speed MENU ( 33) CAMERA SETUP F SPEED PSET• 4 Open the menu and select [CAMERA SETUP]. Set the focus mode switch to the preset focus position...

XL H1S / XL H1A Instruction Manual
Page 48
When there is limited to 1 m - (throughout the entire zoom range). MENU ( 33) CAMERA SETUP FOCUS LIMIT•••OFF Open the menu and select [CAMERA SETUP]. Using the HD 20x L IS III lens, the focus range 10 cm - (at full wide-angle) is no lens attached. 48... [FOCUS LIMIT], set it to restrict the focus range. If the lens attached does not support the macro setting being changed from the camcorder. - Macro Shooting (Focus Limit) Usually the camcorder's focus range allows macro shooting. You can activate the focus limit to [ON ] and close the menu. appears.
When there is limited to 1 m - (throughout the entire zoom range). MENU ( 33) CAMERA SETUP FOCUS LIMIT•••OFF Open the menu and select [CAMERA SETUP]. Using the HD 20x L IS III lens, the focus range 10 cm - (at full wide-angle) is no lens attached. 48... [FOCUS LIMIT], set it to restrict the focus range. If the lens attached does not support the macro setting being changed from the camcorder. - Macro Shooting (Focus Limit) Usually the camcorder's focus range allows macro shooting. You can activate the focus limit to [ON ] and close the menu. appears.

XL H1S / XL H1A Instruction Manual
Page 50
...frames (bc and fg in order to transfer to HDV native 1080/30p specifications. SD The picture captured by the camera at 30 frames per second is ideal for playback on a TV screen but video output from the HDV/DV terminal ...will be 24p. This 24F mode is converted to 60i but may require the extension/compression of some frames while editing. 24F (camera) A B C D E F G H 24p (tape) A B C D E F G H 60i (playback) a a b b b c c d d d e e f f f g g h h h 24F (camera) A B C D E F G H 60i aabbbccdddee f f f gghhh (tape/playback) 24F (2:3:3:2) Mode Signals are down -converted ...
...frames (bc and fg in order to transfer to HDV native 1080/30p specifications. SD The picture captured by the camera at 30 frames per second is ideal for playback on a TV screen but video output from the HDV/DV terminal ...will be 24p. This 24F mode is converted to 60i but may require the extension/compression of some frames while editing. 24F (camera) A B C D E F G H 24p (tape) A B C D E F G H 60i (playback) a a b b b c c d d d e e f f f g g h h h 24F (camera) A B C D E F G H 60i aabbbccdddee f f f gghhh (tape/playback) 24F (2:3:3:2) Mode Signals are down -converted ...

XL H1S / XL H1A Instruction Manual
Page 51
SD Selecting the 24F Pulldown Mode MENU ( 33) CAMERA SETUP 24F MODE SEL•2:3 Open the menu and select [CAMERA SETUP]. Recording 51 Selecting the Frame Rate Set the FRAME RATE switch to record in 24F 2:3 pulldown mode. Video recorded in orange. If ...
SD Selecting the 24F Pulldown Mode MENU ( 33) CAMERA SETUP 24F MODE SEL•2:3 Open the menu and select [CAMERA SETUP]. Recording 51 Selecting the Frame Rate Set the FRAME RATE switch to record in 24F 2:3 pulldown mode. Video recorded in orange. If ...

XL H1S / XL H1A Instruction Manual
Page 62
... exposure. Moving subjects may leave a trailing afterimage. Picture quality may not be as good as in other concentrated light source. The camcorder uses slower shutter speeds (60i, 30F: 1/4-1/500; 24F: 1/3-1/500) to fall. Manual ( 65) This mode offers the creative freedom of a...This mode allows for the best control of depth of shutter speed and aperture levels. Auto Like the Easy Recording mode, the camcorder automatically controls camera adjustments allowing you have the option of manual controls. Shutter-Priority ( 67) Use this mode to select the aperture value from ...
... exposure. Moving subjects may leave a trailing afterimage. Picture quality may not be as good as in other concentrated light source. The camcorder uses slower shutter speeds (60i, 30F: 1/4-1/500; 24F: 1/3-1/500) to fall. Manual ( 65) This mode offers the creative freedom of a...This mode allows for the best control of depth of shutter speed and aperture levels. Auto Like the Easy Recording mode, the camcorder automatically controls camera adjustments allowing you have the option of manual controls. Shutter-Priority ( 67) Use this mode to select the aperture value from ...

XL H1S / XL H1A Instruction Manual
Page 70
...For the lowest noise recording for indoor, low light or low contrast scenes. Increases the brightness in 0.5 dB increments. Set the dial to prevent the camcorder from -3 dB to 0 - +18, +36. The gain level display stops flashing and stays on the lighting and shooting conditions. The 36.0 ... set the maximum gain level and close the menu. 70 Increases the depth of the video signal generated depending on . Open the menu and select [CAMERA SETUP]. Gain Fine Tuning 1. GAIN dial A -3 0 +3, +6, +12, +18 0 - +18, +36 Use Automatic gain control. Gain The gain control adjusts the...
...For the lowest noise recording for indoor, low light or low contrast scenes. Increases the brightness in 0.5 dB increments. Set the dial to prevent the camcorder from -3 dB to 0 - +18, +36. The gain level display stops flashing and stays on the lighting and shooting conditions. The 36.0 ... set the maximum gain level and close the menu. 70 Increases the depth of the video signal generated depending on . Open the menu and select [CAMERA SETUP]. Gain Fine Tuning 1. GAIN dial A -3 0 +3, +6, +12, +18 0 - +18, +36 Use Automatic gain control. Gain The gain control adjusts the...

XL H1S / XL H1A Instruction Manual
Page 74
...183; A AREA REV. Select the [COLOR CORR.] submenu and then select [A AREA SEL.] or [B AREA SEL.]. 2. Open the menu and select [CAMERA SETUP]. When determining the color to be corrected, targeted areas will be detected. 13 levels (-6 to 6) are available; set higher levels to detect a wider...With the color correction function you can set the color correction for up to two different colors (A and B). You can set the camcorder to detect brighter areas. Select each setting option, adjust the levels as necessary and close the menu. [COLOR PHASE]: Select the ...
...183; A AREA REV. Select the [COLOR CORR.] submenu and then select [A AREA SEL.] or [B AREA SEL.]. 2. Open the menu and select [CAMERA SETUP]. When determining the color to be corrected, targeted areas will be detected. 13 levels (-6 to 6) are available; set higher levels to detect a wider...With the color correction function you can set the color correction for up to two different colors (A and B). You can set the camcorder to detect brighter areas. Select each setting option, adjust the levels as necessary and close the menu. [COLOR PHASE]: Select the ...

XL H1S / XL H1A Instruction Manual
Page 75
Open the menu and select [CAMERA SETUP] and select the [COLOR CORR.] submenu. 2. CORRECT OFF 1. Select [CORRECT], select a correction mode and close the menu. • You can correct only the predefined A area, only the predefined B area or both. • appears. Recording 75 Activating the Color Correction MENU ( 33) CAMERA SETUP COLOR CORR.
Open the menu and select [CAMERA SETUP] and select the [COLOR CORR.] submenu. 2. CORRECT OFF 1. Select [CORRECT], select a correction mode and close the menu. • You can correct only the predefined A area, only the predefined B area or both. • appears. Recording 75 Activating the Color Correction MENU ( 33) CAMERA SETUP COLOR CORR.

XL H1S / XL H1A Instruction Manual
Page 76
...appears. 76 Activating the Skin Detail Function MENU ( 33) CAMERA SETUP SKIN DETAIL EFFECT LEVEL••OFF 1. Open the menu, select [CAMERA SETUP] and then select the [SKIN DETAIL] submenu. 2....the brightness for detection of a certain color or tone. Targeted areas will be detected as Skin Area MENU CAMERA SETUP ( 33) SKIN DETAIL HUE 0 CHROMA 0 AREA 0 Y LEVEL 0 1. On a connected ... submenu and then select [EFFECT LEVEL]. 2. Open the menu and select [CAMERA SETUP]. Determining the Tone to be softened in the targeted areas will be ...
...appears. 76 Activating the Skin Detail Function MENU ( 33) CAMERA SETUP SKIN DETAIL EFFECT LEVEL••OFF 1. Open the menu, select [CAMERA SETUP] and then select the [SKIN DETAIL] submenu. 2....the brightness for detection of a certain color or tone. Targeted areas will be detected as Skin Area MENU CAMERA SETUP ( 33) SKIN DETAIL HUE 0 CHROMA 0 AREA 0 Y LEVEL 0 1. On a connected ... submenu and then select [EFFECT LEVEL]. 2. Open the menu and select [CAMERA SETUP]. Determining the Tone to be softened in the targeted areas will be ...

XL H1S / XL H1A Instruction Manual
Page 77
...and automatically reduce noise in a smoother composite picture. Open the menu, select [CAMERA SETUP] and then select the [SELECTIVE NR] submenu. 2. Open the menu and select [CAMERA SETUP]. set the camcorder to be detected. Determining the Area to be detected. 13 levels (-6 to detect...range. • [Y LEVEL]: Adjust the brightness for the color to detect brighter areas. Activating the Selective Noise Reduction MENU ( 33) CAMERA SETUP SELECTIVE NR EFFECT LEVEL••OFF 1. Select the [SELECTIVE NR] submenu and then select [EFFECT LEVEL]. 2. Selective Noise ...
...and automatically reduce noise in a smoother composite picture. Open the menu, select [CAMERA SETUP] and then select the [SELECTIVE NR] submenu. 2. Open the menu and select [CAMERA SETUP]. set the camcorder to be detected. Determining the Area to be detected. 13 levels (-6 to detect...range. • [Y LEVEL]: Adjust the brightness for the color to detect brighter areas. Activating the Selective Noise Reduction MENU ( 33) CAMERA SETUP SELECTIVE NR EFFECT LEVEL••OFF 1. Select the [SELECTIVE NR] submenu and then select [EFFECT LEVEL]. 2. Selective Noise ...

XL H1S / XL H1A Instruction Manual
Page 78
You can adjust the frequency from 60.1 Hz to Tv or M. 2. Open the menu and select [CAMERA SETUP]. Select [CLEAR SCAN], adjust the frequency and close the menu. Adjust the frequency so that the black band does not appear. 78 Set the dial to 203.9 Hz. MENU CAMERA SETUP ( 33) CLEAR SCAN•••60.1Hz 1. Repeatedly press the SHUTTER button to set the shutter speed to record a computer's CRT screen or other equipment without displaying black band or flicker on the screen. Clear Scan This feature allows you to "CS". 3.
You can adjust the frequency from 60.1 Hz to Tv or M. 2. Open the menu and select [CAMERA SETUP]. Select [CLEAR SCAN], adjust the frequency and close the menu. Adjust the frequency so that the black band does not appear. 78 Set the dial to 203.9 Hz. MENU CAMERA SETUP ( 33) CLEAR SCAN•••60.1Hz 1. Repeatedly press the SHUTTER button to set the shutter speed to record a computer's CRT screen or other equipment without displaying black band or flicker on the screen. Clear Scan This feature allows you to "CS". 3.

XL H1S / XL H1A Instruction Manual
Page 80
... SAVE] is powered off the recorder section. The VCR Stop mode is activated. VCR Stop can take your time adjusting the camera settings, while the recorder section of the camcorder is set to [OFF], you can only be operated with the Custom Key [TIME CODE] Time Code ( 52) Press...)]. Press the CUSTOM KEY (1 or 2) button. • will appear while the index signal is being recorded (approx. 6.5 seconds). • When the camcorder is in mode ( 116). Press the button again to record pause mode. The zebra pattern is activated. Open the menu and select [SYSTEM SETUP/ ]. ...
... SAVE] is powered off the recorder section. The VCR Stop mode is activated. VCR Stop can take your time adjusting the camera settings, while the recorder section of the camcorder is set to [OFF], you can only be operated with the Custom Key [TIME CODE] Time Code ( 52) Press...)]. Press the CUSTOM KEY (1 or 2) button. • will appear while the index signal is being recorded (approx. 6.5 seconds). • When the camcorder is in mode ( 116). Press the button again to record pause mode. The zebra pattern is activated. Open the menu and select [SYSTEM SETUP/ ]. ...


