User Manual
Page 6
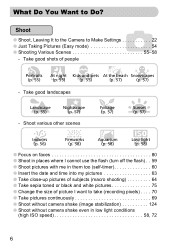
... other scenes H Indoors (p. 56) t Fireworks (p. 58) y Aquarium (p. 58) Z Low light (p. 58) ● Focus on faces 80 ● Shoot in places where I cannot use the flash (turn off the flash) . . 59 ● Shoot pictures with me in them too (self-timer 60 ● Insert the date and time into my pictures 63...
... other scenes H Indoors (p. 56) t Fireworks (p. 58) y Aquarium (p. 58) Z Low light (p. 58) ● Focus on faces 80 ● Shoot in places where I cannot use the flash (turn off the flash) . . 59 ● Shoot pictures with me in them too (self-timer 60 ● Insert the date and time into my pictures 63...
User Manual
Page 7
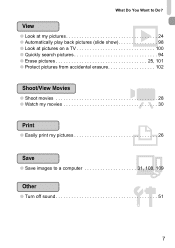
What Do You Want to Do? 1 View ● Look at my pictures 24 ● Automatically play back pictures (slide show 98 ● Look at pictures on a TV 100 ● Quickly search pictures 94 ● Erase pictures 25, 101 ● Protect pictures from accidental erasure 102 E Shoot/View Movies ● Shoot movies 28 ● Watch my movies 30 2 Print ● Easily print my pictures 26 Save ● Save images to a computer 31, 108, 109 3 Other ● Turn off sound 51 7
What Do You Want to Do? 1 View ● Look at my pictures 24 ● Automatically play back pictures (slide show 98 ● Look at pictures on a TV 100 ● Quickly search pictures 94 ● Erase pictures 25, 101 ● Protect pictures from accidental erasure 102 E Shoot/View Movies ● Shoot movies 28 ● Watch my movies 30 2 Print ● Easily print my pictures 26 Save ● Save images to a computer 31, 108, 109 3 Other ● Turn off sound 51 7
User Manual
Page 8
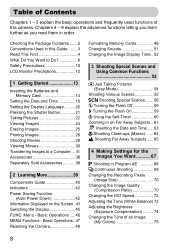
... Using Common Functions 53 9 Just Taking Pictures (Easy Mode 54 Shooting Various Scenes 55 K Shooting Special Scenes....... 56 ! Basic Operations .....46 MENU Functions - Turning the Flash Off 59 h Turning the Flash On 59 Q Using the Self-Timer 60 Zooming in on the Screen . 43 Switching the Display 45 FUNC. Menu - Checking the...
... Using Common Functions 53 9 Just Taking Pictures (Easy Mode 54 Shooting Various Scenes 55 K Shooting Special Scenes....... 56 ! Basic Operations .....46 MENU Functions - Turning the Flash Off 59 h Turning the Flash On 59 Q Using the Self-Timer 60 Zooming in on the Screen . 43 Switching the Display 45 FUNC. Menu - Checking the...
User Manual
Page 10
... injuries to yourself and other persons, or damage to the equipment. • Be sure to also check the guides included with the camera interior, immediately turn the camera power off and remove the batteries. • Do not use . Strap: Putting the strap around a child's neck could result in fire or electrical...
... injuries to yourself and other persons, or damage to the equipment. • Be sure to also check the guides included with the camera interior, immediately turn the camera power off and remove the batteries. • Do not use . Strap: Putting the strap around a child's neck could result in fire or electrical...

User Manual
Page 18
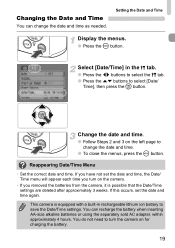
X Once the date and time have been set a value. Since the date and time recorded into your images are based on these settings, be sure to set , the Date/Time menu will appear. X The Date/Time menu will close. 18 Turn on . Set the Date and Time. ● Press the qr buttons to select a setting. ● Press the op buttons to make them. Setting the Date and Time The Date/Time menu will appear the first time the camera is turned on the camera. ● Press the power button. Make the setting. ● Press the m button.
X Once the date and time have been set a value. Since the date and time recorded into your images are based on these settings, be sure to set , the Date/Time menu will appear. X The Date/Time menu will close. 18 Turn on . Set the Date and Time. ● Press the qr buttons to select a setting. ● Press the op buttons to make them. Setting the Date and Time The Date/Time menu will appear the first time the camera is turned on the camera. ● Press the power button. Make the setting. ● Press the m button.
User Manual
Page 19
... is equipped with a built-in the 3 tab. ● Press the qr buttons to select the 3 tab. ● Press the op buttons to turn on the camera. • If you turn the camera on the left page to save the Date/Time settings. Changing the Date and Time You can recharge the battery...
... is equipped with a built-in the 3 tab. ● Press the qr buttons to select the 3 tab. ● Press the op buttons to turn on the camera. • If you turn the camera on the left page to save the Date/Time settings. Changing the Date and Time You can recharge the battery...
User Manual
Page 22
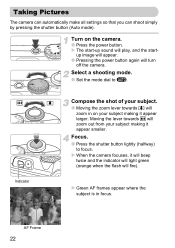
...(Auto mode). Moving the lever towards i will play, and the start -up image will appear. ● Pressing the power button again will fire). Turn on your subject making it appear larger. Indicator Compose the shot of your subject. ● Moving the zoom lever towards j will zoom out from your... subject making it will beep twice and the indicator will light green (orange when the flash will turn off the camera. AF Frame 22 X When the camera focuses, it appear smaller. up sound will zoom in focus. Select a shooting mode. &#...
...(Auto mode). Moving the lever towards i will play, and the start -up image will appear. ● Pressing the power button again will fire). Turn on your subject making it appear larger. Indicator Compose the shot of your subject. ● Moving the zoom lever towards j will zoom out from your... subject making it will beep twice and the indicator will light green (orange when the flash will turn off the camera. AF Frame 22 X When the camera focuses, it appear smaller. up sound will zoom in focus. Select a shooting mode. &#...
User Manual
Page 23
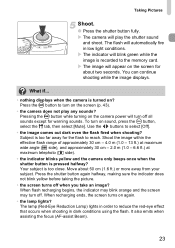
...cm (1.6 ft.) or more away from your subject. Your subject is pressed halfway? When recharging ends, the screen turns on ? Press the ⁄ button to the memory card. Subject is turned on again. • the lamp lights? Taking Pictures Shoot. ● Press the shutter button fully. Pressing ...? Press the shutter button again halfway, making sure the indicator does not blink yellow before taking the picture. • the screen turns off . X The camera will turn on sound, press the · button, select the 3 tab, then select [Mute]. You can continue shooting while the image ...
...cm (1.6 ft.) or more away from your subject. Your subject is pressed halfway? When recharging ends, the screen turns on ? Press the ⁄ button to the memory card. Subject is turned on again. • the lamp lights? Taking Pictures Shoot. ● Press the shutter button fully. Pressing ...? Press the shutter button again halfway, making sure the indicator does not blink yellow before taking the picture. • the screen turns off . X The camera will turn on sound, press the · button, select the 3 tab, then select [Mute]. You can continue shooting while the image ...
User Manual
Page 26
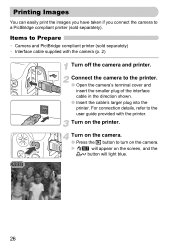
... Images You can easily print the images you have taken if you connect the camera to the user guide provided with the camera (p. 2) Turn off the camera and printer. Turn on the screen, and the c button will light blue. 26 Connect the camera to Prepare • Camera and PictBridge compliant printer (sold... camera's terminal cover and insert the smaller plug of the interface cable in the direction shown. ● Insert the cable's larger plug into the printer. Turn on the camera. ● Press the 1 button to...
... Images You can easily print the images you have taken if you connect the camera to the user guide provided with the camera (p. 2) Turn off the camera and printer. Turn on the screen, and the c button will light blue. 26 Connect the camera to Prepare • Camera and PictBridge compliant printer (sold... camera's terminal cover and insert the smaller plug of the interface cable in the direction shown. ● Insert the cable's larger plug into the printer. Turn on the camera. ● Press the 1 button to...
User Manual
Page 27
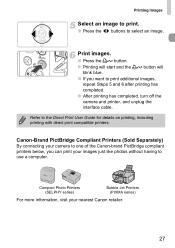
...below, you want to select an image. X Printing will start and the c button will blink blue. ● If you can print your nearest Canon retailer. 27 Printing Images Select an image to print. ● Press the qr buttons to print additional images, repeat Steps 5 and 6 after ...printing has completed. ● After printing has completed, turn off the camera and printer, and unplug the interface cable. Print images. ● Press the c button. Compact Photo Printers (SELPHY series) Bubble Jet ...
...below, you want to select an image. X Printing will start and the c button will blink blue. ● If you can print your nearest Canon retailer. 27 Printing Images Select an image to print. ● Press the qr buttons to print additional images, repeat Steps 5 and 6 after ...printing has completed. ● After printing has completed, turn off the camera and printer, and unplug the interface cable. Print images. ● Press the c button. Compact Photo Printers (SELPHY series) Bubble Jet ...
User Manual
Page 33
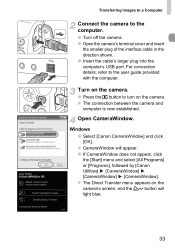
...] [CameraWindow] [CameraWindow] [CameraWindow]. X CameraWindow will light blue. 33 Open CameraWindow. Windows ● Select [Canon CameraWindow] and click [OK]. X The Direct Transfer menu appears on the camera. For connection details, refer to the computer. ● Turn off the camera. ● Open the camera's terminal cover and insert the smaller plug of the interface...
...] [CameraWindow] [CameraWindow] [CameraWindow]. X CameraWindow will light blue. 33 Open CameraWindow. Windows ● Select [Canon CameraWindow] and click [OK]. X The Direct Transfer menu appears on the camera. For connection details, refer to the computer. ● Turn off the camera. ● Open the camera's terminal cover and insert the smaller plug of the interface...

User Manual
Page 34
Transferring Images to a Computer Macintosh X CameraWindow will be transferred to the computer. ● After the transfer finishes, turn off the camera and unplug the cable. ● For further operations, refer to the Software Starter Guide. 34 X All images not previously transferred will appear. &#...
Transferring Images to a Computer Macintosh X CameraWindow will be transferred to the computer. ● After the transfer finishes, turn off the camera and unplug the cable. ● For further operations, refer to the Software Starter Guide. 34 X All images not previously transferred will appear. &#...
User Manual
Page 35
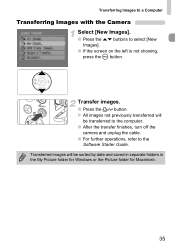
... Software Starter Guide. Transfer images. ● Press the c button. X All images not previously transferred will be transferred to the computer. ● After the transfer finishes, turn off the camera and unplug the cable. ● For further operations, refer to select [New Images]. ● If the screen on the left is not...
... Software Starter Guide. Transfer images. ● Press the c button. X All images not previously transferred will be transferred to the computer. ● After the transfer finishes, turn off the camera and unplug the cable. ● For further operations, refer to select [New Images]. ● If the screen on the left is not...
User Manual
Page 40
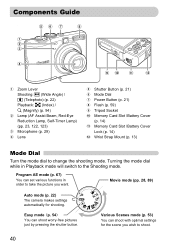
... Button (p. 21) h Flash (p. 59) i Tripod Socket j Memory Card Slot /Battery Cover (p. 14) k Memory Card Slot /Battery Cover Lock (p. 14) l Wrist Strap Mount (p. 13) Mode Dial Turn the mode dial to the Shooting mode. Movie mode (pp. 28, 89) Auto mode (p. 22) The camera makes settings automatically for the scene you want.... Various Scenes mode (p. 53) You can shoot worry-free pictures just by pressing the shutter button. Turning the mode dial while in order to take the picture you wish to shoot. 40
... Button (p. 21) h Flash (p. 59) i Tripod Socket j Memory Card Slot /Battery Cover (p. 14) k Memory Card Slot /Battery Cover Lock (p. 14) l Wrist Strap Mount (p. 13) Mode Dial Turn the mode dial to the Shooting mode. Movie mode (pp. 28, 89) Auto mode (p. 22) The camera makes settings automatically for the scene you want.... Various Scenes mode (p. 53) You can shoot worry-free pictures just by pressing the shutter button. Turning the mode dial while in order to take the picture you wish to shoot. 40

User Manual
Page 41
... button to switch between the Shooting and Playback modes. Lens is extended 1 Shooting mode Playback mode Lens is retracted, you can use the 1 button to turn the camera on and off 1 Playback mode 41 When the lens is retracted Power off in Playback mode. Components Guide a Viewfinder (p. 77) b Indicators (p. 42) c Speaker...
... button to switch between the Shooting and Playback modes. Lens is extended 1 Shooting mode Playback mode Lens is retracted, you can use the 1 button to turn the camera on and off 1 Playback mode 41 When the lens is retracted Power off in Playback mode. Components Guide a Viewfinder (p. 77) b Indicators (p. 42) c Speaker...
User Manual
Page 42
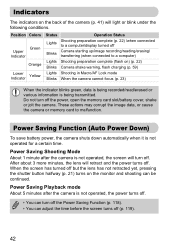
... Green Upper Indicator Orange Lower Indicator Yellow Status Operation Status Lights Shooting preparation complete (p. 22) /when connected to a computer/display turned off Blinks Camera starting up/image recording/reading/erasing/ transferring (when connected to malfunction. After about 3 more minutes, the lens ... or blink under the following conditions. Indicators The indicators on the back of the camera (p. 41) will retract and the power turns off. These actions may corrupt the image data, or cause the camera or memory card to a computer) Lights Shooting preparation complete...
... Green Upper Indicator Orange Lower Indicator Yellow Status Operation Status Lights Shooting preparation complete (p. 22) /when connected to a computer/display turned off Blinks Camera starting up/image recording/reading/erasing/ transferring (when connected to malfunction. After about 3 more minutes, the lens ... or blink under the following conditions. Indicators The indicators on the back of the camera (p. 41) will retract and the power turns off. These actions may corrupt the image data, or cause the camera or memory card to a computer) Lights Shooting preparation complete...
User Manual
Page 59
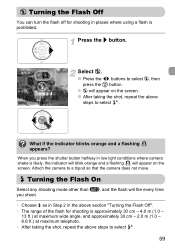
.... • After taking the shot, repeat the above steps to select . Turning the Flash Off You can turn the flash off for shooting in the above section "Turning the Flash Off". • The range of the flash for shooting is prohibited. h Turning the Flash On Select any shooting mode other than A, and the flash...
.... • After taking the shot, repeat the above steps to select . Turning the Flash Off You can turn the flash off for shooting in the above section "Turning the Flash Off". • The range of the flash for shooting is prohibited. h Turning the Flash On Select any shooting mode other than A, and the flash...

User Manual
Page 61
... in on Far Away Subjects The digital zoom can zoom up to 16x and capture subjects too far away for a moment (safety zoom) Turning Off the Digital Zoom To turn off the digital zoom, press the · button, select the 4 tab, and then select the [Digital Zoom] menu item and [Off] option...
... in on Far Away Subjects The digital zoom can zoom up to 16x and capture subjects too far away for a moment (safety zoom) Turning Off the Digital Zoom To turn off the digital zoom, press the · button, select the 4 tab, and then select the [Digital Zoom] menu item and [Off] option...
User Manual
Page 68
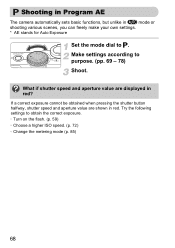
Make settings according to obtain the correct exposure. • Turn on the flash. (p. 59) • Choose a higher ISO speed. (p. 72) • Change the metering mode (p. 85) 68 What if shutter speed and aperture value are ...
Make settings according to obtain the correct exposure. • Turn on the flash. (p. 59) • Choose a higher ISO speed. (p. 72) • Change the metering mode (p. 85) 68 What if shutter speed and aperture value are ...
User Manual
Page 77
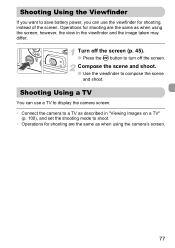
...use a TV to display the camera screen. • Connect the camera to shoot. • Operations for shooting are the same as when using the screen; Turn off the screen (p. 45). ● Press the ⁄ button to compose the scene and shoot. Compose the scene and shoot. ● Use the ...viewfinder to turn off the screen. however, the view in "Viewing Images on a TV" (p. 100), and set the shooting mode to a TV as when using the camera's...
...use a TV to display the camera screen. • Connect the camera to shoot. • Operations for shooting are the same as when using the screen; Turn off the screen (p. 45). ● Press the ⁄ button to compose the scene and shoot. Compose the scene and shoot. ● Use the ...viewfinder to turn off the screen. however, the view in "Viewing Images on a TV" (p. 100), and set the shooting mode to a TV as when using the camera's...


