User Manual
Page 26
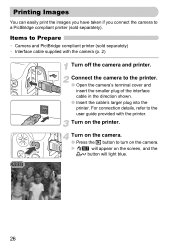
Connect the camera to Prepare • Camera and PictBridge compliant printer (sold separately). X will light blue. 26 Turn on the camera. ● Press the 1 button to turn on the screen, and the c button will appear on the camera. Turn on the ...
Connect the camera to Prepare • Camera and PictBridge compliant printer (sold separately). X will light blue. 26 Turn on the camera. ● Press the 1 button to turn on the screen, and the c button will appear on the camera. Turn on the ...
User Manual
Page 27
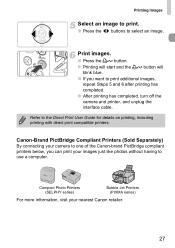
...printing, including printing with direct print compatible printers. Refer to select an image. X Printing will start and the c button will blink blue. ● If you can print your nearest Canon retailer. 27 Compact Photo Printers (SELPHY series) Bubble Jet Printers (PIXMA series) For more information, visit your images just like photos... completed. ● After printing has completed, turn off the camera and printer, and unplug the interface cable. Print images. ● Press the c button. Canon-Brand PictBridge Compliant Printers (Sold Separately) By connecting your camera to one of the...
...printing, including printing with direct print compatible printers. Refer to select an image. X Printing will start and the c button will blink blue. ● If you can print your nearest Canon retailer. 27 Compact Photo Printers (SELPHY series) Bubble Jet Printers (PIXMA series) For more information, visit your images just like photos... completed. ● After printing has completed, turn off the camera and printer, and unplug the interface cable. Print images. ● Press the c button. Canon-Brand PictBridge Compliant Printers (Sold Separately) By connecting your camera to one of the...
User Manual
Page 33
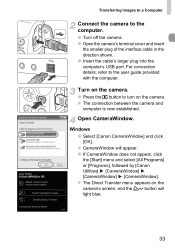
... cable's larger plug into the computer's USB port. X The connection between the camera and computer is now established. Windows ● Select [Canon CameraWindow] and click [OK]. Turn on the camera. ● Press the 1 button to turn on the camera's screen, and the c... CameraWindow does not appear, click the [Start] menu and select [All Programs] or [Programs], followed by [Canon Utilities] [CameraWindow] [CameraWindow] [CameraWindow]. X CameraWindow will light blue. 33 Transferring Images to a Computer Connect the camera to the user guide provided with the computer. X The ...
... cable's larger plug into the computer's USB port. X The connection between the camera and computer is now established. Windows ● Select [Canon CameraWindow] and click [OK]. Turn on the camera. ● Press the 1 button to turn on the camera's screen, and the c... CameraWindow does not appear, click the [Start] menu and select [All Programs] or [Programs], followed by [Canon Utilities] [CameraWindow] [CameraWindow] [CameraWindow]. X CameraWindow will light blue. 33 Transferring Images to a Computer Connect the camera to the user guide provided with the computer. X The ...

User Manual
Page 34
... further operations, refer to the Software Starter Guide. 34 You cannot shoot while the Direct Transfer menu displays. X All images not previously transferred will light blue. X The Direct Transfer menu appears on the Dock (the bar which appears at the bottom of the desktop).
... further operations, refer to the Software Starter Guide. 34 You cannot shoot while the Direct Transfer menu displays. X All images not previously transferred will light blue. X The Direct Transfer menu appears on the Dock (the bar which appears at the bottom of the desktop).

User Manual
Page 61
Image Deterioration Zones with Digital Zoom Recording Pixels Optical Zoom Digital Zoom No image deterioration (zoom factor appears white) Image deterioration (zoom factor appears blue) Zoom factor at which zooming stops for the optical zoom (p. 22). X The camera will zoom in on Far Away Subjects The digital zoom can zoom ...
Image Deterioration Zones with Digital Zoom Recording Pixels Optical Zoom Digital Zoom No image deterioration (zoom factor appears white) Image deterioration (zoom factor appears blue) Zoom factor at which zooming stops for the optical zoom (p. 22). X The camera will zoom in on Far Away Subjects The digital zoom can zoom ...
User Manual
Page 62
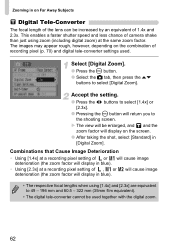
...3x. Combinations that Cause Image Deterioration • Using [1.4x] at a recording pixel setting of or will cause image deterioration (the zoom factor will display in blue). • Using [2.3x] at the same zoom factor. Accept the setting. ● Press the qr buttons to select [1.4x] or [2.3x]. ●... together with the digital zoom. 62 The images may appear rough, however, depending on the screen. ● After taking the shot, select [Standard] in blue). • The respective focal lengths when using [1.4x] and [2.3x] are equivalent to 49 - 196 mm and 80.5 - 322 mm (35mm film ...
...3x. Combinations that Cause Image Deterioration • Using [1.4x] at a recording pixel setting of or will cause image deterioration (the zoom factor will display in blue). • Using [2.3x] at the same zoom factor. Accept the setting. ● Press the qr buttons to select [1.4x] or [2.3x]. ●... together with the digital zoom. 62 The images may appear rough, however, depending on the screen. ● After taking the shot, select [Standard] in blue). • The respective focal lengths when using [1.4x] and [2.3x] are equivalent to 49 - 196 mm and 80.5 - 322 mm (35mm film ...

