User Manual
Page 2
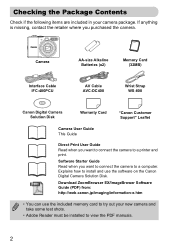
...-800 Canon Digital Camera Solution Disk Warranty Card "Canon Customer Support" Leaflet Camera User Guide This Guide Direct Print User Guide Read when you want to connect the camera to a computer. Software Starter Guide Read when you purchased the camera. Explains how to install and use the included memory card to try out your camera package. If anything is missing, contact the retailer where you want to connect the camera to a printer and print. Download ZoomBrowser EX/ImageBrower Software Guide (PDF) from: http://web.canon.jp/imaging...
...-800 Canon Digital Camera Solution Disk Warranty Card "Canon Customer Support" Leaflet Camera User Guide This Guide Direct Print User Guide Read when you want to connect the camera to a computer. Software Starter Guide Read when you purchased the camera. Explains how to install and use the included memory card to try out your camera package. If anything is missing, contact the retailer where you want to connect the camera to a printer and print. Download ZoomBrowser EX/ImageBrower Software Guide (PDF) from: http://web.canon.jp/imaging...
User Manual
Page 6
...; Take pictures continuously 69 ● Shoot without camera shake (image stabilization 124 ● Shoot without camera shake even in them too (self-timer 60 ● Insert the date and time into my pictures 63 ● Take close-up pictures of subjects (macro shooting 64 ● Take sepia toned or black and white pictures 75 ● Change the size of people I want to Make Settings 22 ● Just Taking Pictures (Easy mode 54 ● Shooting Various Scenes 55-58 - Take good shots of picture...
...; Take pictures continuously 69 ● Shoot without camera shake (image stabilization 124 ● Shoot without camera shake even in them too (self-timer 60 ● Insert the date and time into my pictures 63 ● Take close-up pictures of subjects (macro shooting 64 ● Take sepia toned or black and white pictures 75 ● Change the size of people I want to Make Settings 22 ● Just Taking Pictures (Easy mode 54 ● Shooting Various Scenes 55-58 - Take good shots of picture...
User Manual
Page 8
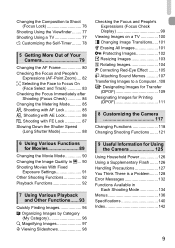
... Making Settings for the Images You Want 67 G Shooting in Program AE 68 W Continuous Shooting 69 Changing the Recording Pixels (Image Size 70 Changing the Image Quality (Compression Ratio 70 Changing the ISO Speed 72 Adjusting the Tone (White Balance) 73 Adjusting the Brightness (Exposure Compensation) ......... 74 Changing the Tone of an Image (My Colors 75 8 Basic Operations.. 47 Resetting the Camera 48 Formatting Memory Cards 49 Changing Sounds 51 Changing the Image Display Time .. 52 3 Shooting Special Scenes and Using Common Functions 53 9 Just Taking Pictures (Easy Mode...
... Making Settings for the Images You Want 67 G Shooting in Program AE 68 W Continuous Shooting 69 Changing the Recording Pixels (Image Size 70 Changing the Image Quality (Compression Ratio 70 Changing the ISO Speed 72 Adjusting the Tone (White Balance) 73 Adjusting the Brightness (Exposure Compensation) ......... 74 Changing the Tone of an Image (My Colors 75 8 Basic Operations.. 47 Resetting the Camera 48 Formatting Memory Cards 49 Changing Sounds 51 Changing the Image Display Time .. 52 3 Shooting Special Scenes and Using Common Functions 53 9 Just Taking Pictures (Easy Mode...
User Manual
Page 9
...Shutter Mode 88 Checking the Focus and People's Expressions (Focus Check Display 99 Viewing Images on a TV 100 + Changing Image Transitions..... 101 / Erasing All Images 101 : Protecting Images 102 = Resizing Images 103 \ Rotating Images 104 ] Correcting Red-Eye Effect ........ 105 ^ Attaching Sound Memos .......... 107 Transferring Images to a Computer ..108 { Designating Images for Transfer (DPOF 109 Designating Images for Printing (DPOF 111 8 Customizing the Camera 117 Changing Functions 118 Changing Shooting Functions ....... 121 6 Using Various Functions for Using the Camera...
...Shutter Mode 88 Checking the Focus and People's Expressions (Focus Check Display 99 Viewing Images on a TV 100 + Changing Image Transitions..... 101 / Erasing All Images 101 : Protecting Images 102 = Resizing Images 103 \ Rotating Images 104 ] Correcting Red-Eye Effect ........ 105 ^ Attaching Sound Memos .......... 107 Transferring Images to a Computer ..108 { Designating Images for Transfer (DPOF 109 Designating Images for Printing (DPOF 111 8 Customizing the Camera 117 Changing Functions 118 Changing Shooting Functions ....... 121 6 Using Various Functions for Using the Camera...

User Manual
Page 17
... a camera at default settings. • The number of shots that can be saved will not be able to take or erase images. 17 If this tab is in the locked position, "Card Locked!" The number of shots that can be saved appear on camera settings, the subject and the memory card used. Number of shots that can be saved Compatible Memory Cards • SD memory cards • SDHC memory cards • MultiMediaCards • MMCplus memory cards • HC MMCplus memory cards What is the Write-Protect...
... a camera at default settings. • The number of shots that can be saved will not be able to take or erase images. 17 If this tab is in the locked position, "Card Locked!" The number of shots that can be saved appear on camera settings, the subject and the memory card used. Number of shots that can be saved Compatible Memory Cards • SD memory cards • SDHC memory cards • MultiMediaCards • MMCplus memory cards • HC MMCplus memory cards What is the Write-Protect...
User Manual
Page 23
... image comes out dark even the flash fired when shooting? Taking Pictures Shoot. ● Press the shutter button fully. Move about two seconds. The flash will turn on the camera power will automatically fire in low light conditions. The lamp (Red-Eye Reduction Lamp) lights in dark conditions using the flash. You can continue shooting while the image displays. Subject is too far away for the flash to the memory card. Shoot the image within the effective flash...
... image comes out dark even the flash fired when shooting? Taking Pictures Shoot. ● Press the shutter button fully. Move about two seconds. The flash will turn on the camera power will automatically fire in low light conditions. The lamp (Red-Eye Reduction Lamp) lights in dark conditions using the flash. You can continue shooting while the image displays. Subject is too far away for the flash to the memory card. Shoot the image within the effective flash...
User Manual
Page 31
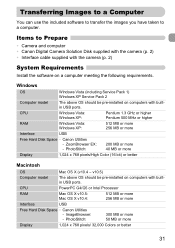
Transferring Images to a Computer You can use the included software to transfer the images you have taken to Prepare • Camera and computer • Canon Digital Camera Solution Disk supplied with the camera (p. 2) • Interface cable supplied with the camera (p. 2) System Requirements Install the software on a computer meeting the following requirements. CPU RAM PowerPC G4/G5 or Intel Processor Mac OS X v10.5: Mac OS X v10.4: 512 MB or more 256...
Transferring Images to a Computer You can use the included software to transfer the images you have taken to Prepare • Camera and computer • Canon Digital Camera Solution Disk supplied with the camera (p. 2) • Interface cable supplied with the camera (p. 2) System Requirements Install the software on a computer meeting the following requirements. CPU RAM PowerPC G4/G5 or Intel Processor Mac OS X v10.5: Mac OS X v10.4: 512 MB or more 256...

User Manual
Page 36
Accessories Supplied with Camera AV Cable AVC-DC400*1 Interface Cable IFC-400PCU*1 Wrist Strap WS-800 AA-size Alkaline Batteries (x2) Memory Card (32 MB) Canon Digital Camera Solution Disk Battery and Charger Kit CBK4-300*3 AC Adapter kit ACK800 Battery Charger CB-5AH AA-size NiMH batteries (NB-3AH x4) Compact Power Adapter CA-PS800 Power Cord *1 Also available for purchase separately. *2 See the user guide supplied with the printer for more information on the printer and interface cables. *3 Battery and Charger Kit CBK4-200 may also be used. 36
Accessories Supplied with Camera AV Cable AVC-DC400*1 Interface Cable IFC-400PCU*1 Wrist Strap WS-800 AA-size Alkaline Batteries (x2) Memory Card (32 MB) Canon Digital Camera Solution Disk Battery and Charger Kit CBK4-300*3 AC Adapter kit ACK800 Battery Charger CB-5AH AA-size NiMH batteries (NB-3AH x4) Compact Power Adapter CA-PS800 Power Cord *1 Also available for purchase separately. *2 See the user guide supplied with the printer for more information on the printer and interface cables. *3 Battery and Charger Kit CBK4-200 may also be used. 36
User Manual
Page 40
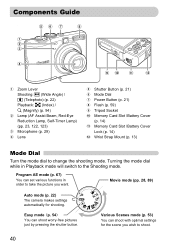
... camera makes settings automatically for the scene you want. Program AE mode (p. 67) You can shoot with optimal settings for shooting. Easy mode (p. 54) You can shoot worry-free pictures just by pressing the shutter button. Components Guide a Zoom Lever Shooting: j (Wide Angle) / i (Telephoto) (p. 22) Playback: g (Index) / k (Magnify) (p. 94) b Lamp (AF Assist Beam, Red-Eye Reduction Lamp, Self-Timer Lamp) (pp. 23, 122, 123) c Microphone (p. 29) d Lens e Shutter Button (p. 21) f Mode Dial g Power Button (p. 21) h Flash (p. 59) i Tripod Socket j Memory Card Slot /Battery...
... camera makes settings automatically for the scene you want. Program AE mode (p. 67) You can shoot with optimal settings for shooting. Easy mode (p. 54) You can shoot worry-free pictures just by pressing the shutter button. Components Guide a Zoom Lever Shooting: j (Wide Angle) / i (Telephoto) (p. 22) Playback: g (Index) / k (Magnify) (p. 94) b Lamp (AF Assist Beam, Red-Eye Reduction Lamp, Self-Timer Lamp) (pp. 23, 122, 123) c Microphone (p. 29) d Lens e Shutter Button (p. 21) f Mode Dial g Power Button (p. 21) h Flash (p. 59) i Tripod Socket j Memory Card Slot /Battery...
User Manual
Page 42
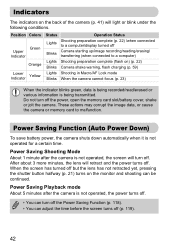
...Blinks Camera shake warning, flash charging (p. 59) Lights Shooting in Macro/AF Lock mode Blinks When the camera cannot focus (p. 23) When the indicator blinks green, data is being transmitted. Position Colors Green Upper Indicator Orange Lower Indicator Yellow Status Operation Status Lights Shooting preparation complete (p. 22) /when connected to a computer/display turned off . After about 3 more minutes, the lens will retract and the power turns off Blinks Camera starting up/image recording/reading/erasing/ transferring (when connected to malfunction. Power Saving Playback...
...Blinks Camera shake warning, flash charging (p. 59) Lights Shooting in Macro/AF Lock mode Blinks When the camera cannot focus (p. 23) When the indicator blinks green, data is being transmitted. Position Colors Green Upper Indicator Orange Lower Indicator Yellow Status Operation Status Lights Shooting preparation complete (p. 22) /when connected to a computer/display turned off . After about 3 more minutes, the lens will retract and the power turns off Blinks Camera starting up/image recording/reading/erasing/ transferring (when connected to malfunction. Power Saving Playback...
User Manual
Page 50
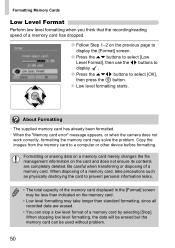
... to display the [Format] screen. ● Press the op buttons to select [Low Level Format], then use the qr buttons to display . ● Press the opqr buttons to select [OK], then press the m button. When disposing of a memory card, take longer than indicated on the card and does not ensure its contents are erased. • You can be less than standard formatting, since all recorded data are completely deleted. When...
... to display the [Format] screen. ● Press the op buttons to select [Low Level Format], then use the qr buttons to display . ● Press the opqr buttons to select [OK], then press the m button. When disposing of a memory card, take longer than indicated on the card and does not ensure its contents are erased. • You can be less than standard formatting, since all recorded data are completely deleted. When...
User Manual
Page 77
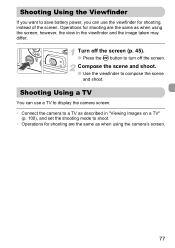
... set the shooting mode to shoot. • Operations for shooting are the same as when using the screen; Compose the scene and shoot. ● Use the viewfinder to turn off the screen (p. 45). ● Press the ⁄ button to compose the scene and shoot. Turn off the screen. Shooting Using the Viewfinder If you want to save battery power, you can use the viewfinder for shooting are the same as when using the camera's screen. 77 Operations...
... set the shooting mode to shoot. • Operations for shooting are the same as when using the screen; Compose the scene and shoot. ● Use the viewfinder to turn off the screen (p. 45). ● Press the ⁄ button to compose the scene and shoot. Turn off the screen. Shooting Using the Viewfinder If you want to save battery power, you can use the viewfinder for shooting are the same as when using the camera's screen. 77 Operations...

User Manual
Page 122
Changing Shooting Functions Using the Auto Red-Eye Correction Function This function automatically reduces red-eye. Turning off this occurs, select in dark conditions using the flash. Only the corrected image will be recorded to the memory card. ● Select [Flash Settings], then press the m button. ● Press the op buttons to select [Red-Eye Corr.], then press the qr buttons to select [On]. • Red-eye correction may not be applied to other red parts than red eyes. If this function. ●...
Changing Shooting Functions Using the Auto Red-Eye Correction Function This function automatically reduces red-eye. Turning off this occurs, select in dark conditions using the flash. Only the corrected image will be recorded to the memory card. ● Select [Flash Settings], then press the m button. ● Press the op buttons to select [Red-Eye Corr.], then press the qr buttons to select [On]. • Red-eye correction may not be applied to other red parts than red eyes. If this function. ●...
User Manual
Page 124
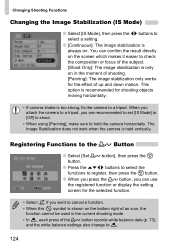
... of up and down motion. Changing Shooting Functions Changing the Image Stabilization (IS Mode) ● Select [IS Mode], then press the qr buttons to select a setting. ● [Continuous]: The image stabilization is shown on the bottom right of an icon, the function cannot be used in the moment of shooting. [Panning]: The image stabilization only works for the effect of the c button records white balance data (p. 73), and the white balance settings also change to . 124
... of up and down motion. Changing Shooting Functions Changing the Image Stabilization (IS Mode) ● Select [IS Mode], then press the qr buttons to select a setting. ● [Continuous]: The image stabilization is shown on the bottom right of an icon, the function cannot be used in the moment of shooting. [Panning]: The image stabilization only works for the effect of the c button records white balance data (p. 73), and the white balance settings also change to . 124

User Manual
Page 128
Lens will record on movies. • When the camera is securely closed (p. 15). • Confirm that the memory card slot/battery cover is subjected to turn the power on then back off (p. 14). Screen does not display properly while shooting. • The display automatically brightens when shooting in your TV (p. 100). You Think There is a Problem If you are using the correct battery type (p. 16). • In low...
Lens will record on movies. • When the camera is securely closed (p. 15). • Confirm that the memory card slot/battery cover is subjected to turn the power on then back off (p. 14). Screen does not display properly while shooting. • The display automatically brightens when shooting in your TV (p. 100). You Think There is a Problem If you are using the correct battery type (p. 16). • In low...
User Manual
Page 131
... copy a movie to a memory card that has been formatted on this camera (p. 49). • If you may interrupt momentarily. • When playing movies on your computer, depending on the screen. • Refer to the Error Messages section (p. 132). 131 You Think There is a Problem Playback Cannot play back. • If the file name or folder structure is set to Easy mode, some buttons and the zoom cannot be able to play back images...
... copy a movie to a memory card that has been formatted on this camera (p. 49). • If you may interrupt momentarily. • When playing movies on your computer, depending on the screen. • Refer to the Error Messages section (p. 132). 131 You Think There is a Problem Playback Cannot play back. • If the file name or folder structure is set to Easy mode, some buttons and the zoom cannot be able to play back images...

User Manual
Page 133
... images for print settings or transfer settings exceeds 998. If this error code reappears, note the number and contact your Canon Customer Support Help Desk as there may not be a problem with the camera. 133 Press the power button to turn the camera off and then back on the memory card. If an error code displays directly after taking a picture, the shot may not have been taken with a different camera may be supported. Check image in playback mode. • If this error message continues...
... images for print settings or transfer settings exceeds 998. If this error code reappears, note the number and contact your Canon Customer Support Help Desk as there may not be a problem with the camera. 133 Press the power button to turn the camera off and then back on the memory card. If an error code displays directly after taking a picture, the shot may not have been taken with a different camera may be supported. Check image in playback mode. • If this error message continues...
User Manual
Page 138
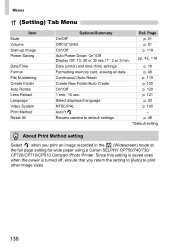
... you print an image recorded in the (Widescreen) mode at the full page setting for wide paper using a Canon SELPHY CP750/740/730/ CP720/CP710/CP510 Compact Photo Printer. Page On/Off* p. 51 Off/1/2*/3/4/5 p. 51 On*/Off p. 118 Auto Power Down: On*/Off Display Off: 10, 20 or 30 sec./1*, 2 or 3 min. Menus (Setting) Tab Menu Item Mute Volume Start-up Image Power Saving Date/Time Format File Numbering Create Folder Auto Rotate Lens Retract Language Video System Print Method Reset...
... you print an image recorded in the (Widescreen) mode at the full page setting for wide paper using a Canon SELPHY CP750/740/730/ CP720/CP710/CP510 Compact Photo Printer. Page On/Off* p. 51 Off/1/2*/3/4/5 p. 51 On*/Off p. 118 Auto Power Down: On*/Off Display Off: 10, 20 or 30 sec./1*, 2 or 3 min. Menus (Setting) Tab Menu Item Mute Volume Start-up Image Power Saving Date/Time Format File Numbering Create Folder Auto Rotate Lens Retract Language Video System Print Method Reset...
User Manual
Page 142
...58 Audio 51 Auto Focus Î Focus AV Cable 2, 100 B Batteries Alkaline Batteries 2, 14 Battery and Charger Kit....... 38 Charge Indicator 16 NiMH Battery (sold separately) . 16 Power Saving 42, 118 Rechargeable Batteries (Date/ Time Battery 19 Beach (Scene Mode 57 Black and White Images.......... 75 C Camera Shake 59, 124 Components Guide 40 Compression Î Image Quality Continuous Shooting 69 D Date and Time Î Date/Time Date/Time 18 Adding to Image 63 Changing 19 Date/Time Battery 19 Setting 18 Default Settings 48 Deleting Î Erasing Digital Camera Solution Disk...
...58 Audio 51 Auto Focus Î Focus AV Cable 2, 100 B Batteries Alkaline Batteries 2, 14 Battery and Charger Kit....... 38 Charge Indicator 16 NiMH Battery (sold separately) . 16 Power Saving 42, 118 Rechargeable Batteries (Date/ Time Battery 19 Beach (Scene Mode 57 Black and White Images.......... 75 C Camera Shake 59, 124 Components Guide 40 Compression Î Image Quality Continuous Shooting 69 D Date and Time Î Date/Time Date/Time 18 Adding to Image 63 Changing 19 Date/Time Battery 19 Setting 18 Default Settings 48 Deleting Î Erasing Digital Camera Solution Disk...
User Manual
Page 144
... Size). 70 Red-Eye Auto Correction 122 Red-Eye Correction .......... 105 Reduction 122 Resizing (Making Images Smaller) 103 Rotating Images 104 144 S Safety Zoom 61 Screen Information Displayed ......... 43 Language 20 Menu Operations .......... 46, 47 Switching the Display .......... 45 SD/SDHC memory cards Î Memory Cards Self-Timer Changing Delay and Number of Shots 78 Shoot 60 Sepia Tones 75 Shooting Date and Time Î Date/ Time Shooting Using a TV 77 Shutter Button 21 Slide Show 98 Snow (Scene Mode 57 Software Digital Camera Solution Disk . 2 Software Starter Guide...
... Size). 70 Red-Eye Auto Correction 122 Red-Eye Correction .......... 105 Reduction 122 Resizing (Making Images Smaller) 103 Rotating Images 104 144 S Safety Zoom 61 Screen Information Displayed ......... 43 Language 20 Menu Operations .......... 46, 47 Switching the Display .......... 45 SD/SDHC memory cards Î Memory Cards Self-Timer Changing Delay and Number of Shots 78 Shoot 60 Sepia Tones 75 Shooting Date and Time Î Date/ Time Shooting Using a TV 77 Shutter Button 21 Slide Show 98 Snow (Scene Mode 57 Software Digital Camera Solution Disk . 2 Software Starter Guide...


