
User Manual
Page 45
... Focus Check Display You can set the display that displays first. Display for Shooting in dark conditions, allowing you to select the 4 tab. Then choose [Review Info]. Noise may be different. However, the Simple Information will not display. Switching the Display You can switch the display using the ⁄ button. Press...
... Focus Check Display You can set the display that displays first. Display for Shooting in dark conditions, allowing you to select the 4 tab. Then choose [Review Info]. Noise may be different. However, the Simple Information will not display. Switching the Display You can switch the display using the ⁄ button. Press...
User Manual
Page 52
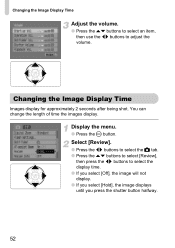
Changing the Image Display Time Images display for approximately 2 seconds after being shot. Select [Review]. ● Press the qr buttons to select the 4 tab. ● Press the op buttons to select [Review], then press the qr buttons to adjust the volume. Changing the Image Display Time Adjust the volume. ● Press the op...
Changing the Image Display Time Images display for approximately 2 seconds after being shot. Select [Review]. ● Press the qr buttons to select the 4 tab. ● Press the op buttons to select [Review], then press the qr buttons to adjust the volume. Changing the Image Display Time Adjust the volume. ● Press the op...
User Manual
Page 84
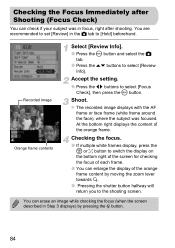
... frame (white frame around the face), where the subject was in the 4 tab to [Hold] beforehand. Shoot. Recorded Image Orange frame contents Select [Review Info]. ● Press the · button and select the 4 tab. ● Press the op buttons to the shooting screen. At the bottom ...the screen described in Step 3 displays) by moving the zoom lever towards k. ● Pressing the shutter button halfway will return you to select [Review Info]. You can enlarge the display of the orange frame content by pressing the a button. 84 Checking the focus. ● If multiple white frames...
... frame (white frame around the face), where the subject was in the 4 tab to [Hold] beforehand. Shoot. Recorded Image Orange frame contents Select [Review Info]. ● Press the · button and select the 4 tab. ● Press the op buttons to the shooting screen. At the bottom ...the screen described in Step 3 displays) by moving the zoom lever towards k. ● Pressing the shutter button halfway will return you to select [Review Info]. You can enlarge the display of the orange frame content by pressing the a button. 84 Checking the focus. ● If multiple white frames...
User Manual
Page 136
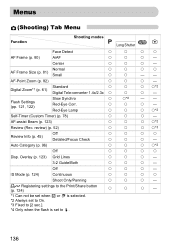
Normal AF Frame Size (p. 81) Small { { { { {{ -- AF-Point Zoom (p. 82) { { {- review) (p. 52) { { { {*3 Review Info (p. 45) Off Detailed/Focus Check { { { { {{ {- Overlay (p. 123) Grid Lines { { {- 3:2 Guide/Both { {...{ {*2 {- Flash Settings (pp. 121, 122) Slow Synchro Red-Eye Corr. Auto Category (p. 96) { { { {*2 Off { { {{ Disp. AF-assist Beam (p. 123) { { { {*2 Review (Rec. Red-Eye Lamp { {*2 { { { { -- {- { {*2 Self-Timer (Custom Timer) (p. 78) { { {- Center { { {- Off { { {- Menus (Shooting) Tab Menu ...
Normal AF Frame Size (p. 81) Small { { { { {{ -- AF-Point Zoom (p. 82) { { {- review) (p. 52) { { { {*3 Review Info (p. 45) Off Detailed/Focus Check { { { { {{ {- Overlay (p. 123) Grid Lines { { {- 3:2 Guide/Both { {...{ {*2 {- Flash Settings (pp. 121, 122) Slow Synchro Red-Eye Corr. Auto Category (p. 96) { { { {*2 Off { { {{ Disp. AF-assist Beam (p. 123) { { { {*2 Review (Rec. Red-Eye Lamp { {*2 { { { { -- {- { {*2 Self-Timer (Custom Timer) (p. 78) { { {- Center { { {- Off { { {- Menus (Shooting) Tab Menu ...


