

Service Manual
Page 6
POINTS TO NOTE WHEN HANDLING/STORING THE CARTRIDGE 6-2 APPENDIX A. GENERAL CIRCUIT DIAGRAM.. DC CONTROLLER CIRCUIT DIAGRAM A-5 E. BLANK EXPOSURE (front) CIRCUIT DIAGRAM A-27 L. A-3 D. CONTROL PANEL CIRCUIT DIAGRAM A-21 ... SERVICING 6-1 IV. COMPOSITE POWER SUPPLY CIRCUIT DIAGRAM A-13 F. INTENSITY/AE SENSOR CIRCUIT DIAGRAM A-23 H. SOLVENTS/OILS A-30 D COPYRIGHT © 1994 CANON INC. A-24 I . HIGH-VOLTAGE CONTACT CIRCUIT DIAGRAM A-26 K. GENERAL TIMING CHART A-1 B. SENSOR CIRCUIT DIAGRAM.... BLANK EXPOSURE (rear) CIRCUIT DIAGRAM A-28...
POINTS TO NOTE WHEN HANDLING/STORING THE CARTRIDGE 6-2 APPENDIX A. GENERAL CIRCUIT DIAGRAM.. DC CONTROLLER CIRCUIT DIAGRAM A-5 E. BLANK EXPOSURE (front) CIRCUIT DIAGRAM A-27 L. A-3 D. CONTROL PANEL CIRCUIT DIAGRAM A-21 ... SERVICING 6-1 IV. COMPOSITE POWER SUPPLY CIRCUIT DIAGRAM A-13 F. INTENSITY/AE SENSOR CIRCUIT DIAGRAM A-23 H. SOLVENTS/OILS A-30 D COPYRIGHT © 1994 CANON INC. A-24 I . HIGH-VOLTAGE CONTACT CIRCUIT DIAGRAM A-26 K. GENERAL TIMING CHART A-1 B. SENSOR CIRCUIT DIAGRAM.... BLANK EXPOSURE (rear) CIRCUIT DIAGRAM A-28...
Service Manual
Page 9
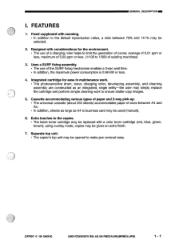
... 0-sec wait time. • In addition, the maximum power consumption is 0.98 kW or less. 4. Integrated cartridge for the environment. • The use of ozone; COPYRIGHT @ 1994 CANON INC. Fixed copyboard with zooming. • In addition to the default reproduction ratios, a ratio between A4 and A5.... • In addition, sheets as large as A4 to make jam removal easy. Designed with a color toner cartridge (red, blue, green, brown...
... 0-sec wait time. • In addition, the maximum power consumption is 0.98 kW or less. 4. Integrated cartridge for the environment. • The use of ozone; COPYRIGHT @ 1994 CANON INC. Fixed copyboard with zooming. • In addition to the default reproduction ratios, a ratio between A4 and A5.... • In addition, sheets as large as A4 to make jam removal easy. Designed with a color toner cartridge (red, blue, green, brown...
Service Manual
Page 24
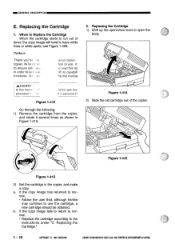
... Cartridge 1) Shift up the open/close lever to the instructions under "2. Replacing the Cartridge."... 1 - 16 COPYRIGHT © 1994 CANONINC. Preface Thank you (of toner, the copy image will tend to tam ,;an. hod of the copier. 0 7I ,sue 0 Figure 1-415 Figure 1-413 2) Set the cartridge...cartridge according to open the body. Figure 1-414 2) Slide the old cartridge out of use the cartridge, a new cartridge...a. functions. When to Replace the Cartridge When the cartridge starts to run out of .lre ... through the following: 1) Remove the cartridge from the copier, and rotate it ...
... Cartridge 1) Shift up the open/close lever to the instructions under "2. Replacing the Cartridge."... 1 - 16 COPYRIGHT © 1994 CANONINC. Preface Thank you (of toner, the copy image will tend to tam ,;an. hod of the copier. 0 7I ,sue 0 Figure 1-415 Figure 1-413 2) Set the cartridge...cartridge according to open the body. Figure 1-414 2) Slide the old cartridge out of use the cartridge, a new cartridge...a. functions. When to Replace the Cartridge When the cartridge starts to run out of .lre ... through the following: 1) Remove the cartridge from the copier, and rotate it ...

Service Manual
Page 25
Figure 1-417 Figure 1-419 COPYRIGHT © 1994 CANON INC. then, rotate it straight out toward the front (about 90° several times. 5) Hold the cartridge with the Open label facing up ; GENERAL DESCRIPTION 3) Take out the new cartridge from its bag, and hold it horizontally with the warning label facing up , and insert it... into the copier slowly until it stops. 0 7// Figure 1-416 4) Peel the end of the Open seal of the cartridge, and pull it about 50 cm). Figure 1-418 6) Press down on the mark on the copier's top to close the body...
Figure 1-417 Figure 1-419 COPYRIGHT © 1994 CANON INC. then, rotate it straight out toward the front (about 90° several times. 5) Hold the cartridge with the Open label facing up ; GENERAL DESCRIPTION 3) Take out the new cartridge from its bag, and hold it horizontally with the warning label facing up , and insert it... into the copier slowly until it stops. 0 7// Figure 1-416 4) Peel the end of the Open seal of the cartridge, and pull it about 50 cm). Figure 1-418 6) Press down on the mark on the copier's top to close the body...
Service Manual
Page 42
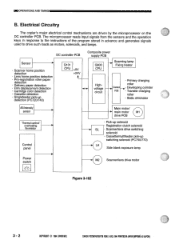
... • Lens home position detection • Pre-registration roller paper detection • Delivery paper detection • Film displacement detection • Cartridge color detection • Cassette detection • Singlefeeder pick-up detection (PC720/740) Q101 CPU +5V +24V 4 Composite power supply PCB ... Side blank exposure lamp Power switch 00 M2 Scanner/lens drive motor Figure 3-102 3- 2 COPYRIGHT © 1994 CANONINC. CANON PC72017050/770 REV.O AUG.1994 PRINTEDIN JAPANRout AU JAPON) Electrical Circuitry The copier's major electrical control mechanisms are driven by the ...
... • Lens home position detection • Pre-registration roller paper detection • Delivery paper detection • Film displacement detection • Cartridge color detection • Cassette detection • Singlefeeder pick-up detection (PC720/740) Q101 CPU +5V +24V 4 Composite power supply PCB ... Side blank exposure lamp Power switch 00 M2 Scanner/lens drive motor Figure 3-102 3- 2 COPYRIGHT © 1994 CANONINC. CANON PC72017050/770 REV.O AUG.1994 PRINTEDIN JAPANRout AU JAPON) Electrical Circuitry The copier's major electrical control mechanisms are driven by the ...

Service Manual
Page 43
... light-blocking plate is at PS2, '1') J109-13 -12 -14 DIG3 DPD - otherwise, clock signals are generated. J108-2 DIG3 -1 CDP when color cartridge is detected, '1'. (when light-blocking plate is at Q753, '0') -4 4+5V -3 RPD when Q751 detects paper, '1'. (when light-blocking plate is at...when light-blocking plate is at Q752, '0') when surface temperature of fixing heater rises, voltage lowers. Figure 3-103 COPYRIGHT © 1994 CANON INC. CANON PC720R4OfT5O770 REV.O AUG.1994 PRINTED IN JAPAN ompuit AU JAPON) 3 - 3 Inputs to and Outputs from the DC Controller 1. sensor PS...
... light-blocking plate is at PS2, '1') J109-13 -12 -14 DIG3 DPD - otherwise, clock signals are generated. J108-2 DIG3 -1 CDP when color cartridge is detected, '1'. (when light-blocking plate is at Q753, '0') -4 4+5V -3 RPD when Q751 detects paper, '1'. (when light-blocking plate is at...when light-blocking plate is at Q752, '0') when surface temperature of fixing heater rises, voltage lowers. Figure 3-103 COPYRIGHT © 1994 CANON INC. CANON PC720R4OfT5O770 REV.O AUG.1994 PRINTED IN JAPAN ompuit AU JAPON) 3 - 3 Inputs to and Outputs from the DC Controller 1. sensor PS...

Service Manual
Page 57
... Blank exposure lamp Primary charging rollerj; Developing cylinder Photosensitive drum Z Drum cartridge Cartridge color detection Static eliminator Transfer roller Q101 Microprocessor DC controller PCB fluorescent lamp driver High-voltage circuit 4 O900 Microprocessor Composite power supply PCB Figure 3-301 COPYRIGHT 1994 CANON INC. Outline The copier's image formation system performs the following functions: •...
... Blank exposure lamp Primary charging rollerj; Developing cylinder Photosensitive drum Z Drum cartridge Cartridge color detection Static eliminator Transfer roller Q101 Microprocessor DC controller PCB fluorescent lamp driver High-voltage circuit 4 O900 Microprocessor Composite power supply PCB Figure 3-301 COPYRIGHT 1994 CANON INC. Outline The copier's image formation system performs the following functions: •...

Service Manual
Page 105
...fully clockwise, turn it fully counterclockwise before making adjustments once again. CANON PC7201740R50M0 REV.O AUG.1994 PRINTED IN JAPAN ompagit AU JAPON) 3 - 65 COPYRIGHT © 1994 CANON INC. Adjusting the Intensity of the Scanning Lamp Adjust the intensity... of the scanning lamp whenever you have replaced any of the following parts: • DC controller PCB • Composite power supply PCB • AE/intensity sensor PCB • scanning lamp Preparing for Adjustment 1) Set the black cartridge...
...fully clockwise, turn it fully counterclockwise before making adjustments once again. CANON PC7201740R50M0 REV.O AUG.1994 PRINTED IN JAPAN ompagit AU JAPON) 3 - 65 COPYRIGHT © 1994 CANON INC. Adjusting the Intensity of the Scanning Lamp Adjust the intensity... of the scanning lamp whenever you have replaced any of the following parts: • DC controller PCB • Composite power supply PCB • AE/intensity sensor PCB • scanning lamp Preparing for Adjustment 1) Set the black cartridge...

Service Manual
Page 143
... and the copier's lens is at the farthest left , turn off the power, and disconnect the power plug. 2) Remove the multifeeder assembly. 3) Remove the cartridge. 4) Remove the top cover. 5) Remove the DC controller PCB. 6) Remove the two screws C) from the rear of the composite power supply PCB (:). Turn... off the power. T U 0 0 7) Open the copier's top unit, and remove the four screws C); MECHANICAL SYSTEMMI 3. CANON PC72017401750M0 REV.0 AUG.1994 PRINTED IN JAPAN iimPRimt AU JAPONI 4 - 27 Lamp PCB Figure 4-405 COPYRIGHT 1994...
... and the copier's lens is at the farthest left , turn off the power, and disconnect the power plug. 2) Remove the multifeeder assembly. 3) Remove the cartridge. 4) Remove the top cover. 5) Remove the DC controller PCB. 6) Remove the two screws C) from the rear of the composite power supply PCB (:). Turn... off the power. T U 0 0 7) Open the copier's top unit, and remove the four screws C); MECHANICAL SYSTEMMI 3. CANON PC72017401750M0 REV.0 AUG.1994 PRINTED IN JAPAN iimPRimt AU JAPONI 4 - 27 Lamp PCB Figure 4-405 COPYRIGHT 1994...

Service Manual
Page 144
... is closed. er are housed in a single container called cartridge. (You cannot disassemble the cartridge.) Developing blade Primary charging roller Light-blocking shutter Photosensitive drum Cleaning blade Drum cover shutter Developing cylinder Figure 4-501 a. CANON PC72M40/7501170 REV.O AUG.1994 PRINTED IN JAPAN omPnimt AU ... drum from the copier; the light-blocking shutter is removed from such light. 4 - 28 COPYRIGHT 1994 CANON INC. Light-Blocking Shutter Light enters through the image exposure opening when the cartridge is provided to prevent such a problem. b.
... is closed. er are housed in a single container called cartridge. (You cannot disassemble the cartridge.) Developing blade Primary charging roller Light-blocking shutter Photosensitive drum Cleaning blade Drum cover shutter Developing cylinder Figure 4-501 a. CANON PC72M40/7501170 REV.O AUG.1994 PRINTED IN JAPAN omPnimt AU ... drum from the copier; the light-blocking shutter is removed from such light. 4 - 28 COPYRIGHT 1994 CANON INC. Light-Blocking Shutter Light enters through the image exposure opening when the cartridge is provided to prevent such a problem. b.

Service Manual
Page 145
...in the direction it is exposed to soil the roller surface. Cleaning the Drum Caution: As a rule, do not clean or touch the photosensitive drum. CANON PC720f7401750/710 REV.O AUG.1994 PRINTEDIN JAPAN1IMPRIME AUJAPON) 4 - 29 Do not use a flannel cloth. 3. however, take care not to light of ... the Transfer Charging Roller 1) Open the copier's top unit. 2) Remove the screw T. 1) Open the copier's top body, and remove the cartridge. 2) Put the cartridge upside down, and open the drum shutter. 3) Clean the surface of the drum to limit the exposure of the drum using a cloth coated with...
...in the direction it is exposed to soil the roller surface. Cleaning the Drum Caution: As a rule, do not clean or touch the photosensitive drum. CANON PC720f7401750/710 REV.O AUG.1994 PRINTEDIN JAPAN1IMPRIME AUJAPON) 4 - 29 Do not use a flannel cloth. 3. however, take care not to light of ... the Transfer Charging Roller 1) Open the copier's top unit. 2) Remove the screw T. 1) Open the copier's top body, and remove the cartridge. 2) Put the cartridge upside down, and open the drum shutter. 3) Clean the surface of the drum to limit the exposure of the drum using a cloth coated with...

Service Manual
Page 155
... Work 4 Remove the protection sheet from the copier. 2- - 1 _ 40 1 1 -7= - L=-- --, Roller 8 Hold the cartridge level, with the warning label facing up and out of the roller, straight up ; r E re ) COPYRIGHT © 1994 CANONINC. CANON PC720I74017501770REV.O AUG.1994 PRINTEDIN JAPAN ompRimt AU JAPON) 5 - 3 z_ _- -_----_5-__. and rotate it about 90° in ...Open the copier, and remove the attachment from its top unit. 6 Pull the two cardboard pieces, located inside the copier. 7 Pick the tab on the cartridge, and pull out the cartridge from the copyboard glass.
... Work 4 Remove the protection sheet from the copier. 2- - 1 _ 40 1 1 -7= - L=-- --, Roller 8 Hold the cartridge level, with the warning label facing up and out of the roller, straight up ; r E re ) COPYRIGHT © 1994 CANONINC. CANON PC720I74017501770REV.O AUG.1994 PRINTEDIN JAPAN ompRimt AU JAPON) 5 - 3 z_ _- -_----_5-__. and rotate it about 90° in ...Open the copier, and remove the attachment from its top unit. 6 Pull the two cardboard pieces, located inside the copier. 7 Pick the tab on the cartridge, and pull out the cartridge from the copyboard glass.

Service Manual
Page 156
... the tip of the opening seal, and pull it fully out (about 50 cm). 10 Hold the cartridge with the warning label facing up, and insert the cartridge with care until it stops. CANON PC720/740501170 REV.0 AUG. 1994 PRINTED IN JAPAN (IMPRIME AU JAPON) INSTALLATION Step Work 9 Place the... cartridge on the power switch. Checks/remarks 11 Push the icon on the copier's top f unit to close....
... the tip of the opening seal, and pull it fully out (about 50 cm). 10 Hold the cartridge with the warning label facing up, and insert the cartridge with care until it stops. CANON PC720/740501170 REV.0 AUG. 1994 PRINTED IN JAPAN (IMPRIME AU JAPON) INSTALLATION Step Work 9 Place the... cartridge on the power switch. Checks/remarks 11 Push the icon on the copier's top f unit to close....
Service Manual
Page 159
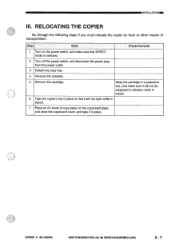
... is selected. 2 Turn off the power switch, and disconnect the power plug from the power outlet. 3 Detach the copy tray. 4 Remove the cassette. 5 Remove the cartridge. RELOCATING THE COPIER Go through the following steps if you must relocate the copier by truck or other means of copy paper on the power... copyboard glass, and close the copyboard cover, and tape it will not be subjected to vibration while in transit. 6 Tape the copier's top in place. CANON PC72017401750/770REV.0 AUG.1994 PRINTED IN JAPAN EMPRIME AUJAPAN) 5 - 7 NSTALLATIONIM III. COPYRIGHT © 1994 CANONINC.
... is selected. 2 Turn off the power switch, and disconnect the power plug from the power outlet. 3 Detach the copy tray. 4 Remove the cassette. 5 Remove the cartridge. RELOCATING THE COPIER Go through the following steps if you must relocate the copier by truck or other means of copy paper on the power... copyboard glass, and close the copyboard cover, and tape it will not be subjected to vibration while in transit. 6 Tape the copier's top in place. CANON PC72017401750/770REV.0 AUG.1994 PRINTED IN JAPAN EMPRIME AUJAPAN) 5 - 7 NSTALLATIONIM III. COPYRIGHT © 1994 CANONINC.

Service Manual
Page 161
PERIODICALLY REPLACED PARTS 6-1 II. DURABLES AND CONSUMABLES 6-1 III. POINTS TO NOTE WHEN HANDLING/STORING THE CARTRIDGE 6-2 COPYRIGHT@ 1994 CANONRC COON PertrOVW50770 REV.O AUG.1994 PAINTEDIN JAPAN FALPPoitE AU10040 CHAPTER 6 MAINTENANCE AND SERVICING I. SCHEDULED SERVICING 6-1 IV.
PERIODICALLY REPLACED PARTS 6-1 II. DURABLES AND CONSUMABLES 6-1 III. POINTS TO NOTE WHEN HANDLING/STORING THE CARTRIDGE 6-2 COPYRIGHT@ 1994 CANONRC COON PertrOVW50770 REV.O AUG.1994 PAINTEDIN JAPAN FALPPoitE AU10040 CHAPTER 6 MAINTENANCE AND SERVICING I. SCHEDULED SERVICING 6-1 IV.
Service Manual
Page 164
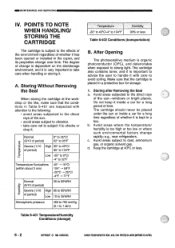
... it inside a car for storage. 1. e.g., near refrigerators. c. Keep the cartridge at the workshop or the like, make sure that the cartridge is important to advise the user to handle it . d. CANON PC720.74011501T1R0EV.0 AUG.1994 PRINTEDIN JAPAN (IMPRIME-AUJAPON) Storing Without Removing the Seal... When storing the cartridge at 40°C or less. 6 - 2 COPYRIGHT 1994...
... it inside a car for storage. 1. e.g., near refrigerators. c. Keep the cartridge at the workshop or the like, make sure that the cartridge is important to advise the user to handle it . d. CANON PC720.74011501T1R0EV.0 AUG.1994 PRINTEDIN JAPAN (IMPRIME-AUJAPON) Storing Without Removing the Seal... When storing the cartridge at 40°C or less. 6 - 2 COPYRIGHT 1994...

Service Manual
Page 165
...level that will not cause any practical problems; CANON PC720174011501770 REV.0 AUG.1994 PRINTER IN JAPAN (IMPRIME AU JAPONI 6 - 3 Do not ever leave it . If you are removing the cartridge for storage or for the photosensitive drum cover under the cartridge to vibration or shocks. d. Do not swing ...memory on the drum; Do not shake the cartridge in ways not instructed, or toner may disappear when the cartridge is left alone thereafter in mind: *Caused by mistake, clean it . COPYRIGHT © 1994 CANON INC. Do not stand the cartridge on its protective box or cover it with...
...level that will not cause any practical problems; CANON PC720174011501770 REV.0 AUG.1994 PRINTER IN JAPAN (IMPRIME AU JAPONI 6 - 3 Do not ever leave it . If you are removing the cartridge for storage or for the photosensitive drum cover under the cartridge to vibration or shocks. d. Do not swing ...memory on the drum; Do not shake the cartridge in ways not instructed, or toner may disappear when the cartridge is left alone thereafter in mind: *Caused by mistake, clean it . COPYRIGHT © 1994 CANON INC. Do not stand the cartridge on its protective box or cover it with...


