
Service Manual
Page 9
... AUG.1994 PRINTED IN JAPAN fMPRIME AU JAPAN) 1 - 1 using overlay mode, copies may be selected. 2. COPYRIGHT @ 1994 CANON INC. FEATURES 1. Separate top unit. • The copier's top unit may be used (manual). 6. Uses a SURF fixing assembly. • The use of the SURF fixing mechanism enables... between A4 and A5. • In addition, sheets as large as an integrated, single entity-the user may simply replace the cartridge and perform simple cleaning work . • The photosensitive drum, toner, charging roller, developing assembly, and cleaning assembly are constructed as...
... AUG.1994 PRINTED IN JAPAN fMPRIME AU JAPAN) 1 - 1 using overlay mode, copies may be selected. 2. COPYRIGHT @ 1994 CANON INC. FEATURES 1. Separate top unit. • The copier's top unit may be used (manual). 6. Uses a SURF fixing assembly. • The use of the SURF fixing mechanism enables... between A4 and A5. • In addition, sheets as large as an integrated, single entity-the user may simply replace the cartridge and perform simple cleaning work . • The photosensitive drum, toner, charging roller, developing assembly, and cleaning assembly are constructed as...
Service Manual
Page 24
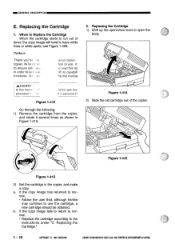
... he/she may continue to the instructions under "2. Replacing the Cartridge 1) Shift up the open the body. b. CANON PC720840r/501770 REV.OAUG.1994 PRINTEDIN JAPAN0MPRIMEAU JAPON) A.1.•. :anon copier. MIGENERAL DESCRIPTION E. When to Replace the Cartridge When the cartridge starts to run out of .lre copier, its capabili• ng this manua ACAUTIO - : In this manii...
... he/she may continue to the instructions under "2. Replacing the Cartridge 1) Shift up the open the body. b. CANON PC720840r/501770 REV.OAUG.1994 PRINTEDIN JAPAN0MPRIMEAU JAPON) A.1.•. :anon copier. MIGENERAL DESCRIPTION E. When to Replace the Cartridge When the cartridge starts to run out of .lre copier, its capabili• ng this manua ACAUTIO - : In this manii...

Service Manual
Page 25
... 6) Press down on the mark on the copier's top to close the body. CANON PCT20/7401150M0 RE© AUG.1994 PRINTEDIN JAPAN twat AUJAPON) 1 - 17 then, rotate it straight out toward the front (about 90° several times. 5) Hold the cartridge with the warning label facing up; Figure 1-...417 Figure 1-419 COPYRIGHT © 1994 CANON INC. GENERAL DESCRIPTION 3) Take out the new cartridge from its bag, and hold it horizontally with the Open label facing up, and insert it into the copier slowly until it stops. 0 7// Figure 1-416 4) Peel the end...
... 6) Press down on the mark on the copier's top to close the body. CANON PCT20/7401150M0 RE© AUG.1994 PRINTEDIN JAPAN twat AUJAPON) 1 - 17 then, rotate it straight out toward the front (about 90° several times. 5) Hold the cartridge with the warning label facing up; Figure 1-...417 Figure 1-419 COPYRIGHT © 1994 CANON INC. GENERAL DESCRIPTION 3) Take out the new cartridge from its bag, and hold it horizontally with the Open label facing up, and insert it into the copier slowly until it stops. 0 7// Figure 1-416 4) Peel the end...
Service Manual
Page 42
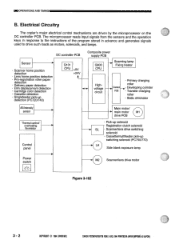
...; Pre-registration roller paper detection • Delivery paper detection • Film displacement detection • Cartridge color detection • Cassette detection • Singlefeeder pick-up detection (PC720/740) Q101 CPU +5V +24V 4 Composite power supply PCB Q90O H Scanning lamp Fixing heater...lens drive motor Figure 3-102 3- 2 COPYRIGHT © 1994 CANONINC. CANON PC72017050/770 REV.O AUG.1994 PRINTEDIN JAPANRout AU JAPON) =OPERATIONS AND TIMING B. Electrical Circuitry The copier's major electrical control mechanisms are driven by the microprocessor on the DC controller...
...; Pre-registration roller paper detection • Delivery paper detection • Film displacement detection • Cartridge color detection • Cassette detection • Singlefeeder pick-up detection (PC720/740) Q101 CPU +5V +24V 4 Composite power supply PCB Q90O H Scanning lamp Fixing heater...lens drive motor Figure 3-102 3- 2 COPYRIGHT © 1994 CANONINC. CANON PC72017050/770 REV.O AUG.1994 PRINTEDIN JAPANRout AU JAPON) =OPERATIONS AND TIMING B. Electrical Circuitry The copier's major electrical control mechanisms are driven by the microprocessor on the DC controller...

Service Manual
Page 57
...The copier's image formation system performs the following functions: • controls the scanning lamp. • controls the primary/transfer corona current. • controls the developing bias. • measures the density of the original. • controls blank exposure. CANON ...PC720114017501770 RE0.0 AUG.1994 PRINTED IN JAPAN (IMPRIME AU JAPAN) 3 - 17 Developing cylinder Photosensitive drum Z Drum cartridge Cartridge color detection Static eliminator Transfer roller Q101 Microprocessor DC controller PCB...
...The copier's image formation system performs the following functions: • controls the scanning lamp. • controls the primary/transfer corona current. • controls the developing bias. • measures the density of the original. • controls blank exposure. CANON ...PC720114017501770 RE0.0 AUG.1994 PRINTED IN JAPAN (IMPRIME AU JAPAN) 3 - 17 Developing cylinder Photosensitive drum Z Drum cartridge Cartridge color detection Static eliminator Transfer roller Q101 Microprocessor DC controller PCB...

Service Manual
Page 105
...counterclockwise before making adjustments once again. OPERATIONS AND TIMINGINN 2. COPYRIGHT © 1994 CANON INC. avoid one with even density; CANON PC7201740R50M0 REV.O AUG.1994 PRINTED IN JAPAN ompagit AU JAPON) 3 - 65... AE Adjustment Execute AE adjustment whenever you have replaced any of the following parts: • DC controller PCB • Composite power supply PCB • AE/intensity sensor PCB • scanning lamp Preparing for Adjustment 1) Set the black cartridge in the copier...
...counterclockwise before making adjustments once again. OPERATIONS AND TIMINGINN 2. COPYRIGHT © 1994 CANON INC. avoid one with even density; CANON PC7201740R50M0 REV.O AUG.1994 PRINTED IN JAPAN ompagit AU JAPON) 3 - 65... AE Adjustment Execute AE adjustment whenever you have replaced any of the following parts: • DC controller PCB • Composite power supply PCB • AE/intensity sensor PCB • scanning lamp Preparing for Adjustment 1) Set the black cartridge in the copier...

Service Manual
Page 143
...make sure that the blanking unit PCB is farthest to both ends and the copier's lens is at the farthest left , turn off the power, and disconnect the power plug. 2) Remove the multifeeder assembly. 3) Remove the cartridge. 4) Remove the top cover. 5) Remove the DC controller PCB. 6) Remove... the two screws C) from the rear of the composite power supply PCB (:). CANON PC72017401750M0 REV.0 AUG.1994 PRINTED IN JAPAN iimPRimt AU JAPONI 4 - 27...
...make sure that the blanking unit PCB is farthest to both ends and the copier's lens is at the farthest left , turn off the power, and disconnect the power plug. 2) Remove the multifeeder assembly. 3) Remove the cartridge. 4) Remove the top cover. 5) Remove the DC controller PCB. 6) Remove... the two screws C) from the rear of the composite power supply PCB (:). CANON PC72017401750M0 REV.0 AUG.1994 PRINTED IN JAPAN iimPRimt AU JAPONI 4 - 27...

Service Manual
Page 144
... is designed to protect the photosensitive drum from the copier; b. er are housed in a single container called cartridge. (You cannot disassemble the cartridge.) Developing blade Primary charging roller Light-blocking shutter Photosensitive drum Cleaning blade Drum cover shutter Developing cylinder Figure 4-501 a. MI MECHANICAL SYSTEM V. CANON PC72M40/7501170 REV.O AUG.1994 PRINTED IN JAPAN...
... is designed to protect the photosensitive drum from the copier; b. er are housed in a single container called cartridge. (You cannot disassemble the cartridge.) Developing blade Primary charging roller Light-blocking shutter Photosensitive drum Cleaning blade Drum cover shutter Developing cylinder Figure 4-501 a. MI MECHANICAL SYSTEM V. CANON PC72M40/7501170 REV.O AUG.1994 PRINTED IN JAPAN...

Service Manual
Page 145
...min, it rotates when making copies. Removing the Transfer Charging Roller 1) Open the copier's top unit. 2) Remove the screw T. 1) Open the copier's top body, and remove the cartridge. 2) Put the cartridge upside down, and open the drum shutter. 3) Clean the surface of the ...bushing, remove the transfer charging roller ©. 3 LZt- Caution: 1. CANON PC720f7401750/710 REV.O AUG.1994 PRINTEDIN JAPAN1IMPRIME AUJAPON)...
...min, it rotates when making copies. Removing the Transfer Charging Roller 1) Open the copier's top unit. 2) Remove the screw T. 1) Open the copier's top body, and remove the cartridge. 2) Put the cartridge upside down, and open the drum shutter. 3) Clean the surface of the ...bushing, remove the transfer charging roller ©. 3 LZt- Caution: 1. CANON PC720f7401750/710 REV.O AUG.1994 PRINTEDIN JAPAN1IMPRIME AUJAPON)...

Service Manual
Page 155
... 1 1 -7= - r E re ) COPYRIGHT © 1994 CANONINC. INSTALLATIONIIIII Checks/remarks 5 Open the copier, and remove the attachment from its top unit. 6 Pull the two cardboard pieces, located inside the copier. 7 Pick the tab on the cartridge, and pull out the cartridge from the copyboard glass. CANON PC720I74017501770REV.O AUG.1994 PRINTEDIN JAPAN ompRimt AU JAPON) 5 - 3 Note: Do not...
... 1 1 -7= - r E re ) COPYRIGHT © 1994 CANONINC. INSTALLATIONIIIII Checks/remarks 5 Open the copier, and remove the attachment from its top unit. 6 Pull the two cardboard pieces, located inside the copier. 7 Pick the tab on the cartridge, and pull out the cartridge from the copyboard glass. CANON PC720I74017501770REV.O AUG.1994 PRINTEDIN JAPAN ompRimt AU JAPON) 5 - 3 Note: Do not...

Service Manual
Page 156
Checks/remarks 11 Push the icon on the copier's top f unit to close. 12 Connect the power cord to the power cord connector. --------1 ------„, 0 13 Connect the power plug to make sure that the ... the opening seal, and pull it fully out (about 50 cm). 10 Hold the cartridge with the warning label facing up, and insert the cartridge with care until it stops. INSTALLATION Step Work 9 Place the cartridge on the power switch. CANON PC720/740501170 REV.0 AUG. 1994 PRINTED IN JAPAN (IMPRIME AU JAPON) the copy count...
Checks/remarks 11 Push the icon on the copier's top f unit to close. 12 Connect the power cord to the power cord connector. --------1 ------„, 0 13 Connect the power plug to make sure that the ... the opening seal, and pull it fully out (about 50 cm). 10 Hold the cartridge with the warning label facing up, and insert the cartridge with care until it stops. INSTALLATION Step Work 9 Place the cartridge on the power switch. CANON PC720/740501170 REV.0 AUG. 1994 PRINTED IN JAPAN (IMPRIME AU JAPON) the copy count...
Service Manual
Page 159
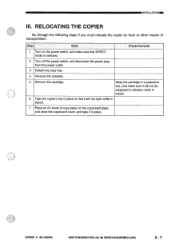
...cartridge. Keep the cartridge in a protective box, and make sure that it will not open while in transit. 7 Place an A4 sheet of transportation: Step Work Checks/remarks 1 Turn on the copyboard glass, and close the copyboard cover, and tape it will not be subjected to vibration while in transit. 6 Tape the copier...'s top in place. COPYRIGHT © 1994 CANONINC. NSTALLATIONIM III. CANON PC72017401750/770REV.0 AUG.1994 PRINTED IN JAPAN EMPRIME AUJAPAN) 5 - 7
...cartridge. Keep the cartridge in a protective box, and make sure that it will not open while in transit. 7 Place an A4 sheet of transportation: Step Work Checks/remarks 1 Turn on the copyboard glass, and close the copyboard cover, and tape it will not be subjected to vibration while in transit. 6 Tape the copier...'s top in place. COPYRIGHT © 1994 CANONINC. NSTALLATIONIM III. CANON PC72017401750/770REV.0 AUG.1994 PRINTED IN JAPAN EMPRIME AUJAPAN) 5 - 7
Service Manual
Page 164
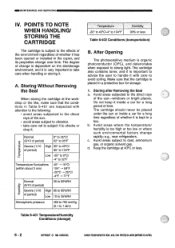
POINTS TO NOTE WHEN HANDLING/ STORING THE CARTRIDGE The cartridge is subject to the direct rays of change rapidly; c. CANON PC720.74011501T1R0EV.0 AUG.1994 PRINTEDIN JAPAN (IMPRIME-AUJAPON) A. After Opening The photosensitive medium is kept in Table 6-401 are respected with care to 104°F... is too high or too low or where such environmental factors change is dependent on the site/storage environment, and it is placed in the copier, and its properties change over time. d. Avoid areas subjected to the direct rays of period) Low 10 to 35%RH Atmospheric pressure 460 ...
POINTS TO NOTE WHEN HANDLING/ STORING THE CARTRIDGE The cartridge is subject to the direct rays of change rapidly; c. CANON PC720.74011501T1R0EV.0 AUG.1994 PRINTEDIN JAPAN (IMPRIME-AUJAPON) A. After Opening The photosensitive medium is kept in Table 6-401 are respected with care to 104°F... is too high or too low or where such environmental factors change is dependent on the site/storage environment, and it is placed in the copier, and its properties change over time. d. Avoid areas subjected to the direct rays of period) Low 10 to 35%RH Atmospheric pressure 460 ...

Service Manual
Page 165
...as strong as shown in passing, is equipped with toner. Handling a. If you soiled the surface of children. COPYRIGHT © 1994 CANON INC. Do not disassemble the cartridge. Do not swing it or use solvent. Do not ever leave it about 90° in its end or upside down on the... drum; CANON PC720174011501770 REV.0 AUG.1994 PRINTER IN JAPAN (IMPRIME AU JAPONI 6 - 3 MAINTENANCE AND SERVICING 2. Before setting the cartridge to the copier or if white spots appear on the copies as toner runs out, hold the...
...as strong as shown in passing, is equipped with toner. Handling a. If you soiled the surface of children. COPYRIGHT © 1994 CANON INC. Do not disassemble the cartridge. Do not swing it or use solvent. Do not ever leave it about 90° in its end or upside down on the... drum; CANON PC720174011501770 REV.0 AUG.1994 PRINTER IN JAPAN (IMPRIME AU JAPONI 6 - 3 MAINTENANCE AND SERVICING 2. Before setting the cartridge to the copier or if white spots appear on the copies as toner runs out, hold the...


