

Service Manual
Page 11
... Auto power off Available (about 0 sheets of 80 gm/2 paper) Copy tray 100 sheets (approx.; fixed) *As recommended by Canon. at 20°C/68°F) Continuous copying 100 copies (max.) Copying speed See Tale 1-1. CANON PC7201740/750M0 REV.O AUG.1994 PRINTED IN JAPAN (IMPRIME AU ..., front loading, A4/LGL to 128 g/m2), colored paper*, postcard*, label sheet*, overlay business card (200 g/m2 or less, 51X88 mm /20X35 in . about 5 min; deep (approx.; COPYRIGHT © 1994 CANON INC. Performance Item PC720 PC740 PC750 PC770 Original type Sheet, book, 3-D object...
... Auto power off Available (about 0 sheets of 80 gm/2 paper) Copy tray 100 sheets (approx.; fixed) *As recommended by Canon. at 20°C/68°F) Continuous copying 100 copies (max.) Copying speed See Tale 1-1. CANON PC7201740/750M0 REV.O AUG.1994 PRINTED IN JAPAN (IMPRIME AU ..., front loading, A4/LGL to 128 g/m2), colored paper*, postcard*, label sheet*, overlay business card (200 g/m2 or less, 51X88 mm /20X35 in . about 5 min; deep (approx.; COPYRIGHT © 1994 CANON INC. Performance Item PC720 PC740 PC750 PC770 Original type Sheet, book, 3-D object...
Service Manual
Page 19
... the next one transparency on the copy tray upright. When you press the Zoom key, you want. E lBm51"1.- configuration) r A5 ► A4-0- CANON PC72017407501770 REV.0 AUG.1994 PRINTED IN JAPAN... (IMPRIME AU JAPON) 1 - 11 the ongoing copy run is over, the auto power-off the power. 1.1 Using Transparencies (PC720/740) 1) Shift...; COPYRIGHT © 1994 CANON INC. configuration 5) Place a single transparency on the copyboard, and close the copyboard cover. 3) If you want using the Paper Select key. 7) Set the...
... the next one transparency on the copy tray upright. When you press the Zoom key, you want. E lBm51"1.- configuration) r A5 ► A4-0- CANON PC72017407501770 REV.0 AUG.1994 PRINTED IN JAPAN... (IMPRIME AU JAPON) 1 - 11 the ongoing copy run is over, the auto power-off the power. 1.1 Using Transparencies (PC720/740) 1) Shift...; COPYRIGHT © 1994 CANON INC. configuration 5) Place a single transparency on the copyboard, and close the copyboard cover. 3) If you want using the Paper Select key. 7) Set the...

Service Manual
Page 20
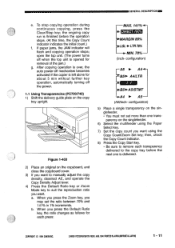
...adjust the copy density, deselect AE, and operate the Copy Density Adjust lever. 4) Press the Default Ratio key or Zoom Mode key to the copy paper, and remove it when the transparency has disappeared into the machine in 1% increments. a. A441- MIN. 70% (Inch- IIIIIIIGENERAL DESCRIPTION If the ... and 141% in response to a press on the Copy Start key. If this is the case, go through the following: 1) Place copy paper underneath the transparency with the copy paper on the copy tray upright. A4/LTR 1 - 12 COPYRIGHT 1994 CANON INC. DIRECT 100% MARGIN 86% LGL 0 . LTR 78% .
...adjust the copy density, deselect AE, and operate the Copy Density Adjust lever. 4) Press the Default Ratio key or Zoom Mode key to the copy paper, and remove it when the transparency has disappeared into the machine in 1% increments. a. A441- MIN. 70% (Inch- IIIIIIIGENERAL DESCRIPTION If the ... and 141% in response to a press on the Copy Start key. If this is the case, go through the following: 1) Place copy paper underneath the transparency with the copy paper on the copy tray upright. A4/LTR 1 - 12 COPYRIGHT 1994 CANON INC. DIRECT 100% MARGIN 86% LGL 0 . LTR 78% .

Service Manual
Page 21
... • You must not set more than one is the case, go through the following: 1) Place copy paper underneath the trans- GENERAL DESCRIPTIONINN Figure 1-408 COPYRIGHT © 1994 CANON INC. then, check the Copy Count indicator. 8) Press the Copy Start key. • Be sure to remove... each transparency delivered to the copy tray before the next one transparency on the singlefeeder. 6) Select the multifeeder using the Paper Select key. 7) Set the ...
... • You must not set more than one is the case, go through the following: 1) Place copy paper underneath the trans- GENERAL DESCRIPTIONINN Figure 1-408 COPYRIGHT © 1994 CANON INC. then, check the Copy Count indicator. 8) Press the Copy Start key. • Be sure to remove... each transparency delivered to the copy tray before the next one transparency on the singlefeeder. 6) Select the multifeeder using the Paper Select key. 7) Set the ...
Service Manual
Page 76
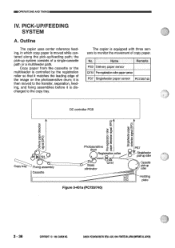
.... Outline The copier uses center reference feeding, in which copy paper is controlled by the registration roller so that it is equipped with three sensors to the copy tray. CANON PC7N740790/170 REV.OAUG.1994 PRINTEDIN JAPAN ompFumt AU JAPON) The copier is ... along the pick-up roller Holding plate 3 - 36 COPYRIGHT 1994 CANONINC. Name Remarks PS3 Delivery paper sensor Q751 Pre-registration roller paper sensor PS7 Singlefeeder paper sensor PC720/740 DC controller PCB 0 CC--opyti ( PS3 Fixing assembly Cassette Photosensitive drum Registration roller eliminator Q751...
.... Outline The copier uses center reference feeding, in which copy paper is controlled by the registration roller so that it is equipped with three sensors to the copy tray. CANON PC7N740790/170 REV.OAUG.1994 PRINTEDIN JAPAN ompFumt AU JAPON) The copier is ... along the pick-up roller Holding plate 3 - 36 COPYRIGHT 1994 CANONINC. Name Remarks PS3 Delivery paper sensor Q751 Pre-registration roller paper sensor PS7 Singlefeeder paper sensor PC720/740 DC controller PCB 0 CC--opyti ( PS3 Fixing assembly Cassette Photosensitive drum Registration roller eliminator Q751...
Service Manual
Page 157
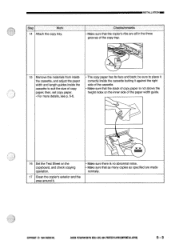
... as specified are made normally. then, set copy paper. • For more details, see p. 5-6. • The copy paper has its face and back; CANON PC720740750/770 REV.O AUG.1994 PRINTED IN JAPAN (INPRIME AU JAPONI 5 - 5 COPYRIGHT © 1994 CANON INC. Step Work 14 Attach the copy tray. be sure to place it correctly inside the...
... as specified are made normally. then, set copy paper. • For more details, see p. 5-6. • The copy paper has its face and back; CANON PC720740750/770 REV.O AUG.1994 PRINTED IN JAPAN (INPRIME AU JAPONI 5 - 5 COPYRIGHT © 1994 CANON INC. Step Work 14 Attach the copy tray. be sure to place it correctly inside the...
Service Manual
Page 159
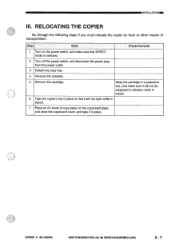
RELOCATING THE COPIER Go through the following steps if you must relocate the copier by truck or other means of copy paper on the power switch, and make sure it will not be subjected to vibration while in transit. 6 Tape the copier's top in place ... that DIRECT mode is selected. 2 Turn off the power switch, and disconnect the power plug from the power outlet. 3 Detach the copy tray. 4 Remove the cassette. 5 Remove the cartridge. CANON PC72017401750/770REV.0 AUG.1994 PRINTED IN JAPAN EMPRIME AUJAPAN) 5 - 7 COPYRIGHT © 1994 CANONINC. Keep the cartridge in a protective box, and...
RELOCATING THE COPIER Go through the following steps if you must relocate the copier by truck or other means of copy paper on the power switch, and make sure it will not be subjected to vibration while in transit. 6 Tape the copier's top in place ... that DIRECT mode is selected. 2 Turn off the power switch, and disconnect the power plug from the power outlet. 3 Detach the copy tray. 4 Remove the cassette. 5 Remove the cartridge. CANON PC72017401750/770REV.0 AUG.1994 PRINTED IN JAPAN EMPRIME AUJAPAN) 5 - 7 COPYRIGHT © 1994 CANONINC. Keep the cartridge in a protective box, and...


