

Operation Manual
Page 3
CONTENTS Parts and Controls Precautions Before Use Precautions on handling the copier Installation environment Consumables Installation procedures Transporting the copier 1 Basic Operating Procedure Putting paper into the ... 40 Copies cannot be made/copies are completely blank 41 Dark stripes appear on copies/copies are completely dark 42 White stripes appear on copies/parts of copies are faint 44 If troubleshooting fails after all operations 46 Weekly Cleaning 48 Specifications 49 1
CONTENTS Parts and Controls Precautions Before Use Precautions on handling the copier Installation environment Consumables Installation procedures Transporting the copier 1 Basic Operating Procedure Putting paper into the ... 40 Copies cannot be made/copies are completely blank 41 Dark stripes appear on copies/copies are completely dark 42 White stripes appear on copies/parts of copies are faint 44 If troubleshooting fails after all operations 46 Weekly Cleaning 48 Specifications 49 1
Operation Manual
Page 4
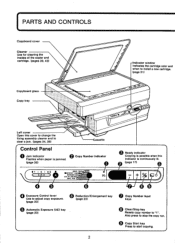
O Copy Start key Press to stop the copy run. Also press to start copying. 2 PARTS AND CONTROLS Copyboard cover Cleaner Use for cleaning the insides of the copier and cartridge. (pages 39, 43) Copyboard glass Copy tray -Indicator window Indicates ...
O Copy Start key Press to stop the copy run. Also press to start copying. 2 PARTS AND CONTROLS Copyboard cover Cleaner Use for cleaning the insides of the copier and cartridge. (pages 39, 43) Copyboard glass Copy tray -Indicator window Indicates ...
Operation Manual
Page 11
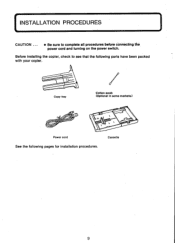
Copy tray Cotton swab (Optional In some markets.) Power cord See the following parts have been packed with your copier. ( INSTALLATION PROCEDURES CAUTION ... • Be sure to see that the following pages for installation procedures. Before installing the copier, check to complete all procedures before connecting the power cord and turning on the power switch. Cassette 9
Copy tray Cotton swab (Optional In some markets.) Power cord See the following parts have been packed with your copier. ( INSTALLATION PROCEDURES CAUTION ... • Be sure to see that the following pages for installation procedures. Before installing the copier, check to complete all procedures before connecting the power cord and turning on the power switch. Cassette 9
Operation Manual
Page 13
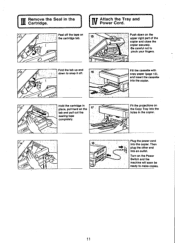
... pinch your fingers. Fill the cassette with copy paper (page 15), and insert the cassette Into the copier. Fit the projections on the upper right part of the copier and close the copier securely.
... pinch your fingers. Fill the cassette with copy paper (page 15), and insert the cassette Into the copier. Fit the projections on the upper right part of the copier and close the copier securely.
Operation Manual
Page 30
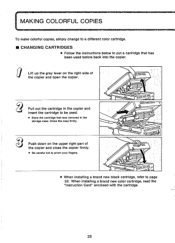
... CARTRIDGES • Follow the instructions below to put a cartridge that was removed in the storage case. Lift up the gray lever on the upper right part of the copier and open the copier. Close the case firmly.
... CARTRIDGES • Follow the instructions below to put a cartridge that was removed in the storage case. Lift up the gray lever on the upper right part of the copier and open the copier. Close the case firmly.

Operation Manual
Page 31
... on the manual feed tray. • When making copies in two or three colors, a slight overlapping of the same original. 0 4 • • Erase the unnecessary parts for each color using white correction liquid or poster color. • ■ PREPARING ORIGINALS FOR COLOR COPIES Get two copies of colors may occur. •...
... on the manual feed tray. • When making copies in two or three colors, a slight overlapping of the same original. 0 4 • • Erase the unnecessary parts for each color using white correction liquid or poster color. • ■ PREPARING ORIGINALS FOR COLOR COPIES Get two copies of colors may occur. •...
Operation Manual
Page 35
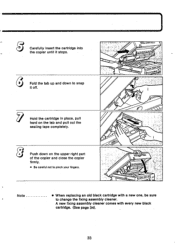
Hold the cartridge in place, pull hard on the upper right part of the copier and close the copier firmly. • Be careful not to pinch your fingers. • r 111 S 0 Note • When replacing an old black cartridge with every new black cartridge. (See page 34). 33 A new fixing assembly cleaner comes with a new one, be sure to snap it stops. Push down to change the fixing assembly cleaner. Fold the tab up and down on the tab and pull out the sealing tape completely. Carefully insert the cartridge into the copier until it off.
Hold the cartridge in place, pull hard on the upper right part of the copier and close the copier firmly. • Be careful not to pinch your fingers. • r 111 S 0 Note • When replacing an old black cartridge with every new black cartridge. (See page 34). 33 A new fixing assembly cleaner comes with a new one, be sure to snap it stops. Push down to change the fixing assembly cleaner. Fold the tab up and down on the tab and pull out the sealing tape completely. Carefully insert the cartridge into the copier until it off.

Operation Manual
Page 37
♦ TROUBLESHOOTING TROUBLESHOOTING el is continuously lit (paper supply/paper feed page check) 37 94, is flashing (paper jam) 38 When "E" and a number is flashing on the Copy Number indicator 40 Copies cannot be made/copies are completely blank 41 Dark stripes appear on copies/copies are completely dark 42 White stripes appear on copies/parts of copies are faint 44 If troubleshooting fails after all operations 46 • S. 35
♦ TROUBLESHOOTING TROUBLESHOOTING el is continuously lit (paper supply/paper feed page check) 37 94, is flashing (paper jam) 38 When "E" and a number is flashing on the Copy Number indicator 40 Copies cannot be made/copies are completely blank 41 Dark stripes appear on copies/copies are completely dark 42 White stripes appear on copies/parts of copies are faint 44 If troubleshooting fails after all operations 46 • S. 35

Operation Manual
Page 46
... described above operations, clean the INSIDE OF THE COPIER (see the Indicator on the first copies Immediately after cartridge changes. IWHITE STRIPES APPEAR ON COPIES/PARTS OF COPIES ARE FAINT • White stripes may become faint or the image will not be sure to red.
... described above operations, clean the INSIDE OF THE COPIER (see the Indicator on the first copies Immediately after cartridge changes. IWHITE STRIPES APPEAR ON COPIES/PARTS OF COPIES ARE FAINT • White stripes may become faint or the image will not be sure to red.
Operation Manual
Page 54
... available from the receiver - reorient the receiving antenna - It has been type tested and found to provide reasonable protection against such interference in subpart J of Part 15 of the following booklet prepared by one or more of FCC Rules, which can be determined by turning the copier off and on different...
... available from the receiver - reorient the receiving antenna - It has been type tested and found to provide reasonable protection against such interference in subpart J of Part 15 of the following booklet prepared by one or more of FCC Rules, which can be determined by turning the copier off and on different...


