

Operation Manual
Page 3
... Make Unique Copies Making two-sided copies 26 Making colorful copies 28 ( Replacing Cartridges Installing a new cartridge 32 Changing the fixing assembly cleaner 34 I Troubleshooting Ej is continuously lit (paper supply/paper feed check) 37 841,, is flashing (paper jam) 38 When "E" and a number is flashing on the Copy Number indicator 40 Copies cannot be made/copies are completely blank 41 Dark stripes appear on copies/copies are completely dark 42 White stripes appear on copies/parts of copies are faint 44 If troubleshooting...
... Make Unique Copies Making two-sided copies 26 Making colorful copies 28 ( Replacing Cartridges Installing a new cartridge 32 Changing the fixing assembly cleaner 34 I Troubleshooting Ej is continuously lit (paper supply/paper feed check) 37 841,, is flashing (paper jam) 38 When "E" and a number is flashing on the Copy Number indicator 40 Copies cannot be made/copies are completely blank 41 Dark stripes appear on copies/copies are completely dark 42 White stripes appear on copies/parts of copies are faint 44 If troubleshooting...
Operation Manual
Page 4
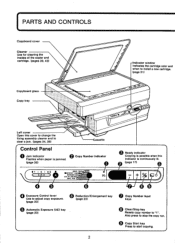
... Copyboard cover Cleaner Use for cleaning the insides of the copier and cartridge. (pages 39, 43) Copyboard glass Copy tray -Indicator window Indicates the cartridge color and when to Install a new cartridge. (page 31) Left cover Open this cover to change the fixing assembly cleaner and to clear a jam. (pages 34, 38) assette Control Panel O Jam indicator O Copy Number indicator Flashes when paper is jammed (page 38) 1 •5 9D • MAY-122...
... Copyboard cover Cleaner Use for cleaning the insides of the copier and cartridge. (pages 39, 43) Copyboard glass Copy tray -Indicator window Indicates the cartridge color and when to Install a new cartridge. (page 31) Left cover Open this cover to change the fixing assembly cleaner and to clear a jam. (pages 34, 38) assette Control Panel O Jam indicator O Copy Number indicator Flashes when paper is jammed (page 38) 1 •5 9D • MAY-122...

Operation Manual
Page 5
Power switch Power cord connector Right cover Manual feed tray Cartridge status indicator This Indicates when to open the copier. Gray lever Lift this lever to install a new cartridge. • Cartridge color indicator Corona assembly cleaning groove cV„ • Tab 3 Cartridge Manual feed guide Slide the guides to adjust them to the size of the copy paper. (page 16) Cartridge -siwr O .e.et'es;
Power switch Power cord connector Right cover Manual feed tray Cartridge status indicator This Indicates when to open the copier. Gray lever Lift this lever to install a new cartridge. • Cartridge color indicator Corona assembly cleaning groove cV„ • Tab 3 Cartridge Manual feed guide Slide the guides to adjust them to the size of the copy paper. (page 16) Cartridge -siwr O .e.et'es;
Operation Manual
Page 10
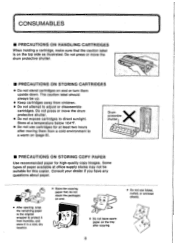
... top side as illustrated. r 0 • Do not leave spare paper on (page 6). ■ PRECAUTIONS ON STORING COPY PAPER Use recommended paper for this copier. Do not press or move the drum protective shutter. • Do not expose cartridges to adjust or disassemble cartridges. CONSUMABLES ■ PRECAUTIONS ON HANDLING CARTRIDGES When holding a cartridge, make sure that the caution label is on end. - Some types...
... top side as illustrated. r 0 • Do not leave spare paper on (page 6). ■ PRECAUTIONS ON STORING COPY PAPER Use recommended paper for this copier. Do not press or move the drum protective shutter. • Do not expose cartridges to adjust or disassemble cartridges. CONSUMABLES ■ PRECAUTIONS ON HANDLING CARTRIDGES When holding a cartridge, make sure that the caution label is on end. - Some types...
Operation Manual
Page 13
Turn on the Power Switch and the machine will soon be ready to snap it off. 18 Hold the cartridge In place, pull hard on the cartridge tab. 5 Fold the tab up and down on the Copy Tray into the copier. AO' Plug the power cord 18 into the holes in the Cartridge. Push down to make copies. 11 Fill the cassette with copy paper (page...
Turn on the Power Switch and the machine will soon be ready to snap it off. 18 Hold the cartridge In place, pull hard on the cartridge tab. 5 Fold the tab up and down on the Copy Tray into the copier. AO' Plug the power cord 18 into the holes in the Cartridge. Push down to make copies. 11 Fill the cassette with copy paper (page...
Operation Manual
Page 14
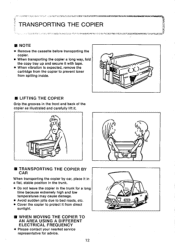
...:447I1:16trtaal&COPOIWMPIth TRANSPORTING THE COPIER ■ NOTE • Remove the cassette before transporting the copier. • When transporting the copier a long way, fold the copy tray up and secure it with tape. • When vibration is expected, remove the cartridge from the copier to prevent toner from direct sunlight. • WHEN MOVING THE COPIER TO AN AREA USING A DIFFERENT ELECTRICAL FREQUENCY •...
...:447I1:16trtaal&COPOIWMPIth TRANSPORTING THE COPIER ■ NOTE • Remove the cassette before transporting the copier. • When transporting the copier a long way, fold the copy tray up and secure it with tape. • When vibration is expected, remove the cartridge from the copier to prevent toner from direct sunlight. • WHEN MOVING THE COPIER TO AN AREA USING A DIFFERENT ELECTRICAL FREQUENCY •...

Operation Manual
Page 17
...paper guide as shown. • If necessary, readjust the position of the paper guides on the cassette to fit the length and width of the copy paper. Place the stack in the cassette and tap it stops. • If the copy paper comes out curled at the edges or gets jammed in the copier, turn over the paper... 201b paper from Mini size (5-1/2" x 8-1/21 to Legal size (8-1/2" x 141 can be put in the cassette. Slide the paper guides on the sides so that the paper fits securely in the cassette. lIar t) rl Push the edge of the-copy paper under the clips as shown. • Paper weighing from...
...paper guide as shown. • If necessary, readjust the position of the paper guides on the cassette to fit the length and width of the copy paper. Place the stack in the cassette and tap it stops. • If the copy paper comes out curled at the edges or gets jammed in the copier, turn over the paper... 201b paper from Mini size (5-1/2" x 8-1/21 to Legal size (8-1/2" x 141 can be put in the cassette. Slide the paper guides on the sides so that the paper fits securely in the cassette. lIar t) rl Push the edge of the-copy paper under the clips as shown. • Paper weighing from...
Operation Manual
Page 19
... copyboard and turn off the Power Switch when you have finished copying. (Do not turn the power switch off during copying for it widthwise (the longer edge of the paper should be fed first) from the manual feed tray. OHP transparencies labels Feed one sheet at a time from the copy tray after the copier warms up . post cards Feed it may cause a paper jam.) • When the copier is not used . Feed one...
... copyboard and turn off the Power Switch when you have finished copying. (Do not turn the power switch off during copying for it widthwise (the longer edge of the paper should be fed first) from the manual feed tray. OHP transparencies labels Feed one sheet at a time from the copy tray after the copier warms up . post cards Feed it may cause a paper jam.) • When the copier is not used . Feed one...

Operation Manual
Page 28
... side second side Place copy paper on the manual feed tray and make the copy. • Use 16 to 34 lb paper for the second side. • The top edge of the original should be oriented In the same direction as it on the manual feed tray. MAKING TWO-SIDED COPIES • When copying the second side, make sure that the original and copy paper are placed with their...
... side second side Place copy paper on the manual feed tray and make the copy. • Use 16 to 34 lb paper for the second side. • The top edge of the original should be oriented In the same direction as it on the manual feed tray. MAKING TWO-SIDED COPIES • When copying the second side, make sure that the original and copy paper are placed with their...
Operation Manual
Page 30
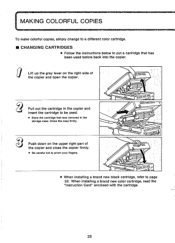
... color cartridge. ■ CHANGING CARTRIDGES • Follow the instructions below to put a cartridge that was removed in the storage case. Pull out the cartridge in the copier and insert the cartridge to page 32. Push down on the right side of the copier and close the copier firmly. • Be careful not to pinch your fingers. 1/1/1////////////011/ 111 • When installing a brand new black cartridge, refer...
... color cartridge. ■ CHANGING CARTRIDGES • Follow the instructions below to put a cartridge that was removed in the storage case. Pull out the cartridge in the copier and insert the cartridge to page 32. Push down on the right side of the copier and close the copier firmly. • Be careful not to pinch your fingers. 1/1/1////////////011/ 111 • When installing a brand new black cartridge, refer...

Operation Manual
Page 32
..., copies in three colors can be made . tr 6r 4 O (Copy lh Iwo colors) 30 Make the copy. (Black copy) ight-blue cartridge Pull the black cartridge out of the copier and insert the light-blue a 4 cartridge into it. 0 (Original for light-blue) Place the original for black on the Manual Feed Tray with the copy side faceup and insert it into the copier. MAKING COLORFUL COPIES • MAKING COLOR COPIES (Example: Black and light-blue copy) Insert the black cartridge into the copier...
..., copies in three colors can be made . tr 6r 4 O (Copy lh Iwo colors) 30 Make the copy. (Black copy) ight-blue cartridge Pull the black cartridge out of the copier and insert the light-blue a 4 cartridge into it. 0 (Original for light-blue) Place the original for black on the Manual Feed Tray with the copy side faceup and insert it into the copier. MAKING COLORFUL COPIES • MAKING COLOR COPIES (Example: Black and light-blue copy) Insert the black cartridge into the copier...
Operation Manual
Page 34
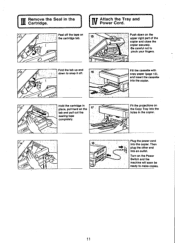
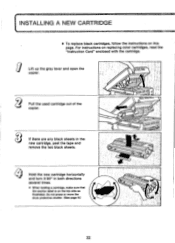
... move the drum protective shutter. (See page 8.) ////////// //////1 111 32 Lift up the gray lever and open the copier. For instructions on this page. Pull the used cartridge out of the copier. INSTALLING A NEW CARTRIDGE • To replace black cartridges, follow the instructions on replacing color cartridges, read the "Instruction Card" enclosed with the cartridge. Hold the new cartridge horizontally and turn it 90° in the new cartridge, peel the tape and remove the two black sheets.
... move the drum protective shutter. (See page 8.) ////////// //////1 111 32 Lift up the gray lever and open the copier. For instructions on this page. Pull the used cartridge out of the copier. INSTALLING A NEW CARTRIDGE • To replace black cartridges, follow the instructions on replacing color cartridges, read the "Instruction Card" enclosed with the cartridge. Hold the new cartridge horizontally and turn it 90° in the new cartridge, peel the tape and remove the two black sheets.
Operation Manual
Page 35
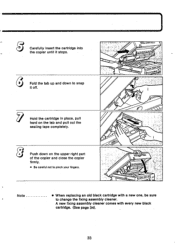
Hold the cartridge in place, pull hard on the upper right part of the copier and close the copier firmly. • Be careful not to pinch your fingers. • r 111 S 0 Note • When replacing an old black cartridge with every new black cartridge. (See page 34). 33 Push down to change the fixing assembly cleaner. Carefully insert the cartridge into the copier until it off. A new fixing assembly cleaner comes with a new one, be sure to snap it stops. Fold the tab up and down on the tab and pull out the sealing tape completely.
Hold the cartridge in place, pull hard on the upper right part of the copier and close the copier firmly. • Be careful not to pinch your fingers. • r 111 S 0 Note • When replacing an old black cartridge with every new black cartridge. (See page 34). 33 Push down to change the fixing assembly cleaner. Carefully insert the cartridge into the copier until it off. A new fixing assembly cleaner comes with a new one, be sure to snap it stops. Fold the tab up and down on the tab and pull out the sealing tape completely.

Operation Manual
Page 36
... facedown. Open the left cover gently and put the Copy Tray back on top of the fixing roller. Insert a new fixing assembly cleaner on . 34 Remove the Copy Tray. it3 Close the left cover by pulling its knob. A new fixing assembly cleaner comes with every new black cartridge. • Since the fixing area is hot, be sure to turn the power off and allow the copier to change the fixing assembly...
... facedown. Open the left cover gently and put the Copy Tray back on top of the fixing roller. Insert a new fixing assembly cleaner on . 34 Remove the Copy Tray. it3 Close the left cover by pulling its knob. A new fixing assembly cleaner comes with every new black cartridge. • Since the fixing area is hot, be sure to turn the power off and allow the copier to change the fixing assembly...

Operation Manual
Page 37
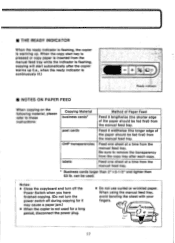
♦ TROUBLESHOOTING TROUBLESHOOTING el is continuously lit (paper supply/paper feed page check) 37 94, is flashing (paper jam) 38 When "E" and a number is flashing on the Copy Number indicator 40 Copies cannot be made/copies are completely blank 41 Dark stripes appear on copies/copies are completely dark 42 White stripes appear on copies/parts of copies are faint 44 If troubleshooting fails after all operations 46 • S. 35
♦ TROUBLESHOOTING TROUBLESHOOTING el is continuously lit (paper supply/paper feed page check) 37 94, is flashing (paper jam) 38 When "E" and a number is flashing on the Copy Number indicator 40 Copies cannot be made/copies are completely blank 41 Dark stripes appear on copies/copies are completely dark 42 White stripes appear on copies/parts of copies are faint 44 If troubleshooting fails after all operations 46 • S. 35
Operation Manual
Page 40
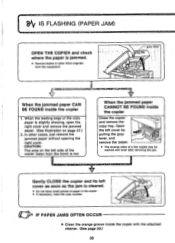
... the jam is jammed. • Remove books or other cases, just remove the jammed paper without opening the right cover. 8Atf IS FLASHING (PAPER JAM) OPEN THE COPIER and check where the paper is cleared. • Do not leave small pieces of paper in the copier. • If necessary, reset the copy number. 0 IF PAPER JAMS OFTEN OCCUR • Clean the orange groove Inside the copier with toner after removing the jam. Open the left side of the copy paper...
... the jam is jammed. • Remove books or other cases, just remove the jammed paper without opening the right cover. 8Atf IS FLASHING (PAPER JAM) OPEN THE COPIER and check where the paper is cleared. • Do not leave small pieces of paper in the copier. • If necessary, reset the copy number. 0 IF PAPER JAMS OFTEN OCCUR • Clean the orange groove Inside the copier with toner after removing the jam. Open the left side of the copy paper...

Operation Manual
Page 45
... • Turn the power switch off and disconnect the power plug before performing the following operations. ■ CLEANING THE DUSTPROOF GLASS GPI C Lift up the gray lever and open the copier. 11' Pull out the cartridge. While pressing the cleaner onto the cartridge in the directon of the cleaner completely into the cartridge slot. III CLEANING THE CORONA WIRE OF THE CARTRIDGE z Insert...
... • Turn the power switch off and disconnect the power plug before performing the following operations. ■ CLEANING THE DUSTPROOF GLASS GPI C Lift up the gray lever and open the copier. 11' Pull out the cartridge. While pressing the cleaner onto the cartridge in the directon of the cleaner completely into the cartridge slot. III CLEANING THE CORONA WIRE OF THE CARTRIDGE z Insert...

Operation Manual
Page 46
... after replacing the cartridge. If troubleshooting fails after the above , install a new cartridge. (See page 32.) • When replacing an old black cartridge with a new one, be reproduced even before the indicator changes to change the fixing assembly cleaner. This is still unclear after turning the cartridge as illustrated. Check if the cartridge INDICATOR is GREEN or YELLOW Clean the corona wire of the cartridge. Pull out the cartridge from dark...
... after replacing the cartridge. If troubleshooting fails after the above , install a new cartridge. (See page 32.) • When replacing an old black cartridge with a new one, be reproduced even before the indicator changes to change the fixing assembly cleaner. This is still unclear after turning the cartridge as illustrated. Check if the cartridge INDICATOR is GREEN or YELLOW Clean the corona wire of the cartridge. Pull out the cartridge from dark...

Operation Manual
Page 51
.... Power requirements: 20 sheets of 14lbs to 341bs For cassette loading: 16lbs to change without notice. 49 Installation environment: Temperature: 50°F-91°F Relative Humidity: 10%- 90% (Black cartridge) 30%- 80% (Color cartridge) 20. Acceptable originals: Desktop Canon PC system Sheets, books, and three-dimensional objects up to 99 copies/original Cassette or manual feed 12. Copy paper: Approx. 100 sheets of 20lbs paper Paper...
.... Power requirements: 20 sheets of 14lbs to 341bs For cassette loading: 16lbs to change without notice. 49 Installation environment: Temperature: 50°F-91°F Relative Humidity: 10%- 90% (Black cartridge) 30%- 80% (Color cartridge) 20. Acceptable originals: Desktop Canon PC system Sheets, books, and three-dimensional objects up to 99 copies/original Cassette or manual feed 12. Copy paper: Approx. 100 sheets of 20lbs paper Paper...
Operation Manual
Page 54
... plug the copier into a different outlet so that copier and receiver are designed to correct the interference by one or more of FCC Rules, which can be determined by turning the copier off and...used properly, that is, in strict accordance with the manufacturer's instructions, may find the following measures: - It has been type tested and found to comply with the limits for additional suggestions. relocate the copier with the specification in subpart J of Part 15 of the following booklet prepared by the Federal Communications Commission helpful: "Interference Handbook". The user...
... plug the copier into a different outlet so that copier and receiver are designed to correct the interference by one or more of FCC Rules, which can be determined by turning the copier off and...used properly, that is, in strict accordance with the manufacturer's instructions, may find the following measures: - It has been type tested and found to comply with the limits for additional suggestions. relocate the copier with the specification in subpart J of Part 15 of the following booklet prepared by the Federal Communications Commission helpful: "Interference Handbook". The user...


