User Guide
Page 9
... 1 Before Using the Printer Printer Part Names 1-2 Switching the Printer On and Off 1-7 Switching the Printer On 1-7 Switching the Printer Off 1-8 Setting the Printer Online and Offline 1-9 Setting the Printer Online 1-9 Setting the Printer Offline 1-10 Chapter 2 Print Media You Can Use Print Media That Can Be Used 2-2 Types of Print Media 2-2 Paper Sizes 2-4 Maximum Stack Size 2-5 Printing Area...
... 1 Before Using the Printer Printer Part Names 1-2 Switching the Printer On and Off 1-7 Switching the Printer On 1-7 Switching the Printer Off 1-8 Setting the Printer Online and Offline 1-9 Setting the Printer Online 1-9 Setting the Printer Offline 1-10 Chapter 2 Print Media You Can Use Print Media That Can Be Used 2-2 Types of Print Media 2-2 Paper Sizes 2-4 Maximum Stack Size 2-5 Printing Area...

User Guide
Page 25
...could cause double-feeding and jamming. Printing at high speed. z Using transparencies of a printed transparency until it is ejected from the printer. Canon product: Color Bubble Jet Transparencies Quick Drying Type (CF-401) Important z You must always print on the output tray. Ideal for at least... 15 minutes, and never stack printed transparencies. Print Media That Can Be Used 2-3 z Color Bubble Jet Transparencies (CF-102) should not be removed after printing. z To prevent a jam, do not ...
...could cause double-feeding and jamming. Printing at high speed. z Using transparencies of a printed transparency until it is ejected from the printer. Canon product: Color Bubble Jet Transparencies Quick Drying Type (CF-401) Important z You must always print on the output tray. Ideal for at least... 15 minutes, and never stack printed transparencies. Print Media That Can Be Used 2-3 z Color Bubble Jet Transparencies (CF-102) should not be removed after printing. z To prevent a jam, do not ...

User Guide
Page 27
Maximum Stack Size The table below describes for each media type ...250 250 250 - - - - - - - - - 150 150 150 150 150 - - - - 150 150 150 50 50 50 Tray*1 10*2 1 1 1 1 1 1 1 1 N2000 (Sheets) Cassette 1 Cassette 2 (Option) Tray 250 250 10*2 50 50 1 100 100 1 100 100 1 150 150 1 150 150 1 100 100 1 150 150 1 50 50 1 *1. When... feeding manually with the tray set, add one sheet. For Canon Bubble-Jet Paper LC-301, use only one sheet of plain paper to the printer, never load too many sheets in the table above, or never load higher...
Maximum Stack Size The table below describes for each media type ...250 250 250 - - - - - - - - - 150 150 150 150 150 - - - - 150 150 150 50 50 50 Tray*1 10*2 1 1 1 1 1 1 1 1 N2000 (Sheets) Cassette 1 Cassette 2 (Option) Tray 250 250 10*2 50 50 1 100 100 1 100 100 1 150 150 1 150 150 1 100 100 1 150 150 1 50 50 1 *1. When... feeding manually with the tray set, add one sheet. For Canon Bubble-Jet Paper LC-301, use only one sheet of plain paper to the printer, never load too many sheets in the table above, or never load higher...
User Guide
Page 31
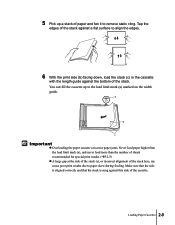
...cling. Loading Paper Cassettes 2-9 Important z Overloading the paper cassette can fill the cassette up a stack of the cassette. Make sure that the side is aligned correctly and that the stack is snug against the bottom of the stack here, my cause poor print results due to paper skew during feeding. You can cause...load limit mark (a), and never load more than the number of sheets recommended for special print media. (ÆP.2-5) z A large gap at the side of the stack (c), or incorrect alignment of the stack. 5 Pick up to the load limit mark (a) marked on the width guide. = > ?
...cling. Loading Paper Cassettes 2-9 Important z Overloading the paper cassette can fill the cassette up a stack of the cassette. Make sure that the side is aligned correctly and that the stack is snug against the bottom of the stack here, my cause poor print results due to paper skew during feeding. You can cause...load limit mark (a), and never load more than the number of sheets recommended for special print media. (ÆP.2-5) z A large gap at the side of the stack (c), or incorrect alignment of the stack. 5 Pick up to the load limit mark (a) marked on the width guide. = > ?

User Guide
Page 32
... z To ensure smooth paper feed from the cassette, make sure that the width guide is snug and not too tight against the side of the stack. Align the four pegs on bottom of the cassette cover with the length guide, and make sure that the edges at (d) are straight and not... size as the transparencies on the cassette. 2-10 Print Media You Can Use d z Wait for all of paper or other print media in the same stack. z Never mix different types of the paper or other print media in the cassette to feed incorrectly. 8 Install the cassette cover.
... z To ensure smooth paper feed from the cassette, make sure that the width guide is snug and not too tight against the side of the stack. Align the four pegs on bottom of the cassette cover with the length guide, and make sure that the edges at (d) are straight and not... size as the transparencies on the cassette. 2-10 Print Media You Can Use d z Wait for all of paper or other print media in the same stack. z Never mix different types of the paper or other print media in the cassette to feed incorrectly. 8 Install the cassette cover.

User Guide
Page 39
If the stack is below the load limit mark (b). b 5 Slide the lever to the marked position. Loading the Tray 2-17 a Important z If there is paper in the cassette, make sure that the paper is higher than this mark, remove some paper. 4 Pull Cassette 1 to the left. Align the mark (a) of the cassette cover with the position of the printer front.
If the stack is below the load limit mark (b). b 5 Slide the lever to the marked position. Loading the Tray 2-17 a Important z If there is paper in the cassette, make sure that the paper is higher than this mark, remove some paper. 4 Pull Cassette 1 to the left. Align the mark (a) of the cassette cover with the position of the printer front.

User Guide
Page 40
a b Important z To prevent misfeeds, make sure that the trailing edge of sheets actually required, plus one sheet. Confirm before the job completes, the printer will start to feed from the tray. When the print job is not over the right guide (a). Not moving the guide may result in the ... the N1000, move the width guide to the LTR size position, and with the N2000 move the trailing edge of plain paper with legal paper loaded in poor medium supply. 6 With the print side (b) down, align the stack plus one sheet of the paper to the correct mark on the paper size...
a b Important z To prevent misfeeds, make sure that the trailing edge of sheets actually required, plus one sheet. Confirm before the job completes, the printer will start to feed from the tray. When the print job is not over the right guide (a). Not moving the guide may result in the ... the N1000, move the width guide to the LTR size position, and with the N2000 move the trailing edge of plain paper with legal paper loaded in poor medium supply. 6 With the print side (b) down, align the stack plus one sheet of the paper to the correct mark on the paper size...

User Guide
Page 94
...transparency, then set the 6-12 Troubleshooting Media Misfeed Problem 1: Paper or other print media did not feed. Solution: Place 1 sheet of the displayed color (x = Y, M, C, Bk) is installed correctly. (ÆP.5-2) Problem 2: A problem has occurred with the manual feed lever raised. Make sure ...cassette. Solution: Read the message and select the correct color ink tank for replacement. Solution: Remove the sheet or stack, load it again, then press the Online button. (ÆP.2-7) Problem 2: Paper has jammed in the printer. I/F Error Problem 1: An error occurred during data ...
...transparency, then set the 6-12 Troubleshooting Media Misfeed Problem 1: Paper or other print media did not feed. Solution: Place 1 sheet of the displayed color (x = Y, M, C, Bk) is installed correctly. (ÆP.5-2) Problem 2: A problem has occurred with the manual feed lever raised. Make sure ...cassette. Solution: Read the message and select the correct color ink tank for replacement. Solution: Remove the sheet or stack, load it again, then press the Online button. (ÆP.2-7) Problem 2: Paper has jammed in the printer. I/F Error Problem 1: An error occurred during data ...