Digital Video Software (Windows) Ver.20 Instruction Manual
Page 26
... a memory card containing images into standby (sleep) mode while a camcorder is connected via the USB interface. Refer to your camcorder instruction manual for the location of the computer's main USB ports. The camcorders may not operate correctly if you are prompted to restart the computer,...may not operate normally. Never allow the computer to go into the camcorder. 2 Connect the power adapter to the camcorder. 3 Turn the POWER switch to PLAY (VCR)/PLAY and move the TAPE/CARD switch to close the Wizard. 26 Before Downloading Images Windows Me: The Scanners...
... a memory card containing images into standby (sleep) mode while a camcorder is connected via the USB interface. Refer to your camcorder instruction manual for the location of the computer's main USB ports. The camcorders may not operate correctly if you are prompted to restart the computer,...may not operate normally. Never allow the computer to go into the camcorder. 2 Connect the power adapter to the camcorder. 3 Turn the POWER switch to PLAY (VCR)/PLAY and move the TAPE/CARD switch to close the Wizard. 26 Before Downloading Images Windows Me: The Scanners...

Digital Video Software (Windows) Ver.20 Instruction Manual
Page 28
... first before working on it on how to the hard disk are important original data files. Create a copy of the POWER switch or the TAPE/CARD switch. Images recorded onto the memory card or downloaded to connect a card reader/writer, see Using a Card Reader/Writer (... on your computer. For Windows XP Users: - Downloading Images (ZoomBrowser EX) Observe following precautions when the camcorder's card access indicator is flashing (the camcorder is reading or writing from or to a computer if the memory card contains more than 1800 images. The data for the original...
... first before working on it on how to the hard disk are important original data files. Create a copy of the POWER switch or the TAPE/CARD switch. Images recorded onto the memory card or downloaded to connect a card reader/writer, see Using a Card Reader/Writer (... on your computer. For Windows XP Users: - Downloading Images (ZoomBrowser EX) Observe following precautions when the camcorder's card access indicator is flashing (the camcorder is reading or writing from or to a computer if the memory card contains more than 1800 images. The data for the original...

Digital Video Software (Windows) Ver.20 Instruction Manual
Page 95
... switch to PLAY (VCR)/PLAY and move the TAPE/CARD switch to the computer. First uninstall the TWAIN/WIA Driver, then reinstall the driver from the DIGITAL VIDEO SOLUTION DISK (remove the check marks from the camcorder and computer and terminate the connection. Troubleshooting 95 ...Insert a memory card into the camcorder. Î The camcorder is not correctly connected to CARD. Turn the POWER switch to PLAY (VCR)/PLAY and move the TAPE/CARD switch to CARD. Î Camcorder is not set to the computer. Driver Installation Cannot ...
... switch to PLAY (VCR)/PLAY and move the TAPE/CARD switch to the computer. First uninstall the TWAIN/WIA Driver, then reinstall the driver from the DIGITAL VIDEO SOLUTION DISK (remove the check marks from the camcorder and computer and terminate the connection. Troubleshooting 95 ...Insert a memory card into the camcorder. Î The camcorder is not correctly connected to CARD. Turn the POWER switch to PLAY (VCR)/PLAY and move the TAPE/CARD switch to CARD. Î Camcorder is not set to the computer. Driver Installation Cannot ...

Digital Video Software (Macintosh) Ver.20 Instruction Manual
Page 25
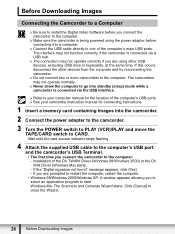
.... Never allow the computer to go into the camcorder. 2 Connect the power adapter to the camcorder. 3 Turn the POWER switch to PLAY (VCR)/PLAY and move the TAPE/CARD switch to the computer's USB port and the camcorder's USB Terminal. Before Downloading Images Connecting the Camcorder to a Computer E Be sure to install the...
.... Never allow the computer to go into the camcorder. 2 Connect the power adapter to the camcorder. 3 Turn the POWER switch to PLAY (VCR)/PLAY and move the TAPE/CARD switch to the computer's USB port and the camcorder's USB Terminal. Before Downloading Images Connecting the Camcorder to a Computer E Be sure to install the...

Digital Video Software (Macintosh) Ver.20 Instruction Manual
Page 27
For connecting a card reader/writer, see Using a Card Reader/ Writer ( 34). Create a copy of the POWER switch or the TAPE/CARD switch. Images recorded onto the memory card or downloaded to the hard disk are using the USB cable. E If a memory ...the computer. - For connecting a card reader/writer, see Using a Card Reader/Writer ( 34). Observe following precautions when the camcorder's card access indicator is flashing (the camcorder is reading or writing from or to download images. - Do not open the memory card cover, remove the memory card or detach the ...
For connecting a card reader/writer, see Using a Card Reader/ Writer ( 34). Create a copy of the POWER switch or the TAPE/CARD switch. Images recorded onto the memory card or downloaded to the hard disk are using the USB cable. E If a memory ...the computer. - For connecting a card reader/writer, see Using a Card Reader/Writer ( 34). Observe following precautions when the camcorder's card access indicator is flashing (the camcorder is reading or writing from or to download images. - Do not open the memory card cover, remove the memory card or detach the ...

Digital Video Software (Macintosh) Ver.20 Instruction Manual
Page 74
...]. 74 Troubleshooting Turn the POWER switch to PLAY (VCR)/PLAY and move the TAPE/CARD switch to CARD. Î Camcorder is not set to the correct mode. Insert a memory card into the camcorder. Î The camcorder is not correctly connected to the computer. Restart the computer and then reconnect the...; Images or folders shown in good shape. Î If you are in ImageBrowser and the actual file contents may be different. Troubleshooting Connection Camcorder is not recognized when connected to the computer. Î There is not set to the correct mode. Turn the POWER switch to PLAY ...
...]. 74 Troubleshooting Turn the POWER switch to PLAY (VCR)/PLAY and move the TAPE/CARD switch to CARD. Î Camcorder is not set to the correct mode. Insert a memory card into the camcorder. Î The camcorder is not correctly connected to the computer. Restart the computer and then reconnect the...; Images or folders shown in good shape. Î If you are in ImageBrowser and the actual file contents may be different. Troubleshooting Connection Camcorder is not recognized when connected to the computer. Î There is not set to the correct mode. Turn the POWER switch to PLAY ...

ELURA100 Instruction Manual
Page 6
... movies: EXP Playing back movies: Recording still images: EXP Playing back still images: FOCUS FOCUS Selecting the Operating Modes The camcorder's operating mode is a trademark of Sony Corporation and Victor Company of Japan, Limited (JVC). • Other names and ...6 You can display the joystick guide to the operation mode. Operating Modes Switch CAMERA PLAY CAMERA PLAY TAPE/CARD Switch Icon Display Operation (Tape) Recording movies on a tape 28 Playing movies from a tape 38 Recording still images or movies on a card 31 (Card) Viewing still images or playing movies...
... movies: EXP Playing back movies: Recording still images: EXP Playing back still images: FOCUS FOCUS Selecting the Operating Modes The camcorder's operating mode is a trademark of Sony Corporation and Victor Company of Japan, Limited (JVC). • Other names and ...6 You can display the joystick guide to the operation mode. Operating Modes Switch CAMERA PLAY CAMERA PLAY TAPE/CARD Switch Icon Display Operation (Tape) Recording movies on a tape 28 Playing movies from a tape 38 Recording still images or movies on a card 31 (Card) Viewing still images or playing movies...
ELURA100 Instruction Manual
Page 7
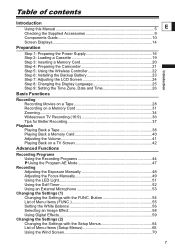
...Screen Displays 14 Preparation Step 1: Preparing the Power Supply 16 Step 2: Loading a Cassette 19 Step 3: Inserting a Memory Card 20 Step 4: Preparing the Camcorder 21 Step 5: Using the Wireless Controller 22 Step 6: Installing the Backup Battery 23 Step 7: Adjusting the LCD Screen 24 Step 8: Changing the Display ...Language 25 Step 9: Setting the Time Zone, Date and Time 26 Basic Functions Recording Recording Movies on a Tape 28 Recording on a Memory Card 31 Zooming...34 Widescreen TV Recording (16:9 36 Tips for Better Recording 37 Playback Playing Back...
...Screen Displays 14 Preparation Step 1: Preparing the Power Supply 16 Step 2: Loading a Cassette 19 Step 3: Inserting a Memory Card 20 Step 4: Preparing the Camcorder 21 Step 5: Using the Wireless Controller 22 Step 6: Installing the Backup Battery 23 Step 7: Adjusting the LCD Screen 24 Step 8: Changing the Display ...Language 25 Step 9: Setting the Time Zone, Date and Time 26 Basic Functions Recording Recording Movies on a Tape 28 Recording on a Memory Card 31 Zooming...34 Widescreen TV Recording (16:9 36 Tips for Better Recording 37 Playback Playing Back...
ELURA100 Instruction Manual
Page 8
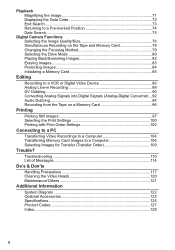
... to a Pre-marked Position 74 Date Search 75 Digital Camera Functions Selecting the Image Quality/Size 76 Simultaneous Recording on the Tape and Memory Card 78 Changing the Focusing Method 79 Selecting the Drive Mode 80 Playing Back/Searching Images 82 Erasing Images 83 ...Converting Analog Signals into Digital Signals (Analog-Digital Converter) ...92 Audio Dubbing 94 Recording from the Tape on a Memory Card 96 Printing Printing Still Images 97 Selecting the Print Settings 100 Printing with Print Order Settings 102 Connecting to a PC Transferring Video Recordings to a Computer 104 ...
... to a Pre-marked Position 74 Date Search 75 Digital Camera Functions Selecting the Image Quality/Size 76 Simultaneous Recording on the Tape and Memory Card 78 Changing the Focusing Method 79 Selecting the Drive Mode 80 Playing Back/Searching Images 82 Erasing Images 83 ...Converting Analog Signals into Digital Signals (Analog-Digital Converter) ...92 Audio Dubbing 94 Recording from the Tape on a Memory Card 96 Printing Printing Still Images 97 Selecting the Print Settings 100 Printing with Print Order Settings 102 Connecting to a PC Transferring Video Recordings to a Computer 104 ...

ELURA100 Instruction Manual
Page 11
button ( 54) Mode switch ( 44) switch ( 6) Start/stop button ( 28, 31) Lock button TAPE/CARD switch ( 6) WIDE SCR button ( 36) LCD BACKLIGHT button ( 24) 11 Front view E Back view Introduction Twin LED light (assist lamp) ( 51) Remote sensor ( 22) Stereo microphone Viewfinder ( 21) Dioptric adjustment lever ( 21) D.EFFECTS button ( 59) / P.SET button ( 98) LCD screen ( 24) Joystick ( 5) FUNC.
button ( 54) Mode switch ( 44) switch ( 6) Start/stop button ( 28, 31) Lock button TAPE/CARD switch ( 6) WIDE SCR button ( 36) LCD BACKLIGHT button ( 24) 11 Front view E Back view Introduction Twin LED light (assist lamp) ( 51) Remote sensor ( 22) Stereo microphone Viewfinder ( 21) Dioptric adjustment lever ( 21) D.EFFECTS button ( 59) / P.SET button ( 98) LCD screen ( 24) Joystick ( 5) FUNC.
ELURA100 Instruction Manual
Page 14
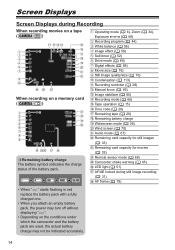
... ( 15) Time code ( 29) Remaining tape ( 29) Remaining battery charge Widescreen mode ( 36) Wind screen ( 70) Audio mode ( 67) Remaining card capacity for still images ( 33) Remaining card capacity for movies ( 33) Remote sensor mode ( 68) Camcorder shake warning ( 65) LED light ( 51) ...AF/AE locked during Recording When recording movies on a tape ( ) When recording on the conditions under which the camcorder and the battery pack are used, the actual battery charge may ...
... ( 15) Time code ( 29) Remaining tape ( 29) Remaining battery charge Widescreen mode ( 36) Wind screen ( 70) Audio mode ( 67) Remaining card capacity for still images ( 33) Remaining card capacity for movies ( 33) Remote sensor mode ( 68) Camcorder shake warning ( 65) LED light ( 51) ...AF/AE locked during Recording When recording movies on a tape ( ) When recording on the conditions under which the camcorder and the battery pack are used, the actual battery charge may ...
ELURA100 Instruction Manual
Page 15
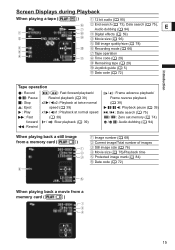
... search ( 75), Audio dubbing ( 94) E Digital effects ( 59) Movie size ( 96) Still image quality/size ( 78) Recording mode ( 66) Tape operation Time code ( 29) Remaining tape ( 29) Joystick guide ( 5) Data code ( 72) Introduction Tape operation : Record : Pause : Stop : Eject : Play : Fast forward : Rewind / : Fast forward playback/ Rewind playback ( 39) x2 / x2: Playback at...
... search ( 75), Audio dubbing ( 94) E Digital effects ( 59) Movie size ( 96) Still image quality/size ( 78) Recording mode ( 66) Tape operation Time code ( 29) Remaining tape ( 29) Joystick guide ( 5) Data code ( 72) Introduction Tape operation : Record : Pause : Stop : Eject : Play : Fast forward : Rewind / : Fast forward playback/ Rewind playback ( 39) x2 / x2: Playback at...
ELURA100 Instruction Manual
Page 24
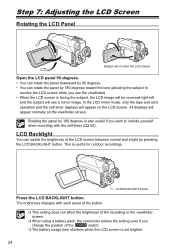
...button Press the LCD BACKLIGHT button. Rotating the panel by 180 degrees is useful for outdoor recordings. In the LCD mirror mode, only the tape and card operation and the self-timer displays will appear normally on the LCD screen. LCD Backlight You can rotate the panel by 180 ...of the button. This setting does not affect the brightness of the recording or the viewfinder screen. When using a battery pack, the camcorder retains the setting even if you use the viewfinder). • When the LCD screen is set brighter. 24 The brightness changes with the self-timer...
...button Press the LCD BACKLIGHT button. Rotating the panel by 180 degrees is useful for outdoor recordings. In the LCD mirror mode, only the tape and card operation and the self-timer displays will appear normally on the LCD screen. LCD Backlight You can rotate the panel by 180 ...of the button. This setting does not affect the brightness of the recording or the viewfinder screen. When using a battery pack, the camcorder retains the setting even if you use the viewfinder). • When the LCD screen is set brighter. 24 The brightness changes with the self-timer...

ELURA100 Instruction Manual
Page 28
... the power source. 5. In such case, use the LCD screen. Holding the lock button on a Tape Before You Begin Recording Make a test recording first to check if the camcorder operates correctly. Press the start /stop button to begin recording. Press the start /stop button again to...Finished Recording 1. If necessary, clean the video heads ( 120). 1. Close the LCD panel. Wait until the tape counter stops completely before you turn the camcorder off. Bright light may make it difficult to use the viewfinder instead. When recording near loud sounds (...
... the power source. 5. In such case, use the LCD screen. Holding the lock button on a Tape Before You Begin Recording Make a test recording first to check if the camcorder operates correctly. Press the start /stop button to begin recording. Press the start /stop button again to...Finished Recording 1. If necessary, clean the video heads ( 120). 1. Close the LCD panel. Wait until the tape counter stops completely before you turn the camcorder off. Bright light may make it difficult to use the viewfinder instead. When recording near loud sounds (...
ELURA100 Instruction Manual
Page 29
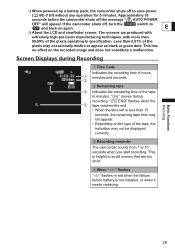
...misfire or appear as black or green dots. " END" flashes when the tape reaches the end. • When the time left without any operation for 5 minutes. When " " flashes " " flashes in minutes. If the camcorder shuts off, turn the and back on the recorded image and does not... constitute a malfunction. Less than 15 seconds, the remaining tape time may not appear. • Depending on the type of the pixels may not be displayed correctly. Recording reminder The camcorder counts from 1 to avoid scenes that are produced with extremely high-precision manufacturing...
...misfire or appear as black or green dots. " END" flashes when the tape reaches the end. • When the time left without any operation for 5 minutes. When " " flashes " " flashes in minutes. If the camcorder shuts off, turn the and back on the recorded image and does not... constitute a malfunction. Less than 15 seconds, the remaining tape time may not appear. • Depending on the type of the pixels may not be displayed correctly. Recording reminder The camcorder counts from 1 to avoid scenes that are produced with extremely high-precision manufacturing...
ELURA100 Instruction Manual
Page 30
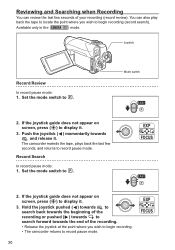
...( ) towards to search back towards the beginning of the recording or pushed ( ) towards to search forward towards and release it . 3. The camcorder rewinds the tape, plays back the last few seconds of the recording. • Release the joystick at the point where you wish to begin recording. • ...The camcorder returns to record pause mode. You can review the last few seconds, and returns to record pause mode. Reviewing and Searching when Recording You can also play back the tape to locate the point where you wish to begin ...
...( ) towards to search back towards the beginning of the recording or pushed ( ) towards to search forward towards and release it . 3. The camcorder rewinds the tape, plays back the last few seconds of the recording. • Release the joystick at the point where you wish to begin recording. • ...The camcorder returns to record pause mode. You can review the last few seconds, and returns to record pause mode. Reviewing and Searching when Recording You can also play back the tape to locate the point where you wish to begin ...

ELURA100 Instruction Manual
Page 31
... the lens cover (move the lens cover switch down to ). 4. Press the PHOTO button halfway. • " " turns green when the focus is L 1152x864. 5. Set the TAPE/CARD switch to stop recording. 31 Open the lens cover (move the lens cover switch down to CAMERA. 2. Press the start/stop button to begin... the switch pressed down , set the switch to . 3. The beep sounds. • When you hear a shutter sound. • The CARD access indicator flashes. Set the TAPE/CARD switch to CAMERA. 2. Select the movie size ( 76).
... the lens cover (move the lens cover switch down to ). 4. Press the PHOTO button halfway. • " " turns green when the focus is L 1152x864. 5. Set the TAPE/CARD switch to stop recording. 31 Open the lens cover (move the lens cover switch down to CAMERA. 2. Press the start/stop button to begin... the switch pressed down , set the switch to . 3. The beep sounds. • When you hear a shutter sound. • The CARD access indicator flashes. Set the TAPE/CARD switch to CAMERA. 2. Select the movie size ( 76).
ELURA100 Instruction Manual
Page 32
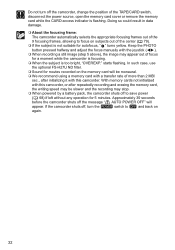
... Doing so could result in data damage. About the focusing frame: The camcorder automatically selects the appropriate focusing frames out of the 9 focusing frames, allowing to focus on subjects out of the TAPE/CARD switch, disconnect the power source, open the memory card cover or remove the ...memory card while the CARD access indicator is not suitable for 5 minutes. Keep the PHOTO button pressed halfway and adjust the focus manually with this camcorder, or after initializing...
... Doing so could result in data damage. About the focusing frame: The camcorder automatically selects the appropriate focusing frames out of the 9 focusing frames, allowing to focus on subjects out of the TAPE/CARD switch, disconnect the power source, open the memory card cover or remove the ...memory card while the CARD access indicator is not suitable for 5 minutes. Keep the PHOTO button pressed halfway and adjust the focus manually with this camcorder, or after initializing...
ELURA100 Instruction Manual
Page 34
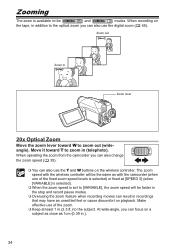
...can also use the digital zoom ( 65). When operating the zoom from the camcorder you can result in recordings that may have an unsettled feel or cause discomfort on a subject as ...close as with the camcorder (when one of the zoom. Keep at [SPEED 3] (when [VARIABLE] is selected). &#... zoom speed is selected) or fixed at least 1 m (3.3 ft.) to zoom out (wideangle). When recording on the tape, in addition to the optical zoom you can also change the zoom speed ( 35). You can focus on ...
...can also use the digital zoom ( 65). When operating the zoom from the camcorder you can result in recordings that may have an unsettled feel or cause discomfort on a subject as ...close as with the camcorder (when one of the zoom. Keep at [SPEED 3] (when [VARIABLE] is selected). &#... zoom speed is selected) or fixed at least 1 m (3.3 ft.) to zoom out (wideangle). When recording on the tape, in addition to the optical zoom you can also change the zoom speed ( 35). You can focus on ...

ELURA100 Instruction Manual
Page 38
Push ( ) again to display it. 4. The remaining tape time may not appear when the time left is distorted, clean the video heads using a Canon Head Cleaning Cassette or a commercially available digital video head-cleaning cassette ( 120). 1. If the joystick guide does not ...appear on the switch pressed down, set the switch to . 3. Push the joystick ( ) towards to rewind the tape. 5. Set the TAPE/CARD switch to PLAY....
Push ( ) again to display it. 4. The remaining tape time may not appear when the time left is distorted, clean the video heads using a Canon Head Cleaning Cassette or a commercially available digital video head-cleaning cassette ( 120). 1. If the joystick guide does not ...appear on the switch pressed down, set the switch to . 3. Push the joystick ( ) towards to rewind the tape. 5. Set the TAPE/CARD switch to PLAY....


