i80 Quick Start Guide
Page 2
... very attractive price. Getting Help from your product's warranty period. CarePAK must be purchased during your Canon service and support, call . Serial Number (located on the inside of the printer): Model Number (located on the front of your service and support coverage (both toll-free tech... support and repair) by purchasing a cost-attractive Canon CarePAK extended service plan. Live Tech Support** - (1-757-413-2848...
... very attractive price. Getting Help from your product's warranty period. CarePAK must be purchased during your Canon service and support, call . Serial Number (located on the inside of the printer): Model Number (located on the front of your service and support coverage (both toll-free tech... support and repair) by purchasing a cost-attractive Canon CarePAK extended service plan. Live Tech Support** - (1-757-413-2848...
i80 Quick Start Guide
Page 4
... are not guaranteed or warranted, and they be understood to be an easy-to your Canon i80 Color Bubble Jet Printer. has reviewed this product meets the ENERGY STAR guidelines for energy efficiency. Trademarks • Canon is a registered trademark of Canon Inc. • PhotoRecord is under licence. • All other countries. • Microsoft® and...
... are not guaranteed or warranted, and they be understood to be an easy-to your Canon i80 Color Bubble Jet Printer. has reviewed this product meets the ENERGY STAR guidelines for energy efficiency. Trademarks • Canon is a registered trademark of Canon Inc. • PhotoRecord is under licence. • All other countries. • Microsoft® and...
i80 Quick Start Guide
Page 5
...from a Digital Camera 17 Accessing Printer Driver 22 Adjusting Print Quality for Photographs 23 Using Printer Driver Options 30 Using the Bundle...Colors are Incorrect 37 Printing the Nozzle Check Pattern 38 Print Head Cleaning 41 Print Head Deep Cleaning 44 Aligning the Print Head 46 Replacing an Ink Tank 50 Troubleshooting Cannot Install the Printer... Driver 56 Print Quality is Poor or Contains Errors 57 Troubleshooting Printer Hardware 58 Paper ...from the Digital Camera 64 Appendix Installing the Printer Driver when using Mac OS 9.x 66 User's Guide ...
...from a Digital Camera 17 Accessing Printer Driver 22 Adjusting Print Quality for Photographs 23 Using Printer Driver Options 30 Using the Bundle...Colors are Incorrect 37 Printing the Nozzle Check Pattern 38 Print Head Cleaning 41 Print Head Deep Cleaning 44 Aligning the Print Head 46 Replacing an Ink Tank 50 Troubleshooting Cannot Install the Printer... Driver 56 Print Quality is Poor or Contains Errors 57 Troubleshooting Printer Hardware 58 Paper ...from the Digital Camera 64 Appendix Installing the Printer Driver when using Mac OS 9.x 66 User's Guide ...
i80 Quick Start Guide
Page 6
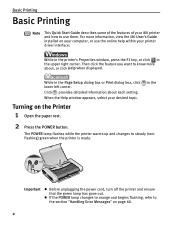
... to know more information, view the i80 User's Guide installed on your computer, or use the online help within your i80 printer and how to steady (nonflashing) green when the printer is ready. While in the Turning on page 60. 2 Then click the feature you want to the section "Handling Error ...Messages" on the Printer 1 Open the paper rest. 2 Press the POWER button. For more about each setting. in the Page Setup dialog box or Print dialog box, click lower...
... to know more information, view the i80 User's Guide installed on your computer, or use the online help within your i80 printer and how to steady (nonflashing) green when the printer is ready. While in the Turning on page 60. 2 Then click the feature you want to the section "Handling Error ...Messages" on the Printer 1 Open the paper rest. 2 Press the POWER button. For more about each setting. in the Page Setup dialog box or Print dialog box, click lower...

i80 Quick Start Guide
Page 7
... Basic Printing „ Print Media to load envelopes and speciality media into the printer. 1 Flatten the four corners of paper. Important When paper is too thick* (more than 105 gsm or 28 lb) *non-Canon branded paper • Picture postcards • Postcards with an affixed photo or sticker... surface „ Loading the Print Media This section describes how to load plain paper into your printer. • For detailed information on the speciality media Canon provides for use with its various printers, refer to the section "Using Speciality Media" on page 5. • Consult the User's ...
... Basic Printing „ Print Media to load envelopes and speciality media into the printer. 1 Flatten the four corners of paper. Important When paper is too thick* (more than 105 gsm or 28 lb) *non-Canon branded paper • Picture postcards • Postcards with an affixed photo or sticker... surface „ Loading the Print Media This section describes how to load plain paper into your printer. • For detailed information on the speciality media Canon provides for use with its various printers, refer to the section "Using Speciality Media" on page 5. • Consult the User's ...

i80 Quick Start Guide
Page 10
... included on the Setup Software & User's Guide CD-ROM when printing with Photo Paper Pro Perforated. Basic Printing „ Canon Speciality Media Media Name Paper Rest Load Limit Paper Thickness Lever Position Printer Driver Settings for Media Type Photo Paper Pro Photo Paper Pro Perforated Letter: up to 1 sheet Right 4"×6": up... sheet feeder with them separating from each other to avoid them from the software applications, refer to the right and select Plain Paper from the printer driver Media Type. Set the Paper Thickness Lever to the Photo Application Guide. 6
... included on the Setup Software & User's Guide CD-ROM when printing with Photo Paper Pro Perforated. Basic Printing „ Canon Speciality Media Media Name Paper Rest Load Limit Paper Thickness Lever Position Printer Driver Settings for Media Type Photo Paper Pro Photo Paper Pro Perforated Letter: up to 1 sheet Right 4"×6": up... sheet feeder with them separating from each other to avoid them from the software applications, refer to the right and select Plain Paper from the printer driver Media Type. Set the Paper Thickness Lever to the Photo Application Guide. 6

i80 Quick Start Guide
Page 11
Basic Printing Printing with Windows Note z The menu screens and dialog boxes that appear may vary, depending on the software application you are for printing in Windows XP. 1 Create a document or open a file to print. 2 Open Printer Properties dialog box. (1) Select Print from the application software's File menu. (2) Ensure that Canon i80 is selected. (3) Click Preferences or Properties. Note In Windows 2000, click the Main tab in this section are using. z The steps described in the Print dialog box. 7
Basic Printing Printing with Windows Note z The menu screens and dialog boxes that appear may vary, depending on the software application you are for printing in Windows XP. 1 Create a document or open a file to print. 2 Open Printer Properties dialog box. (1) Select Print from the application software's File menu. (2) Ensure that Canon i80 is selected. (3) Click Preferences or Properties. Note In Windows 2000, click the Main tab in this section are using. z The steps described in the Print dialog box. 7

i80 Quick Start Guide
Page 12
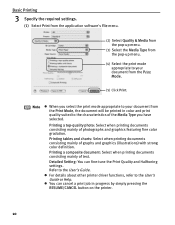
... preview. 4 Print the document. (1) Click Print. Note You can control quality in the Set Print Quality dialog box. You can cancel a print job in the printer. (2) Click OK. Some applications do not contain the function to the User's Guide or Help. Note z From the Page Setup tab select the correct document... before printing by simply pressing the RESUME/ CANCEL button on the Main tab. z To adjust Print Quality settings, select Custom and click Set on the printer. 8
... preview. 4 Print the document. (1) Click Print. Note You can control quality in the Set Print Quality dialog box. You can cancel a print job in the printer. (2) Click OK. Some applications do not contain the function to the User's Guide or Help. Note z From the Page Setup tab select the correct document... before printing by simply pressing the RESUME/ CANCEL button on the Main tab. z To adjust Print Quality settings, select Custom and click Set on the printer. 8
i80 Quick Start Guide
Page 14
.... Detailed Setting: You can cancel a print job in color and print quality suited to your document from the Print Mode, the document will be printed in progress by simply pressing the RESUME/CANCEL button on the printer. 10 z For details about other printer driver functions, refer to the User's Guide. Printing a top-quality... mode appropriate to your document from the pop-up menu. (4) Select the print mode appropriate to the characteristics of graphs and graphics (illustrations) with strong color definition.
.... Detailed Setting: You can cancel a print job in color and print quality suited to your document from the Print Mode, the document will be printed in progress by simply pressing the RESUME/CANCEL button on the printer. 10 z For details about other printer driver functions, refer to the User's Guide. Printing a top-quality... mode appropriate to your document from the pop-up menu. (4) Select the print mode appropriate to the characteristics of graphs and graphics (illustrations) with strong color definition.

i80 Quick Start Guide
Page 15
... the Enable infrared communication check box is displayed in the window. z Before printing data or using a maintenance function of the printer driver, ensure that the name of the printer is displayed by placing the mouse pointer on the Wireless Link icon (For Windows 98, click the Infrared icon) on ) ... If you can print data with a cordless connection with the Computer Printing through infrared communication. „ Requirements for Infrared Communication with the printer. z In Windows 98 or Windows Me, check whether the infrared communication driver has been installed.
... the Enable infrared communication check box is displayed in the window. z Before printing data or using a maintenance function of the printer driver, ensure that the name of the printer is displayed by placing the mouse pointer on the Wireless Link icon (For Windows 98, click the Infrared icon) on ) ... If you can print data with a cordless connection with the Computer Printing through infrared communication. „ Requirements for Infrared Communication with the printer. z In Windows 98 or Windows Me, check whether the infrared communication driver has been installed.

i80 Quick Start Guide
Page 16
...It does not support printing video files. - z If the print head has not been aligned, the print speed may take a while for this printer to start to the computer. Depending on how to align the print head, refer to improve the print quality. JPEG images are only supported. Align... the print head by connecting the printer to print after starting the infrared transfer. Depending on transmittable data - The mobile phone must have an IrDA port and support IrMC ver ...
...It does not support printing video files. - z If the print head has not been aligned, the print speed may take a while for this printer to start to the computer. Depending on how to align the print head, refer to improve the print quality. JPEG images are only supported. Align... the print head by connecting the printer to print after starting the infrared transfer. Depending on transmittable data - The mobile phone must have an IrDA port and support IrMC ver ...

i80 Quick Start Guide
Page 17
... Before using an optional battery, ensure that it has been charged. (2) Connect the printer to your computer with a USB cable and install the printer driver and the i80 Setup Utility. 1 Set up the printer. (1) Ensure that the universal AC adapter is applicable in the i80 Setup Utility when...can select the media type, page size, layout and borderless printing in Macintosh. 13 Windows Click Start and select All Programs (or Programs), Canon Utilities, i80 Setup Utility and i80 Setup Utility. Macintosh Open the Applications folder, and then double-click the i80 Setup Utility folder and ...
... Before using an optional battery, ensure that it has been charged. (2) Connect the printer to your computer with a USB cable and install the printer driver and the i80 Setup Utility. 1 Set up the printer. (1) Ensure that the universal AC adapter is applicable in the i80 Setup Utility when...can select the media type, page size, layout and borderless printing in Macintosh. 13 Windows Click Start and select All Programs (or Programs), Canon Utilities, i80 Setup Utility and i80 Setup Utility. Macintosh Open the Applications folder, and then double-click the i80 Setup Utility folder and ...
i80 Quick Start Guide
Page 18
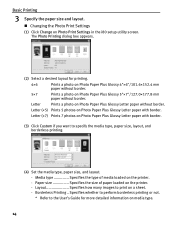
...size, and layout. - Basic Printing 3 Specify the paper size and layout. „ Changing the Photo Print Settings (1) Click Change on the printer. - Letter Prints a photo on Photo Paper Plus Glossy Letter paper with border. Letter (×5) Prints 5 photos on Photo Paper Plus Glossy ...Letter paper with border. (3) Click Custom if you want to print on the printer. - Borderless Printing.. Media type Specifies the type of paper loaded on a sheet. - The Photo Printing dialog box appears. (2) Select a ...
...size, and layout. - Basic Printing 3 Specify the paper size and layout. „ Changing the Photo Print Settings (1) Click Change on the printer. - Letter Prints a photo on Photo Paper Plus Glossy Letter paper with border. Letter (×5) Prints 5 photos on Photo Paper Plus Glossy ...Letter paper with border. (3) Click Custom if you want to print on the printer. - Borderless Printing.. Media type Specifies the type of paper loaded on a sheet. - The Photo Printing dialog box appears. (2) Select a ...

i80 Quick Start Guide
Page 20
...these ports properly as mentioned above. The allowable distance of communication with the printer depends on the paper rest. 2 Start Infrared Communication. (1) Oppose the infrared port of less than 31.5 inch (80 cm) (Do not block with the printer. If it is about 10° from a mobile phone, place it... cancel printing on the Control Panel allows you use. z During printing, be transmitted between the infrared ports of printer Less than 31.5 inch (80 cm). When using an optional battery, ensure that the universal AC adapter is connected securely. Data cannot be careful not to...
...these ports properly as mentioned above. The allowable distance of communication with the printer depends on the paper rest. 2 Start Infrared Communication. (1) Oppose the infrared port of less than 31.5 inch (80 cm) (Do not block with the printer. If it is about 10° from a mobile phone, place it... cancel printing on the Control Panel allows you use. z During printing, be transmitted between the infrared ports of printer Less than 31.5 inch (80 cm). When using an optional battery, ensure that the universal AC adapter is connected securely. Data cannot be careful not to...

i80 Quick Start Guide
Page 21
...is an Industry standard enabling a range of digital photo solutions, including the direct printing of the printer. Connect the USB cable that came with the digital camera for "PictBridge" or Canon "Bubble Jet Direct" to the Direct Print Port of photos from a Digital Camera Connecting a ...digital camera or camcoder to printer allows you to print photos from a Canon "Bubble Jet Direct" compatible ("PictBridge" incompatible) digital camera or digital camcorder without a computer by simply connecting the...
...is an Industry standard enabling a range of digital photo solutions, including the direct printing of the printer. Connect the USB cable that came with the digital camera for "PictBridge" or Canon "Bubble Jet Direct" to the Direct Print Port of photos from a Digital Camera Connecting a ...digital camera or camcoder to printer allows you to print photos from a Canon "Bubble Jet Direct" compatible ("PictBridge" incompatible) digital camera or digital camcorder without a computer by simply connecting the...
i80 Quick Start Guide
Page 22
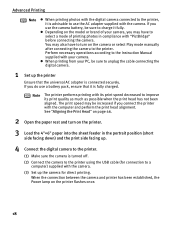
... quality as much as possible when the print head has not been aligned. When the connection between the camera and printer has been established, the Power lamp on the printer. 3 Load the 4"×6" paper into the sheet feeder in compliance with "PictBridge" before connecting the camera. See...side facing down) and the print side facing up. 4 Connect the digital camera to the printer. (1) Make sure the camera is connected securely. z When printing from your camera, you connect the printer with the computer and perform the print head alignment. z Depending on the camera or select ...
... quality as much as possible when the print head has not been aligned. When the connection between the camera and printer has been established, the Power lamp on the printer. 3 Load the 4"×6" paper into the sheet feeder in compliance with "PictBridge" before connecting the camera. See...side facing down) and the print side facing up. 4 Connect the digital camera to the printer. (1) Make sure the camera is connected securely. z When printing from your camera, you connect the printer with the computer and perform the print head alignment. z Depending on the camera or select ...

i80 Quick Start Guide
Page 23
...the default setting explained above is started with the camera. A Canon "Bubble Jet Direct" compatible digital camera. „ Direct Printing from PictBridge-compatible Digital Cameras When operating the camera, be sure to the printer. „ Confirming or Changing the Camera Settings When a ...PictBridge-compatible camera is connected and printing is used in the Instruction Manual supplied with no setting changes, this printer operates based on the following default settings: - Date print Off (No printing) Note About the Settings Explained Below The settings...
...the default setting explained above is started with the camera. A Canon "Bubble Jet Direct" compatible digital camera. „ Direct Printing from PictBridge-compatible Digital Cameras When operating the camera, be sure to the printer. „ Confirming or Changing the Camera Settings When a ...PictBridge-compatible camera is connected and printing is used in the Instruction Manual supplied with no setting changes, this printer operates based on the following default settings: - Date print Off (No printing) Note About the Settings Explained Below The settings...
i80 Quick Start Guide
Page 24
...the paper size or paper type, operate the camera to produce photos using a Canon PictBridge-compatible camera, you can select 5"×7" in "Paper Size". z Never disconnect the USB cable during printing. Printer maintenance 20 If using PictBridge. By default, 4"×6" is selected in "Paper...Photo Photo Paper Pro 5"×7" * Photo Photo Paper Plus Glossy * This size can be selected only for Canon PictBridge-compatible cameras. (Note that it cannot be used for this printer. The following : - Advanced Printing „ About "Paper Size" and "Paper Type" To change the settings...
...the paper size or paper type, operate the camera to produce photos using a Canon PictBridge-compatible camera, you can select 5"×7" in "Paper Size". z Never disconnect the USB cable during printing. Printer maintenance 20 If using PictBridge. By default, 4"×6" is selected in "Paper...Photo Photo Paper Pro 5"×7" * Photo Photo Paper Plus Glossy * This size can be selected only for Canon PictBridge-compatible cameras. (Note that it cannot be used for this printer. The following : - Advanced Printing „ About "Paper Size" and "Paper Type" To change the settings...

i80 Quick Start Guide
Page 25
... support the following prints: - Advanced Printing „ Printing Photographs Directly from a Canon "Bubble Jet Direct" compatible digital camera Let's take a look at the media types that can be set on the printer. Images will be used. - Maintenance * The print head position cannot be index... Letter Photo Paper Pro or Photo Paper Plus Glossy A4 Note z For the digital camera operation method and troubleshooting, refer to this printer and limitations. „ Media Types for better print quality. You can make the following functions: - z By operating the digital ...
... support the following prints: - Advanced Printing „ Printing Photographs Directly from a Canon "Bubble Jet Direct" compatible digital camera Let's take a look at the media types that can be set on the printer. Images will be used. - Maintenance * The print head position cannot be index... Letter Photo Paper Pro or Photo Paper Plus Glossy A4 Note z For the digital camera operation method and troubleshooting, refer to this printer and limitations. „ Media Types for better print quality. You can make the following functions: - z By operating the digital ...
i80 Quick Start Guide
Page 26
...by selecting Print from the File menu. 2 Ensure that the Canon i80 is selected. The operations may vary depending on your Windows documentation. 1 Click Start and select Control Panel, Printers and Other Hardware, and then Printers and Faxes. The Print dialog box can be more steps ... from the Start Menu This method is opened from either within an application. The Printer Properties dialog box opens. 22 For non-Windows XP users, click Start, select Settings, and then Printers. 2 Select the Canon i80 icon. 3 Open the File menu and select Printing Preferences (or Properties). ...
...by selecting Print from the File menu. 2 Ensure that the Canon i80 is selected. The operations may vary depending on your Windows documentation. 1 Click Start and select Control Panel, Printers and Other Hardware, and then Printers and Faxes. The Print dialog box can be more steps ... from the Start Menu This method is opened from either within an application. The Printer Properties dialog box opens. 22 For non-Windows XP users, click Start, select Settings, and then Printers. 2 Select the Canon i80 icon. 3 Open the File menu and select Printing Preferences (or Properties). ...


