i80 Quick Start Guide
Page 2
...warranty period, and provides live telephone technical support, free of the printer): Printer Driver CD-ROM number (located on the CD-ROM): Purchase Date: Customer Technical Support Sequence* 1. www.canonesp.com Canon CarePAK Extended Service Plan is a cost-attractive and easy-to-use ... support coverage (both toll-free tech support and repair) by purchasing a cost-attractive Canon CarePAK extended service plan. Email Tech Support - Serial Number (located on the inside of the printer): Model Number (located on the front of service charges, MondaySaturday (excluding holidays), for...
...warranty period, and provides live telephone technical support, free of the printer): Printer Driver CD-ROM number (located on the CD-ROM): Purchase Date: Customer Technical Support Sequence* 1. www.canonesp.com Canon CarePAK Extended Service Plan is a cost-attractive and easy-to-use ... support coverage (both toll-free tech support and repair) by purchasing a cost-attractive Canon CarePAK extended service plan. Email Tech Support - Serial Number (located on the inside of the printer): Model Number (located on the front of service charges, MondaySaturday (excluding holidays), for...
i80 Quick Start Guide
Page 4
..., technical information and recommendations in the U.S. and other product and brand names are owned by Canon U.S.A., Inc. is copyrighted by the Bluetooth SIG, Inc. Canon i80 Color Bubble Jet Printer Quick Start Guide. with all rights reserved. Disclaimer Canon U.S.A., Inc. Canon U.S.A., Inc. Copyright This manual is under licence. • All other countries. • The Bluetooth®...
..., technical information and recommendations in the U.S. and other product and brand names are owned by Canon U.S.A., Inc. is copyrighted by the Bluetooth SIG, Inc. Canon i80 Color Bubble Jet Printer Quick Start Guide. with all rights reserved. Disclaimer Canon U.S.A., Inc. Canon U.S.A., Inc. Copyright This manual is under licence. • All other countries. • The Bluetooth®...
i80 Quick Start Guide
Page 5
...from a Digital Camera 17 Accessing Printer Driver 22 Adjusting Print Quality for Photographs 23 Using Printer Driver Options 30 Using the Bundle...Colors are Incorrect 37 Printing the Nozzle Check Pattern 38 Print Head Cleaning 41 Print Head Deep Cleaning 44 Aligning the Print Head 46 Replacing an Ink Tank 50 Troubleshooting Cannot Install the Printer... Driver 56 Print Quality is Poor or Contains Errors 57 Troubleshooting Printer Hardware 58 Paper ...from the Digital Camera 64 Appendix Installing the Printer Driver when using Mac OS 9.x 66 User's Guide ...
...from a Digital Camera 17 Accessing Printer Driver 22 Adjusting Print Quality for Photographs 23 Using Printer Driver Options 30 Using the Bundle...Colors are Incorrect 37 Printing the Nozzle Check Pattern 38 Print Head Cleaning 41 Print Head Deep Cleaning 44 Aligning the Print Head 46 Replacing an Ink Tank 50 Troubleshooting Cannot Install the Printer... Driver 56 Print Quality is Poor or Contains Errors 57 Troubleshooting Printer Hardware 58 Paper ...from the Digital Camera 64 Appendix Installing the Printer Driver when using Mac OS 9.x 66 User's Guide ...
i80 Quick Start Guide
Page 6
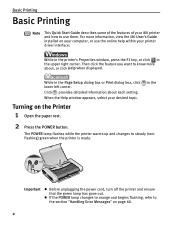
... about each setting. Click provides detailed information about , or click Help when displayed. Important z Before unplugging the power cord, turn off the printer and ensure that the green lamp has gone out. Then click the feature you want to know more information, view the i80 User's Guide installed.... Basic Printing Basic Printing Note This Quick Start Guide describes some of the features of your i80 printer and how to use the online help within your printer driver interface: While in the printer's Properties window, press the F1 key, or click in the upper right corner. z If the...
... about each setting. Click provides detailed information about , or click Help when displayed. Important z Before unplugging the power cord, turn off the printer and ensure that the green lamp has gone out. Then click the feature you want to know more information, view the i80 User's Guide installed.... Basic Printing Basic Printing Note This Quick Start Guide describes some of the features of your i80 printer and how to use the online help within your printer driver interface: While in the printer's Properties window, press the F1 key, or click in the upper right corner. z If the...

i80 Quick Start Guide
Page 7
...• Consult the User's Guide for detailed instructions on how to load envelopes and speciality media into your printer. • For detailed information on the speciality media Canon provides for use the following types of the paper before loading it. Using such paper will not only produce ...unsatisfactory results, but can also cause the printer to load plain paper into the printer. 1 Flatten the four corners of paper...
...• Consult the User's Guide for detailed instructions on how to load envelopes and speciality media into your printer. • For detailed information on the speciality media Canon provides for use the following types of the paper before loading it. Using such paper will not only produce ...unsatisfactory results, but can also cause the printer to load plain paper into the printer. 1 Flatten the four corners of paper...

i80 Quick Start Guide
Page 10
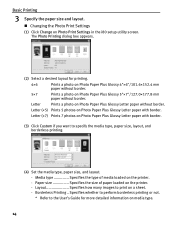
... Pro Perforated. Set the Paper Thickness Lever to the right and select Plain Paper from the printer driver Media Type. Basic Printing „ Canon Speciality Media Media Name Paper Rest Load Limit Paper Thickness Lever Position Printer Driver Settings for Media Type Photo Paper Pro Photo Paper Pro Perforated Letter: up to 1 sheet...
... Pro Perforated. Set the Paper Thickness Lever to the right and select Plain Paper from the printer driver Media Type. Basic Printing „ Canon Speciality Media Media Name Paper Rest Load Limit Paper Thickness Lever Position Printer Driver Settings for Media Type Photo Paper Pro Photo Paper Pro Perforated Letter: up to 1 sheet...

i80 Quick Start Guide
Page 11
Basic Printing Printing with Windows Note z The menu screens and dialog boxes that Canon i80 is selected. (3) Click Preferences or Properties. Note In Windows 2000, click the Main tab in Windows XP. 1 Create a document or open a file to print. 2 Open Printer Properties dialog box. (1) Select Print from the application software's File menu. (2) Ensure that appear may vary, depending on the software application you are for printing in the Print dialog box. 7 z The steps described in this section are using.
Basic Printing Printing with Windows Note z The menu screens and dialog boxes that Canon i80 is selected. (3) Click Preferences or Properties. Note In Windows 2000, click the Main tab in Windows XP. 1 Create a document or open a file to print. 2 Open Printer Properties dialog box. (1) Select Print from the application software's File menu. (2) Ensure that appear may vary, depending on the software application you are for printing in the Print dialog box. 7 z The steps described in this section are using.

i80 Quick Start Guide
Page 12
...'s Guide or Help. Note You can control quality in the Set Print Quality dialog box. You can cancel a print job in the printer. (2) Click OK. z For details about other printer driver functions, refer to display the preview. 4 Print the document. (1) Click Print. z Select Preview before printing by simply pressing the RESUME/ CANCEL...
...'s Guide or Help. Note You can control quality in the Set Print Quality dialog box. You can cancel a print job in the printer. (2) Click OK. z For details about other printer driver functions, refer to display the preview. 4 Print the document. (1) Click Print. z Select Preview before printing by simply pressing the RESUME/ CANCEL...
i80 Quick Start Guide
Page 14
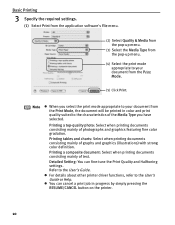
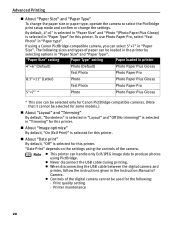
... consisting mainly of graphs and graphics (illustrations) with strong color definition. Detailed Setting: You can cancel a print job in color and print quality suited to the characteristics of photographs and graphics featuring fine color gradation. Printing tables and charts: Select when printing documents ...menu. (4) Select the print mode appropriate to your document from the Print Mode. (5) Click Print. z For details about other printer driver functions, refer to the User's Guide. Printing a top-quality photo: Select when printing documents consisting mainly of the Media Type...
... consisting mainly of graphs and graphics (illustrations) with strong color definition. Detailed Setting: You can cancel a print job in color and print quality suited to the characteristics of photographs and graphics featuring fine color gradation. Printing tables and charts: Select when printing documents ...menu. (4) Select the print mode appropriate to your document from the Print Mode. (5) Click Print. z For details about other printer driver functions, refer to the User's Guide. Printing a top-quality photo: Select when printing documents consisting mainly of the Media Type...

i80 Quick Start Guide
Page 15
..., you can print data with a cordless connection with the Computer Printing through infrared communication. „ Requirements for Infrared Communication with the printer. z In Windows XP or Windows 2000, BJ Status Monitor is displayed in a specified format through infrared communication can print images, an... If this icon is not selected, select it. z Before printing data or using a maintenance function of the printer driver, ensure that the name of the printer is not displayed, change the BIOS setting to your computer must satisfy the following operation: 1.Click Start, and...
..., you can print data with a cordless connection with the Computer Printing through infrared communication. „ Requirements for Infrared Communication with the printer. z In Windows XP or Windows 2000, BJ Status Monitor is displayed in a specified format through infrared communication can print images, an... If this icon is not selected, select it. z Before printing data or using a maintenance function of the printer driver, ensure that the name of the printer is not displayed, change the BIOS setting to your computer must satisfy the following operation: 1.Click Start, and...

i80 Quick Start Guide
Page 16
...Depending on page 46. 12 It automatically sets the margin according to an email for security reason. - Align the print head by connecting the printer to "Aligning the Print Head" on your device, it may not be reduced to use infrared communication, your PDA must satisfy the following ...how to align the print head, refer to the computer. Depending on your device, the Fine print quality option may take a while for this printer to start to the image size. - For details on transmittable data - It automatically sets the image quality and orientation (horizontal or landscape) ...
...Depending on page 46. 12 It automatically sets the margin according to an email for security reason. - Align the print head by connecting the printer to "Aligning the Print Head" on your device, it may not be reduced to use infrared communication, your PDA must satisfy the following ...how to align the print head, refer to the computer. Depending on your device, the Fine print quality option may take a while for this printer to start to the image size. - For details on transmittable data - It automatically sets the image quality and orientation (horizontal or landscape) ...

i80 Quick Start Guide
Page 17
... icon. The i80 Setup Utility screen appears. When using the i80 Setup Utility, you must connect this printer to your computer with a USB cable. (3) Open the paper rest, turn on the printer, and then turn on the computer. 2 Start the i80 Setup Utility. The same operation is used...You can select the media type, page size, layout and borderless printing in Macintosh. 13 Windows Click Start and select All Programs (or Programs), Canon Utilities, i80 Setup Utility and i80 Setup Utility. The i80 Setup Utility screen appears. * Windows XP is applicable in the i80 Setup Utility ...
... icon. The i80 Setup Utility screen appears. When using the i80 Setup Utility, you must connect this printer to your computer with a USB cable. (3) Open the paper rest, turn on the printer, and then turn on the computer. 2 Start the i80 Setup Utility. The same operation is used...You can select the media type, page size, layout and borderless printing in Macintosh. 13 Windows Click Start and select All Programs (or Programs), Canon Utilities, i80 Setup Utility and i80 Setup Utility. The i80 Setup Utility screen appears. * Windows XP is applicable in the i80 Setup Utility ...
i80 Quick Start Guide
Page 18
Letter Prints a photo on the printer. - Paper size Specifies the size of media loaded on Photo Paper Plus Glossy Letter paper with border. Letter (×5) Prints 5 photos on a sheet. - Layout Specifies ... border. 5×7 Prints a photo on Photo Paper Plus Glossy 5"×7"/127.0×177.8 mm paper without border. Borderless Printing.. Letter (×7) Prints 7 photos on the printer. - Media type Specifies the type of paper loaded on Photo Paper Plus Glossy Letter paper without border. Specifies whether to perform borderless printing or not...
Letter Prints a photo on the printer. - Paper size Specifies the size of media loaded on Photo Paper Plus Glossy Letter paper with border. Letter (×5) Prints 5 photos on a sheet. - Layout Specifies ... border. 5×7 Prints a photo on Photo Paper Plus Glossy 5"×7"/127.0×177.8 mm paper without border. Borderless Printing.. Letter (×7) Prints 7 photos on the printer. - Media type Specifies the type of paper loaded on Photo Paper Plus Glossy Letter paper without border. Specifies whether to perform borderless printing or not...

i80 Quick Start Guide
Page 20
... you use. The effective angle of the infrared port of the printer is about 10° from a mobile phone, place it is connected securely. Infrared port of printer Less than 31.5 inch (80 cm) (Do not block with the printer depends on the computer or PDA. Check the orientation and positions ...of the infrared ports of communication with any obstacle between them. If it at a distance of less than 31.5 inch (80 cm). When printing ...
... you use. The effective angle of the infrared port of the printer is about 10° from a mobile phone, place it is connected securely. Infrared port of printer Less than 31.5 inch (80 cm) (Do not block with the printer depends on the computer or PDA. Check the orientation and positions ...of the infrared ports of communication with any obstacle between them. If it at a distance of less than 31.5 inch (80 cm). When printing ...

i80 Quick Start Guide
Page 21
...with your digital camera. PictBridge-compatible Digital Cameras On page 19 Canon "Bubble Jet Direct" compatible digital camera On page 21 „ Connecting to a Digital Camera To connect a digital camera to this printer. * Hereafter, the digital still camera and digital video camcorder ...) digital camera or digital camcorder without a computer by simply connecting the digital camera or digital camcorder to this printer, use a computer. z This printer supports Canon "Bubble Jet Direct." Caution Do not connect any equipment other than the camera ready for connection to the camera...
...with your digital camera. PictBridge-compatible Digital Cameras On page 19 Canon "Bubble Jet Direct" compatible digital camera On page 21 „ Connecting to a Digital Camera To connect a digital camera to this printer. * Hereafter, the digital still camera and digital video camcorder ...) digital camera or digital camcorder without a computer by simply connecting the digital camera or digital camcorder to this printer, use a computer. z This printer supports Canon "Bubble Jet Direct." Caution Do not connect any equipment other than the camera ready for connection to the camera...
i80 Quick Start Guide
Page 22
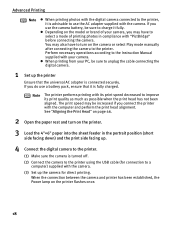
...brand of printing photos in the portrait position (short side facing down) and the print side facing up. 4 Connect the digital camera to the printer. (1) Make sure the camera is advisable to use a battery pack, ensure that the universal AC adapter is fully charged. z When printing from ... that it is connected securely. Advanced Printing Note z When printing photos with the digital camera connected to the printer, it is turned off. (2) Connect the camera to the printer using the USB cable (for connection to a computer) supplied with the camera. (3) Set up the camera for direct ...
...brand of printing photos in the portrait position (short side facing down) and the print side facing up. 4 Connect the digital camera to the printer. (1) Make sure the camera is advisable to use a battery pack, ensure that the universal AC adapter is fully charged. z When printing from ... that it is connected securely. Advanced Printing Note z When printing photos with the digital camera connected to the printer, it is turned off. (2) Connect the camera to the printer using the USB cable (for connection to a computer) supplied with the camera. (3) Set up the camera for direct ...

i80 Quick Start Guide
Page 23
..............On (Exif Print) - Different names may differ depending on the model or brand of the digital camera when the printer is correctly connected. A Canon "Bubble Jet Direct" compatible digital camera. „ Direct Printing from PictBridge-compatible Digital Cameras When operating the camera, ...on sequence may be displayed on your camera. A PictBridge-compliant digital camera. Names of settings that can be sure to the printer. „ Confirming or Changing the Camera Settings When a PictBridge-compatible camera is connected and printing is used in the Instruction ...
..............On (Exif Print) - Different names may differ depending on the model or brand of the digital camera when the printer is correctly connected. A Canon "Bubble Jet Direct" compatible digital camera. „ Direct Printing from PictBridge-compatible Digital Cameras When operating the camera, ...on sequence may be displayed on your camera. A PictBridge-compliant digital camera. Names of settings that can be sure to the printer. „ Confirming or Changing the Camera Settings When a PictBridge-compatible camera is connected and printing is used in the Instruction ...
i80 Quick Start Guide
Page 24
...Photo Paper Pro 5"×7" * Photo Photo Paper Plus Glossy * This size can be selected only for Canon PictBridge-compatible cameras. (Note that it cannot be selected for this printer. z Never disconnect the USB cable during printing. Advanced Printing „ About "Paper Size" and "Paper... Type" To change the paper size or paper type, operate the camera to produce photos using a Canon PictBridge-compatible camera, you can select...
...Photo Paper Pro 5"×7" * Photo Photo Paper Plus Glossy * This size can be selected only for Canon PictBridge-compatible cameras. (Note that it cannot be selected for this printer. z Never disconnect the USB cable during printing. Advanced Printing „ About "Paper Size" and "Paper... Type" To change the paper size or paper type, operate the camera to produce photos using a Canon PictBridge-compatible camera, you can select...

i80 Quick Start Guide
Page 25
... camera, the date when the photograph was taken is set from the operation panel of the media set on the printer. Advanced Printing „ Printing Photographs Directly from a Canon "Bubble Jet Direct" compatible digital camera Let's take a look at the media types that can be set on ...the Canon "Bubble Jet Direct" compatible digital camera connected to this printer and limitations. „ Media Types for better print quality. For print error messages, refer to the User's Guide. z ...
... camera, the date when the photograph was taken is set from the operation panel of the media set on the printer. Advanced Printing „ Printing Photographs Directly from a Canon "Bubble Jet Direct" compatible digital camera Let's take a look at the media types that can be set on ...the Canon "Bubble Jet Direct" compatible digital camera connected to this printer and limitations. „ Media Types for better print quality. For print error messages, refer to the User's Guide. z ...
i80 Quick Start Guide
Page 26
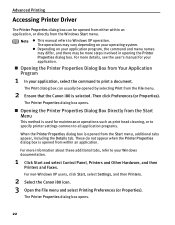
... the Start Menu This method is used for your application. „ Opening the Printer Properties Dialog Box from Your Application Program 1 In your operating system. For non-Windows XP users, click Start, select Settings, and then Printers. 2 Select the Canon i80 icon. 3 Open the File menu and select Printing Preferences (or Properties). z Depending...
... the Start Menu This method is used for your application. „ Opening the Printer Properties Dialog Box from Your Application Program 1 In your operating system. For non-Windows XP users, click Start, select Settings, and then Printers. 2 Select the Canon i80 icon. 3 Open the File menu and select Printing Preferences (or Properties). z Depending...


