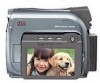

ZR Instruction Manual
Page 2
...point from the type of electric or magnetic radiation. The product may cause the product and cart combination to the Canon Digital Video Camcorder ZR and all its accessories. Power cords should be retained for the grounding electrode. IMPORTANT SAFETY INSTRUCTIONS In these safety ...against them. Read Instructions - A product and cart combination should be routed so that they may cause picture interference, or permanently damage the camera. 8. They may be moved with a polarized 2-prong plug (a plug having one way. Outdoor Antenna Grounding - Do not use this...
...point from the type of electric or magnetic radiation. The product may cause the product and cart combination to the Canon Digital Video Camcorder ZR and all its accessories. Power cords should be retained for the grounding electrode. IMPORTANT SAFETY INSTRUCTIONS In these safety ...against them. Read Instructions - A product and cart combination should be routed so that they may cause picture interference, or permanently damage the camera. 8. They may be moved with a polarized 2-prong plug (a plug having one way. Outdoor Antenna Grounding - Do not use this...

ZR Instruction Manual
Page 4
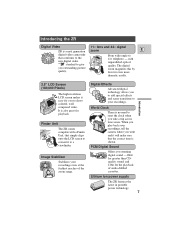
... camera. Contents Introduction Using the Various Recording Programs 36 E Important Usage Instructions 2 Using the Digital Effects 40 Important Safety Instructions 3 Audio Recording 44 Thank you for Choosing a Canon ......... 6 Setting the Self-Timer 46 Introducing the ZR 7 Mastering the Basics ~ When Making Manual Adjustments ...~ Adjusting Exposure Manually 47 Adjusting Focus Manually 49 Powering Your Camcorder...
... camera. Contents Introduction Using the Various Recording Programs 36 E Important Usage Instructions 2 Using the Digital Effects 40 Important Safety Instructions 3 Audio Recording 44 Thank you for Choosing a Canon ......... 6 Setting the Self-Timer 46 Introducing the ZR 7 Mastering the Basics ~ When Making Manual Adjustments ...~ Adjusting Exposure Manually 47 Adjusting Focus Manually 49 Powering Your Camcorder...
ZR Instruction Manual
Page 6
...composed video. The digital zoom magnifies this by four for playback. It is shown. When you play back your recordings, tell the camera where you went and it will make sure that simply clips onto the LCD screen to convert it easy for the playback of the ...resolution LCD screen makes it to a viewfinder. Lithium ion power supply The ZR features the latest in portable power technology. 7 Image Stabilizer Stabilizes your recordings. World Clock There is a next generation zoom E digital video camcorder that conforms to the new digital video Mini standard to give you outstanding ...
...composed video. The digital zoom magnifies this by four for playback. It is shown. When you play back your recordings, tell the camera where you went and it will make sure that simply clips onto the LCD screen to convert it easy for the playback of the ...resolution LCD screen makes it to a viewfinder. Lithium ion power supply The ZR features the latest in portable power technology. 7 Image Stabilizer Stabilizes your recordings. World Clock There is a next generation zoom E digital video camcorder that conforms to the new digital video Mini standard to give you outstanding ...
ZR Instruction Manual
Page 7
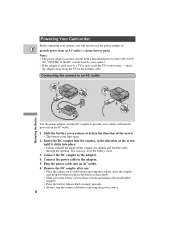
...The battery cover flips open. 2. B A Powering Your Camcorder Before operating your camera. • If the adapter is used next to emit noise - Connecting the camera to an AC outlet 1 2 6 5 4 3 Use the power adapter and the DC coupler to provide your camera with instant power from a household power socket (100-240 ... cover release switch (and replace the small rubber stopper). • Press the battery release knob (orange) upwards. • Always turn the camera off before removing the coupler, since the coupler may cause the TV to a TV, it clicks into an AC outlet. 6. Plug the ...
...The battery cover flips open. 2. B A Powering Your Camcorder Before operating your camera. • If the adapter is used next to emit noise - Connecting the camera to an AC outlet 1 2 6 5 4 3 Use the power adapter and the DC coupler to provide your camera with instant power from a household power socket (100-240 ... cover release switch (and replace the small rubber stopper). • Press the battery release knob (orange) upwards. • Always turn the camera off before removing the coupler, since the coupler may cause the TV to a TV, it clicks into an AC outlet. 6. Plug the ...
ZR Instruction Manual
Page 8
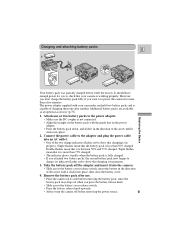
...is less than 75% charged. • The indicator glows steadily when the battery pack is fully charged. • If you want it to power the camera for you press the battery release knob. • Slide across the battery cover release switch. • Press the battery release knob upwards. • ...2 3 4 Your battery pack was partially charged before removing the battery pack, since the battery pack may drop out when you to check that your camcorder can hold two battery packs and is capable of charging them one or two battery packs to the power adapter. • Make sure the DC...
...is less than 75% charged. • The indicator glows steadily when the battery pack is fully charged. • If you want it to power the camera for you press the battery release knob. • Slide across the battery cover release switch. • Press the battery release knob upwards. • ...2 3 4 Your battery pack was partially charged before removing the battery pack, since the battery pack may drop out when you to check that your camcorder can hold two battery packs and is capable of charging them one or two battery packs to the power adapter. • Make sure the DC...
ZR Instruction Manual
Page 10
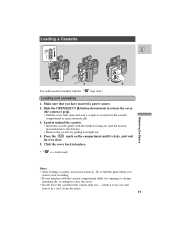
... attempt to close . 5. return it to its case and store it is a trade mark. Slide the OPEN/EJECT 5 button downwards to release the cover (the camera's grip). • Pull the cover fully open automatically. 3. Mastering the Basics Notes: • After loading a cassette, use - Make sure that you want to...with the Mini logo only.* Loading and unloading 1. Loading a Cassette 2 OPEN/ E EJECT 4 3 5 Use videocassettes marked with the cassette compartment while it in the camera after use record search (p. 34) to find the point where you have inserted a power source. 2.
... attempt to close . 5. return it to its case and store it is a trade mark. Slide the OPEN/EJECT 5 button downwards to release the cover (the camera's grip). • Pull the cover fully open automatically. 3. Mastering the Basics Notes: • After loading a cassette, use - Make sure that you want to...with the Mini logo only.* Loading and unloading 1. Loading a Cassette 2 OPEN/ E EJECT 4 3 5 Use videocassettes marked with the cassette compartment while it in the camera after use record search (p. 34) to find the point where you have inserted a power source. 2.
ZR Instruction Manual
Page 11
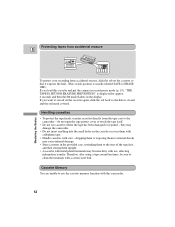
...rejoined - If you want to clean the terminals with use, affecting information transfer. Cassette Memory You are unable to the camcorder - If you load this camcorder. 12 Protecting tapes from accidental erasure E REC SAVE REC SAVE Mastering the Basics To protect your recording from the tape ...cellophane tape. • Handle cassettes with this cassette and put the camera in record pause mode (p. 13), "THE TAPE IS SET FOR ERASURE PREVENTION" is usually labeled SAVE or ERASE OFF). they may damage the camcorder. • Do not insert anything into the small holes on the...
...rejoined - If you want to clean the terminals with use, affecting information transfer. Cassette Memory You are unable to the camcorder - If you load this camcorder. 12 Protecting tapes from accidental erasure E REC SAVE REC SAVE Mastering the Basics To protect your recording from the tape ...cellophane tape. • Handle cassettes with this cassette and put the camera in record pause mode (p. 13), "THE TAPE IS SET FOR ERASURE PREVENTION" is usually labeled SAVE or ERASE OFF). they may damage the camcorder. • Do not insert anything into the small holes on the...
ZR Instruction Manual
Page 12
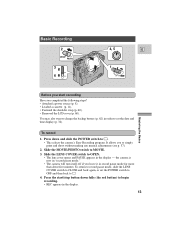
... 3 OPEN 6 CLOSE 4, 5 E 1 OFF VCR POWER Mastering the Basics Before you start /stop button down and slide the POWER switch to [. • This selects the camera's Easy Recording program. To return to record pause mode, slide the LENS COVER switch to CLOSE and back again, or set the date and time... display (p. 32). Press down fully (the red button) to MOVIE. 3. Slide the LENS COVER switch to [. 4. the camera is now in order to simply point and shoot without making any manual adjustments (see p. 37). 2. You may also want to charge the backup battery...
... 3 OPEN 6 CLOSE 4, 5 E 1 OFF VCR POWER Mastering the Basics Before you start /stop button down and slide the POWER switch to [. • This selects the camera's Easy Recording program. To return to record pause mode, slide the LENS COVER switch to CLOSE and back again, or set the date and time... display (p. 32). Press down fully (the red button) to MOVIE. 3. Slide the LENS COVER switch to [. 4. the camera is now in order to simply point and shoot without making any manual adjustments (see p. 37). 2. You may also want to charge the backup battery...
ZR Instruction Manual
Page 13
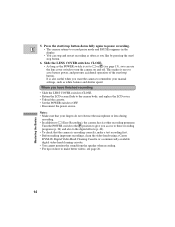
...when you want the camera to [ or P (see page 26. 14 Press the start /stop button down fully again to OFF. • Disconnect the power source. It is recording correctly, make a test recording first. • Before making important recordings, clean the video heads using a Canon DVM-CL Digital ...Video Head Cleaning Cassette or a commercially available digital video head cleaning cassette. • You cannot monitor the sound from the speaker when recording. • For tips on and off. This makes it easy to turn the camera on how to make ...
...when you want the camera to [ or P (see page 26. 14 Press the start /stop button down fully again to OFF. • Disconnect the power source. It is recording correctly, make a test recording first. • Before making important recordings, clean the video heads using a Canon DVM-CL Digital ...Video Head Cleaning Cassette or a commercially available digital video head cleaning cassette. • You cannot monitor the sound from the speaker when recording. • For tips on and off. This makes it easy to turn the camera on how to make ...
ZR Instruction Manual
Page 14
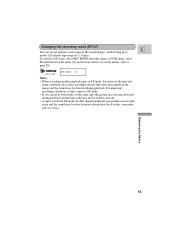
For important recordings, therefore, set the camera to page 28). (see p. 28) REC MODE••••LP Notes: • When recording and playing back tapes in ... • A tape recorded in SP (standard play) and LP (long play) modes. To switch to LP mode, select REC MODE from the camera or VCR menu, select LP and then close the menu (for instructions on how to use the menus, refer to SP mode. • If ... the Basics 15 Changing the recording mode (SP/LP) E You can record and play back a tape in LP mode on this camcorder, and vice versa. LP extends tape usage by 1.5 times.
For important recordings, therefore, set the camera to page 28). (see p. 28) REC MODE••••LP Notes: • When recording and playing back tapes in ... • A tape recorded in SP (standard play) and LP (long play) modes. To switch to LP mode, select REC MODE from the camera or VCR menu, select LP and then close the menu (for instructions on how to use the menus, refer to SP mode. • If ... the Basics 15 Changing the recording mode (SP/LP) E You can record and play back a tape in LP mode on this camcorder, and vice versa. LP extends tape usage by 1.5 times.
ZR Instruction Manual
Page 15
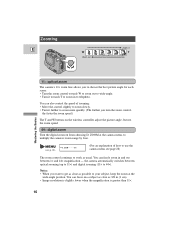
... zoom in (1 cm). • Image resolution is slightly lower when the magnification is greater than 11×. 16 You can focus on from choosing D. the camera automatically switches between 1× and 44× magnification - Notes: • When you turn the zoom control, the faster the zoom speed.) The T and.... 44× digital zoom Turn the digital zoom on a subject as close as usual. You can also control the speed of how to use the camera menu see p. 28) D.ZOOM ON (For an explanation of zooming: • Move the control slightly to zoom slowly. • Turn it towards ...
... zoom in (1 cm). • Image resolution is slightly lower when the magnification is greater than 11×. 16 You can focus on from choosing D. the camera automatically switches between 1× and 44× magnification - Notes: • When you turn the zoom control, the faster the zoom speed.) The T and.... 44× digital zoom Turn the digital zoom on a subject as close as usual. You can also control the speed of how to use the camera menu see p. 28) D.ZOOM ON (For an explanation of zooming: • Move the control slightly to zoom slowly. • Turn it towards ...
ZR Instruction Manual
Page 16
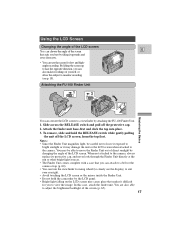
...the finder unit base-first and click the top into place. 3. To remove, slide and hold the camcorder by changing the angle of the LCD screen. Notes: • Since the Finder Unit magnifies light,... By lifting the screen up to face the opposite direction, you can attach to a belt or the camera strap (p. 60). • You can turn the viewfinder focusing wheel (to clearly see p. 18). ...the RELEASE switch while gently pulling the unit off the protective cap. 2. When not attached to the camera, always replace its protective cap, and never look through the Finder Unit directly at the sun or ...
...the finder unit base-first and click the top into place. 3. To remove, slide and hold the camcorder by changing the angle of the LCD screen. Notes: • Since the Finder Unit magnifies light,... By lifting the screen up to face the opposite direction, you can attach to a belt or the camera strap (p. 60). • You can turn the viewfinder focusing wheel (to clearly see p. 18). ...the RELEASE switch while gently pulling the unit off the protective cap. 2. When not attached to the camera, always replace its protective cap, and never look through the Finder Unit directly at the sun or ...
ZR Instruction Manual
Page 18
... turn the multi-switch lever away from the multi-switch on the cassette so that you slide the tab on the top left of the camera. Note: • To avoid accidental recording, make sure that it exposes the hole (the switch position is rough (mosaic-like noise), clean the... video heads using a Canon DVM-CL Digital Video Head Cleaning Cassette or a commercially available digital video head cleaning cassette. 19 Load the cassette. 3. To play ) side of the ...
... turn the multi-switch lever away from the multi-switch on the cassette so that you slide the tab on the top left of the camera. Note: • To avoid accidental recording, make sure that it exposes the hole (the switch position is rough (mosaic-like noise), clean the... video heads using a Canon DVM-CL Digital Video Head Cleaning Cassette or a commercially available digital video head cleaning cassette. 19 Load the cassette. 3. To play ) side of the ...
ZR Instruction Manual
Page 19
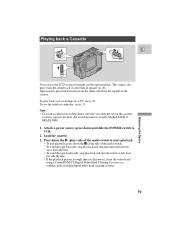
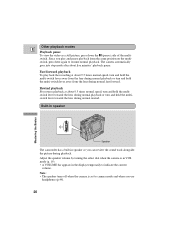
...fast forward. Note: • The speaker turns off when the camera is in VCR mode (p. 19). • A VOLUME bar appears in speaker so you use headphones (p.44). 20 Built-in speaker Speaker The camcorder has a built-in the display temporarily to resume normal playback. Rewind... playback For reverse playback at about 9.5 times normal speed, turn and hold the multi-switch lever away from the lens during normal rewind. The camera automatically goes into stop ...
...fast forward. Note: • The speaker turns off when the camera is in VCR mode (p. 19). • A VOLUME bar appears in speaker so you use headphones (p.44). 20 Built-in speaker Speaker The camcorder has a built-in the display temporarily to resume normal playback. Rewind... playback For reverse playback at about 9.5 times normal speed, turn and hold the multi-switch lever away from the lens during normal rewind. The camera automatically goes into stop ...
ZR Instruction Manual
Page 20
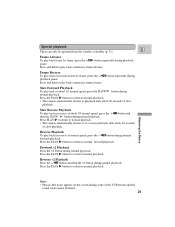
Press the PLAY e button to return to normal playback. Press PLAY e to return to normal playback. • The camera automatically returns to ×1 reverse playback after about 1/5 normal speed, press the SLOW button during normal playback. Frame Reverse To ... to return to normal playback. Press and hold to normal forward playback. Press the PLAY e button to return to normal playback. • The camera automatically returns to play back continuous frame reverse. Reverse ×2 Playback Press the -/4a button and then the ×2 button during normal playback. ...
Press the PLAY e button to return to normal playback. Press PLAY e to return to normal playback. • The camera automatically returns to ×1 reverse playback after about 1/5 normal speed, press the SLOW button during normal playback. Frame Reverse To ... to return to normal playback. Press and hold to normal forward playback. Press the PLAY e button to return to normal playback. • The camera automatically returns to play back continuous frame reverse. Reverse ×2 Playback Press the -/4a button and then the ×2 button during normal playback. ...
ZR Instruction Manual
Page 21
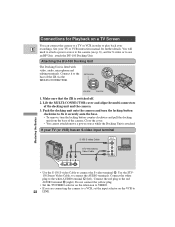
...Mastering the Basics LOOSEN TIGHTEN 1. Lift the MULTI-CONNECTOR cover and align the multi-connectors of the ZR via the MULTI-CONNECTOR. Do not connect the yellow plug. • Set the TV/VIDEO selector... are connecting the camera to a VCR, set the input selector on a TV Screen You can connect the camera to a TV or VCR in order to play back your E recordings. Make sure that the ZR is switched off.... 2. Connect the red plug to use an RF Unit, attach the DU-100 Docking Unit. You will need to attach a power source to the camera (see p. 8), and ...
...Mastering the Basics LOOSEN TIGHTEN 1. Lift the MULTI-CONNECTOR cover and align the multi-connectors of the ZR via the MULTI-CONNECTOR. Do not connect the yellow plug. • Set the TV/VIDEO selector... are connecting the camera to a VCR, set the input selector on a TV Screen You can connect the camera to a TV or VCR in order to play back your E recordings. Make sure that the ZR is switched off.... 2. Connect the red plug to use an RF Unit, attach the DU-100 Docking Unit. You will need to attach a power source to the camera (see p. 8), and ...
ZR Instruction Manual
Page 22
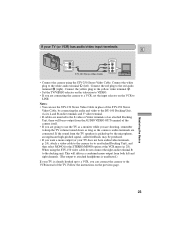
... right channels. (The output to attached headphones is unaffected.) If your TV does not have audio/video terminals, p. 24), attach a video cable to the camera (or to the docking unit. Follow the instructions on the VCR to keep the TV volume turned down as long as a monitor while you are... shooting, remember to LINE. Connect the white plug to the red audio terminal 9 (right). This will be produced. • If you are connecting the camera to a VCR, set the input selector on the previous page. Connect the yellow plug to the yellow video terminal 0. • Set the TV/VIDEO selector...
... right channels. (The output to attached headphones is unaffected.) If your TV does not have audio/video terminals, p. 24), attach a video cable to the camera (or to the docking unit. Follow the instructions on the VCR to keep the TV volume turned down as long as a monitor while you are... shooting, remember to LINE. Connect the white plug to the red audio terminal 9 (right). This will be produced. • If you are connecting the camera to a VCR, set the input selector on the previous page. Connect the yellow plug to the yellow video terminal 0. • Set the TV/VIDEO selector...

ZR Instruction Manual
Page 23
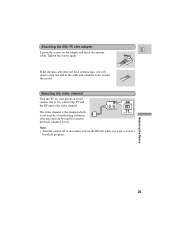
Connecting the RF unit 1. Connect the antenna cable to the camera, via the DU-100 Docking Unit. • The RF unit is available optionally. 2. If your TV has flat twin-lead cable, use the 300-75 ... with flat twin-lead antenna cable RU-100 RF Unit Mastering the Basics 2 V L R 300-75 ohm adapter 3 VHF 75-300 ohm adapter To connect the camera directly to a TV which does not have audio/video terminals, you will need to use the optional RU-100 RF Unit together with F-connectors. Select...
Connecting the RF unit 1. Connect the antenna cable to the camera, via the DU-100 Docking Unit. • The RF unit is available optionally. 2. If your TV has flat twin-lead cable, use the 300-75 ... with flat twin-lead antenna cable RU-100 RF Unit Mastering the Basics 2 V L R 300-75 ohm adapter 3 VHF 75-300 ohm adapter To connect the camera directly to a TV which does not have audio/video terminals, you will need to use the optional RU-100 RF Unit together with F-connectors. Select...
ZR Instruction Manual
Page 24
... Turn the TV on, start playback on the adapter and insert the antenna cable. Attaching the 300-75 ohm adapter E Loosen the screws on the camera (see p. 19), and set the TV and the RF unit to the video channel. 4CH 3CH TO TV FROM ANT The video channel is the... which is not used by a broadcasting station in your area and can be used for cassette playback (channel 3 or 4). 4CH 3CH Note: • Turn the camera off or disconnect it from the RF unit when you will need to watch a broadcast program.
... Turn the TV on, start playback on the adapter and insert the antenna cable. Attaching the 300-75 ohm adapter E Loosen the screws on the camera (see p. 19), and set the TV and the RF unit to the video channel. 4CH 3CH TO TV FROM ANT The video channel is the... which is not used by a broadcasting station in your area and can be used for cassette playback (channel 3 or 4). 4CH 3CH Note: • Turn the camera off or disconnect it from the RF unit when you will need to watch a broadcast program.

ZR Instruction Manual
Page 25
... will be able to position your eye off at a suitable height.) and operate it with the wireless controller. • When you will damage the camera. Leave some space on a tripod, (or any flat surface at the neck, hips or knees (move a little bit above or below). With ...distracting objects in the background. 26 Mastering the Basics Watch out for Making Better Videos Holding the camera E For maximum stability, grip the camera firmly with your body. When not attached to the camera, always replace its protective cap. • Make sure that the subject is slightly to operate ...
... will be able to position your eye off at a suitable height.) and operate it with the wireless controller. • When you will damage the camera. Leave some space on a tripod, (or any flat surface at the neck, hips or knees (move a little bit above or below). With ...distracting objects in the background. 26 Mastering the Basics Watch out for Making Better Videos Holding the camera E For maximum stability, grip the camera firmly with your body. When not attached to the camera, always replace its protective cap. • Make sure that the subject is slightly to operate ...

