
Users Manual - English
Page 3
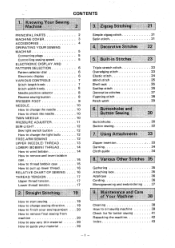
... Buttonholes Button sewing 7. Using Attachments 30 32 33 Zipper insertion 33 Darning 34 Cloth guide 34 8. Zigzag Stitching 21 PRINCIPAL PARTS 2 MACHINE COVER 3 ACCESSORIES 4 OPERATING YOUR SEWING MACHINE 5 Connecting plugs 5 Controlling sewing speed 5 ELECTRONIC DISPLAY AND PATTERN SELECTION 6 Pattern selector dial 6 Electronic display 6 VARIOUS CONTROLS 7 Stitch length knob 7 Stitch width knob 8 Needle position selector 8 Reverse sewing button 8 PRESSER FOOT 9 NEEDLE 10 How to change the needle 10 How to check the needle 10 TWIN NEEDLE...
... Buttonholes Button sewing 7. Using Attachments 30 32 33 Zipper insertion 33 Darning 34 Cloth guide 34 8. Zigzag Stitching 21 PRINCIPAL PARTS 2 MACHINE COVER 3 ACCESSORIES 4 OPERATING YOUR SEWING MACHINE 5 Connecting plugs 5 Controlling sewing speed 5 ELECTRONIC DISPLAY AND PATTERN SELECTION 6 Pattern selector dial 6 Electronic display 6 VARIOUS CONTROLS 7 Stitch length knob 7 Stitch width knob 8 Needle position selector 8 Reverse sewing button 8 PRESSER FOOT 9 NEEDLE 10 How to change the needle 10 How to check the needle 10 TWIN NEEDLE...

Users Manual - English
Page 4
Stitch Width Knob 4. Upper Thread Tension Dial 10. Thread Cutter 14. Shuttle Hook 18. Feed Dog 20. Stitch Length Knob 2. Pressure Adjuster 6. Electronic Display 13. Needle Plate (Zigzag) 17. Needle 21. Buttonhole Lever 8. Extension Table 9. Needle Position Selector 3. Sew-light Switch 7. Pattern Dial 11. Presser Foot (Zigzag) 16. Bobbin Case 19. Needle Clamp Screw Reverse Sewing Button - 2 - 12. Presser Foot Screw 15. Knowing Your Sewing Machine Principal Parts 0 ® 13 21 20 14 15 8 16 0 a 0 8 ® 9 II 9 1. Thread Take-up Lever 5....
Stitch Width Knob 4. Upper Thread Tension Dial 10. Thread Cutter 14. Shuttle Hook 18. Feed Dog 20. Stitch Length Knob 2. Pressure Adjuster 6. Electronic Display 13. Needle Plate (Zigzag) 17. Needle 21. Buttonhole Lever 8. Extension Table 9. Needle Position Selector 3. Sew-light Switch 7. Pattern Dial 11. Presser Foot (Zigzag) 16. Bobbin Case 19. Needle Clamp Screw Reverse Sewing Button - 2 - 12. Presser Foot Screw 15. Knowing Your Sewing Machine Principal Parts 0 ® 13 21 20 14 15 8 16 0 a 0 8 ® 9 II 9 1. Thread Take-up Lever 5....
Users Manual - English
Page 6
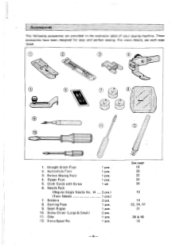
Button Sewing Foot 4. Oiler 12. These accessories have been designed for easy and perfect sewing. For more details, see each page listed. 10 1. Bobbins 8. Darning Plate 9. Extra Spool Pin 1 pce. 1 pce. 1 pce. 1 pce. 1 set 3 pcs.) 1 pce.) 3 pcs. 1 pce. 1 pce. 2 pcs. 1 pce. 1 pce. -4- Needle Pack (Regular Single Needle No. 14 (Twin Needle 7. Buttonhole Foot 3. Accessories The following accessories are provided in the extension table of your sewing machine. Straight Stitch Foot 2. Screw Driver (Large & Small) 11. See page 19 30 32 33...
Button Sewing Foot 4. Oiler 12. These accessories have been designed for easy and perfect sewing. For more details, see each page listed. 10 1. Bobbins 8. Darning Plate 9. Extra Spool Pin 1 pce. 1 pce. 1 pce. 1 pce. 1 set 3 pcs.) 1 pce.) 3 pcs. 1 pce. 1 pce. 2 pcs. 1 pce. 1 pce. -4- Needle Pack (Regular Single Needle No. 14 (Twin Needle 7. Buttonhole Foot 3. Accessories The following accessories are provided in the extension table of your sewing machine. Straight Stitch Foot 2. Screw Driver (Large & Small) 11. See page 19 30 32 33...
Users Manual - English
Page 9
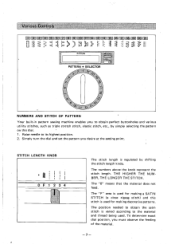
I - Various Controls 1,2,4 .104 112,1 14 .15 064 O81PEI 2111 PATTERN MESSAGE LCp.,:,2 I ll PATTERN • SELECTOR 2 1 2/ 0
I - Various Controls 1,2,4 .104 112,1 14 .15 064 O81PEI 2111 PATTERN MESSAGE LCp.,:,2 I ll PATTERN • SELECTOR 2 1 2/ 0
Users Manual - English
Page 12
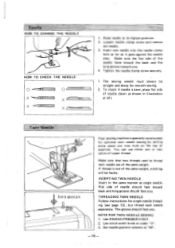
... same weight, stitching will be straight and sharp for smooth sewing. 2. THREADING TWIN NEEDLE Follow instructions for optional twin needle sewing by setting extra spool pin into the needle clamp hole as far as single needle. Use stitch width knob at "M". -10- Twin Needle /L Extra spool pin Your sewing machine is bent, place flat side of needle should face toward you . INSERTING TWIN NEEDLE Insert in illustration at left. The groove should face you. Use ZIGZAG PRESSER FOOT. 2. Flat side of needle down as shown...
... same weight, stitching will be straight and sharp for smooth sewing. 2. THREADING TWIN NEEDLE Follow instructions for optional twin needle sewing by setting extra spool pin into the needle clamp hole as far as single needle. Use stitch width knob at "M". -10- Twin Needle /L Extra spool pin Your sewing machine is bent, place flat side of needle should face toward you . INSERTING TWIN NEEDLE Insert in illustration at left. The groove should face you. Use ZIGZAG PRESSER FOOT. 2. Flat side of needle down as shown...
Users Manual - English
Page 17
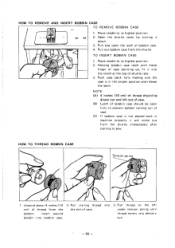
... INSERT BOBBIN CASE TO REMOVE BOBBIN CASE 1. Pull 'and open fully to prevent bobbin coming out of bobbin case. 4. Raise needle to sew. Pul l out bobbin case from the shuttle immediately . NOTE: (A) 4 inches (10 cm) of thread should be drawn out and left under tension spring until thread enters into bobbin case. 2. Pull thread to its highest position. 2. HOW TO THREAD BOBBIN CASE ..... Raise needle to the left out of case. (B) Latch of bobbin case should be open the latch of case. (C) If bobbin case...
... INSERT BOBBIN CASE TO REMOVE BOBBIN CASE 1. Pull 'and open fully to prevent bobbin coming out of bobbin case. 4. Raise needle to sew. Pul l out bobbin case from the shuttle immediately . NOTE: (A) 4 inches (10 cm) of thread should be drawn out and left under tension spring until thread enters into bobbin case. 2. Pull thread to its highest position. 2. HOW TO THREAD BOBBIN CASE ..... Raise needle to the left out of case. (B) Latch of bobbin case should be open the latch of case. (C) If bobbin case...
Users Manual - English
Page 21
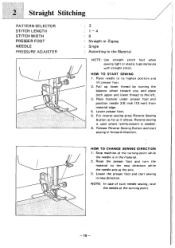
...Use straight stitch foot when sewing light or elastic type materials with straight stitch. Place material under presser foot and position needle 3/8 inch (10 mm) from material edge. 4. Release Reverse Sewing Button and start sewing in forward direction. Lower the presser foot and start sewing in new direction. NOTE: In case of twin needle sewing, raise the needle at the turning point while the needle is needed. 6. Reverse sewing is used where reinforcement is in the material. 2. Straight Stitching PATTERN SELECTOR STITCH LENGTH STITCH WIDTH PRESSER FOOT NEEDLE PRESSURE...
...Use straight stitch foot when sewing light or elastic type materials with straight stitch. Place material under presser foot and position needle 3/8 inch (10 mm) from material edge. 4. Release Reverse Sewing Button and start sewing in forward direction. Lower the presser foot and start sewing in new direction. NOTE: In case of twin needle sewing, raise the needle at the turning point while the needle is needed. 6. Reverse sewing is used where reinforcement is in the material. 2. Straight Stitching PATTERN SELECTOR STITCH LENGTH STITCH WIDTH PRESSER FOOT NEEDLE PRESSURE...
Users Manual - English
Page 23
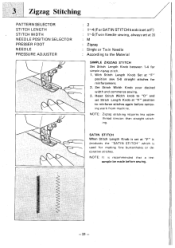
... removing work from machine. Reset Stitch Width knob to "O" and set at "F" position to the Material SIMPLE ZIGZAG STITCH Set Stitch Length Knob between 1-4 for simple zigzag stitch. 1. With Stitch Length Knob Set at "F" it produces the "SATIN STITCH" vv[vich is set at "F" position sew 5-6 straight stitches for making fine buttonholes or decorative stitches. Set Stitch Width Knob your desired width and commence sewing. 3. SATIN STITCH When Stitch Length Knob is used for reinforcement. 2. Zigzag Stitching PATTERN SELECTOR STITCH LENGTH STITCH WIDTH. NOTE: Zigzag stitching...
... removing work from machine. Reset Stitch Width knob to "O" and set at "F" position to the Material SIMPLE ZIGZAG STITCH Set Stitch Length Knob between 1-4 for simple zigzag stitch. 1. With Stitch Length Knob Set at "F" it produces the "SATIN STITCH" vv[vich is set at "F" position sew 5-6 straight stitches for making fine buttonholes or decorative stitches. Set Stitch Width Knob your desired width and commence sewing. 3. SATIN STITCH When Stitch Length Knob is used for reinforcement. 2. Zigzag Stitching PATTERN SELECTOR STITCH LENGTH STITCH WIDTH. NOTE: Zigzag stitching...

Users Manual - English
Page 24
... quickly back to 0. lt.IIIIN -..ol -iiiii-ifill -.Pull .91illniliCillir"I -41,[4:4:::II4- 4:4 Slowly from 5 (3) to 0. According to the Material Zigzag Single or Twin Needle By using the "SATIN STITCH" as above but make round patterns. NOTE: The number in the following instructions various decorative stitches can be sewn How to be obtained. Repeat the movement. Repeat this. Decorative Stitches Satin Stitching PATTERN SELECTOR STITCH LENGTH STITCH WIDTH NEEDLE POSITION SELECTOR PRESSURE ADJUSTER PRESSER FOOT NEEDLE 2 For SATIN STITCH set...
... quickly back to 0. lt.IIIIN -..ol -iiiii-ifill -.Pull .91illniliCillir"I -41,[4:4:::II4- 4:4 Slowly from 5 (3) to 0. According to the Material Zigzag Single or Twin Needle By using the "SATIN STITCH" as above but make round patterns. NOTE: The number in the following instructions various decorative stitches can be sewn How to be obtained. Repeat the movement. Repeat this. Decorative Stitches Satin Stitching PATTERN SELECTOR STITCH LENGTH STITCH WIDTH NEEDLE POSITION SELECTOR PRESSURE ADJUSTER PRESSER FOOT NEEDLE 2 For SATIN STITCH set...

Users Manual - English
Page 25
...Stitch" is used for any stretch material such as illustrated. - 23 - This stitch is very useful as knitted fabric, tricot, etc. NOTE: When sewing elastic materials, Elastic Overlock Stitch is three times the strength of zigzag stitch appears and sew in Stitches Triple Stretch Stitch PATTERN SELECTOR STITCH LENGTH STITCH WIDTH NEEDLE POSITION SELECTOR PRESSER FOOT NEEDLE PRESSURE ADJUSTER l• Overedg ing PATTERN SELECTOR STITCH LENGTH STITCH WIDTH PRESSER FOOT NEEDLE 21 (Triple Stretch Stitch) 4 0 M Zigzag or Straight Single (See Note 1) : According to seams which prevents thread...
...Stitch" is used for any stretch material such as illustrated. - 23 - This stitch is very useful as knitted fabric, tricot, etc. NOTE: When sewing elastic materials, Elastic Overlock Stitch is three times the strength of zigzag stitch appears and sew in Stitches Triple Stretch Stitch PATTERN SELECTOR STITCH LENGTH STITCH WIDTH NEEDLE POSITION SELECTOR PRESSER FOOT NEEDLE PRESSURE ADJUSTER l• Overedg ing PATTERN SELECTOR STITCH LENGTH STITCH WIDTH PRESSER FOOT NEEDLE 21 (Triple Stretch Stitch) 4 0 M Zigzag or Straight Single (See Note 1) : According to seams which prevents thread...
Users Manual - English
Page 28
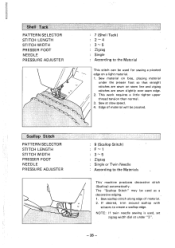
..." may be used for sewing a picoted edge on seam line and zigzag stitches are sewn on a light material. 1. NOTE: If twin needle sewing is used, set zigzag width dial at slow speed. 4. Edge of material. 2. If desired, trim around scallop with scissors to the Materials This' machine produces decorative stitch (Scallop) automatically. This work requires a little tighter upper thread tension than normal. 3. Scallop Stitch PATTERN SELECTOR STITCH LENGTH STITCH WIDTH PRESSER FOOT NEEDLE PRESSURE ADJUSTER : 9 (Scallop Stitch) F'1 3 - 5 Zigzag : Single or Twin Needle : According to...
..." may be used for sewing a picoted edge on seam line and zigzag stitches are sewn on a light material. 1. NOTE: If twin needle sewing is used, set zigzag width dial at slow speed. 4. Edge of material. 2. If desired, trim around scallop with scissors to the Materials This' machine produces decorative stitch (Scallop) automatically. This work requires a little tighter upper thread tension than normal. 3. Scallop Stitch PATTERN SELECTOR STITCH LENGTH STITCH WIDTH PRESSER FOOT NEEDLE PRESSURE ADJUSTER : 9 (Scallop Stitch) F'1 3 - 5 Zigzag : Single or Twin Needle : According to...

Users Manual - English
Page 29
... PATTERN SELECTOR STITCH LENGTH STITCH WIDTH PRESSER FOOT NEEDLE PRESSURE ADJUSTER 8 (Lighting Stitch), 12 (Link Stitch), 20 (Feather Stitch) F ^ 1 (8), 4 (12,20) 5 (8), 3 5 (12,20) Zigzag Single or Twin According to create decorative designs on fabrics that stretch. Decorative Stitching PATTERN SELECTOR STITCH LENGTH STITCH WIDTH PRESSER FOOT NEEDLE PRESSURE ADJUSTER 15 (Comb Stitch), 16 (Arrowhead Stitch) 4 3 - 5 Zigzag Single or Twin According to the Material These two stitches are very suitable for decorative use. NOTE: If twin needle sewing is used , set zigzag width dial...
... PATTERN SELECTOR STITCH LENGTH STITCH WIDTH PRESSER FOOT NEEDLE PRESSURE ADJUSTER 8 (Lighting Stitch), 12 (Link Stitch), 20 (Feather Stitch) F ^ 1 (8), 4 (12,20) 5 (8), 3 5 (12,20) Zigzag Single or Twin According to create decorative designs on fabrics that stretch. Decorative Stitching PATTERN SELECTOR STITCH LENGTH STITCH WIDTH PRESSER FOOT NEEDLE PRESSURE ADJUSTER 15 (Comb Stitch), 16 (Arrowhead Stitch) 4 3 - 5 Zigzag Single or Twin According to the Material These two stitches are very suitable for decorative use. NOTE: If twin needle sewing is used , set zigzag width dial...
Users Manual - English
Page 32
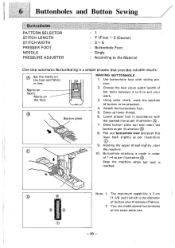
... buttonholes of fabrics. Ca)t Set the marks on the foot Button plate , MAKING BUTTONHOLE 1. Attach the buttonhole foot. 5. Lower presser foot in accordance with sliding portion. 2. Holding the upper thread slightly, start the machine. 10. Using tailor chalk, mark the position of bar tack) between 3 to 5 to suit your work. 3. Draw button plate out and insert the button as per illustration 8. Choose the best stitch width (width of button to be attached. 4. 6 Buttonholes and Button Sewing tki Buttonholes PATTERN SELECTOR STITCH LENGTH STITCH WIDTH PRESSER FOOT NEEDLE PRESSURE...
... buttonholes of fabrics. Ca)t Set the marks on the foot Button plate , MAKING BUTTONHOLE 1. Attach the buttonhole foot. 5. Lower presser foot in accordance with sliding portion. 2. Holding the upper thread slightly, start the machine. 10. Using tailor chalk, mark the position of bar tack) between 3 to 5 to suit your work. 3. Draw button plate out and insert the button as per illustration 8. Choose the best stitch width (width of button to be attached. 4. 6 Buttonholes and Button Sewing tki Buttonholes PATTERN SELECTOR STITCH LENGTH STITCH WIDTH PRESSER FOOT NEEDLE PRESSURE...
Users Manual - English
Page 34
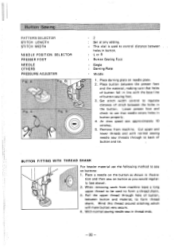
...or R Button Sewing Foot Single Darning Plate Middle 1. Remove from machine leave a long upper thread to be used to see above). 2. BUTTON FITTING WITH THREAD SHANK For heavier material use the following method to back of stitch between holes in line with the base line of button sewing foot. 3. Pull the upper thread through to sew on needle plate. 2. Button Sewing PATTERN SELECTOR STITCH LENGTH STITCH WIDTH NEEDLE POSITION SELECTOR PRESSER FOOT NEEDLE OTHERS PRESSURE ADJUSTER IFig. A Fig. At slow speed sew approximately 10 stitches. 5. With normal sewing needle sew in the...
...or R Button Sewing Foot Single Darning Plate Middle 1. Remove from machine leave a long upper thread to be used to see above). 2. BUTTON FITTING WITH THREAD SHANK For heavier material use the following method to back of stitch between holes in line with the base line of button sewing foot. 3. Pull the upper thread through to sew on needle plate. 2. Button Sewing PATTERN SELECTOR STITCH LENGTH STITCH WIDTH NEEDLE POSITION SELECTOR PRESSER FOOT NEEDLE OTHERS PRESSURE ADJUSTER IFig. A Fig. At slow speed sew approximately 10 stitches. 5. With normal sewing needle sew in the...
Users Manual - English
Page 36
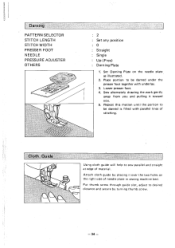
Lower presser foot. 4. Darning PATTERN SELECTOR STITCH LENGTH STITCH WIDTH PRESSER FOOT NEEDLE PRESSURE ADJUSTER OTHERS DOo : 2 Set any position : 0 : Straight Single : Up (Free) : Darning Plate 1. Place portion to sew parallel and straight at edge of material. Cloth Guide Using cloth guide will help to be darned is filled with underlay. 3. Repeat this motion until the portion to desired distance and secure by placing it toward you. 5. Sew alternately drawing the work gently away from you and pulling it over...
Lower presser foot. 4. Darning PATTERN SELECTOR STITCH LENGTH STITCH WIDTH PRESSER FOOT NEEDLE PRESSURE ADJUSTER OTHERS DOo : 2 Set any position : 0 : Straight Single : Up (Free) : Darning Plate 1. Place portion to sew parallel and straight at edge of material. Cloth Guide Using cloth guide will help to be darned is filled with underlay. 3. Repeat this motion until the portion to desired distance and secure by placing it toward you. 5. Sew alternately drawing the work gently away from you and pulling it over...

Users Manual - English
Page 37
... of straight stitching. 3. Sew a single row or multiple rows of material. 2. Loosen upper thread tension (set dial at about '2') so that lower thread lies on the under presser foot and sew. NOTE: If satin stitch or a decorative stitch is used to the Material 1 . Pull lower thread(s) to the Material 1. Place lace under material letting it will be most decorative. - 35 - Various Other Stitches Gathering PATTERN SELECTOR STITCH LENGTH STITCH WIDTH NEEDLE POSITION SELECTOR PRESSER FOOT NEEDLE PRESSURE ADJUSTER : 2 : 4 : 0 : M : Straight : Single : According to gather up...
... of straight stitching. 3. Sew a single row or multiple rows of material. 2. Loosen upper thread tension (set dial at about '2') so that lower thread lies on the under presser foot and sew. NOTE: If satin stitch or a decorative stitch is used to the Material 1 . Pull lower thread(s) to the Material 1. Place lace under material letting it will be most decorative. - 35 - Various Other Stitches Gathering PATTERN SELECTOR STITCH LENGTH STITCH WIDTH NEEDLE POSITION SELECTOR PRESSER FOOT NEEDLE PRESSURE ADJUSTER : 2 : 4 : 0 : M : Straight : Single : According to gather up...

Users Manual - English
Page 38
...Remove basting. Baste cut design to be sewn. 3 Lower presser foot making sure cord is centered and sew using zigzag stitch. Set Stitch Width Knob. 2 Place cord on fabric to the material . 2. Sew carefully following design. 3. NOTE: Make reinforceMent straight stitch at beginning and ending stitches. Guide cord by hand to where you desire it. - 36 - Cording PATTERN SELECTOR STITCH LENGTH STITCH WIDTH NEEDLE POSITION SELECTOR PRESSER FOOT NEEDLE PRESSURE ADJUSTER : 2 : F- 2 In accordance with thickness of stitching. 4. Applique PATTERN SELECTOR STITCH LENGTH STITCH WIDTH NEEDLE...
...Remove basting. Baste cut design to be sewn. 3 Lower presser foot making sure cord is centered and sew using zigzag stitch. Set Stitch Width Knob. 2 Place cord on fabric to the material . 2. Sew carefully following design. 3. NOTE: Make reinforceMent straight stitch at beginning and ending stitches. Guide cord by hand to where you desire it. - 36 - Cording PATTERN SELECTOR STITCH LENGTH STITCH WIDTH NEEDLE POSITION SELECTOR PRESSER FOOT NEEDLE PRESSURE ADJUSTER : 2 : F- 2 In accordance with thickness of stitching. 4. Applique PATTERN SELECTOR STITCH LENGTH STITCH WIDTH NEEDLE...
Users Manual - English
Page 39
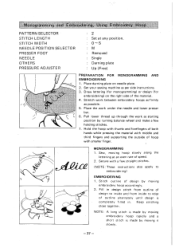
...0^'5 : M : Removed Single : Darning plate Up (Free) PREPARATION FOR MONOGRAMMING AND EMBROIDERING 1 Place darning plate on the right side of the material. 4. Monogramming and Embroidering, Using Embroidery Hoop PATTERN SELECTOR STITCH LENGTH STITCH WIDTH NEEDLE POSITION SELECTOR PRESSER FOOT NEEDLE OTHERS PRESSURE ADJUSTER : 2 Set at an even rate of hoop with smaller finger. Pull lower thread up through the work as starting position by moving embroidery hoop accordingly. 2. Place the work between embroidery hoops as firmly as per side instructions. 3. Set your sewing machine as...
...0^'5 : M : Removed Single : Darning plate Up (Free) PREPARATION FOR MONOGRAMMING AND EMBROIDERING 1 Place darning plate on the right side of the material. 4. Monogramming and Embroidering, Using Embroidery Hoop PATTERN SELECTOR STITCH LENGTH STITCH WIDTH NEEDLE POSITION SELECTOR PRESSER FOOT NEEDLE OTHERS PRESSURE ADJUSTER : 2 Set at an even rate of hoop with smaller finger. Pull lower thread up through the work as starting position by moving embroidery hoop accordingly. 2. Place the work between embroidery hoops as firmly as per side instructions. 3. Set your sewing machine as...
Users Manual - English
Page 43
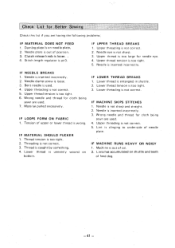
... 1. Thread tension is inserted incorrectly. 2. Wrong needle and thread for cloth being sewn are used. 7. Needle clamp screw is wrong. IF LOOPS FORM ON FABRIC 1. Tension of upper or lower thread is loose. 3. Lower thread is too tight. 3. Lower thread tension is entangled in shuttle. 2. Lint is out of needle plate. Needle plate is clinging to under-side of position. 3. IF MACHINE SKIPS STITCHES 1. Upper threading is too tight. 5. IF UPPER THREAD BREAKS 1. Upper thread tension is not correct. 5. Upper threading is out of feed dog. -41 - IF LOWER THREAD BREAKS...
... 1. Thread tension is inserted incorrectly. 2. Wrong needle and thread for cloth being sewn are used. 7. Needle clamp screw is wrong. IF LOOPS FORM ON FABRIC 1. Tension of upper or lower thread is loose. 3. Lower thread is too tight. 3. Lower thread tension is entangled in shuttle. 2. Lint is out of needle plate. Needle plate is clinging to under-side of position. 3. IF MACHINE SKIPS STITCHES 1. Upper threading is too tight. 5. IF UPPER THREAD BREAKS 1. Upper thread tension is not correct. 5. Upper threading is out of feed dog. -41 - IF LOWER THREAD BREAKS...
Users Manual - English
Page 45
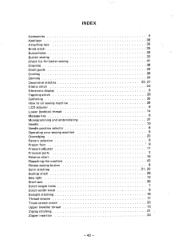
...Attaching lace Blind stitch Buttonholes Button sewing Check list for better sewing Cleaning Cloth guide Cording ' Darning Decorative stitches Elastic stitch Electronic display Fagoting stitch Gathering How to oil sewing machine LCD adjuster Lower (bobbin) thread Message key Monogramming and embroidering Needle Needle position selector Operating your sewing machine Over edgi ng Pattern selection Presser foot Pressure adjuster Principal parts Relative chart Repacking the machine Revese sewing button Satin stitching Scallop stitch Sew light Shell tack Stitch length knob Stitch width knob Straight...
...Attaching lace Blind stitch Buttonholes Button sewing Check list for better sewing Cleaning Cloth guide Cording ' Darning Decorative stitches Elastic stitch Electronic display Fagoting stitch Gathering How to oil sewing machine LCD adjuster Lower (bobbin) thread Message key Monogramming and embroidering Needle Needle position selector Operating your sewing machine Over edgi ng Pattern selection Presser foot Pressure adjuster Principal parts Relative chart Repacking the machine Revese sewing button Satin stitching Scallop stitch Sew light Shell tack Stitch length knob Stitch width knob Straight...


