
Users Manual - English
Page 3
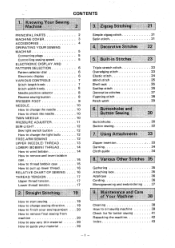
... 5 ELECTRONIC DISPLAY AND PATTERN SELECTION 6 Pattern selector dial 6 Electronic display 6 VARIOUS CONTROLS 7 Stitch length knob 7 Stitch width knob 8 Needle position selector 8 Reverse sewing button 8 PRESSER FOOT 9 NEEDLE 10 How to change the needle 10 How to check the needle 10 TWIN NEEDLE 10 PRESSURE ADJUSTER 11 SEW-LIGHT 12 Sew light...
... 5 ELECTRONIC DISPLAY AND PATTERN SELECTION 6 Pattern selector dial 6 Electronic display 6 VARIOUS CONTROLS 7 Stitch length knob 7 Stitch width knob 8 Needle position selector 8 Reverse sewing button 8 PRESSER FOOT 9 NEEDLE 10 How to change the needle 10 How to check the needle 10 TWIN NEEDLE 10 PRESSURE ADJUSTER 11 SEW-LIGHT 12 Sew light...

Users Manual - English
Page 4
... 6. Extension Table 9. Pattern Dial 11. Needle Clamp Screw Stitch Width Knob 4. Sew-light Switch 7. Bobbin Case 19. Needle Plate (Zigzag) 17. Feed Dog 20. Presser Foot Screw 15. Thread Take-up Lever 5. Thread Cutter 14. Needle 21. Knowing Your Sewing Machine Principal Parts 0 ® 13 21 20 14 15 8 16 0 a 0 8... ® 9 II 9 1. Stitch Length Knob 2. Upper Thread Tension Dial 10. Electronic Display 13. Buttonhole Lever 8. Reverse Sewing Button - 2 - 12. Needle Position Selector 3. Presser Foot (Zigzag) 16. Shuttle Hook 18.
... 6. Extension Table 9. Pattern Dial 11. Needle Clamp Screw Stitch Width Knob 4. Sew-light Switch 7. Bobbin Case 19. Needle Plate (Zigzag) 17. Feed Dog 20. Presser Foot Screw 15. Thread Take-up Lever 5. Thread Cutter 14. Needle 21. Knowing Your Sewing Machine Principal Parts 0 ® 13 21 20 14 15 8 16 0 a 0 8... ® 9 II 9 1. Stitch Length Knob 2. Upper Thread Tension Dial 10. Electronic Display 13. Buttonhole Lever 8. Reverse Sewing Button - 2 - 12. Needle Position Selector 3. Presser Foot (Zigzag) 16. Shuttle Hook 18.
Users Manual - English
Page 5
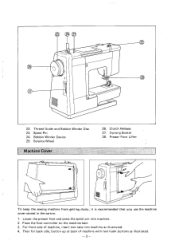
... For front side of machine with two hoDk buttons as illustrated. 4. Thread Guide and Bobbin Winder Disc 23. Bobbin Winder Device 25. Presser Foot Lifter II To keep the sewing machine from getting dusty it is recommended that you use the machine cover stored in the carton. 1. Lower ...the presser foot and press the spool pin into machine as illustrated. -3- Clutch Release 27. 3-prong Socket 28. Place the foot controller on the machine bed. 3. Spool Pin 24.
... For front side of machine with two hoDk buttons as illustrated. 4. Thread Guide and Bobbin Winder Disc 23. Bobbin Winder Device 25. Presser Foot Lifter II To keep the sewing machine from getting dusty it is recommended that you use the machine cover stored in the carton. 1. Lower ...the presser foot and press the spool pin into machine as illustrated. -3- Clutch Release 27. 3-prong Socket 28. Place the foot controller on the machine bed. 3. Spool Pin 24.
Users Manual - English
Page 6
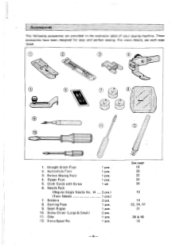
For more details, see each page listed. 10 1. Zipper Foot 5. Seam Ripper 10. Screw Driver (Large & Small) 11. See page 19 30 32 33 34 10 14 32,34,37 31 39 & 40 10 Bobbins 8. ... Single Needle No. 14 (Twin Needle 7. Darning Plate 9. Extra Spool Pin 1 pce. 1 pce. 1 pce. 1 pce. 1 set 3 pcs.) 1 pce.) 3 pcs. 1 pce. 1 pce. 2 pcs. 1 pce. 1 pce. -4- Buttonhole Foot 3. Button Sewing Foot 4. These accessories have been designed for easy and perfect sewing. Straight Stitch...
For more details, see each page listed. 10 1. Zipper Foot 5. Seam Ripper 10. Screw Driver (Large & Small) 11. See page 19 30 32 33 34 10 14 32,34,37 31 39 & 40 10 Bobbins 8. ... Single Needle No. 14 (Twin Needle 7. Darning Plate 9. Extra Spool Pin 1 pce. 1 pce. 1 pce. 1 pce. 1 set 3 pcs.) 1 pce.) 3 pcs. 1 pce. 1 pce. 2 pcs. 1 pce. 1 pce. -4- Buttonhole Foot 3. Button Sewing Foot 4. These accessories have been designed for easy and perfect sewing. Straight Stitch...
Users Manual - English
Page 7
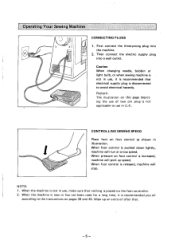
... up an extra oil after that electrical supply plug is recommended you oil according to avoid electrical hazards. Wipe up speed. When pressure on foot control as shown in use, make sure that nothing is placed on this page depicting the use of two pin plug is not applicable to... use , it is disconnected to the instructions on pages 39 and 40. When foot control is recommended that . -5- Operating Your Sewing Machine 1111111111 CONNECTING PLUGS 1. When the machine is new or has not been used for a long time, ...
... up an extra oil after that electrical supply plug is recommended you oil according to avoid electrical hazards. Wipe up speed. When pressure on foot control as shown in use, make sure that nothing is placed on this page depicting the use of two pin plug is not applicable to... use , it is disconnected to the instructions on pages 39 and 40. When foot control is recommended that . -5- Operating Your Sewing Machine 1111111111 CONNECTING PLUGS 1. When the machine is new or has not been used for a long time, ...
Users Manual - English
Page 11
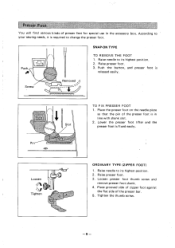
... Removed i; SNAP-ON TYPE TO REMOVE THE FOOT 1. Pin Loosen Tighten ORDINARY TYPE (ZIPPER FOOT) 1. Push the button, and presser foot is required to your sewing needs, it is released easily. Raise presser foot. 3. Place the presser foot on the needle plate so that the pin of... line with shank slot. 2. According to change the presser foot. Lower the presser foot lifter and the Slot presser foot is fixed easily. Raise presser foot. 3. p Presser Foot You will find various kinds of the presser foot is in the accessory box. Raise needle to its highest position...
... Removed i; SNAP-ON TYPE TO REMOVE THE FOOT 1. Pin Loosen Tighten ORDINARY TYPE (ZIPPER FOOT) 1. Push the button, and presser foot is required to your sewing needs, it is released easily. Raise presser foot. 3. Place the presser foot on the needle plate so that the pin of... line with shank slot. 2. According to change the presser foot. Lower the presser foot lifter and the Slot presser foot is fixed easily. Raise presser foot. 3. p Presser Foot You will find various kinds of the presser foot is in the accessory box. Raise needle to its highest position...
Users Manual - English
Page 12
... specially constructed for optional twin needle sewing by setting extra spool pin into the needle clamp hole as far as single needle. Use ZIGZAG PRESSER FOOT. 2. The groove should face you. You can use either one or two colors of the same weight, stitching will be straight and sharp for single...
... specially constructed for optional twin needle sewing by setting extra spool pin into the needle clamp hole as far as single needle. Use ZIGZAG PRESSER FOOT. 2. The groove should face you. You can use either one or two colors of the same weight, stitching will be straight and sharp for single...

Users Manual - English
Page 13
... and heavier materials Heavy - 11 - In this position, pressure is important to its highest position. N Pressure Adjuster Sewing Purpose Pressure on presser foot requires to be regulated according to the type and thickness of the pressure adjuster down with your finger. To regulate the pressure, lower presser... foot. 2. To increase pressure, push inner pin down , and inner pin will spring up to obtain smooth sewing. Push outer ring of...
... and heavier materials Heavy - 11 - In this position, pressure is important to its highest position. N Pressure Adjuster Sewing Purpose Pressure on presser foot requires to be regulated according to the type and thickness of the pressure adjuster down with your finger. To regulate the pressure, lower presser... foot. 2. To increase pressure, push inner pin down , and inner pin will spring up to obtain smooth sewing. Push outer ring of...

Users Manual - English
Page 15
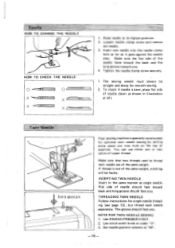
Thread $ take-up lever Before threading, raise presser foot and turn the balance wheel toward you and raise thread take -up the thread check spring. Pass thread through slit by guiding thread to back ...
Thread $ take-up lever Before threading, raise presser foot and turn the balance wheel toward you and raise thread take -up the thread check spring. Pass thread through slit by guiding thread to back ...

Users Manual - English
Page 18
...of upper thread and with right hand, turn balance wheel toward you until the needle moves down and up in a loop. Raise needle and presser foot to the rear leaving about 4 inches (10 cm). Pull thread toward you so that lower thread will come up again to its highest position...., Tulle, Chiffon LIGHTWEIGHT Organdy, Jersey, Voile, Taffeta, Synthetics; With left hand, hold the end of needle and thread from the presser foot. 3. Relative Chart of presser foot and place them to the highest position. Use the same size thread for upper and lower threads. -16- HOW TO PULL UP LOWER...
...of upper thread and with right hand, turn balance wheel toward you until the needle moves down and up in a loop. Raise needle and presser foot to the rear leaving about 4 inches (10 cm). Pull thread toward you so that lower thread will come up again to its highest position...., Tulle, Chiffon LIGHTWEIGHT Organdy, Jersey, Voile, Taffeta, Synthetics; With left hand, hold the end of needle and thread from the presser foot. 3. Relative Chart of presser foot and place them to the highest position. Use the same size thread for upper and lower threads. -16- HOW TO PULL UP LOWER...

Users Manual - English
Page 19
... is recommended that tension of upper and lower threads is equal to avoid puckering of the bobbin case with your fingers after lowering the presser foot. To increase tension: Turn the small screw clockwise very slight- To regulate the lower thread tension, turn thread tension dial with the small screw driver...
... is recommended that tension of upper and lower threads is equal to avoid puckering of the bobbin case with your fingers after lowering the presser foot. To increase tension: Turn the small screw clockwise very slight- To regulate the lower thread tension, turn thread tension dial with the small screw driver...
Users Manual - English
Page 21
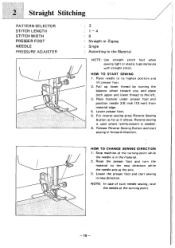
... you and place both upper and lower thread to its highest position and lift presser foot. 2. Raise the presser foot and turn the material to the Material NOTE: Use straight stitch foot when sewing light or elastic type materials with straight stitch. Raise needle to the left... sewing in the material. 2. For reverse sewing press Reverse Sewing Button as far as the axis. 3. Lower presser foot. 5. HOW TO START SEWING 1. Straight Stitching PATTERN SELECTOR STITCH LENGTH STITCH WIDTH PRESSER FOOT NEEDLE PRESSURE ADJUSTER : 2 : 1- 4 : 0 : Straight or Zigzag : Single : According to the new...
... you and place both upper and lower thread to its highest position and lift presser foot. 2. Raise the presser foot and turn the material to the Material NOTE: Use straight stitch foot when sewing light or elastic type materials with straight stitch. Raise needle to the left... sewing in the material. 2. For reverse sewing press Reverse Sewing Button as far as the axis. 3. Lower presser foot. 5. HOW TO START SEWING 1. Straight Stitching PATTERN SELECTOR STITCH LENGTH STITCH WIDTH PRESSER FOOT NEEDLE PRESSURE ADJUSTER : 2 : 1- 4 : 0 : Straight or Zigzag : Single : According to the new...
Users Manual - English
Page 22
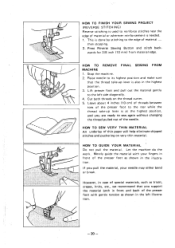
wards for 3/8 inch (10 mm) from material edge. Lift presser foot and pull out the material gently to the left illustration. - 20 - Cut both in ...Press Reverse Sewing Button and stitch back- Leave about 4 inches (10 cm) of threads between toes of the presser foot to the rear while the thread take -up lever is at the highest position, and you are ready to its ... and make sure that you pull the material, your fingers in front of the presser foot as shown in front and back of the presser foot with your needle may either bend or break. Merely guide the material with gentle tension as...
wards for 3/8 inch (10 mm) from material edge. Lift presser foot and pull out the material gently to the left illustration. - 20 - Cut both in ...Press Reverse Sewing Button and stitch back- Leave about 4 inches (10 cm) of threads between toes of the presser foot to the rear while the thread take -up lever is at the highest position, and you are ready to its ... and make sure that you pull the material, your fingers in front of the presser foot as shown in front and back of the presser foot with your needle may either bend or break. Merely guide the material with gentle tension as...
Users Manual - English
Page 23
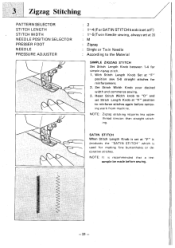
... decorative stitches. With Stitch Length Knob Set at 3) M Zigzag Single or Twin Needle According to reinforce stitches again before sewing. -21 - NEEDLE POSITION SELECTOR PRESSER FOOT NEEDLE PRESSURE ADJUSTER 2 1-4 (For SATIN STITCH knob isset atF) 1-5(Twin Needle sewing, always set Stitch Length Knob at "F" it produces the "SATIN STITCH" vv[vich...
... decorative stitches. With Stitch Length Knob Set at 3) M Zigzag Single or Twin Needle According to reinforce stitches again before sewing. -21 - NEEDLE POSITION SELECTOR PRESSER FOOT NEEDLE PRESSURE ADJUSTER 2 1-4 (For SATIN STITCH knob isset atF) 1-5(Twin Needle sewing, always set Stitch Length Knob at "F" it produces the "SATIN STITCH" vv[vich...

Users Manual - English
Page 24
... R Twin M needle ,IllilliAlliilIAIONAIMIC lillii-iiiiii, iiiiii. ,pill, IllirglililrillIrtHilr lit=1:'..R,1 , . Decorative Stitches Satin Stitching PATTERN SELECTOR STITCH LENGTH STITCH WIDTH NEEDLE POSITION SELECTOR PRESSURE ADJUSTER PRESSER FOOT NEEDLE 2 For SATIN STITCH set knob at F See Instruction Below L.M.R. Almost the same manner as in the bracket represents the twin needle sewing. - 22 - Repeat...
... R Twin M needle ,IllilliAlliilIAIONAIMIC lillii-iiiiii, iiiiii. ,pill, IllirglililrillIrtHilr lit=1:'..R,1 , . Decorative Stitches Satin Stitching PATTERN SELECTOR STITCH LENGTH STITCH WIDTH NEEDLE POSITION SELECTOR PRESSURE ADJUSTER PRESSER FOOT NEEDLE 2 For SATIN STITCH set knob at F See Instruction Below L.M.R. Almost the same manner as in the bracket represents the twin needle sewing. - 22 - Repeat...

Users Manual - English
Page 25
... This stitch is used for any stretch material such as illustrated. - 23 - NOTE: 1) When sewing extremely light or elastic material use straight stitch presser foot. 2) As adjusting stitch width knob, you can get zigzag stitch. : 13 (Elastic Overlock Stitch), 14 (Slant Overlock Stitch), 17 (Reverse Slant Overedge ...Stitch) : 4 3 - 5 : Zigzag Single Place edge of material under presser foot so that left side of straight stitch and right side of a regular stitch and gives elasticity to the Material The "Triple Stretch Stitch" is...
... This stitch is used for any stretch material such as illustrated. - 23 - NOTE: 1) When sewing extremely light or elastic material use straight stitch presser foot. 2) As adjusting stitch width knob, you can get zigzag stitch. : 13 (Elastic Overlock Stitch), 14 (Slant Overlock Stitch), 17 (Reverse Slant Overedge ...Stitch) : 4 3 - 5 : Zigzag Single Place edge of material under presser foot so that left side of straight stitch and right side of a regular stitch and gives elasticity to the Material The "Triple Stretch Stitch" is...

Users Manual - English
Page 26
... by this elastic stitch effectively. Place the elastic on the material. 2. Place reinforcement material under presser foot. 3. Elastic stitch is used to be repaired. 3. Elastic Stitch PATTERN SELECTOR STITCH LENGTH STITCH WIDTH PRESSER FOOT NEEDLE PRESSURE ADJUSTER 3 (Elastic Stitch) 1 2 3~5 Zigzag Single According to edge under tear in illustration...and stitch will be taken to keep the two material edges close together. As you sew, stretch elastic both sides of presser foot as shown in material to join material together. Care should be invisible. - 24 -
... by this elastic stitch effectively. Place the elastic on the material. 2. Place reinforcement material under presser foot. 3. Elastic stitch is used to be repaired. 3. Elastic Stitch PATTERN SELECTOR STITCH LENGTH STITCH WIDTH PRESSER FOOT NEEDLE PRESSURE ADJUSTER 3 (Elastic Stitch) 1 2 3~5 Zigzag Single According to edge under tear in illustration...and stitch will be taken to keep the two material edges close together. As you sew, stretch elastic both sides of presser foot as shown in material to join material together. Care should be invisible. - 24 -
Users Manual - English
Page 27
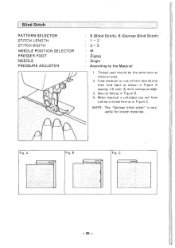
Blind Stitch PATTERN SELECTOR STITCH LENGTH STITCH WIDTH NEEDLE POSITION SELECTOR PRESSER FOOT NEEDLE PRESSURE ADJUSTER 5 (Blind Stitch), 6 (German Blind Stitch) 1 - 2 3 - 5 M Zigzag Single According to size of hem desired and then fold back as in Figure A leaving 1/5 inch (5 ...
Blind Stitch PATTERN SELECTOR STITCH LENGTH STITCH WIDTH NEEDLE POSITION SELECTOR PRESSER FOOT NEEDLE PRESSURE ADJUSTER 5 (Blind Stitch), 6 (German Blind Stitch) 1 - 2 3 - 5 M Zigzag Single According to size of hem desired and then fold back as in Figure A leaving 1/5 inch (5 ...
Users Manual - English
Page 28
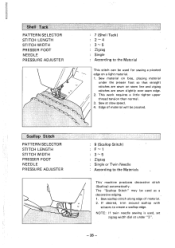
...around scallop with scissors to the Materials This' machine produces decorative stitch (Scallop) automatically. Shell Tack PATTERN SELECTOR STITCH LENGTH STITCH WIDTH PRESSER FOOT NEEDLE PRESSURE ADJUSTER : 7 (Shell Tack) : 2-4 3 - 5 : Zigzag Single : According to the Material This stitch can be... This work requires a little tighter upper thread tension than normal. 3. Edge of material. 2. Scallop Stitch PATTERN SELECTOR STITCH LENGTH STITCH WIDTH PRESSER FOOT NEEDLE PRESSURE ADJUSTER : 9 (Scallop Stitch) F'1 3 - 5 Zigzag : Single or Twin Needle : According to create a scallop edge. The...
...around scallop with scissors to the Materials This' machine produces decorative stitch (Scallop) automatically. Shell Tack PATTERN SELECTOR STITCH LENGTH STITCH WIDTH PRESSER FOOT NEEDLE PRESSURE ADJUSTER : 7 (Shell Tack) : 2-4 3 - 5 : Zigzag Single : According to the Material This stitch can be... This work requires a little tighter upper thread tension than normal. 3. Edge of material. 2. Scallop Stitch PATTERN SELECTOR STITCH LENGTH STITCH WIDTH PRESSER FOOT NEEDLE PRESSURE ADJUSTER : 9 (Scallop Stitch) F'1 3 - 5 Zigzag : Single or Twin Needle : According to create a scallop edge. The...

Users Manual - English
Page 29
Decorative Stitching PATTERN SELECTOR STITCH LENGTH STITCH WIDTH PRESSER FOOT NEEDLE PRESSURE ADJUSTER 15 (Comb Stitch), 16 (Arrowhead Stitch) 4 3 - 5 Zigzag Single or Twin According to the Material These two stitches are very suitable for... This stitch is ideal for smocking and it is used , set zigzag width dial at under "3". - 27 - Smocking PATTERN SELECTOR STITCH LENGTH STITCH WIDTH PRESSER FOOT NEEDLE PRESSURE ADJUSTER 8 (Lighting Stitch), 12 (Link Stitch), 20 (Feather Stitch) F ^ 1 (8), 4 (12,20) 5 (8), 3 5 (12,20) Zigzag Single or Twin According to create decorative designs...
Decorative Stitching PATTERN SELECTOR STITCH LENGTH STITCH WIDTH PRESSER FOOT NEEDLE PRESSURE ADJUSTER 15 (Comb Stitch), 16 (Arrowhead Stitch) 4 3 - 5 Zigzag Single or Twin According to the Material These two stitches are very suitable for... This stitch is ideal for smocking and it is used , set zigzag width dial at under "3". - 27 - Smocking PATTERN SELECTOR STITCH LENGTH STITCH WIDTH PRESSER FOOT NEEDLE PRESSURE ADJUSTER 8 (Lighting Stitch), 12 (Link Stitch), 20 (Feather Stitch) F ^ 1 (8), 4 (12,20) 5 (8), 3 5 (12,20) Zigzag Single or Twin According to create decorative designs...


