
Users Manual - English
Page 1
how to use and enjoy your ELECTRONIC Sewing Machine I
how to use and enjoy your ELECTRONIC Sewing Machine I
Users Manual - English
Page 2
Iff ,a ,rarmArs,mrarrmwm-,mirr.ararm,armararrrirArardir.ararsmIrma-mms,.u.uarAruml FOR INFORMATION OF THE FEATURES OF THIS SWING MACHINE,CALL TOLL FREE AT 1-800-284-HELP. IIMIIMJMMAr.I.IIMM.I.1,1 I'•MAII,Ari IIIIIrArIM AIMAIII.I.M.1.1.1111V.WIIVIIMJN,I,IMIIM.IJITIMNAVIIIM Ili ili 4 CAUTION Z 4 4 k4i WHEN CHANGING NEEDLE, BOBBIN OR LIGHT BULB, OR WHEN SEWING §4 MACHINE IS NOT IN USE, IT IS RECOMMENDED, THAT ELECTRICAL SUPPLY PLUG IS DISCONNECTED TO AVOID ELECTRICAL HAZARDS.
Iff ,a ,rarmArs,mrarrmwm-,mirr.ararm,armararrrirArardir.ararsmIrma-mms,.u.uarAruml FOR INFORMATION OF THE FEATURES OF THIS SWING MACHINE,CALL TOLL FREE AT 1-800-284-HELP. IIMIIMJMMAr.I.IIMM.I.1,1 I'•MAII,Ari IIIIIrArIM AIMAIII.I.M.1.1.1111V.WIIVIIMJN,I,IMIIM.IJITIMNAVIIIM Ili ili 4 CAUTION Z 4 4 k4i WHEN CHANGING NEEDLE, BOBBIN OR LIGHT BULB, OR WHEN SEWING §4 MACHINE IS NOT IN USE, IT IS RECOMMENDED, THAT ELECTRICAL SUPPLY PLUG IS DISCONNECTED TO AVOID ELECTRICAL HAZARDS.
Users Manual - English
Page 3
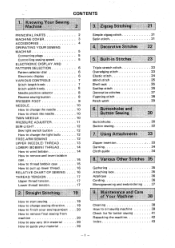
... 8. Various Other Stitches 35 Gathering 35 Attaching lace 35 Applique 36 Cording 36 Monogramming and embroidering , . 37 9. Zigzag Stitching 21 PRINCIPAL PARTS 2 MACHINE COVER 3 ACCESSORIES 4 OPERATING YOUR SEWING MACHINE 5 Connecting plugs 5 Controlling sewing speed 5 ELECTRONIC DISPLAY AND PATTERN SELECTION 6 Pattern selector dial 6 Electronic display 6 VARIOUS CONTROLS 7 Stitch length knob 7 Stitch width knob 8 Needle position...
... 8. Various Other Stitches 35 Gathering 35 Attaching lace 35 Applique 36 Cording 36 Monogramming and embroidering , . 37 9. Zigzag Stitching 21 PRINCIPAL PARTS 2 MACHINE COVER 3 ACCESSORIES 4 OPERATING YOUR SEWING MACHINE 5 Connecting plugs 5 Controlling sewing speed 5 ELECTRONIC DISPLAY AND PATTERN SELECTION 6 Pattern selector dial 6 Electronic display 6 VARIOUS CONTROLS 7 Stitch length knob 7 Stitch width knob 8 Needle position...

Users Manual - English
Page 4
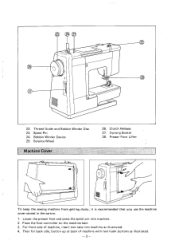
.... Needle Clamp Screw Extension Table 9. Electronic Display 13. Bobbin Case 19. Feed Dog 20. Needle Position Selector 3. Shuttle Hook 18. Knowing Your Sewing Machine Principal Parts 0 ® 13 21 20 14 15 8 16 0 a 0 8 ® 9 II 9 1. Presser Foot Screw 15. Sew-light Switch 7. Buttonhole Lever 8. Stitch Width Knob 4. Stitch Length Knob 2. Thread Cutter 14.
.... Needle Clamp Screw Extension Table 9. Electronic Display 13. Bobbin Case 19. Feed Dog 20. Needle Position Selector 3. Shuttle Hook 18. Knowing Your Sewing Machine Principal Parts 0 ® 13 21 20 14 15 8 16 0 a 0 8 ® 9 II 9 1. Presser Foot Screw 15. Sew-light Switch 7. Buttonhole Lever 8. Stitch Width Knob 4. Stitch Length Knob 2. Thread Cutter 14.
Users Manual - English
Page 5
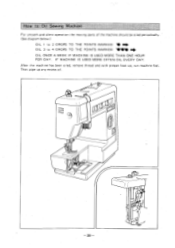
...keep the sewing machine from getting dusty it is recommended that you use the machine cover stored in the carton. 1. Then for back side, button up at back of machine, insert two tabs into machine. 2. Clutch Release 27. 3-prong Socket 28. Place the foot controller on the machine bed. 3.... Bobbin Winder Device 25. Lower the presser foot and press the spool pin into machine as illustrated. -3- For front side of machine with two hoDk buttons as illustrated. 4. Balance Wheel Machine Cover 26. Spool Pin 24. g a 23 ...
...keep the sewing machine from getting dusty it is recommended that you use the machine cover stored in the carton. 1. Then for back side, button up at back of machine, insert two tabs into machine. 2. Clutch Release 27. 3-prong Socket 28. Place the foot controller on the machine bed. 3.... Bobbin Winder Device 25. Lower the presser foot and press the spool pin into machine as illustrated. -3- For front side of machine with two hoDk buttons as illustrated. 4. Balance Wheel Machine Cover 26. Spool Pin 24. g a 23 ...
Users Manual - English
Page 6
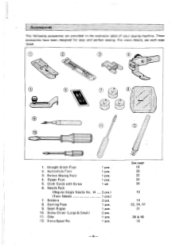
... with Screw 6. Darning Plate 9. Accessories The following accessories are provided in the extension table of your sewing machine. These accessories have been designed for easy and perfect sewing. For more details, see each page listed. 10 1. Button Sewing Foot 4. Zipper Foot 5. Extra Spool Pin 1 pce. 1 pce. 1 pce. 1 pce. 1 set 3 pcs.) 1 pce.) 3 pcs. 1 pce. 1 pce...
... with Screw 6. Darning Plate 9. Accessories The following accessories are provided in the extension table of your sewing machine. These accessories have been designed for easy and perfect sewing. For more details, see each page listed. 10 1. Button Sewing Foot 4. Zipper Foot 5. Extra Spool Pin 1 pce. 1 pce. 1 pce. 1 pce. 1 set 3 pcs.) 1 pce.) 3 pcs. 1 pce. 1 pce...
Users Manual - English
Page 7
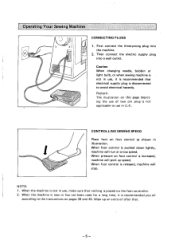
...PLUGS 1. Then connect the electric supply plug into the machine. 2. Caution When changing needle, bobbin or light bulb, or when sewing machine is not in use, it is recommended you oil according to the instructions on foot control is increased, machine will pick up an extra oil after that electrical supply... plug is recommended that . -5- When pressure on pages 39 and 40. When the machine is new or...
...PLUGS 1. Then connect the electric supply plug into the machine. 2. Caution When changing needle, bobbin or light bulb, or when sewing machine is not in use, it is recommended you oil according to the instructions on foot control is increased, machine will pick up an extra oil after that electrical supply... plug is recommended that . -5- When pressure on pages 39 and 40. When the machine is new or...
Users Manual - English
Page 8
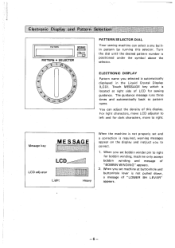
... selector. Message key MESSAGE LCD adjuster Light Heavy When the machine is not properly set bobbin winder pin to left and for sewing guidance. Electronic Display and Pattern Selection PATTERN MESSAGE li II LCQp PATTERN • SELECTOR 2. 1 2/ 0 LL PATTERN SELECTOR DIAL Your sewing machine can adjust the density of this selector. For light characters...
... selector. Message key MESSAGE LCD adjuster Light Heavy When the machine is not properly set bobbin winder pin to left and for sewing guidance. Electronic Display and Pattern Selection PATTERN MESSAGE li II LCQp PATTERN • SELECTOR 2. 1 2/ 0 LL PATTERN SELECTOR DIAL Your sewing machine can adjust the density of this selector. For light characters...
Users Manual - English
Page 9
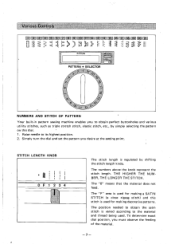
Various Controls 1,2,4 .104 112,1 14 .15 064 O81PEI 2111 PATTERN MESSAGE LCp.,:,2 I ll PATTERN • SELECTOR 2 1 2/ 0 I -
Various Controls 1,2,4 .104 112,1 14 .15 064 O81PEI 2111 PATTERN MESSAGE LCp.,:,2 I ll PATTERN • SELECTOR 2 1 2/ 0 I -
Users Manual - English
Page 12
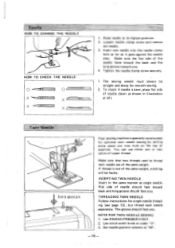
...page 13), but thread each needle separately. NOTE FOR TWIN NEEDLE SEWING 1. Use ZIGZAG PRESSER FOOT. 2. Twin Needle /L Extra spool pin Your sewing machine is not of the same weight, stitching will be straight and sharp for smooth sewing. 2. Use stitch width knob at "M". -10- Set needle ...position selector at under "3". 3. Make sure the flat side of machine. Loosen needle clamp screw and remove...
...page 13), but thread each needle separately. NOTE FOR TWIN NEEDLE SEWING 1. Use ZIGZAG PRESSER FOOT. 2. Twin Needle /L Extra spool pin Your sewing machine is not of the same weight, stitching will be straight and sharp for smooth sewing. 2. Use stitch width knob at "M". -10- Set needle ...position selector at under "3". 3. Make sure the flat side of machine. Loosen needle clamp screw and remove...
Users Manual - English
Page 14
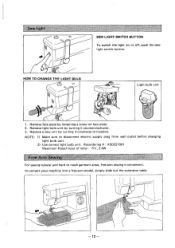
... a screw on or off, push the sewlight switch button. Remove light bulb unit by turning it counterclockwise. 3. To convert your machine into a free-arm model, simply slide out the extension table. Sew-light SEW LIGHT SWITCH BUTTON To switch the light on face plate. 2. i 1 1 Light bulb unit ---------- NOTE: 1) Make sure to location. al... supply plug from wall outlet before changing light bulb unit. 2) Use correct light bulb unit. Recordering # : X50227001 Maximum Rated input of lamp : 8 V, 2.4W Free-Arm Sewing For sewing tubular and hard to reach garment areas, free-arm...
... a screw on or off, push the sewlight switch button. Remove light bulb unit by turning it counterclockwise. 3. To convert your machine into a free-arm model, simply slide out the extension table. Sew-light SEW LIGHT SWITCH BUTTON To switch the light on face plate. 2. i 1 1 Light bulb unit ---------- NOTE: 1) Make sure to location. al... supply plug from wall outlet before changing light bulb unit. 2) Use correct light bulb unit. Recordering # : X50227001 Maximum Rated input of lamp : 8 V, 2.4W Free-Arm Sewing For sewing tubular and hard to reach garment areas, free-arm...
Users Manual - English
Page 17
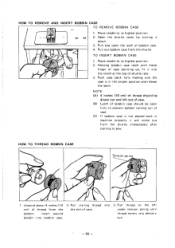
... the top of thread from the shuttle. after starting to prevent bobbin coming out of case. (C) If bobbin case is in machine properly it down. 3. Pull 'and open fully to sew. NOTE: (A) 4 inches (10 cm) of thread should be drawn out and left under tension spring until thread enters into bobbin case...
... the top of thread from the shuttle. after starting to prevent bobbin coming out of case. (C) If bobbin case is in machine properly it down. 3. Pull 'and open fully to sew. NOTE: (A) 4 inches (10 cm) of thread should be drawn out and left under tension spring until thread enters into bobbin case...
Users Manual - English
Page 21
...mm) from material edge. 4. Reverse sewing is used where reinforcement is in new direction. Raise the presser foot and turn the material to the left. 3. Lower presser foot. 5. Release Reverse Sewing Button and start sewing in the material. 2. Stop machine at the turning point. -19- ...HOW TO CHANGE SEWING DIRECTION 1. NOTE: In case of twin needle sewing, raise the needle at the turning point while the needle is...
...mm) from material edge. 4. Reverse sewing is used where reinforcement is in new direction. Raise the presser foot and turn the material to the left. 3. Lower presser foot. 5. Release Reverse Sewing Button and start sewing in the material. 2. Stop machine at the turning point. -19- ...HOW TO CHANGE SEWING DIRECTION 1. NOTE: In case of twin needle sewing, raise the needle at the turning point while the needle is...
Users Manual - English
Page 22
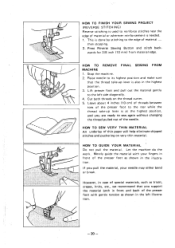
... recommend that the thread take -up lever is also in the illustration. However, in the left side diagonally. 4. Press Reverse Sewing Button and stitch back- Let the machine do the work. Raise needle to the rear while the thread take -up lever is at the highest position, and you pull...presser foot to its highest position and make sure that you support the material both threads on very thin material. HOW TO REMOVE FINAL SEWING FROM MACHINE 1. HOW TO GUIDE YOUR MATERIAL Do not pull the material. Lift presser foot and pull out the material gently to reinforce stitches ...
... recommend that the thread take -up lever is also in the illustration. However, in the left side diagonally. 4. Press Reverse Sewing Button and stitch back- Let the machine do the work. Raise needle to the rear while the thread take -up lever is at the highest position, and you pull...presser foot to its highest position and make sure that you support the material both threads on very thin material. HOW TO REMOVE FINAL SEWING FROM MACHINE 1. HOW TO GUIDE YOUR MATERIAL Do not pull the material. Lift presser foot and pull out the material gently to reinforce stitches ...
Users Manual - English
Page 23
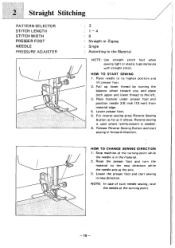
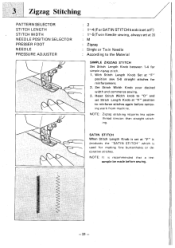
...FOOT NEEDLE PRESSURE ADJUSTER 2 1-4 (For SATIN STITCH knob isset atF) 1-5(Twin Needle sewing, always set at "F" position sew 5-6 straight stitches for making fine buttonholes or decorative stitches. NOTE: Zigzag stitching requires ...Set at 3) M Zigzag Single or Twin Needle According to reinforce stitches again before sewing. -21 - Set Stitch Width Knob your desired width and commence sewing. 3. Reset Stitch Width knob to "O" and set at "F" position to the Material...is recommended that a test sample be made before removing work from machine. NOTE: It is used for reinforcement. 2.
...FOOT NEEDLE PRESSURE ADJUSTER 2 1-4 (For SATIN STITCH knob isset atF) 1-5(Twin Needle sewing, always set at "F" position sew 5-6 straight stitches for making fine buttonholes or decorative stitches. NOTE: Zigzag stitching requires ...Set at 3) M Zigzag Single or Twin Needle According to reinforce stitches again before sewing. -21 - Set Stitch Width Knob your desired width and commence sewing. 3. Reset Stitch Width knob to "O" and set at "F" position to the Material...is recommended that a test sample be made before removing work from machine. NOTE: It is used for reinforcement. 2.
Users Manual - English
Page 36
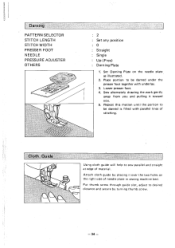
... thumb screw. - 34 - Put thumb screw through guide slot, adjust to be darned under the presser foot together with parallel lines of needle plate in sewing machine bed. Cloth Guide Using cloth guide will help to be darned is filled with underlay. 3. Darning PATTERN SELECTOR STITCH LENGTH STITCH WIDTH PRESSER FOOT NEEDLE...
... thumb screw. - 34 - Put thumb screw through guide slot, adjust to be darned under the presser foot together with parallel lines of needle plate in sewing machine bed. Cloth Guide Using cloth guide will help to be darned is filled with underlay. 3. Darning PATTERN SELECTOR STITCH LENGTH STITCH WIDTH PRESSER FOOT NEEDLE...
Users Manual - English
Page 39
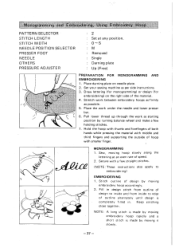
... needle and lower presser bar. 6. S. Hold the hoop with thumb and forefingers of both hands while pressing the material with a few holding stitches. 7. Set your sewing machine as per side instructions. 3. Stitch outline of design by turning balance wheel and make a few straight stitches. (NOTE: These instructions also apply to edge of...
... needle and lower presser bar. 6. S. Hold the hoop with thumb and forefingers of both hands while pressing the material with a few holding stitches. 7. Set your sewing machine as per side instructions. 3. Stitch outline of design by turning balance wheel and make a few straight stitches. (NOTE: These instructions also apply to edge of...
Users Manual - English
Page 41
After the machine has been oiled, remove thread and with presser foot up any excess oil. Then wipe up , run machine fast. IF MACHINE IS USED MORE OFTEN OIL EVERY DAY. w to Oil Sewing Machine For smooth and silent operation the moving parts of the machine should be oiled periodically. (See diagram below.) OIL 1 to 2 DROPS TO THE POINTS MARKED OIL 3 to 4 DROPS TO THE POINTS MARKED *WO OIL ONCE A WEEK IF MACHINE IS USED MORE THAN ONE HOUR PER DAY. O ( or - 39 -
After the machine has been oiled, remove thread and with presser foot up any excess oil. Then wipe up , run machine fast. IF MACHINE IS USED MORE OFTEN OIL EVERY DAY. w to Oil Sewing Machine For smooth and silent operation the moving parts of the machine should be oiled periodically. (See diagram below.) OIL 1 to 2 DROPS TO THE POINTS MARKED OIL 3 to 4 DROPS TO THE POINTS MARKED *WO OIL ONCE A WEEK IF MACHINE IS USED MORE THAN ONE HOUR PER DAY. O ( or - 39 -
Users Manual - English
Page 44
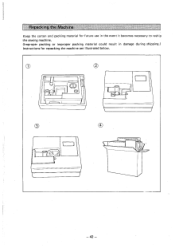
C.) 03 0 - 42 - ir Repacking the Machine Keep the carton and packing material for future use in the event it becomes necessary to reship the sewing machine. (Improper packing or improper packing material could result in damage during shipping.) Instructions for repacking the machine are illustrated below.
C.) 03 0 - 42 - ir Repacking the Machine Keep the carton and packing material for future use in the event it becomes necessary to reship the sewing machine. (Improper packing or improper packing material could result in damage during shipping.) Instructions for repacking the machine are illustrated below.
Users Manual - English
Page 45
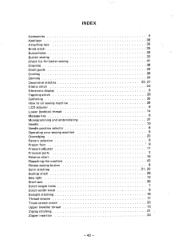
... Lower (bobbin) thread Message key Monogramming and embroidering Needle Needle position selector Operating your sewing machine Over edgi ng Pattern selection Presser foot Pressure adjuster Principal parts Relative chart Repacking the machine Revese sewing button Satin stitching Scallop stitch Sew light Shell tack Stitch length knob Stitch width knob Straight stitching Thread tension Triple stretch...
... Lower (bobbin) thread Message key Monogramming and embroidering Needle Needle position selector Operating your sewing machine Over edgi ng Pattern selection Presser foot Pressure adjuster Principal parts Relative chart Repacking the machine Revese sewing button Satin stitching Scallop stitch Sew light Shell tack Stitch length knob Stitch width knob Straight stitching Thread tension Triple stretch...


