
Brother International VX-940 Support Question
Brother International VX-940 Support Question
Find answers below for this question about Brother International VX-940.Need a Brother International VX-940 manual? We have 1 online manual for this item!
Question posted by lionsroar on February 12th, 2016
Age Of Machine
what were the production years for the VX-940
Current Answers
Answer #1: Posted by BusterDoogen on February 12th, 2016 8:28 PM
BusterDoogen

Member since:
October 30th, 2011 Points: 28,565,447

Member since:
October 30th, 2011 Points: 28,565,447
Go here on how to determine the manufacture date.
I hope this is helpful to you!
Please respond to my effort to provide you with the best possible solution by using the "Acceptable Solution" and/or the "Helpful" buttons when the answer has proven to be helpful. Please feel free to submit further info for your question, if a solution was not provided. I appreciate the opportunity to serve you!
Related Brother International VX-940 Manual Pages
Users Manual - English - Page 1
how to use and enjoy your
ELECTRONIC
Sewing Machine
I
Users Manual - English - Page 2
...,.u.uarAruml
FOR INFORMATION OF THE FEATURES OF THIS SWING MACHINE,CALL TOLL FREE AT 1-800-284-HELP. IIMIIMJMMAr.I.IIMM.I.1,1 I'•MAII,Ari IIIIIrArIM AIMAIII.I.M.1.1.1111V.WIIVIIMJN,I,IMIIM.IJITIMNAVIIIM
Ili
ili
4
CAUTION
Z 4
4
k4i WHEN CHANGING NEEDLE, BOBBIN OR LIGHT BULB, OR WHEN SEWING §4
MACHINE IS NOT IN USE, IT IS RECOMMENDED, THAT ELECTRICAL...
Users Manual - English - Page 3
... 26 27 28 29
30
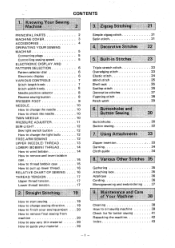
Buttonholes Button sewing
7. Maintenance and Care
of Your Machine
38
Cleaning
38
How to guide your sewing project . . 20
How to remove final sewing from
machine
20
How to sew very thin material
20
How to oil sewing machine
39
Check list for better sewing
41
Repacking the machine
42
Index
43
- 1 - Various Other Stitches...
Users Manual - English - Page 4

...
- 2 -
12. Presser Foot (Zigzag) 16. Shuttle Hook 18. Knowing Your Sewing Machine
Principal Parts
0 ®
13
21
20
14
15
8
16
0
a
0
8
®
9 II
9
1. Pressure Adjuster 6. Feed ...Screw Extension Table 9. Bobbin Case 19. Pattern Dial 11. Presser Foot Screw 15. Needle Position Selector 3. Sew-light Switch 7. Stitch Length Knob 2. Thread Cutter 14.
Users Manual - English - Page 5
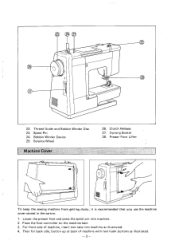
... for back side, button up at back of machine, insert two tabs into machine. 2. Lower the presser foot and press the spool pin into machine as illustrated.
-3- Thread Guide and Bobbin Winder Disc 23. Spool Pin 24. Presser Foot Lifter
II
To keep the sewing machine from getting dusty it is recommended that you use...
Users Manual - English - Page 6
...) 11. Oiler 12.
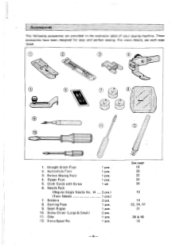
Accessories
The following accessories are provided in the extension table of your sewing machine. Buttonhole Foot 3. These accessories have been designed for easy and perfect sewing. For more details, see each page listed.
10
1. Button Sewing Foot 4. Needle Pack
(Regular Single Needle No. 14 (Twin Needle 7. See page 19 30 32...
Users Manual - English - Page 7
... pressure on the foot controller. 2.
NOTE: 1. Wipe up speed. Operating Your Sewing Machine
1111111111
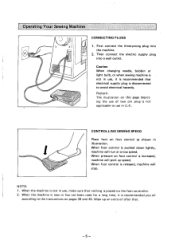
CONNECTING PLUGS
1. Then connect the electric supply plug into the machine.
2.
Caution When changing needle, bobbin or light bulb, or when sewing machine is not in use in illustration. CONTROLLING SEWING SPEED
Place foot on pages 39 and 40. When foot control...
Users Manual - English - Page 8
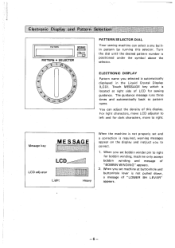
... pattern by turning this display. Message key
MESSAGE
LCD adjuster Light
Heavy
When the machine is not properly set and a correction is required, warning messages appear on the display...
PATTERN
MESSAGE
li II
LCQp
PATTERN • SELECTOR 2. 1 2/ 0
LL
PATTERN SELECTOR DIAL
Your sewing machine can adjust the density of "LOWER BH LEVER" appears.
-6- Touch MESSAGE key which is not pulled...
Users Manual - English - Page 9
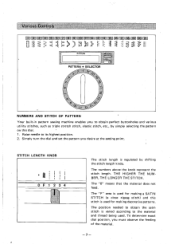
I - Various Controls
1,2,4
.104 112,1 14 .15 064 O81PEI 2111
PATTERN
MESSAGE
LCp.,:,2 I ll
PATTERN • SELECTOR
2 1 2/ 0
Users Manual - English - Page 12
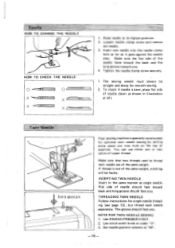
... sure the flat side of the same weight, stitching will be straight and sharp for smooth sewing.
2. Twin Needle
/L Extra spool pin
Your sewing machine is not of the needle faces toward the back and the long groove toward back and long groove should face you. Use ZIGZAG PRESSER FOOT. 2. ...
Users Manual - English - Page 14
... : X50227001
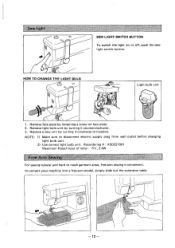
Maximum Rated input of lamp : 8 V, 2.4W
Free-Arm Sewing
For sewing tubular and hard to location. To convert your machine into a free-arm model, simply slide out the extension table.
HOW TO...unit by loosening a screw on or off, push the sewlight switch button. al
-12- Sew-light
SEW LIGHT SWITCH BUTTON
To switch the light on face plate. 2.
Remove face plate by turning it ...
Users Manual - English - Page 17
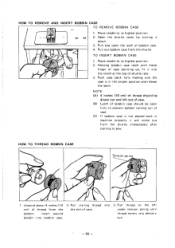
...4 incheS (10 cm) of bobbin case. 4. Pull thread to prevent bobbin coming out of case. (C) If bobbin case is in machine properly it
down. 3. HOW TO REMOVE AND INSERT BOBBIN CASE TO REMOVE BOBBIN CASE
1. NOTE: (A) 4 inches (10 cm) of...cover by turning it will come out from the shuttle immediately . Raise needle to sew. after starting to its highest position. 2. TO INSERT BOBBIN CASE
1.
Users Manual - English - Page 21
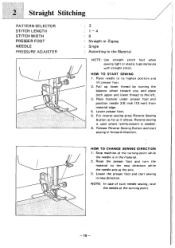
... foot and turn the
material to the Material
NOTE: Use straight stitch foot when sewing light or elastic type materials with straight stitch.
Pull up lower thread by turning the... Stop machine at the turning point.
-19- For reverse sewing press Reverse Sewing Button as far as the axis. 3. Release Reverse Sewing Button and start sewing in the material. 2. HOW TO CHANGE SEWING DIRECTION ...
Users Manual - English - Page 22
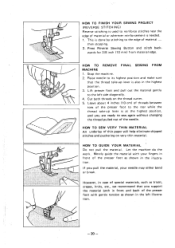
... back of the presser foot with your needle may either bend or break. Let the machine do the work. Press Reverse Sewing Button and stitch back- Stop the machine. 2. Lift presser foot and pull out the material gently to sew again without changing the thread pulled out of the needle. HOW TO GUIDE YOUR...
Users Manual - English - Page 23
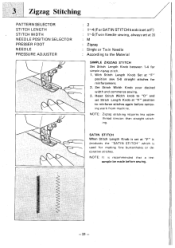
... Width knob to reinforce stitches again before sewing.
-21 -
NOTE: Zigzag stitching requires...sew 5-6 straight stitches for reinforcement. 2.
With Stitch Length Knob Set at "F" position to "O" and set at "F" it
produces the "SATIN STITCH" vv[vich is recommended that a test
sample be made before removing work from machine. Set Stitch Width Knob your desired width and commence sewing...
Users Manual - English - Page 28
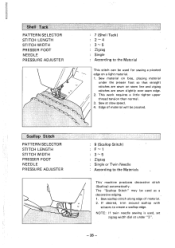
... work requires a little tighter upper thread tension than normal. 3. If desired, trim around scallop with
scissors to the Materials
This' machine produces decorative stitch (Scallop) automatically. The "Scallop Stitch" may be picoted. Sew scallop stitch along edge of material will be used as a decorative edging. 1. Edge of material. 2. Scallop Stitch
PATTERN SELECTOR...
Users Manual - English - Page 32
... results.
Draw button plate out and insert the button as per illustration OD Stop the machine when bar tack is made in order
4
of 1-4 as per illustration OA 7. You...best stitch width (width of bar tack) between 3 to 5 to be attached. 4.
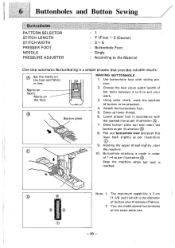
6 Buttonholes and Button Sewing
tki Buttonholes
PATTERN SELECTOR STITCH LENGTH STITCH WIDTH PRESSER FOOT NEEDLE PRESSURE ADJUSTER
: 1 : F (Fine) - ...
Users Manual - English - Page 33
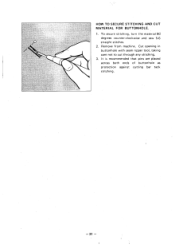
To secure stitching, turn the material 90 degrees counter-clockwise and sew 5-6 straight stitches.
2. It is recommended that pins are placed across both ends of buttonhole as protection against cutting bar tack stitching.
-31 - Remove from machine. fr
HOW TO SECURE STITCHING AND CUT
MATERIAL FOR BUTTONHOLE.
1. Cut opening in buttonhole with seam...
Users Manual - English - Page 34
...
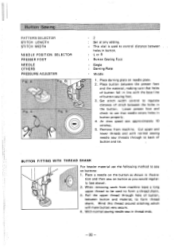
Middle
1. Place a needle on button as shown in button. Wind this thread around stitching which will make button very secure. 4. When removing work from machine. Button Sewing
PATTERN SELECTOR STITCH LENGTH STITCH WIDTH
NEEDLE POSITION SELECTOR PRESSER FOOT
NEEDLE OTHERS PRESSURE ADJUSTER
IFig. Set stitch width control to see above). 2. Cut upper...
Users Manual - English - Page 36
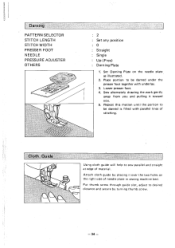
... the needle plate
as illustrated. 2.
Attach cloth guide by turning thumb screw.
- 34 - Sew alternately drawing the work gently
away from you . 5. Put thumb screw through guide slot, adjust... parallel lines of needle plate in sewing machine bed. Cloth Guide
Using cloth guide will help to be darned is filled with underlay. 3.
Place portion to sew parallel and straight at edge of ...
Similar Questions

I Have A New (brand New In The Box) Vx-940. It Will Only Sew In Reverse!
I have a new (brand new in the box) vx-940. It will only sew in reverse!
I have a new (brand new in the box) vx-940. It will only sew in reverse!
(Posted by mydeborah 9 years ago)

I Sent You Some Money For A Manuals For The 940 And I Not Got It. It Was In Marc
it was in march. I need a manuale so I can work my sewing machine.
it was in march. I need a manuale so I can work my sewing machine.
(Posted by Anonymous-134983 10 years ago)

How To Wind Bobbin On Brother Sewing Machine Vx-1120
(Posted by drtameburbude 10 years ago)

Need To Know How To Thread Machine
received from friend who lost instruction book don't know how to the thread goe's to needle
received from friend who lost instruction book don't know how to the thread goe's to needle
(Posted by ardellaforsyth 11 years ago)

Brother Sewing Machine Vx-810
will not pick up thread from bobbin,tried new needle,checked belt
will not pick up thread from bobbin,tried new needle,checked belt
(Posted by mrsmpf 11 years ago)