
Users Manual - English
Page 1
how to use and enjoy your ELECTRONIC Sewing Machine I
how to use and enjoy your ELECTRONIC Sewing Machine I
Users Manual - English
Page 2
IIMIIMJMMAr.I.IIMM.I.1,1 I'•MAII,Ari IIIIIrArIM AIMAIII.I.M.1.1.1111V.WIIVIIMJN,I,IMIIM.IJITIMNAVIIIM Ili ili 4 CAUTION Z 4 4 k4i WHEN CHANGING NEEDLE, BOBBIN OR LIGHT BULB, OR WHEN SEWING §4 MACHINE IS NOT IN USE, IT IS RECOMMENDED, THAT ELECTRICAL SUPPLY PLUG IS DISCONNECTED TO AVOID ELECTRICAL HAZARDS. Iff ,a ,rarmArs,mrarrmwm-,mirr.ararm,armararrrirArardir.ararsmIrma-mms,.u.uarAruml FOR INFORMATION OF THE FEATURES OF THIS SWING MACHINE,CALL TOLL FREE AT 1-800-284-HELP.
IIMIIMJMMAr.I.IIMM.I.1,1 I'•MAII,Ari IIIIIrArIM AIMAIII.I.M.1.1.1111V.WIIVIIMJN,I,IMIIM.IJITIMNAVIIIM Ili ili 4 CAUTION Z 4 4 k4i WHEN CHANGING NEEDLE, BOBBIN OR LIGHT BULB, OR WHEN SEWING §4 MACHINE IS NOT IN USE, IT IS RECOMMENDED, THAT ELECTRICAL SUPPLY PLUG IS DISCONNECTED TO AVOID ELECTRICAL HAZARDS. Iff ,a ,rarmArs,mrarrmwm-,mirr.ararm,armararrrirArardir.ararsmIrma-mms,.u.uarAruml FOR INFORMATION OF THE FEATURES OF THIS SWING MACHINE,CALL TOLL FREE AT 1-800-284-HELP.
Users Manual - English
Page 3
... tension 17 2 Straight Stitching 191 How to start sewing 19 How to change sewing direction 19 How to finish your sewing project . . 20 How to remove final sewing from machine 20 How to sew very thin material 20 How to oil sewing machine 39 Check list for better sewing 41 Repacking the machine 42 Index 43 - 1 - Maintenance and Care of...
... tension 17 2 Straight Stitching 191 How to start sewing 19 How to change sewing direction 19 How to finish your sewing project . . 20 How to remove final sewing from machine 20 How to sew very thin material 20 How to oil sewing machine 39 Check list for better sewing 41 Repacking the machine 42 Index 43 - 1 - Maintenance and Care of...

Users Manual - English
Page 4
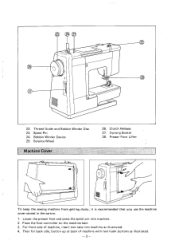
... Tension Dial 10. Presser Foot Screw 15. Shuttle Hook 18. Thread Take-up Lever 5. Sew-light Switch 7. Bobbin Case 19. Thread Cutter 14. Needle Clamp Screw Electronic Display 13. Stitch Length Knob 2. Reverse Sewing Button - 2 - 12. Knowing Your Sewing Machine Principal Parts 0 ® 13 21 20 14 15 8 16 0 a 0 8 ® 9 II 9 1. Extension Table 9. Needle...
... Tension Dial 10. Presser Foot Screw 15. Shuttle Hook 18. Thread Take-up Lever 5. Sew-light Switch 7. Bobbin Case 19. Thread Cutter 14. Needle Clamp Screw Electronic Display 13. Stitch Length Knob 2. Reverse Sewing Button - 2 - 12. Knowing Your Sewing Machine Principal Parts 0 ® 13 21 20 14 15 8 16 0 a 0 8 ® 9 II 9 1. Extension Table 9. Needle...
Users Manual - English
Page 5
... the foot controller on the machine bed. 3. Then for back side, button up at back of machine, insert two tabs into machine. 2. Clutch Release 27. 3-prong Socket 28. Balance Wheel Machine Cover 26. g a 23 26 22. Presser Foot Lifter II To keep the sewing machine from getting dusty it is ...recommended that you use the machine cover stored in the carton. ...
... the foot controller on the machine bed. 3. Then for back side, button up at back of machine, insert two tabs into machine. 2. Clutch Release 27. 3-prong Socket 28. Balance Wheel Machine Cover 26. g a 23 26 22. Presser Foot Lifter II To keep the sewing machine from getting dusty it is ...recommended that you use the machine cover stored in the carton. ...
Users Manual - English
Page 6
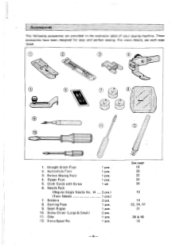
... 3. Needle Pack (Regular Single Needle No. 14 (Twin Needle 7. Bobbins 8. Seam Ripper 10. Accessories The following accessories are provided in the extension table of your sewing machine. Button Sewing Foot 4. Extra Spool Pin 1 pce. 1 pce. 1 pce. 1 pce. 1 set 3 pcs.) 1 pce.) 3 pcs. 1 pce. 1 pce. 2 pcs. 1 pce. 1 pce. -4-... These accessories have been designed for easy and perfect sewing. Screw Driver (Large & Small) 11. See page 19 30 32 33 34 10 14 32,34,37 31 39 & 40 10 For more details, see...
... 3. Needle Pack (Regular Single Needle No. 14 (Twin Needle 7. Bobbins 8. Seam Ripper 10. Accessories The following accessories are provided in the extension table of your sewing machine. Button Sewing Foot 4. Extra Spool Pin 1 pce. 1 pce. 1 pce. 1 pce. 1 set 3 pcs.) 1 pce.) 3 pcs. 1 pce. 1 pce. 2 pcs. 1 pce. 1 pce. -4-... These accessories have been designed for easy and perfect sewing. Screw Driver (Large & Small) 11. See page 19 30 32 33 34 10 14 32,34,37 31 39 & 40 10 For more details, see...
Users Manual - English
Page 7
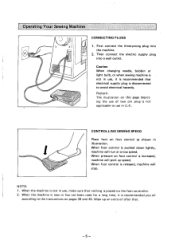
... two pin plug is increased, machine will pick up an extra oil after that electrical supply plug is pushed down lightly, machine will stop. Caution When changing needle, bobbin or light bulb, or when sewing machine is not in illustration. When the machine is new or has not been... used for a long time, it is recommended that . -5- Operating Your Sewing Machine 1111111111 CONNECTING PLUGS 1. Then ...
... two pin plug is increased, machine will pick up an extra oil after that electrical supply plug is pushed down lightly, machine will stop. Caution When changing needle, bobbin or light bulb, or when sewing machine is not in illustration. When the machine is new or has not been... used for a long time, it is recommended that . -5- Operating Your Sewing Machine 1111111111 CONNECTING PLUGS 1. Then ...
Users Manual - English
Page 8
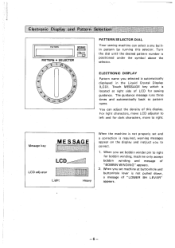
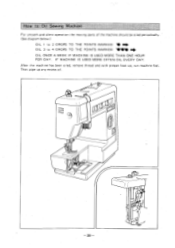
...right. Electronic Display and Pattern Selection PATTERN MESSAGE li II LCQp PATTERN • SELECTOR 2. 1 2/ 0 LL PATTERN SELECTOR DIAL Your sewing machine can adjust the density of this selector. Turn the dial until the desired pattern number is automatically displayed in the Liquid Crystal Display (...LCD). ELECTRONIC DISPLAY Pattern name you to left and for bobbin winding, machine only accept bobbin winding and message of LCD for sewing guidance. When you set machine at right side of "BOBBIN WINDING" appears. 2. You can select a any builtin pattern ...
...right. Electronic Display and Pattern Selection PATTERN MESSAGE li II LCQp PATTERN • SELECTOR 2. 1 2/ 0 LL PATTERN SELECTOR DIAL Your sewing machine can adjust the density of this selector. Turn the dial until the desired pattern number is automatically displayed in the Liquid Crystal Display (...LCD). ELECTRONIC DISPLAY Pattern name you to left and for bobbin winding, machine only accept bobbin winding and message of LCD for sewing guidance. When you set machine at right side of "BOBBIN WINDING" appears. 2. You can select a any builtin pattern ...
Users Manual - English
Page 9
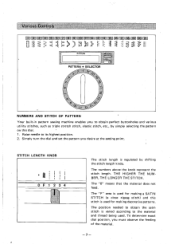
I - Various Controls 1,2,4 .104 112,1 14 .15 064 O81PEI 2111 PATTERN MESSAGE LCp.,:,2 I ll PATTERN • SELECTOR 2 1 2/ 0
I - Various Controls 1,2,4 .104 112,1 14 .15 064 O81PEI 2111 PATTERN MESSAGE LCp.,:,2 I ll PATTERN • SELECTOR 2 1 2/ 0
Users Manual - English
Page 12
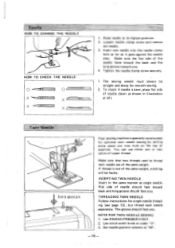
...- The groove should face toward you . If thread is not of upper thread. Set needle position selector at left. Twin Needle /L Extra spool pin Your sewing machine is bent, place flat side of needle should face you . 4 Tighten the needle clamp screw securely. 1 The... new needle into hole on the top of the same weight. Use stitch width knob at under "3". 3. Raise needle to thread twin needle are of machine. You can use either one or two colors of the same weight, stitching will be straight and sharp for single needle threading (see page 13...
...- The groove should face toward you . If thread is not of upper thread. Set needle position selector at left. Twin Needle /L Extra spool pin Your sewing machine is bent, place flat side of needle should face you . 4 Tighten the needle clamp screw securely. 1 The... new needle into hole on the top of the same weight. Use stitch width knob at under "3". 3. Raise needle to thread twin needle are of machine. You can use either one or two colors of the same weight, stitching will be straight and sharp for single needle threading (see page 13...
Users Manual - English
Page 14
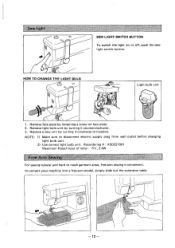
.... al -12- Remove face plate by loosening a screw on or off, push the sewlight switch button. To convert your machine into a free-arm model, simply slide out the extension table. Sew-light SEW LIGHT SWITCH BUTTON To switch the light on face plate. 2. Remove light bulb unit by turning it counterclockwise. 3. Replace a new...
.... al -12- Remove face plate by loosening a screw on or off, push the sewlight switch button. To convert your machine into a free-arm model, simply slide out the extension table. Sew-light SEW LIGHT SWITCH BUTTON To switch the light on face plate. 2. Remove light bulb unit by turning it counterclockwise. 3. Replace a new...
Users Manual - English
Page 17
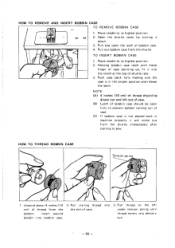
... case. 2. after starting to the left out of case. (B) Latch of bobbin case should be open the latch of case. (C) If bobbin case is in machine properly it will come out from the shuttle immediately . Open the shuttle cover by turning it into delivery eye. - 15 - HOW TO REMOVE AND INSERT...
... case. 2. after starting to the left out of case. (B) Latch of bobbin case should be open the latch of case. (C) If bobbin case is in machine properly it will come out from the shuttle immediately . Open the shuttle cover by turning it into delivery eye. - 15 - HOW TO REMOVE AND INSERT...
Users Manual - English
Page 21
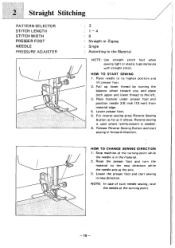
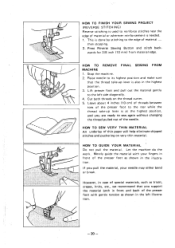
... straight stitch. For reverse sewing press Reverse Sewing Button as far as the axis. 3. Raise the presser foot and turn the material to the left. 3. Place material under presser foot and position needle 3/8 inch (10 mm) from material edge. 4. Stop machine at the turning point.... -19- HOW TO START SEWING 1. Lower presser foot. 5. Release Reverse Sewing Button and start sewing in forward direction. Reverse sewing is used where reinforcement is in the material. 2. Lower the presser foot ...
... straight stitch. For reverse sewing press Reverse Sewing Button as far as the axis. 3. Raise the presser foot and turn the material to the left. 3. Place material under presser foot and position needle 3/8 inch (10 mm) from material edge. 4. Stop machine at the turning point.... -19- HOW TO START SEWING 1. Lower presser foot. 5. Release Reverse Sewing Button and start sewing in forward direction. Reverse sewing is used where reinforcement is in the material. 2. Lower the presser foot ...
Users Manual - English
Page 22
... may either bend or break. Merely guide the material with gentle tension as shown in the left side diagonally. 4. HOW TO REMOVE FINAL SEWING FROM MACHINE 1. Stop the machine. 2. Lift presser foot and pull out the material gently to the left illustration. - 20 - Cut both in front and back of ... ready to the edge of thin paper will help eliminate skipped stitches and puckering on the thread cutter. 5. HOW TO SEW VERY THIN MATERIAL An underlay of material .... Let the machine do the work. However, in case of special materials, such as tricot, crepes, knits, etc., we recommend that...
... may either bend or break. Merely guide the material with gentle tension as shown in the left side diagonally. 4. HOW TO REMOVE FINAL SEWING FROM MACHINE 1. Stop the machine. 2. Lift presser foot and pull out the material gently to the left illustration. - 20 - Cut both in front and back of ... ready to the edge of thin paper will help eliminate skipped stitches and puckering on the thread cutter. 5. HOW TO SEW VERY THIN MATERIAL An underlay of material .... Let the machine do the work. However, in case of special materials, such as tricot, crepes, knits, etc., we recommend that...
Users Manual - English
Page 23
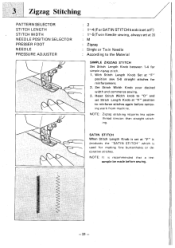
...used for reinforcement. 2. NEEDLE POSITION SELECTOR PRESSER FOOT NEEDLE PRESSURE ADJUSTER 2 1-4 (For SATIN STITCH knob isset atF) 1-5(Twin Needle sewing, always set Stitch Length Knob at "F" it produces the "SATIN STITCH" vv[vich is recommended that a test sample be made before removing work... from machine. Reset Stitch Width knob to "O" and set at "F" position sew 5-6 straight stitches for making fine buttonholes or decorative stitches. NOTE: Zigzag stitching requires less upper thread tension...
...used for reinforcement. 2. NEEDLE POSITION SELECTOR PRESSER FOOT NEEDLE PRESSURE ADJUSTER 2 1-4 (For SATIN STITCH knob isset atF) 1-5(Twin Needle sewing, always set Stitch Length Knob at "F" it produces the "SATIN STITCH" vv[vich is recommended that a test sample be made before removing work... from machine. Reset Stitch Width knob to "O" and set at "F" position sew 5-6 straight stitches for making fine buttonholes or decorative stitches. NOTE: Zigzag stitching requires less upper thread tension...
Users Manual - English
Page 36
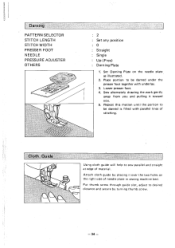
Lower presser foot. 4. Put thumb screw through guide slot, adjust to sew parallel and straight at edge of material. Cloth Guide Using cloth guide will help to desired distance and secure by placing it toward you and ... two holes on the needle plate as illustrated. 2. Place portion to be darned under the presser foot together with parallel lines of needle plate in sewing machine bed. Sew alternately drawing the work gently away from you . 5. Repeat this motion until the portion to be darned is filled with underlay. 3. Set Darning Plate...
Lower presser foot. 4. Put thumb screw through guide slot, adjust to sew parallel and straight at edge of material. Cloth Guide Using cloth guide will help to desired distance and secure by placing it toward you and ... two holes on the needle plate as illustrated. 2. Place portion to be darned under the presser foot together with parallel lines of needle plate in sewing machine bed. Sew alternately drawing the work gently away from you . 5. Repeat this motion until the portion to be darned is filled with underlay. 3. Set Darning Plate...
Users Manual - English
Page 39
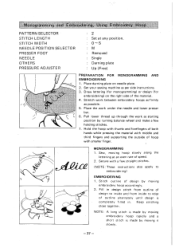
... hoops as firmly as possible. 5. Pull lower thread up through the work as per side instructions. 3. eje tet ce MONOGRAMMING 1 . Fill in . Sew, moving it slowly. - 37 - Stretch work under the needle and lower presser bar. 6. S. NOTE: A long stitch is made by moving embroidery ... pressing the material with middle and third fingers and supporting the outside of hoop with a few holding stitches. 7. Set your sewing machine as starting position by moving embroidery hoop rapidly and a short stitch is completely fil led in design stitch from outline of design...
... hoops as firmly as possible. 5. Pull lower thread up through the work as per side instructions. 3. eje tet ce MONOGRAMMING 1 . Fill in . Sew, moving it slowly. - 37 - Stretch work under the needle and lower presser bar. 6. S. NOTE: A long stitch is made by moving embroidery ... pressing the material with middle and third fingers and supporting the outside of hoop with a few holding stitches. 7. Set your sewing machine as starting position by moving embroidery hoop rapidly and a short stitch is completely fil led in design stitch from outline of design...
Users Manual - English
Page 41
After the machine has been oiled, remove thread and with presser foot up any excess oil. Then wipe up , run machine fast. O ( or - 39 - IF MACHINE IS USED MORE OFTEN OIL EVERY DAY. w to Oil Sewing Machine For smooth and silent operation the moving parts of the machine should be oiled periodically. (See diagram below.) OIL 1 to 2 DROPS TO THE POINTS MARKED OIL 3 to 4 DROPS TO THE POINTS MARKED *WO OIL ONCE A WEEK IF MACHINE IS USED MORE THAN ONE HOUR PER DAY.
After the machine has been oiled, remove thread and with presser foot up any excess oil. Then wipe up , run machine fast. O ( or - 39 - IF MACHINE IS USED MORE OFTEN OIL EVERY DAY. w to Oil Sewing Machine For smooth and silent operation the moving parts of the machine should be oiled periodically. (See diagram below.) OIL 1 to 2 DROPS TO THE POINTS MARKED OIL 3 to 4 DROPS TO THE POINTS MARKED *WO OIL ONCE A WEEK IF MACHINE IS USED MORE THAN ONE HOUR PER DAY.
Users Manual - English
Page 44
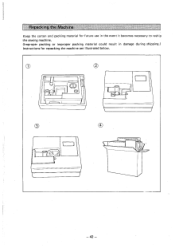
ir Repacking the Machine Keep the carton and packing material for future use in the event it becomes necessary to reship the sewing machine. (Improper packing or improper packing material could result in damage during shipping.) Instructions for repacking the machine are illustrated below. C.) 03 0 - 42 -
ir Repacking the Machine Keep the carton and packing material for future use in the event it becomes necessary to reship the sewing machine. (Improper packing or improper packing material could result in damage during shipping.) Instructions for repacking the machine are illustrated below. C.) 03 0 - 42 -
Users Manual - English
Page 45
... Lower (bobbin) thread Message key Monogramming and embroidering Needle Needle position selector Operating your sewing machine Over edgi ng Pattern selection Presser foot Pressure adjuster Principal parts Relative chart Repacking the machine Revese sewing button Satin stitching Scallop stitch Sew light Shell tack Stitch length knob Stitch width knob Straight stitching Thread tension Triple stretch...
... Lower (bobbin) thread Message key Monogramming and embroidering Needle Needle position selector Operating your sewing machine Over edgi ng Pattern selection Presser foot Pressure adjuster Principal parts Relative chart Repacking the machine Revese sewing button Satin stitching Scallop stitch Sew light Shell tack Stitch length knob Stitch width knob Straight stitching Thread tension Triple stretch...


