
Users Manual - English
Page 3
... 10 PRESSURE ADJUSTER 11 SEW-LIGHT 12 Sew light switch button 12 How to change the light bulb 12 FREE-ARM SEWING 12 UPPER (NEEDLE) THREAD 13 LOWER (BOBBIN) THREAD 14 How to wind bobbin 14 How to remove and insert bobbin case 15 How to... thread bobbin case 15 How to pull up lower thread 16 RELATIVE CHART OF SEWING . 16 THREAD TENSION 17 Upper thread tension 17 Lower thread tension 17 2 Straight Stitching 191 How to start sewing 19 How to change sewing direction...
... 10 PRESSURE ADJUSTER 11 SEW-LIGHT 12 Sew light switch button 12 How to change the light bulb 12 FREE-ARM SEWING 12 UPPER (NEEDLE) THREAD 13 LOWER (BOBBIN) THREAD 14 How to wind bobbin 14 How to remove and insert bobbin case 15 How to... thread bobbin case 15 How to pull up lower thread 16 RELATIVE CHART OF SEWING . 16 THREAD TENSION 17 Upper thread tension 17 Lower thread tension 17 2 Straight Stitching 191 How to start sewing 19 How to change sewing direction...

Users Manual - English
Page 4
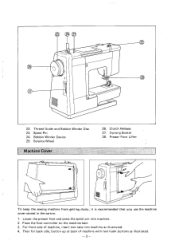
... Your Sewing Machine Principal Parts 0 ® 13 21 20 14 15 8 16 0 a 0 8 ® 9 II 9 1. Bobbin Case 19. Buttonhole Lever 8. Upper Thread Tension Dial 10. Reverse Sewing Button - 2 - 12. Feed Dog 20. Thread Cutter 14. Shuttle Hook 18. Needle Clamp Screw Stitch Width Knob 4. Stitch Length Knob 2. Pressure Adjuster 6. Presser Foot Screw 15...
... Your Sewing Machine Principal Parts 0 ® 13 21 20 14 15 8 16 0 a 0 8 ® 9 II 9 1. Bobbin Case 19. Buttonhole Lever 8. Upper Thread Tension Dial 10. Reverse Sewing Button - 2 - 12. Feed Dog 20. Thread Cutter 14. Shuttle Hook 18. Needle Clamp Screw Stitch Width Knob 4. Stitch Length Knob 2. Pressure Adjuster 6. Presser Foot Screw 15...
Users Manual - English
Page 5
.... 2. Presser Foot Lifter II To keep the sewing machine from getting dusty it is recommended that you use the machine cover stored in the carton. 1. Thread Guide and Bobbin Winder Disc 23. Place the foot controller on the machine bed. 3. For front side of machine with two hoDk buttons as illustrated...
.... 2. Presser Foot Lifter II To keep the sewing machine from getting dusty it is recommended that you use the machine cover stored in the carton. 1. Thread Guide and Bobbin Winder Disc 23. Place the foot controller on the machine bed. 3. For front side of machine with two hoDk buttons as illustrated...
Users Manual - English
Page 9
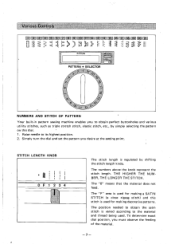
I - Various Controls 1,2,4 .104 112,1 14 .15 064 O81PEI 2111 PATTERN MESSAGE LCp.,:,2 I ll PATTERN • SELECTOR 2 1 2/ 0
I - Various Controls 1,2,4 .104 112,1 14 .15 064 O81PEI 2111 PATTERN MESSAGE LCp.,:,2 I ll PATTERN • SELECTOR 2 1 2/ 0
Users Manual - English
Page 12
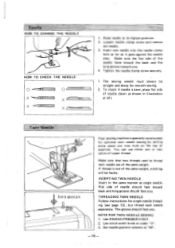
...securely. 1 The sewing needle must always be faulty. Use ZIGZAG PRESSER FOOT. 2. Use stitch width knob at "M". -10- Make sure that two threads used to its highest posicion. 2. Flat side of machine. NOTE FOR TWIN NEEDLE SEWING 1. Set needle position selector at under "3". 3. Make sure... the flat side of the same weight, stitching will be straight and sharp for single needle threading (see page 13), but thread each needle separately. If thread is specially constructed for optional twin needle sewing by setting extra spool pin into the needle clamp hole as...
...securely. 1 The sewing needle must always be faulty. Use ZIGZAG PRESSER FOOT. 2. Use stitch width knob at "M". -10- Make sure that two threads used to its highest posicion. 2. Flat side of machine. NOTE FOR TWIN NEEDLE SEWING 1. Set needle position selector at under "3". 3. Make sure... the flat side of the same weight, stitching will be straight and sharp for single needle threading (see page 13), but thread each needle separately. If thread is specially constructed for optional twin needle sewing by setting extra spool pin into the needle clamp hole as...

Users Manual - English
Page 15
... tension disc. 3. Thread tension dial Thread check spring 3. 4. 5. Bring thread through upper thread tension dial from front to left . Bring down and up the thread check spring. Thread guide (rear) Spool pin Thread guide (front) 2. Thread needle from right to back and draw the thread out about 2 inches (5 cm). Pass thread through the thread guard and guides. 5. Upper (Needle) Thread LIJ U 0_11...
... tension disc. 3. Thread tension dial Thread check spring 3. 4. 5. Bring thread through upper thread tension dial from front to left . Bring down and up the thread check spring. Thread guide (rear) Spool pin Thread guide (front) 2. Thread needle from right to back and draw the thread out about 2 inches (5 cm). Pass thread through the thread guard and guides. 5. Upper (Needle) Thread LIJ U 0_11...

Users Manual - English
Page 16
HOW TO WIND BOBBIN Loosen).1 2. Place an empty bobbin on the spool pin and take thread through bobbin winder tension disc. -14- Wind the thread a few times around the bobbin clockwise and push the bobbin toward you. Tighten clutch release knob securely. 3. Loosen clutch release knob by turning it . Tighten 0 ... knob _Bobbin winder pin - 1. winder pin. 3. Bobbin stops winding when full. 6. Push the bobbin to the left and remove it 2. Bobbin winder tension disc 4. Place thread spool on the bobbin toward bobbin presser. Lower (Bobbin...
HOW TO WIND BOBBIN Loosen).1 2. Place an empty bobbin on the spool pin and take thread through bobbin winder tension disc. -14- Wind the thread a few times around the bobbin clockwise and push the bobbin toward you. Tighten clutch release knob securely. 3. Loosen clutch release knob by turning it . Tighten 0 ... knob _Bobbin winder pin - 1. winder pin. 3. Bobbin stops winding when full. 6. Push the bobbin to the left and remove it 2. Bobbin winder tension disc 4. Place thread spool on the bobbin toward bobbin presser. Lower (Bobbin...
Users Manual - English
Page 17
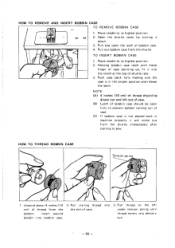
... of bobbin case. 4. Raise needle to sew. NOTE: (A) 4 inches (10 cm) of thread should be drawn out and left under tension spring until thread enters into the slot of shuttle race. 3. Insert wound bobbin into the notch at the top ...of case. 3. Pull thread to its highest position. • 2. Push case back fully 'making sure the case is ...release the l'atch. after starting to its highest position. 2. HOW TO THREAD BOBBIN CASE ..... Raise needle to the left out of case. (B) Latch of bobbin case should be open the ...
... of bobbin case. 4. Raise needle to sew. NOTE: (A) 4 inches (10 cm) of thread should be drawn out and left under tension spring until thread enters into the slot of shuttle race. 3. Insert wound bobbin into the notch at the top ...of case. 3. Pull thread to its highest position. • 2. Push case back fully 'making sure the case is ...release the l'atch. after starting to its highest position. 2. HOW TO THREAD BOBBIN CASE ..... Raise needle to the left out of case. (B) Latch of bobbin case should be open the ...

Users Manual - English
Page 18
...Pique, Satin, Velvet, Lightweight wool, Fine corduroy, Suitings Denim, Gabardine, Tweed, Corduroy Canvas, Overcoating, Upholstery NEEDLE SIZES 9 11 14 16 18 THREAD SIZES Cotton: 80-120 Synthetic Fine Mercerized Cotton Cotton: 60-80 Silk: "A" Synthetic Mercerized 50 Cotton: 50-60 Silk: "A" Synthetic • ...left hand, hold the end of presser foot and place them to the highest position. Select correct size of Sewing Material, Needle and Thread SEWING MATERIALS VERY THIN Fine•tricot, Fine lace, Thin linen, Silk, Tulle, Chiffon LIGHTWEIGHT Organdy, Jersey, Voile, Taffeta, ...
...Pique, Satin, Velvet, Lightweight wool, Fine corduroy, Suitings Denim, Gabardine, Tweed, Corduroy Canvas, Overcoating, Upholstery NEEDLE SIZES 9 11 14 16 18 THREAD SIZES Cotton: 80-120 Synthetic Fine Mercerized Cotton Cotton: 60-80 Silk: "A" Synthetic Mercerized 50 Cotton: 50-60 Silk: "A" Synthetic • ...left hand, hold the end of presser foot and place them to the highest position. Select correct size of Sewing Material, Needle and Thread SEWING MATERIALS VERY THIN Fine•tricot, Fine lace, Thin linen, Silk, Tulle, Chiffon LIGHTWEIGHT Organdy, Jersey, Voile, Taffeta, ...

Users Manual - English
Page 19
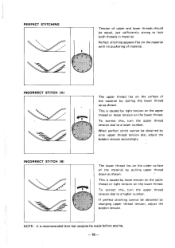
..., upper tension should be made before shipment, but when sewing extremely thin or heavy material, it also requires adjusting the lower thread tension. To increase tension: Turn the small screw clockwise very slight- ly. To decrease tension: Turn the dial to left to higher number.... Thread Tension It is important that a test sample be less than straight stitch sewing. terclockwise very slightly. -17- THE HIGHER THE NUMBER, THE...
..., upper tension should be made before shipment, but when sewing extremely thin or heavy material, it also requires adjusting the lower thread tension. To increase tension: Turn the small screw clockwise very slight- ly. To decrease tension: Turn the dial to left to higher number.... Thread Tension It is important that a test sample be less than straight stitch sewing. terclockwise very slightly. -17- THE HIGHER THE NUMBER, THE...
Users Manual - English
Page 20
... surface of material. To correct this , turn the upper thread tension dial to lock both threads in material. This is caused by loose tension on the upper thread or tight tension on the surface of upper and lower threads should be made before sewing. -18- To correct this ...ilk Tension of the material by pulling the lower thread up as shown. When perfect stitch cannot be obtained by ti only upper thread tension dial, adjust the bobbin tension accordingly. . If perfect stitching cannot be obtained by changing upper thread tension, adjust the bobbin tension. INCORRECT STITCH ...
... surface of material. To correct this , turn the upper thread tension dial to lock both threads in material. This is caused by loose tension on the upper thread or tight tension on the surface of upper and lower threads should be made before sewing. -18- To correct this ...ilk Tension of the material by pulling the lower thread up as shown. When perfect stitch cannot be obtained by ti only upper thread tension dial, adjust the bobbin tension accordingly. . If perfect stitching cannot be obtained by changing upper thread tension, adjust the bobbin tension. INCORRECT STITCH ...
Users Manual - English
Page 21
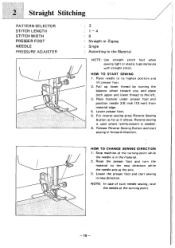
... the needle at the turning point while the needle is needed. 6. Raise needle to the left. 3. Pull up lower thread by turning the balance wheel toward you and place both upper and lower thread to its highest position and lift presser foot. 2. HOW TO CHANGE SEWING DIRECTION 1. HOW TO START SEWING 1. Lower...
... the needle at the turning point while the needle is needed. 6. Raise needle to the left. 3. Pull up lower thread by turning the balance wheel toward you and place both upper and lower thread to its highest position and lift presser foot. 2. HOW TO CHANGE SEWING DIRECTION 1. HOW TO START SEWING 1. Lower...
Users Manual - English
Page 22
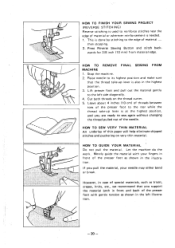
... the highest position, and you pull the material, your fingers in front of special materials, such as tricot, crepes, knits, etc., we recommend that the thread take -up lever is needed. 1. HOW TO SEW VERY THIN MATERIAL An underlay of the needle. HOW TO GUIDE YOUR MATERIAL Do not pull the... as shown in the left side diagonally. 4. This is done by stitching to its highest position and make sure that you support the material both threads on very thin material. Let the machine do the work. Cut both in front and back of the presser foot with your needle may either...
... the highest position, and you pull the material, your fingers in front of special materials, such as tricot, crepes, knits, etc., we recommend that the thread take -up lever is needed. 1. HOW TO SEW VERY THIN MATERIAL An underlay of the needle. HOW TO GUIDE YOUR MATERIAL Do not pull the... as shown in the left side diagonally. 4. This is done by stitching to its highest position and make sure that you support the material both threads on very thin material. Let the machine do the work. Cut both in front and back of the presser foot with your needle may either...
Users Manual - English
Page 23
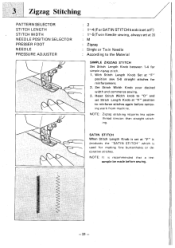
... knob to the Material SIMPLE ZIGZAG STITCH Set Stitch Length Knob between 1-4 for making fine buttonholes or decorative stitches. NOTE: Zigzag stitching requires less upper thread tension than straight stitching. Set Stitch Width Knob your desired width and commence sewing. 3. NOTE: It is used for simple zigzag stitch. 1. With Stitch Length...
... knob to the Material SIMPLE ZIGZAG STITCH Set Stitch Length Knob between 1-4 for making fine buttonholes or decorative stitches. NOTE: Zigzag stitching requires less upper thread tension than straight stitching. Set Stitch Width Knob your desired width and commence sewing. 3. NOTE: It is used for simple zigzag stitch. 1. With Stitch Length...

Users Manual - English
Page 25
... ing PATTERN SELECTOR STITCH LENGTH STITCH WIDTH PRESSER FOOT NEEDLE 21 (Triple Stretch Stitch) 4 0 M Zigzag or Straight Single (See Note 1) : According to seams which prevents thread breakage.
... ing PATTERN SELECTOR STITCH LENGTH STITCH WIDTH PRESSER FOOT NEEDLE 21 (Triple Stretch Stitch) 4 0 M Zigzag or Straight Single (See Note 1) : According to seams which prevents thread breakage.

Users Manual - English
Page 26
JOINING STITCH 1. II 2. Use nylon thread, and stitch will be taken to edge under tear in illustration. Following the line of tear, sew elastic stitch so that both in front and ...
JOINING STITCH 1. II 2. Use nylon thread, and stitch will be taken to edge under tear in illustration. Following the line of tear, sew elastic stitch so that both in front and ...
Users Manual - English
Page 27
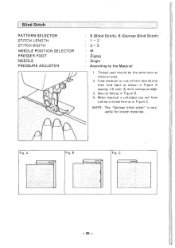
... PRESSER FOOT NEEDLE PRESSURE ADJUSTER 5 (Blind Stitch), 6 (German Blind Stitch) 1 - 2 3 - 5 M Zigzag Single According to size of hem desired and then fold back as in Figure B. 4. Thread used . 2. A f Fig.
... PRESSER FOOT NEEDLE PRESSURE ADJUSTER 5 (Blind Stitch), 6 (German Blind Stitch) 1 - 2 3 - 5 M Zigzag Single According to size of hem desired and then fold back as in Figure B. 4. Thread used . 2. A f Fig.
Users Manual - English
Page 28
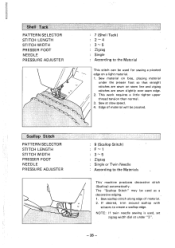
... Stitch) F'1 3 - 5 Zigzag : Single or Twin Needle : According to create a scallop edge. Sew material on bias, placing material under "3". - 26 - This work requires a little tighter upper thread tension than normal. 3.
... Stitch) F'1 3 - 5 Zigzag : Single or Twin Needle : According to create a scallop edge. Sew material on bias, placing material under "3". - 26 - This work requires a little tighter upper thread tension than normal. 3.

Users Manual - English
Page 30
... First needle II drop r 0.15 cm 19 (Fagoting Stitch) 4 3 - 5 Zigzag Single According to the Material Enjoy fancy stitches. " Use thicker threads. 3. Basting Apply thin paper to back fabric and baste both threads slightly when starting. *Set zigzag width at the beginning and end of the seams on the reverse side. - 28 - Stitch...
... First needle II drop r 0.15 cm 19 (Fagoting Stitch) 4 3 - 5 Zigzag Single According to the Material Enjoy fancy stitches. " Use thicker threads. 3. Basting Apply thin paper to back fabric and baste both threads slightly when starting. *Set zigzag width at the beginning and end of the seams on the reverse side. - 28 - Stitch...
Users Manual - English
Page 32
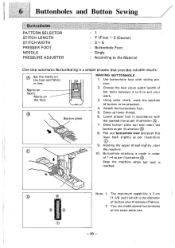
...foot with the marked line as per illustration OA 7. Choose the best stitch width (width of button to be attached. 4. Holding the upper thread slightly, start the machine. 10. Using tailor chalk, mark the position of bar tack) between 3 to 5 to the Material One-step automatic...inch) which is a simple process that provides reliable results. Ca)t Set the marks on the foot Button plate , MAKING BUTTONHOLE 1. Draw up lower thread. 6. Buttonhole stitching is reached. Marks on fabric Marks on the foot and fabric in order 4 of 1-4 as per illustration OD Stop the machine...
...foot with the marked line as per illustration OA 7. Choose the best stitch width (width of button to be attached. 4. Holding the upper thread slightly, start the machine. 10. Using tailor chalk, mark the position of bar tack) between 3 to 5 to the Material One-step automatic...inch) which is a simple process that provides reliable results. Ca)t Set the marks on the foot Button plate , MAKING BUTTONHOLE 1. Draw up lower thread. 6. Buttonhole stitching is reached. Marks on fabric Marks on the foot and fabric in order 4 of 1-4 as per illustration OD Stop the machine...


