
Quick Setup Guide - English
Page 4
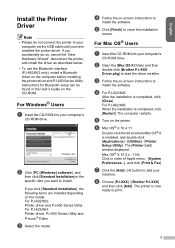
.... e Turn on the computer before installing the printer driver and PJ-600 Series Utility. f Mac OS® X 10.4.11: Double-click the drive where Mac OS® X is completed, click [Close]. g Click the [Add] / [+] button to start the driver installer. b Click [PC (Windows) software], and then click [Standard Installation] or the specific item you have installed the printer driver. Mac OS® X 10.5.x - 10.6: Click in the User's Guide on -screen instructions to install. For...
.... e Turn on the computer before installing the printer driver and PJ-600 Series Utility. f Mac OS® X 10.4.11: Double-click the drive where Mac OS® X is completed, click [Close]. g Click the [Add] / [+] button to start the driver installer. b Click [PC (Windows) software], and then click [Standard Installation] or the specific item you have installed the printer driver. Mac OS® X 10.5.x - 10.6: Click in the User's Guide on -screen instructions to install. For...
Quick Setup Guide - English
Page 5
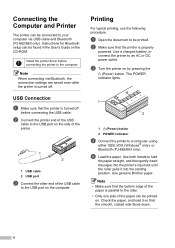
... (Power) button. e Load the paper. Printing For typical printing, use the following procedure. a Open the document to an AC or DC power outlet. Use a charged battery, or connect the printer to be printed. USB Connection a Make sure that the printer is turned off before connecting the printer to the roller. • Only one side of the paper can be printed on. b Make sure that the printer is parallel to the computer. b Connect the printer end of the USB cable to the USB port...
... (Power) button. e Load the paper. Printing For typical printing, use the following procedure. a Open the document to an AC or DC power outlet. Use a charged battery, or connect the printer to be printed. USB Connection a Make sure that the printer is turned off before connecting the printer to the roller. • Only one side of the paper can be printed on. b Make sure that the printer is parallel to the computer. b Connect the printer end of the USB cable to the USB port...

Quick Setup Guide - English
Page 6
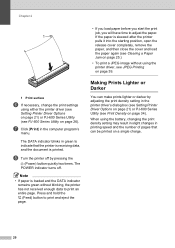
... into your computer. 5 Accessing the User's Guide and P-touch® Editor Software User's Guide The User's Guide and P-touch® Editor Software User's Guide (PJ-623/663 only) can access these documents by pressing the (Power) button quickly two times. English 1 1 Print surface f If necessary, change the print settings using either the printer driver or PJ-600 Series Utility. h Turn the printer off . Note • If paper is loaded and the DATA indicator remains green without blinking, the printer has not received...
... into your computer. 5 Accessing the User's Guide and P-touch® Editor Software User's Guide The User's Guide and P-touch® Editor Software User's Guide (PJ-623/663 only) can access these documents by pressing the (Power) button quickly two times. English 1 1 Print surface f If necessary, change the print settings using either the printer driver or PJ-600 Series Utility. h Turn the printer off . Note • If paper is loaded and the DATA indicator remains green without blinking, the printer has not received...
Software Users Manual - English
Page 4
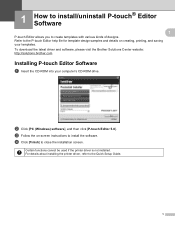
... you to the Quick Setup Guide. 1 Refer to the P-touch Editor help file for template design samples and details on -screen instructions to close the installation screen. For details about installing the printer driver, refer to create templates with various kinds of designs. To download the latest driver and software, please visit the Brother Solutions Center website: http://solutions.brother.com Installing P-touch Editor Software 1 a Insert the...
... you to the Quick Setup Guide. 1 Refer to the P-touch Editor help file for template design samples and details on -screen instructions to close the installation screen. For details about installing the printer driver, refer to create templates with various kinds of designs. To download the latest driver and software, please visit the Brother Solutions Center website: http://solutions.brother.com Installing P-touch Editor Software 1 a Insert the...
User Guide
Page 3
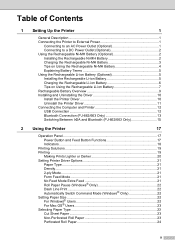
... 2 Using the Printer 17 Operation Panel 17 Power Button and Feed Button Functions 17 Indicators ...18 Printing Solutions 19 Printing ...19 Making Prints Lighter or Darker 20 Setting Printer Driver Options 21 Paper Type ...21 Density...21 2-ply Mode...21 Form Feed Mode 21 No Feed Mode Extra Feed 21 Roll Paper Pause (Windows® Only 22 Dash Line Print 22 Automatically Switch Command Mode (Windows® Only 22 Setting Paper Size 22 For Windows® Users 22 For Mac OS® Users 23 Selecting Paper Type 23 Cut Sheet Paper...
... 2 Using the Printer 17 Operation Panel 17 Power Button and Feed Button Functions 17 Indicators ...18 Printing Solutions 19 Printing ...19 Making Prints Lighter or Darker 20 Setting Printer Driver Options 21 Paper Type ...21 Density...21 2-ply Mode...21 Form Feed Mode 21 No Feed Mode Extra Feed 21 Roll Paper Pause (Windows® Only 22 Dash Line Print 22 Automatically Switch Command Mode (Windows® Only 22 Setting Paper Size 22 For Windows® Users 22 For Mac OS® Users 23 Selecting Paper Type 23 Cut Sheet Paper...
User Guide
Page 4
... Series Utility 28 Parameters ...29 4 Other Function 39 JPEG Printing ...39 5 Maintaining the Printer 40 Cleaning the Platen Roller 40 Cleaning the Printer's Exterior 41 6 Reference 42 Indicators ...42 Indicator Warnings 44 Printing a Printer Report 46 7 Troubleshooting 47 Overview ...47 Paper Problems 48 Printed Image Problems 48 Pages Don't Print 49 Pages Are Partially Printed 50 8 Technical Information 51 Product Specifications (PJ-622/623 51 Product Specifications (PJ-662/663 53 A Character Sets...
... Series Utility 28 Parameters ...29 4 Other Function 39 JPEG Printing ...39 5 Maintaining the Printer 40 Cleaning the Platen Roller 40 Cleaning the Printer's Exterior 41 6 Reference 42 Indicators ...42 Indicator Warnings 44 Printing a Printer Report 46 7 Troubleshooting 47 Overview ...47 Paper Problems 48 Printed Image Problems 48 Pages Don't Print 49 Pages Are Partially Printed 50 8 Technical Information 51 Product Specifications (PJ-622/623 51 Product Specifications (PJ-662/663 53 A Character Sets...
User Guide
Page 14
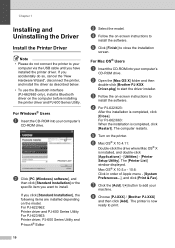
... your machine. If you accidentally do not connect the printer to your computer via the USB cable until you want to add your computer's CD-ROM drive. The printer is completed, click [Restart]. c Follow the on -screen instructions to install the software. e Turn on the model. Mac OS® X 10.5.x - 10.6: Click in order of Apple menu - [System Preferences...], and click [Print & Fax]. g Click the [Add] / [+] button to install. If...
... your machine. If you accidentally do not connect the printer to your computer via the USB cable until you want to add your computer's CD-ROM drive. The printer is completed, click [Restart]. c Follow the on -screen instructions to install the software. e Turn on the model. Mac OS® X 10.5.x - 10.6: Click in order of Apple menu - [System Preferences...], and click [Print & Fax]. g Click the [Add] / [+] button to install. If...
User Guide
Page 15
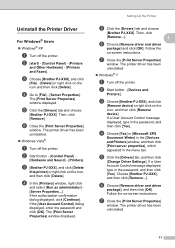
... [Change Driver Settings]. If a User Account Control message displayed, type in the menu bar. c [Brother PJ-XXX], and click [Delete this printer] or right click on -screen instructions. If the [User Account Control] dialog displayed, enter the password and click [OK]. b Start button - [Devices and Printers]. The printer driver has been uninstalled. 11 b [start] - [Control Panel] - [Printers and Other Hardware] - [Printers and Faxes]. d Go to [File] - [Server Properties]. d In the [Printers] window, right click and select [Run as administrator] [Server Properties...
... [Change Driver Settings]. If a User Account Control message displayed, type in the menu bar. c [Brother PJ-XXX], and click [Delete this printer] or right click on -screen instructions. If the [User Account Control] dialog displayed, enter the password and click [OK]. b Start button - [Devices and Printers]. The printer driver has been uninstalled. 11 b [start] - [Control Panel] - [Printers and Other Hardware] - [Printers and Faxes]. d Go to [File] - [Server Properties]. d In the [Printers] window, right click and select [Run as administrator] [Server Properties...

User Guide
Page 16
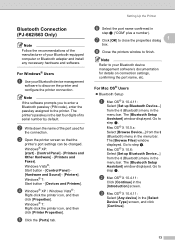
... [Printer List] window displayed. The printer driver has been uninstalled. b Connect the printer end of the USB cable to the USB port on the side of the printer. 1 2 1 USB cable 2 USB port c Connect the other end of Apple menu - [System Preferences...], and click [Print & Fax]. Note When connecting via USB cable and Bluetooth (PJ-662/663 only). USB Connection 1 a Make sure that the printer is turned off the printer. d Close the [Printer List] (10.4.11) / [Print & Fax] (10.5.x - 10.6) window. Connecting the Computer and Printer 1 The printer can be connected...
... [Printer List] window displayed. The printer driver has been uninstalled. b Connect the printer end of the USB cable to the USB port on the side of the printer. 1 2 1 USB cable 2 USB port c Connect the other end of Apple menu - [System Preferences...], and click [Print & Fax]. Note When connecting via USB cable and Bluetooth (PJ-662/663 only). USB Connection 1 a Make sure that the printer is turned off the printer. d Close the [Printer List] (10.4.11) / [Print & Fax] (10.5.x - 10.6) window. Connecting the Computer and Printer 1 The printer can be connected...
User Guide
Page 17
... connection settings, confirming the port name, etc. c Mac OS® X 10.4.11: Select [Any device] in step b ("COM" plus a number). For Windows® Users 1 a Use your Bluetooth-equipped computer or Bluetooth adapter and install any necessary hardware and software. c Open the printer screen so that the printer's port settings can be changed. d Windows® XP / Windows Vista® : Right-click the printer icon, and then click [Properties]. The [Browse Files] window displayed. Mac...
... connection settings, confirming the port name, etc. c Mac OS® X 10.4.11: Select [Any device] in step b ("COM" plus a number). For Windows® Users 1 a Use your Bluetooth-equipped computer or Bluetooth adapter and install any necessary hardware and software. c Open the printer screen so that the printer's port settings can be changed. d Windows® XP / Windows Vista® : Right-click the printer icon, and then click [Properties]. The [Browse Files] window displayed. Mac...
User Guide
Page 22
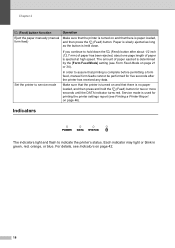
... (Feed) button after the printer has received any data. Indicators 2 The indicators light and flash to hold the (Feed) button for printing the printer settings report (see Printing a Printer Report on page 46). Set the printer to service mode In order to assure that printing is used for two or more seconds until the DATA indicator turns red. Each indicator may light or blink in green, red, orange, or blue. The amount of paper is no paper loaded, and...
... (Feed) button after the printer has received any data. Indicators 2 The indicators light and flash to hold the (Feed) button for printing the printer settings report (see Printing a Printer Report on page 46). Set the printer to service mode In order to assure that printing is used for two or more seconds until the DATA indicator turns red. Each indicator may light or blink in green, red, orange, or blue. The amount of paper is no paper loaded, and...
User Guide
Page 24
... cover and load the paper again (see Clearing a Paper Jam on page 25.) • To print a JPEG image without blinking, the printer has not received enough data to indicate that can make prints lighter or darker by pressing the (Power) button quickly two times. g Click [Print] in green to print an entire page. The POWER indicator turns off by adjusting the print density setting in printing speed and the number of pages that the printer is receiving data, and the document is printed...
... cover and load the paper again (see Clearing a Paper Jam on page 25.) • To print a JPEG image without blinking, the printer has not received enough data to indicate that can make prints lighter or darker by pressing the (Power) button quickly two times. g Click [Print] in green to print an entire page. The POWER indicator turns off by adjusting the print density setting in printing speed and the number of pages that the printer is receiving data, and the document is printed...
User Guide
Page 25
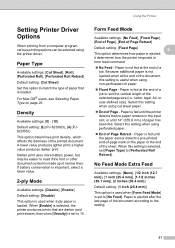
... printed document. Paper is loaded. Paper Type 2 Available settings: [Cut Sheet], [Roll], [Perforated Roll], [Perforated Roll Retract] Default setting: [Cut Sheet] Set this setting is selected, the printer produces prints that no paper remains in the input slot, or until the paper sensor detects a pre-printed end-of-page mark on page 23. When [Enable] is useful when using the printer driver. Because additional paper is made up of a job. For Mac OS® users, see Selecting Paper Type on the paper...
... printed document. Paper is loaded. Paper Type 2 Available settings: [Cut Sheet], [Roll], [Perforated Roll], [Perforated Roll Retract] Default setting: [Cut Sheet] Set this setting is selected, the printer produces prints that no paper remains in the input slot, or until the paper sensor detects a pre-printed end-of-page mark on page 23. When [Enable] is useful when using the printer driver. Because additional paper is made up of a job. For Mac OS® users, see Selecting Paper Type on the paper...
User Guide
Page 27
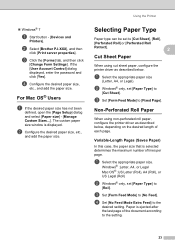
... using cut sheet paper, configure the printer driver as described below . b Select [Brother PJ-XXX], and then click [Print server properties]. If the [User Account Control] dialog displayed, enter the password and click [Yes]. The custom paper size window is selected determines the maximum number of the document according to the setting. 23 b Windows® only, set [Paper Type] to [Cut Sheet]. Variable-Length Pages (Saves Paper) 2 In this case, the paper size that is displayed. a Select the appropriate paper size. Paper...
... using cut sheet paper, configure the printer driver as described below . b Select [Brother PJ-XXX], and then click [Print server properties]. If the [User Account Control] dialog displayed, enter the password and click [Yes]. The custom paper size window is selected determines the maximum number of the document according to the setting. 23 b Windows® only, set [Paper Type] to [Cut Sheet]. Variable-Length Pages (Saves Paper) 2 In this case, the paper size that is displayed. a Select the appropriate paper size. Paper...

User Guide
Page 28
... ink. If you use genuine Brother thermal paper, which has been specifically designed and tested for any paper size (including custom sizes) is the same as many notebook or report covers. Avoid contact with the PocketJet printer family. d Set [No Feed Mode Extra Feed] to [End of Page] or [End of the printer. To avoid wrinkling and tearing, keep paper in its box or bag until ready to loading...
... ink. If you use genuine Brother thermal paper, which has been specifically designed and tested for any paper size (including custom sizes) is the same as many notebook or report covers. Avoid contact with the PocketJet printer family. d Set [No Feed Mode Extra Feed] to [End of Page] or [End of the printer. To avoid wrinkling and tearing, keep paper in its box or bag until ready to loading...

User Guide
Page 31
... PJ-600 Series Utility is requested, type in the trash. [Macintosh HD] - [Library] - [Printers] [Brother] - [PocketJet Utilities] - [Brother PJ-600 Series Utility.app]. For Mac OS® Users 3 To start ] - [Control Panel] - [Add or Remove Programs]. For Windows® Users 3 To start PJ-600 Series Utility, click the start button - [All Programs] - [Brother PocketJet] - [Brother PJ-600 Series Utility]. The uninstall operation starts. When the [User Account Control] dialog box displayed, click [Allow...
... PJ-600 Series Utility is requested, type in the trash. [Macintosh HD] - [Library] - [Printers] [Brother] - [PocketJet Utilities] - [Brother PJ-600 Series Utility.app]. For Mac OS® Users 3 To start ] - [Control Panel] - [Add or Remove Programs]. For Windows® Users 3 To start PJ-600 Series Utility, click the start button - [All Programs] - [Brother PocketJet] - [Brother PJ-600 Series Utility]. The uninstall operation starts. When the [User Account Control] dialog box displayed, click [Allow...
User Guide
Page 36
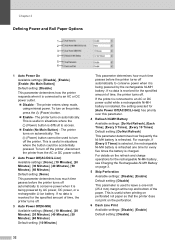
... Time], [Every 5 Times], [Every 10 Times] Default setting: [Do Not Refresh] This parameter determines how frequently the Ni-MH battery is useful when printing on perforated roll paper so that the printer does not print on page 3. 5 Skip Perforation Available settings: [Disable], [Enable] Default setting: [Disable] This parameter is used to turn off automatically to conserve power when it is difficult to an AC or DC power outlet. Disable - The printer turns on...
... Time], [Every 5 Times], [Every 10 Times] Default setting: [Do Not Refresh] This parameter determines how frequently the Ni-MH battery is useful when printing on perforated roll paper so that the printer does not print on page 3. 5 Skip Perforation Available settings: [Disable], [Enable] Default setting: [Disable] This parameter is used to turn off automatically to conserve power when it is difficult to an AC or DC power outlet. Disable - The printer turns on...

User Guide
Page 38
... Feed Mode Available settings: [No Feed], [Fixed Page], [End of Page], [End of Page Retract] Default setting: [Fixed Page] This parameter determines how paper is fed until 14" (355.6 mm) of the selected page size (i.e., letter, legal, A4, or user-defined size). Select this setting when using cut sheet paper. End of the document, this parameter is changed in the input slot, or until the paper sensor detects a pre-printed end-of narrow lines. By default...
... Feed Mode Available settings: [No Feed], [Fixed Page], [End of Page], [End of Page Retract] Default setting: [Fixed Page] This parameter determines how paper is fed until 14" (355.6 mm) of the selected page size (i.e., letter, legal, A4, or user-defined size). Select this setting when using cut sheet paper. End of the document, this parameter is changed in the input slot, or until the paper sensor detects a pre-printed end-of narrow lines. By default...
User Guide
Page 52
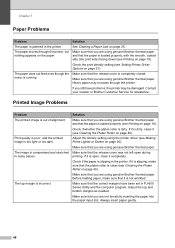
... using genuine Brother thermal paper. Adjust the density setting using genuine Brother thermal paper and that the release cover was not left open , close it is running Solution See Clearing a Paper Jam on page 20). If it is clean (see Cleaning the Platen Roller on page 21). Printed Image Problems 7 Problem The printed image is out of alignment Print quality is poor, and the printed image is too light or too dark The image is compressed and stretched in the printer. Make...
... using genuine Brother thermal paper. Adjust the density setting using genuine Brother thermal paper and that the release cover was not left open , close it is running Solution See Clearing a Paper Jam on page 20). If it is clean (see Cleaning the Platen Roller on page 21). Printed Image Problems 7 Problem The printed image is out of alignment Print quality is poor, and the printed image is too light or too dark The image is compressed and stretched in the printer. Make...
User Guide
Page 53
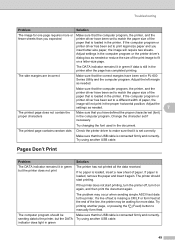
... (Feed) button to the printer. Adjust the settings as needed or reduce the size of the paper that is connected firmly and correctly. Adjust the left margin as needed . 7 The printed page does not contain the proper characters Make sure that the USB cable is loaded, insert a new sheet of the line, the printer may occur when sending simple ASCII text data to manually form feed. Make sure that the computer program, the printer, and the printer driver have...
... (Feed) button to the printer. Adjust the settings as needed or reduce the size of the paper that is connected firmly and correctly. Adjust the left margin as needed . 7 The printed page does not contain the proper characters Make sure that the USB cable is loaded, insert a new sheet of the line, the printer may occur when sending simple ASCII text data to manually form feed. Make sure that the computer program, the printer, and the printer driver have...


