
Accessory Catalog
Page 7
...Plate Vertical Stitching Alignment Foot Brother General Sewing Accessories 12 Straight Stitch Foot For precise straight stitching on thin fabrics or on the top of the foot guide plate. 4. The side extension ruler on the needle plate with the Straight Stitch Needle Plate to accomplish perfect straight stitching. Available in the seam line of fabrics. Select a stitch, and adjust settings as it stitches. Installing the Straight Stitch Needle Plate automatically sets the needle position to create a beautiful finish without any adjustment on both straight and curved lines. Use...
...Plate Vertical Stitching Alignment Foot Brother General Sewing Accessories 12 Straight Stitch Foot For precise straight stitching on thin fabrics or on the top of the foot guide plate. 4. The side extension ruler on the needle plate with the Straight Stitch Needle Plate to accomplish perfect straight stitching. Available in the seam line of fabrics. Select a stitch, and adjust settings as it stitches. Installing the Straight Stitch Needle Plate automatically sets the needle position to create a beautiful finish without any adjustment on both straight and curved lines. Use...

Accessory Catalog
Page 11
... brother sewing machines of 7 mm feed width. 1. Place cord under the presser foot, and select zigzag stitch with maximum stitch width. SA158 ABCDEFJKMN www.brother.com It can be used with maximum stitch width. Insert cords or threads into each hole on the presser foot. 2. Slide the plate of the guide back and forth to use single cord, use sewing machines Clear-view Foot Use this presser foot where visibility of the braid. 6. Attach the presser foot and pull cords under the presser foot. 3. Slip a cord from satin...
... brother sewing machines of 7 mm feed width. 1. Place cord under the presser foot, and select zigzag stitch with maximum stitch width. SA158 ABCDEFJKMN www.brother.com It can be used with maximum stitch width. Insert cords or threads into each hole on the presser foot. 2. Slide the plate of the guide back and forth to use single cord, use sewing machines Clear-view Foot Use this presser foot where visibility of the braid. 6. Attach the presser foot and pull cords under the presser foot. 3. Slip a cord from satin...

Accessory Catalog
Page 12
... cords up the center guide mark (red) of the presser foot to the edge of loops to make or attach piping. Zigzag-sew with a single zigzag stitch. Increase the upper thread tension. 3. Girl's Dress Innov-is Project Book (See page 47 for edge-stitching heavy fabric such as home decor. Create 3-D loops and fringe with dense stitches. Brother Embellishment Feet 21 Fringe Foot Gathering Foot SA142 All Brother home-use sewing machines SA120 All Brother home-use sewing machines Fringe Foot Used...
... cords up the center guide mark (red) of the presser foot to the edge of loops to make or attach piping. Zigzag-sew with a single zigzag stitch. Increase the upper thread tension. 3. Girl's Dress Innov-is Project Book (See page 47 for edge-stitching heavy fabric such as home decor. Create 3-D loops and fringe with dense stitches. Brother Embellishment Feet 21 Fringe Foot Gathering Foot SA142 All Brother home-use sewing machines SA120 All Brother home-use sewing machines Fringe Foot Used...

Accessory Catalog
Page 13
... center position. 3. www.brother.com Brother Embellishment Feet 23 Bed Runner & Pillowcase Innov-is Project Book (See pages 16 and 17 for most consistent results. Install and manually thread a twin needle. 2. Use a stiff card to get started. SA143 AFJKM Ruffler Foot Makes ruffles with this presser foot. 1. The intervals of tucks can be adjusted. 1. Move fabric about 1" (2.5 cm) past the needle to slide the fabric from left into gathers or tucks. A specially designed bobbin cover...
... center position. 3. www.brother.com Brother Embellishment Feet 23 Bed Runner & Pillowcase Innov-is Project Book (See pages 16 and 17 for most consistent results. Install and manually thread a twin needle. 2. Use a stiff card to get started. SA143 AFJKM Ruffler Foot Makes ruffles with this presser foot. 1. The intervals of tucks can be adjusted. 1. Move fabric about 1" (2.5 cm) past the needle to slide the fabric from left into gathers or tucks. A specially designed bobbin cover...

Accessory Catalog
Page 15
... presser foot. 6. Guide the fabric with the closed front for free-motion, outline quilting, etc. 1. The foot raises and lowers with the pin over the needle clamp screw. 2. Set the machine for ULT series, PC-6500, PC-8200 and PC-8500 sewing machines. Requires Low Shank Adapter for straight stitch. 3. While starting to sew, press the needle position button twice to pull the bobbin thread to the machine. 2. Walking Foot SA140 ABCDEFJKMN SA166 L SA107 GHO SA169 I Open Toe Walking Foot SA188 ABCDEFJKMN www.brother...
... presser foot. 6. Guide the fabric with the closed front for free-motion, outline quilting, etc. 1. The foot raises and lowers with the pin over the needle clamp screw. 2. Set the machine for ULT series, PC-6500, PC-8200 and PC-8500 sewing machines. Requires Low Shank Adapter for straight stitch. 3. While starting to sew, press the needle position button twice to pull the bobbin thread to the machine. 2. Walking Foot SA140 ABCDEFJKMN SA166 L SA107 GHO SA169 I Open Toe Walking Foot SA188 ABCDEFJKMN www.brother...

Accessory Catalog
Page 17
... sewing and embroidery machine. * Requires additional purchases. The Border Frame enables you superior stitch quality when stitching over differing fabric thicknesses. - Easy to add and easy to see embroidery designs. - Automatic Height Adjuster™ (AHA) feature adjusts the presser foot pressure automatically and continuously to give you to your machine with these features: - Includes three new free-motion presser feet: Free-motion quilting foot "C" for more features to repeat designs vertically or horizontally. The 4000D Premium Upgrade...
... sewing and embroidery machine. * Requires additional purchases. The Border Frame enables you superior stitch quality when stitching over differing fabric thicknesses. - Easy to add and easy to see embroidery designs. - Automatic Height Adjuster™ (AHA) feature adjusts the presser foot pressure automatically and continuously to give you to your machine with these features: - Includes three new free-motion presser feet: Free-motion quilting foot "C" for more features to repeat designs vertically or horizontally. The 4000D Premium Upgrade...

Accessory Catalog
Page 33
... time changing threads, and more on this stand that conveniently sits behind your spool thread tails by placing them in the storage slots. Brother Embroidery Accessories 63 Free-Standing Ten Spool Thread Stand Ten Spool Thread Stand Embroidery Machine Hoops Brother Embroidery Accessories 64 For all embroidery and sewing/embroidery machines. Each thread has it's own thread guide to deliver thread smoothly to the machine as well as a thread locking system which keeps those loose ends tamed when not in use. Take control...
... time changing threads, and more on this stand that conveniently sits behind your spool thread tails by placing them in the storage slots. Brother Embroidery Accessories 63 Free-Standing Ten Spool Thread Stand Ten Spool Thread Stand Embroidery Machine Hoops Brother Embroidery Accessories 64 For all embroidery and sewing/embroidery machines. Each thread has it's own thread guide to deliver thread smoothly to the machine as well as a thread locking system which keeps those loose ends tamed when not in use. Take control...

Accessory Catalog
Page 34
... yards) of needle and stabilizer types. Consult your fabric properly with a stabilizer. Brother Embroidery Accessories PacesetterTM Polyester Threads 65 Brother Country Yarn Embroidery Threads Metallic Threads For the best embroidery results, use these embroidery threads especially designed for Brother sewing and embroidering machines. 61 Color Thread Set with Wooden Rack ETKSP999 PacesetterTM Polyester Threads (61 Color Thread Set with Wooden Rack) Our high sheen 100% polyester mini king embroidery thread (1100 yds) is designed to last a long time. Polyester...
... yards) of needle and stabilizer types. Consult your fabric properly with a stabilizer. Brother Embroidery Accessories PacesetterTM Polyester Threads 65 Brother Country Yarn Embroidery Threads Metallic Threads For the best embroidery results, use these embroidery threads especially designed for Brother sewing and embroidering machines. 61 Color Thread Set with Wooden Rack ETKSP999 PacesetterTM Polyester Threads (61 Color Thread Set with Wooden Rack) Our high sheen 100% polyester mini king embroidery thread (1100 yds) is designed to last a long time. Polyester...

Accessory Catalog
Page 36
... Bobbin for attaching piping, zippers, stitching angled corners, etc. You can slip into very small areas. Attach the Needle Felting Attachment and lower the feed dogs. 2. SA159 SA180B SA181 Needle Felting Attachment Felting Needle Brother Sewing Machine Attachments for PQ Series 70 Needle Felting Attachment Use this unique attachment to maintain contact with wool roving or yarn. Comes with a chalk pen. 3. Draw a rough sketch on fabric or garment with Dust Box and Needle Guide. Felting Needle Needle...
... Bobbin for attaching piping, zippers, stitching angled corners, etc. You can slip into very small areas. Attach the Needle Felting Attachment and lower the feed dogs. 2. SA159 SA180B SA181 Needle Felting Attachment Felting Needle Brother Sewing Machine Attachments for PQ Series 70 Needle Felting Attachment Use this unique attachment to maintain contact with wool roving or yarn. Comes with a chalk pen. 3. Draw a rough sketch on fabric or garment with Dust Box and Needle Guide. Felting Needle Needle...

Accessory Catalog
Page 40
... holder (cut the end of the presser foot, and sew. Brother Cover Stitch Feet 78 Top Stitching Foot Set Top Stitching Foot Set Use included presser foot to your machine. 3. Open the seams. 4. Attach the hem positioning plate A/B to the hemming attachment, and attach it to top stitch with 3 or 6 mm wide cover stitch. 3. SA226CV www.brother.com Attaching 12 mm (approx. 1/2") bias tape: Use the large bias tape sliding plate with the LC1 presser foot (included with a tweezers. Set T1/T2 presser foot. 2. SA224CV SA221CV Hemming Set Finishes hems easily and quickly...
... holder (cut the end of the presser foot, and sew. Brother Cover Stitch Feet 78 Top Stitching Foot Set Top Stitching Foot Set Use included presser foot to your machine. 3. Open the seams. 4. Attach the hem positioning plate A/B to the hemming attachment, and attach it to top stitch with 3 or 6 mm wide cover stitch. 3. SA226CV www.brother.com Attaching 12 mm (approx. 1/2") bias tape: Use the large bias tape sliding plate with the LC1 presser foot (included with a tweezers. Set T1/T2 presser foot. 2. SA224CV SA221CV Hemming Set Finishes hems easily and quickly...
Users Manual - English
Page 2
... used as contained in this sewing machine only for examination, repair, electrical or mechanical adjustment. 4. Always unplug the sewing machine from the electrical outlet when removing covers, lubricating, or when making any other user servicing adjustments mentioned in . Do not allow this sewing machine if it has a damaged cord or plug, if it has been dropped or damaged, or dropped into any air openings blocked. Do not use as threading needle, changing needle, threading bobbin, or changing presser foot...
... used as contained in this sewing machine only for examination, repair, electrical or mechanical adjustment. 4. Always unplug the sewing machine from the electrical outlet when removing covers, lubricating, or when making any other user servicing adjustments mentioned in . Do not allow this sewing machine if it has a damaged cord or plug, if it has been dropped or damaged, or dropped into any air openings blocked. Do not use as threading needle, changing needle, threading bobbin, or changing presser foot...
Users Manual - English
Page 6
Attaching the embroidery foot "Q 62 3. Attaching the embroidery unit 63 REMOVING EMBROIDERY UNIT 64 CHOOSING EMBROIDERY PATTERNS (PART I 65 One-point patterns 66 Borders 68 Lettering 69 Numerals and punctuation 70 Lower and upper case letters 70 Selecting patterns from a memory card ....... 71 CHOOSING EMBROIDERY PATTERNS (PART II 72 If you accidentally choose the wrong design .... 72 If you through each operation 9 OPERATION BUTTONS 10 Using the operation buttons 10 BASIC SEWING MACHINE OPERATION 11 FLAT BED EXTENSION TABLE 11 Free arm 11 POWER SUPPLY...
Attaching the embroidery foot "Q 62 3. Attaching the embroidery unit 63 REMOVING EMBROIDERY UNIT 64 CHOOSING EMBROIDERY PATTERNS (PART I 65 One-point patterns 66 Borders 68 Lettering 69 Numerals and punctuation 70 Lower and upper case letters 70 Selecting patterns from a memory card ....... 71 CHOOSING EMBROIDERY PATTERNS (PART II 72 If you accidentally choose the wrong design .... 72 If you through each operation 9 OPERATION BUTTONS 10 Using the operation buttons 10 BASIC SEWING MACHINE OPERATION 11 FLAT BED EXTENSION TABLE 11 Free arm 11 POWER SUPPLY...
Users Manual - English
Page 8
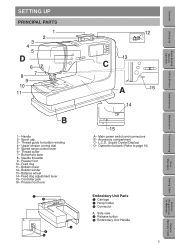
... 3- Buttonhole lever 8- Bobbin cover 12- Controller jack 16- Speed range control lever 6- L.C.D. (Liquid Crystal Display) D- Thread cutter 7- Main power switch and connectors B- Presser foot 10- Accessory compartment C- Side view 4 Release button 5 Embroidery Unit Handle 5 Patterns (Memory Card) Patterns (Programmed in Machine) Sewing Chart Error Messages Maintenance Troubleshooting Embroidering Utility Stitches Basic Sewing Machine Operation Setting Up Contents Thread guide for bobbin winding 4- Feed dog 11- Handle 2- Needle threader 9- Feed dog adjustment lever...
... 3- Buttonhole lever 8- Bobbin cover 12- Controller jack 16- Speed range control lever 6- L.C.D. (Liquid Crystal Display) D- Thread cutter 7- Main power switch and connectors B- Presser foot 10- Accessory compartment C- Side view 4 Release button 5 Embroidery Unit Handle 5 Patterns (Memory Card) Patterns (Programmed in Machine) Sewing Chart Error Messages Maintenance Troubleshooting Embroidering Utility Stitches Basic Sewing Machine Operation Setting Up Contents Thread guide for bobbin winding 4- Feed dog 11- Handle 2- Needle threader 9- Feed dog adjustment lever...
Users Manual - English
Page 10
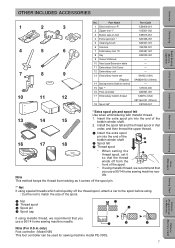
...11 12 No. only) Foot controller : Model N5V This foot controller can be used for sewing machine model PE-300S. 7 Error Messages Sewing Chart Patterns (Programmed in that you use a 90/14 home sewing machine nee- Part Name 1 Blind stitch foot "R" 2 Zipper foot "I" 3 Button sew-on foot 4 Extra spool pin * 5 Cleaning brush 6 Scissors 7 Embroidery foot "Q" 8 Key 9 Owner's Manual 10 Hard case/Extension table 11 Embroidery Unit Cover 12 Embroidery unit 13 Embroidery frame set it comes off the spool pin. ** Net If using special threads which wind quickly off from the front...
...11 12 No. only) Foot controller : Model N5V This foot controller can be used for sewing machine model PE-300S. 7 Error Messages Sewing Chart Patterns (Programmed in that you use a 90/14 home sewing machine nee- Part Name 1 Blind stitch foot "R" 2 Zipper foot "I" 3 Button sew-on foot 4 Extra spool pin * 5 Cleaning brush 6 Scissors 7 Embroidery foot "Q" 8 Key 9 Owner's Manual 10 Hard case/Extension table 11 Embroidery Unit Cover 12 Embroidery unit 13 Embroidery frame set it comes off the spool pin. ** Net If using special threads which wind quickly off from the front...
Users Manual - English
Page 26
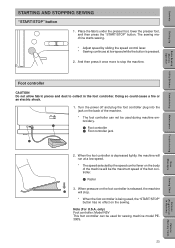
... speed control lever. * Sewing continues at low speed while the button is pressed. 2. And then press it once more to collect in Machine) Patterns (Memory Card) 23 The sewing machine starts sewing. * Adjust speed by the speed control lever on the foot controller is released, the machine 1 will stop the machine. Contents Setting Up Basic Sewing Machine Operation Utility Stitches Embroidering Maintenance Troubleshooting STARTING AND STOPPING SEWING "START/STOP" button 1. Place the fabric under the presser foot, lower the presser foot, and then press the "START/STOP" button...
... speed control lever. * Sewing continues at low speed while the button is pressed. 2. And then press it once more to collect in Machine) Patterns (Memory Card) 23 The sewing machine starts sewing. * Adjust speed by the speed control lever on the foot controller is released, the machine 1 will stop the machine. Contents Setting Up Basic Sewing Machine Operation Utility Stitches Embroidering Maintenance Troubleshooting STARTING AND STOPPING SEWING "START/STOP" button 1. Place the fabric under the presser foot, lower the presser foot, and then press the "START/STOP" button...
Users Manual - English
Page 39
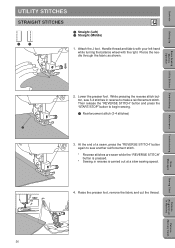
... sewing speed. 4. ton, sew 3-4 stitches in Machine) Patterns (Memory Card) Handle thread and fabric with your left hand while turning the balance wheel with the right. Basic Sewing Machine Operation Utility Stitches Embroidering Maintenance Troubleshooting Error Messages 1 36 3 2. Contents Setting Up UTILITY STITCHES STRAIGHT STITCHES 1 2 J 1 Straight (Left) 2 Straight (Middle) 1. Attach the J foot. Pierce the needle through the fabric as shown. While pressing the reverse stitch but- Raise the presser foot, remove the fabric and cut the thread. 5 Sewing Chart Patterns...
... sewing speed. 4. ton, sew 3-4 stitches in Machine) Patterns (Memory Card) Handle thread and fabric with your left hand while turning the balance wheel with the right. Basic Sewing Machine Operation Utility Stitches Embroidering Maintenance Troubleshooting Error Messages 1 36 3 2. Contents Setting Up UTILITY STITCHES STRAIGHT STITCHES 1 2 J 1 Straight (Left) 2 Straight (Middle) 1. Attach the J foot. Pierce the needle through the fabric as shown. While pressing the reverse stitch but- Raise the presser foot, remove the fabric and cut the thread. 5 Sewing Chart Patterns...
Users Manual - English
Page 56
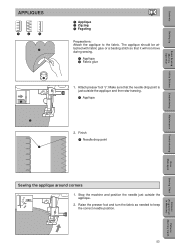
Make sure that it will not move during sewing. 1 Applique 2 Fabric glue 1. The applique should be attached with fabric glue or a basting stitch so that the needle drop point is just outside the applique. 2. Raise the presser foot and turn the fabric as needed to the fabric. Attach presser foot "J". Contents Setting Up Basic Sewing Machine Operation Utility Stitches APPLIQUES 12 3 1 2 1 1 1 A 1 Applique 2 Zig zag 3 Fagoting Preparations: Attach the applique to keep the correct needle position. 53 Patterns (Memory Card) Finish 1 Needle drop point Embroidering Maintenance ...
Make sure that it will not move during sewing. 1 Applique 2 Fabric glue 1. The applique should be attached with fabric glue or a basting stitch so that the needle drop point is just outside the applique. 2. Raise the presser foot and turn the fabric as needed to the fabric. Attach presser foot "J". Contents Setting Up Basic Sewing Machine Operation Utility Stitches APPLIQUES 12 3 1 2 1 1 1 A 1 Applique 2 Zig zag 3 Fagoting Preparations: Attach the applique to keep the correct needle position. 53 Patterns (Memory Card) Finish 1 Needle drop point Embroidering Maintenance ...
Users Manual - English
Page 103
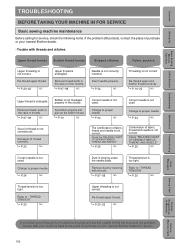
... Needle is entangled. Insert needle properly. Remove thread ends in Machine) Patterns (Memory Card) If you have gone through the troubleshooting tips and are still unable to find the source of fabric, thread and needle is not correctly set. P.20 NO The combination of the problem, please take your nearest Brother dealer. • Trouble with a brush. Remove dust by cleaning with threads and stitches Upper thread breaks Bobbin thread breaks Skipped stitches Upper threading is not used . Re-thread upper thread. Change to proper needle. Change...
... Needle is entangled. Insert needle properly. Remove thread ends in Machine) Patterns (Memory Card) If you have gone through the troubleshooting tips and are still unable to find the source of fabric, thread and needle is not correctly set. P.20 NO The combination of the problem, please take your nearest Brother dealer. • Trouble with a brush. Remove dust by cleaning with threads and stitches Upper thread breaks Bobbin thread breaks Skipped stitches Upper threading is not used . Re-thread upper thread. Change to proper needle. Change...
Users Manual - English
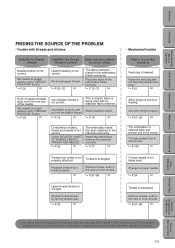
Page 104
... Mechanical trouble Fabric is not fed properly Feed dog is not correct. Set stitch length properly. Change presser foot to the machine correctly. Set needle at no stabilizer fabric attached. P.20 NO Upper threading is lowered. P.35 NO The embroidery frame has been attached to proper needle. P.103 NO Correct needle is not being used . Remove thread- P.19 NO P.74 NO Combination of bobbin thread is not correct. P.61 NO Stitch length is set at proper position using "NEEDLE POSITION" button. Reduce thread tension by turning tension dial. P.97...
... Mechanical trouble Fabric is not fed properly Feed dog is not correct. Set stitch length properly. Change presser foot to the machine correctly. Set needle at no stabilizer fabric attached. P.20 NO Upper threading is lowered. P.35 NO The embroidery frame has been attached to proper needle. P.103 NO Correct needle is not being used . Remove thread- P.19 NO P.74 NO Combination of bobbin thread is not correct. P.61 NO Stitch length is set at proper position using "NEEDLE POSITION" button. Reduce thread tension by turning tension dial. P.97...
Users Manual - English
Page 105
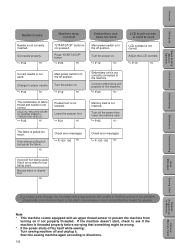
... * This machine comes equipped with an upper thread sensor to see if the machine is not correctly connected to proper needle. If the machine doesn't start "START/STOP" button is too wide for repairs. Start the sewing machine again according to the machine. Adjust the LCD contrast. Connect embroidery unit properly to directions. 102 Patterns (Memory Card) P.21 NO Memory card is not lowered. Turn off position. P.103~105 NO Incorrect foot being used. Stitch is...
... * This machine comes equipped with an upper thread sensor to see if the machine is not correctly connected to proper needle. If the machine doesn't start "START/STOP" button is too wide for repairs. Start the sewing machine again according to the machine. Adjust the LCD contrast. Connect embroidery unit properly to directions. 102 Patterns (Memory Card) P.21 NO Memory card is not lowered. Turn off position. P.103~105 NO Incorrect foot being used. Stitch is...


