Accessory Catalog
Page 8
... Innov-is equipped with a feature that keeps the foot level when sewing thick seams. 1. Attach the presser foot shaft. Brother General Sewing Accessories 13 Zigzag Foot (with leveling button) Adapter for Low Shank Attaching this adapter onto the presser foot shaft lets you set two large spool threads such ... Thread Spool Stand Brother General Sewing Accessories 14 King Thread Spool Stand Lets you use optional feet on the stand and thread the machine. The black button will return to a handle of a machine, and does not require any extra space. Remove Presser Foot Holder. 2. It can...
... Innov-is equipped with a feature that keeps the foot level when sewing thick seams. 1. Attach the presser foot shaft. Brother General Sewing Accessories 13 Zigzag Foot (with leveling button) Adapter for Low Shank Attaching this adapter onto the presser foot shaft lets you set two large spool threads such ... Thread Spool Stand Brother General Sewing Accessories 14 King Thread Spool Stand Lets you use optional feet on the stand and thread the machine. The black button will return to a handle of a machine, and does not require any extra space. Remove Presser Foot Holder. 2. It can...

Accessory Catalog
Page 14
... the needle drop position and helps to expand the presser foot area that has already been sewn. 4. www.brother.com Stitch, keeping the guide in the first row of the presser foot holder, or a mounting hole on the left side of the seam. 5. Brother Quilting Feet 25 Quality quilting Brother offers you innovative accessories to make quilting easier...
... the needle drop position and helps to expand the presser foot area that has already been sewn. 4. www.brother.com Stitch, keeping the guide in the first row of the presser foot holder, or a mounting hole on the left side of the seam. 5. Brother Quilting Feet 25 Quality quilting Brother offers you innovative accessories to make quilting easier...

Accessory Catalog
Page 40
... a chain stitch, the center needle. 2. Fold fabric and set through the holder). 4. Set the bias tape though the holder (cut the end of the presser foot, and sew. Set up your machine for a cover stitch, with 3 or 6 mm wide cover stitch. 3. SA226CV www.brother.com Sew. Insert the tab on the bias tape attachment into...
... a chain stitch, the center needle. 2. Fold fabric and set through the holder). 4. Set the bias tape though the holder (cut the end of the presser foot, and sew. Set up your machine for a cover stitch, with 3 or 6 mm wide cover stitch. 3. SA226CV www.brother.com Sew. Insert the tab on the bias tape attachment into...
Users Manual - English
Page 8
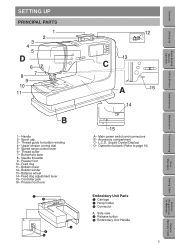
... page 10) Embroidery Unit Parts 1 Carriage 2 Hoop holder 3 Connector A. Buttonhole lever 8- Side view 4 Release button 5 Embroidery Unit Handle 5 Patterns (Memory Card) Patterns (Programmed in Machine) Sewing Chart Error Messages Maintenance Troubleshooting Embroidering Utility Stitches Basic Sewing Machine Operation Setting Up Contents Balance wheel 14- Presser foot lever 1 2 A 3 4 5 12 13 C A 16 14 15 A- SETTING...
... page 10) Embroidery Unit Parts 1 Carriage 2 Hoop holder 3 Connector A. Buttonhole lever 8- Side view 4 Release button 5 Embroidery Unit Handle 5 Patterns (Memory Card) Patterns (Programmed in Machine) Sewing Chart Error Messages Maintenance Troubleshooting Embroidering Utility Stitches Basic Sewing Machine Operation Setting Up Contents Balance wheel 14- Presser foot lever 1 2 A 3 4 5 12 13 C A 16 14 15 A- SETTING...
Users Manual - English
Page 34
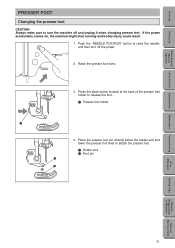
... the presser foot holder to attach the presser foot. 1 Holder-end 2 Foot pin 1 2 31 Error Messages Sewing Chart Patterns (Programmed in Machine) Patterns (Memory Card) Raise the presser foot lever. 3. Place the presser foot pin directly below the holder-end and lower the presser foot lever to release the foot. 1 Presser foot holder 1 4. Contents Setting Up Basic Sewing Machine Operation Utility Stitches Embroidering Maintenance Troubleshooting PRESSER FOOT Changing the presser foot CAUTION...
... the presser foot holder to attach the presser foot. 1 Holder-end 2 Foot pin 1 2 31 Error Messages Sewing Chart Patterns (Programmed in Machine) Patterns (Memory Card) Raise the presser foot lever. 3. Place the presser foot pin directly below the holder-end and lower the presser foot lever to release the foot. 1 Presser foot holder 1 4. Contents Setting Up Basic Sewing Machine Operation Utility Stitches Embroidering Maintenance Troubleshooting PRESSER FOOT Changing the presser foot CAUTION...
Users Manual - English
Page 35
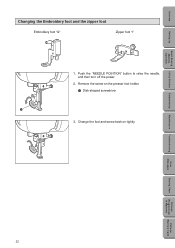
Change the foot and screw back on the presser foot holder. 1 Disk-shaped screwdriver 1 3. Embroidering Maintenance Troubleshooting Error Messages Sewing Chart Patterns (Programmed in Machine) Patterns (Memory Card) 32 Remove the screw on tightly. Contents Setting Up Basic Sewing Machine Operation Utility Stitches Changing the Embroidery foot and the zipper foot Embroidery foot "Q" Zipper foot "I" 1. Push the "NEEDLE POSITION" button to raise the needle, and then turn off the power. 2.
Change the foot and screw back on the presser foot holder. 1 Disk-shaped screwdriver 1 3. Embroidering Maintenance Troubleshooting Error Messages Sewing Chart Patterns (Programmed in Machine) Patterns (Memory Card) 32 Remove the screw on tightly. Contents Setting Up Basic Sewing Machine Operation Utility Stitches Changing the Embroidery foot and the zipper foot Embroidery foot "Q" Zipper foot "I" 1. Push the "NEEDLE POSITION" button to raise the needle, and then turn off the power. 2.
Users Manual - English
Page 51
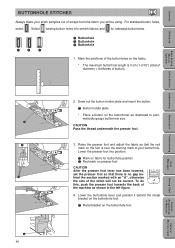
... the button. 3 1 Button holder plate * Place a button on the buttonholer as shown in Machine) Patterns (Memory Card) Raise the presser foot and adjust the fabric so that there is no gap be- Basic Sewing Machine Operation Utility Stitches Embroidering Maintenance Troubleshooting Error Messages 1 1 A 2 1 48 5 2. CAUTION Pass the thread underneath the presser foot. 5 3 3 3. hind the section...
... the button. 3 1 Button holder plate * Place a button on the buttonholer as shown in Machine) Patterns (Memory Card) Raise the presser foot and adjust the fabric so that there is no gap be- Basic Sewing Machine Operation Utility Stitches Embroidering Maintenance Troubleshooting Error Messages 1 1 A 2 1 48 5 2. CAUTION Pass the thread underneath the presser foot. 5 3 3 3. hind the section...
Users Manual - English
Page 53
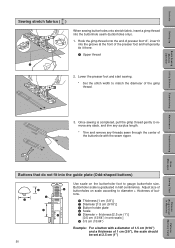
Lower the presser foot and start sewing. 5 3 * Set the stitch width to diameter + thickness of buttons. 1 Thickness [1 cm (3/8")] 2 Diameter [1.5 cm (9/16")] 3 Button holder plate 4 Scale 5 Diameter + thickness [2.5 cm (1")] [0.5 cm (13/64") in one scale.] 6 0.5 cm (13/64") Example: ...For a button with the seam ripper. Buttonholer scale is completed, pull the gimp thread gently to gauge buttonhole size. Hook the gimp thread onto the end of presser foot "A", insert...
Lower the presser foot and start sewing. 5 3 * Set the stitch width to diameter + thickness of buttons. 1 Thickness [1 cm (3/8")] 2 Diameter [1.5 cm (9/16")] 3 Button holder plate 4 Scale 5 Diameter + thickness [2.5 cm (1")] [0.5 cm (13/64") in one scale.] 6 0.5 cm (13/64") Example: ...For a button with the seam ripper. Buttonholer scale is completed, pull the gimp thread gently to gauge buttonhole size. Hook the gimp thread onto the end of presser foot "A", insert...
Users Manual - English
Page 80
... a click is not firmly attached, it could mess up to lift it out of the front pin. 2. Raise the presser foot to lift it out of the hoop up your stitching. 1 2 1 Embroidery arm frame holder 2 Pins Embroidering Maintenance Troubleshooting Error Messages Sewing Chart Patterns (Programmed in Machine) Removing the embroidery frame 5 3 1 2 1. While holding...
... a click is not firmly attached, it could mess up to lift it out of the front pin. 2. Raise the presser foot to lift it out of the hoop up your stitching. 1 2 1 Embroidery arm frame holder 2 Pins Embroidering Maintenance Troubleshooting Error Messages Sewing Chart Patterns (Programmed in Machine) Removing the embroidery frame 5 3 1 2 1. While holding...
Users Manual - English
Page 100
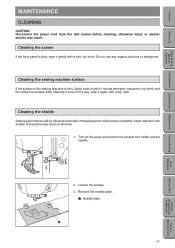
... the surface. Cleaning the shuttle Sewing performance will become unreliable if dust collects in Machine) Patterns (Memory Card) Turn off the power and remove the presser foot holder and the needle. 2. It should be affected and bobbin thread detection will be kept clean at all times. 1. Remove the needle plate. 1 Needle plate 1 97...
... the surface. Cleaning the shuttle Sewing performance will become unreliable if dust collects in Machine) Patterns (Memory Card) Turn off the power and remove the presser foot holder and the needle. 2. It should be affected and bobbin thread detection will be kept clean at all times. 1. Remove the needle plate. 1 Needle plate 1 97...
Users Manual - English
Page 104
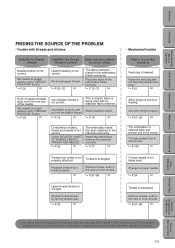
...SOURCE OF THE PROBLEM • Trouble with threads and stitches Inability to thread needle Inability for repairs. 101 P.77 NO Presser foot holder is not being used . P.97~98 NO Upper thread tension is lowered. ends in the embroidery frame correctly. Re-...Brother dealer for thread Embroldered pattern tension control is out of fabric, thread and needle is not correct. P.97~98 NO Error Messages Sewing Chart Patterns (Programmed in the race or inner shuttle. P.20~22 NO The fabric has been placed in the embroidery frame incorrectly. Change presser foot...
...SOURCE OF THE PROBLEM • Trouble with threads and stitches Inability to thread needle Inability for repairs. 101 P.77 NO Presser foot holder is not being used . P.97~98 NO Upper thread tension is lowered. ends in the embroidery frame correctly. Re-...Brother dealer for thread Embroldered pattern tension control is out of fabric, thread and needle is not correct. P.97~98 NO Error Messages Sewing Chart Patterns (Programmed in the race or inner shuttle. P.20~22 NO The fabric has been placed in the embroidery frame incorrectly. Change presser foot...


