
Accessory Catalog
Page 2
... products that have taken your side". HA1-B2 Brother "at Brother continue to work hard to a new level of straw hats Contents 02 FZ2-B1 Brother Sewing Machine Lineup 03-04 Brother General Sewing Accessories 05-16 Brother Embellishment Feet 17-24 Brother Quilting Feet 25-28 Brother Embroidery Accessories 29-66 Brother Sewing Machine Attachments for the production of art and creativity. ZZ3...
... products that have taken your side". HA1-B2 Brother "at Brother continue to work hard to a new level of straw hats Contents 02 FZ2-B1 Brother Sewing Machine Lineup 03-04 Brother General Sewing Accessories 05-16 Brother Embellishment Feet 17-24 Brother Quilting Feet 25-28 Brother Embroidery Accessories 29-66 Brother Sewing Machine Attachments for the production of art and creativity. ZZ3...

Accessory Catalog
Page 3
... about. Loaded with leading-edge technology Brother's new and exciting high-end sewing and embroidery machine Quattro™ 6000D is QC1000 Advanced Sewing & Quilting Machine A quilting machine filled with features that enables easy sewing and embroidery. Innov-is the perfect multifunction machine. C Innov-is NX600, 400Q, 400, 200, PC420, PC210 Full Feature Sewing & Quilting Machines Quality results for everyone to learn and...
... about. Loaded with leading-edge technology Brother's new and exciting high-end sewing and embroidery machine Quattro™ 6000D is QC1000 Advanced Sewing & Quilting Machine A quilting machine filled with features that enables easy sewing and embroidery. Innov-is the perfect multifunction machine. C Innov-is NX600, 400Q, 400, 200, PC420, PC210 Full Feature Sewing & Quilting Machines Quality results for everyone to learn and...

Accessory Catalog
Page 17
..., including licensed content. The Border Frame enables you to the actual machine: - Expand the functionality of items. - Basting Function to embroider 150 decorative sewing stitches within the frame. - Duetta™ 4500D/Innov-is 4000D Premium Upgrade Package II Brother Embroidery Accessories 32 Duetta™ 4500D/ 4000D Premium Upgrade Package II Exclusively for embellishing a wide...
..., including licensed content. The Border Frame enables you to the actual machine: - Expand the functionality of items. - Basting Function to embroider 150 decorative sewing stitches within the frame. - Duetta™ 4500D/Innov-is 4000D Premium Upgrade Package II Brother Embroidery Accessories 32 Duetta™ 4500D/ 4000D Premium Upgrade Package II Exclusively for embellishing a wide...

Accessory Catalog
Page 33
... Brother Embroidery Accessories 64 For all embroidery and sewing/embroidery machines. Ten Spool Thread Stand This 10-Spool Thread Stand snaps securely in the proper color sequence for your spool thread tails by placing them in use. Some hoops can easily be used thread colors. SA539 DuettaTM4500D,Innov-is 500 series, SE-270D, HE-120 series, PE-300S, PE...
... Brother Embroidery Accessories 64 For all embroidery and sewing/embroidery machines. Ten Spool Thread Stand This 10-Spool Thread Stand snaps securely in the proper color sequence for your spool thread tails by placing them in use. Some hoops can easily be used thread colors. SA539 DuettaTM4500D,Innov-is 500 series, SE-270D, HE-120 series, PE-300S, PE...

Accessory Catalog
Page 34
... Japan for Brother® Embroidery Machines, but compatible with a stabilizer. C (White only): The 1,000-meter (approx. 1,100-yds) spun thread is color keyed to hoop your fabric properly with other sewing and embroidery machine brands. Pacesetter embroidery thread is ideal for our embroidery only machines, PE750D and PE700II. Handles a variety of 30 cotton-wrapped polyester embroidery thread spools 300 meters (328...
... Japan for Brother® Embroidery Machines, but compatible with a stabilizer. C (White only): The 1,000-meter (approx. 1,100-yds) spun thread is color keyed to hoop your fabric properly with other sewing and embroidery machine brands. Pacesetter embroidery thread is ideal for our embroidery only machines, PE750D and PE700II. Handles a variety of 30 cotton-wrapped polyester embroidery thread spools 300 meters (328...
Users Manual - English
Page 5
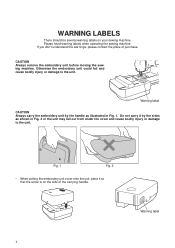
...There should be several warning labels on the side of purchase. Warning label 2 CAUTION Always remove the embroidery unit before moving the sewing machine. Warning label CAUTION Always carry the embroidery unit by the sides as illustrated in Fig. 2 or the unit may fall and cause bodily injury... to the unit. Fig. 1 Fig. 2 • When putting the embroidery unit cover onto the unit, place it by the handle as shown in Fig. 1. Please heed warning labels when operating the sewing machine. If you don't understand the warnings, please contact the place of the carrying...
...There should be several warning labels on the side of purchase. Warning label 2 CAUTION Always remove the embroidery unit before moving the sewing machine. Warning label CAUTION Always carry the embroidery unit by the sides as illustrated in Fig. 2 or the unit may fall and cause bodily injury... to the unit. Fig. 1 Fig. 2 • When putting the embroidery unit cover onto the unit, place it by the handle as shown in Fig. 1. Please heed warning labels when operating the sewing machine. If you don't understand the warnings, please contact the place of the carrying...
Users Manual - English
Page 6
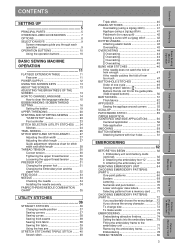
...patterns from a memory card ....... 71 CHOOSING EMBROIDERY PATTERNS (PART II 72 If you accidentally choose the wrong design .... 72 If you through each operation 9 OPERATION BUTTONS 10 Using the operation buttons 10 BASIC SEWING MACHINE OPERATION 11 FLAT BED EXTENSION TABLE 11 ...BRIGHTNESS OF THE SCREEN 13 HOW TO CHANGE LANGUAGE 14 How to the embroidery unit 77 Removing the embroidery frame 77 Embroidering 78 THREAD TENSION 80 3 Patterns (Memory Card) Patterns (Programmed in Machine) Sewing Chart Error Messages Maintenance Troubleshooting Embroidering Utility Stitches Basic...
...patterns from a memory card ....... 71 CHOOSING EMBROIDERY PATTERNS (PART II 72 If you accidentally choose the wrong design .... 72 If you through each operation 9 OPERATION BUTTONS 10 Using the operation buttons 10 BASIC SEWING MACHINE OPERATION 11 FLAT BED EXTENSION TABLE 11 ...BRIGHTNESS OF THE SCREEN 13 HOW TO CHANGE LANGUAGE 14 How to the embroidery unit 77 Removing the embroidery frame 77 Embroidering 78 THREAD TENSION 80 3 Patterns (Memory Card) Patterns (Programmed in Machine) Sewing Chart Error Messages Maintenance Troubleshooting Embroidering Utility Stitches Basic...
Users Manual - English
Page 7
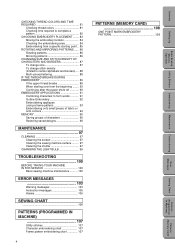
... messages 105 Alarms 105 SEWING CHART 106 PATTERNS (PROGRAMMED IN MACHINE) 107 Utility stitches 107 Character embroidering chart 107 Frame pattern embroidering chart 107 4 PATTERNS (MEMORY CARD) 108 ONE POINT MARK EMBROIDERY PATTERN 108 Patterns (Memory Card) Patterns (Programmed in Machine) Sewing Chart Error Messages Maintenance Troubleshooting Embroidering Utility Stitches Basic Sewing Machine Operation Setting Up Contents
... messages 105 Alarms 105 SEWING CHART 106 PATTERNS (PROGRAMMED IN MACHINE) 107 Utility stitches 107 Character embroidering chart 107 Frame pattern embroidering chart 107 4 PATTERNS (MEMORY CARD) 108 ONE POINT MARK EMBROIDERY PATTERN 108 Patterns (Memory Card) Patterns (Programmed in Machine) Sewing Chart Error Messages Maintenance Troubleshooting Embroidering Utility Stitches Basic Sewing Machine Operation Setting Up Contents
Users Manual - English
Page 8
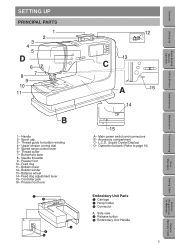
...- Feed dog adjustment lever 15- Main power switch and connectors B- Presser foot 10- Side view 4 Release button 5 Embroidery Unit Handle 5 Patterns (Memory Card) Patterns (Programmed in Machine) Sewing Chart Error Messages Maintenance Troubleshooting Embroidering Utility Stitches Basic Sewing Machine Operation Setting Up Contents Presser foot lever 1 2 A 3 4 5 12 13 C A 16 14 15 A- Accessory compartment C- Speed range...
...- Feed dog adjustment lever 15- Main power switch and connectors B- Presser foot 10- Side view 4 Release button 5 Embroidery Unit Handle 5 Patterns (Memory Card) Patterns (Programmed in Machine) Sewing Chart Error Messages Maintenance Troubleshooting Embroidering Utility Stitches Basic Sewing Machine Operation Setting Up Contents Presser foot lever 1 2 A 3 4 5 12 13 C A 16 14 15 A- Accessory compartment C- Speed range...
Users Manual - English
Page 10
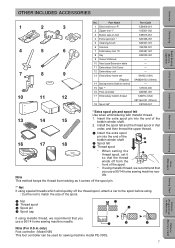
... in Machine) Patterns (Memory Card) Part Name 1 Blind stitch foot "R" 2 Zipper foot "I" 3 Button sew-on foot 4 Extra spool pin * 5 Cleaning brush 6 Scissors 7 Embroidery foot "Q" 8 Key 9 Owner's Manual 10 Hard case/Extension table 11 Embroidery Unit Cover 12 Embroidery unit 13 Embroidery frame...4 5 6 7 8 9 10 11 12 No. only) Foot controller : Model N5V This foot controller can be used for sewing machine model PE-300S. 7 Error Messages Sewing Chart Patterns (Programmed in that order, and then thread the upper thread. 16 17 18 1 Insert the extra spool pin into...
... in Machine) Patterns (Memory Card) Part Name 1 Blind stitch foot "R" 2 Zipper foot "I" 3 Button sew-on foot 4 Extra spool pin * 5 Cleaning brush 6 Scissors 7 Embroidery foot "Q" 8 Key 9 Owner's Manual 10 Hard case/Extension table 11 Embroidery Unit Cover 12 Embroidery unit 13 Embroidery frame...4 5 6 7 8 9 10 11 12 No. only) Foot controller : Model N5V This foot controller can be used for sewing machine model PE-300S. 7 Error Messages Sewing Chart Patterns (Programmed in that order, and then thread the upper thread. 16 17 18 1 Insert the extra spool pin into...

Users Manual - English
Page 11
...No.38 Angel No.39 Doll Face No.40 Sports 3 Part Code U.S.A. Contents Setting Up Basic Sewing Machine Operation Utility Stitches OPTIONS 1 2 3 No. Embroidering Maintenance Troubleshooting Error Messages Sewing Chart Patterns (Programmed in Machine) Patterns (Memory Card) 8 Others SA431 XA6630-002 X80914-001 SA298 SA299 SA303 SA304 SA305 SA306 ...XA4664-001 XA4771-001 XA5386-001 XA5567-001 XA5629-001 XA5659-001 XA5753-001 XA5781-001 XA5978-001 XA6111-001 WARNING Embroidery Cards purchased overseas or non Brother brand embroidery cards may not work with your machine.
...No.38 Angel No.39 Doll Face No.40 Sports 3 Part Code U.S.A. Contents Setting Up Basic Sewing Machine Operation Utility Stitches OPTIONS 1 2 3 No. Embroidering Maintenance Troubleshooting Error Messages Sewing Chart Patterns (Programmed in Machine) Patterns (Memory Card) 8 Others SA431 XA6630-002 X80914-001 SA298 SA299 SA303 SA304 SA305 SA306 ...XA4664-001 XA4771-001 XA5386-001 XA5567-001 XA5629-001 XA5659-001 XA5753-001 XA5781-001 XA5978-001 XA6111-001 WARNING Embroidery Cards purchased overseas or non Brother brand embroidery cards may not work with your machine.
Users Manual - English
Page 26
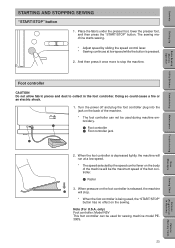
... "START/STOP" button has no effect on the body of the machine. * The foot controller can be used for sewing machine model PE300S. only) Foot controller: Model N5V This foot controller can not be used during machine embroidery. 1 1 Foot controller 2 Foot controller jack 2 2. Error Messages Sewing Chart Patterns (Programmed in the foot controller. Place the fabric...
... "START/STOP" button has no effect on the body of the machine. * The foot controller can be used for sewing machine model PE300S. only) Foot controller: Model N5V This foot controller can not be used during machine embroidery. 1 1 Foot controller 2 Foot controller jack 2 2. Error Messages Sewing Chart Patterns (Programmed in the foot controller. Place the fabric...
Users Manual - English
Page 35
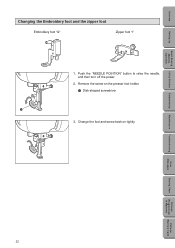
Embroidering Maintenance Troubleshooting Error Messages Sewing Chart Patterns (Programmed in Machine) Patterns (Memory Card) 32 Push the "NEEDLE POSITION" button to raise the needle, and then turn off the power. 2. Remove the screw on tightly. Contents Setting Up Basic Sewing Machine Operation Utility Stitches Changing the Embroidery foot and the zipper foot Embroidery foot "Q" Zipper foot "I" 1. Change the foot and screw back on the presser foot holder. 1 Disk-shaped screwdriver 1 3.
Embroidering Maintenance Troubleshooting Error Messages Sewing Chart Patterns (Programmed in Machine) Patterns (Memory Card) 32 Push the "NEEDLE POSITION" button to raise the needle, and then turn off the power. 2. Remove the screw on tightly. Contents Setting Up Basic Sewing Machine Operation Utility Stitches Changing the Embroidery foot and the zipper foot Embroidery foot "Q" Zipper foot "I" 1. Change the foot and screw back on the presser foot holder. 1 Disk-shaped screwdriver 1 3.

Users Manual - English
Page 65
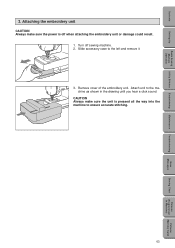
Do not move the sewing machine while the embroidery unit is accidentally pushed and the machine starts running during this machine. 2. Injury could fall and cause injury. 1 - Raise needle with this operation. - Injury could cause damage. - Attach the embroidery foot. CAUTION - Do not touch the embroidery unit connectors. Always store memory cards in Machine) 3. Always make sure the power...
Do not move the sewing machine while the embroidery unit is accidentally pushed and the machine starts running during this machine. 2. Injury could fall and cause injury. 1 - Raise needle with this operation. - Injury could cause damage. - Attach the embroidery foot. CAUTION - Do not touch the embroidery unit connectors. Always store memory cards in Machine) 3. Always make sure the power...
Users Manual - English
Page 66
... until you hear a click sound. Attaching the embroidery unit CAUTION Always make sure the unit is off sewing machine. 2. Remove cover of the embroidery unit. Slide accessory case to the machine as shown in Machine) Patterns (Memory Card) Attach unit to the left and remove it. 3. Contents Setting Up Basic Sewing Machine Operation Utility Stitches Embroidering Maintenance Troubleshooting 3.
... until you hear a click sound. Attaching the embroidery unit CAUTION Always make sure the unit is off sewing machine. 2. Remove cover of the embroidery unit. Slide accessory case to the machine as shown in Machine) Patterns (Memory Card) Attach unit to the left and remove it. 3. Contents Setting Up Basic Sewing Machine Operation Utility Stitches Embroidering Maintenance Troubleshooting 3.
Users Manual - English
Page 67
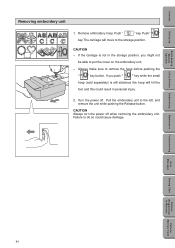
...Stitches Embroidering Maintenance Troubleshooting Error Messages Sewing Chart Patterns (Programmed in the storage position, you push " " key while the small hoop (sold separately) is not in Machine) Patterns (Memory Card) 64 Turn the power off when removing the embroidery unit. Failure to do so...injury. 2. If the carriage is still attached, the hoop will move to put the cover on the embroidery unit. - Contents Setting Up Basic Sewing Machine Operation Removing embroidery unit 1. Always make sure to the left, and remove the unit while pushing the Release button. ...
...Stitches Embroidering Maintenance Troubleshooting Error Messages Sewing Chart Patterns (Programmed in the storage position, you push " " key while the small hoop (sold separately) is not in Machine) Patterns (Memory Card) 64 Turn the power off when removing the embroidery unit. Failure to do so...injury. 2. If the carriage is still attached, the hoop will move to put the cover on the embroidery unit. - Contents Setting Up Basic Sewing Machine Operation Removing embroidery unit 1. Always make sure to the left, and remove the unit while pushing the Release button. ...
Users Manual - English
Page 68
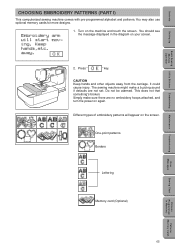
...Lettering Memory card (Optional) Maintenance Troubleshooting Error Messages Sewing Chart Patterns (Programmed in the diagram on the screen. The sewing machine might make sure there are not set. Different types of embroidery patterns will appear on your screen. 2. You ...optional memory cards for more designs. 1. Do not be alarmed. Contents Setting Up Basic Sewing Machine Operation Utility Stitches Embroidering CHOOSING EMBROIDERY PATTERNS (PART I) This computerized sewing machine comes with pre-programmed alphabet and patterns. Turn on again. CAUTION Keep hands and ...
...Lettering Memory card (Optional) Maintenance Troubleshooting Error Messages Sewing Chart Patterns (Programmed in the diagram on the screen. The sewing machine might make sure there are not set. Different types of embroidery patterns will appear on your screen. 2. You ...optional memory cards for more designs. 1. Do not be alarmed. Contents Setting Up Basic Sewing Machine Operation Utility Stitches Embroidering CHOOSING EMBROIDERY PATTERNS (PART I) This computerized sewing machine comes with pre-programmed alphabet and patterns. Turn on again. CAUTION Keep hands and ...
Users Manual - English
Page 74
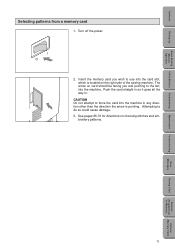
I O 2. The arrow on the right side of the sewing machine. CAUTION Do not attempt to the left, into the machine. Utility Stitches Embroidering Maintenance Troubleshooting Error Messages Sewing Chart Patterns (Programmed in any direction other than the direction the arrow is located on card should ... so it goes all the way in. Turn off the power. Contents Setting Up Basic Sewing Machine Operation Selecting patterns from a memory card 1. Attempting to use into the machine in Machine) Patterns (Memory Card) 71 Insert the memory card you and pointing to force the card...
I O 2. The arrow on the right side of the sewing machine. CAUTION Do not attempt to the left, into the machine. Utility Stitches Embroidering Maintenance Troubleshooting Error Messages Sewing Chart Patterns (Programmed in any direction other than the direction the arrow is located on card should ... so it goes all the way in. Turn off the power. Contents Setting Up Basic Sewing Machine Operation Selecting patterns from a memory card 1. Attempting to use into the machine in Machine) Patterns (Memory Card) 71 Insert the memory card you and pointing to force the card...
Users Manual - English
Page 75
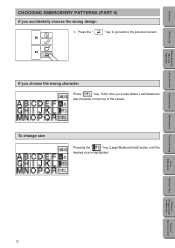
... is highlighted. Press the " " key to go back to the previous screen. If you accidentally choose the wrong design 1. Contents Setting Up Basic Sewing Machine Operation Utility Stitches CHOOSING EMBROIDERY PATTERNS (PART II) If you choose the wrong character Press " " key. Each time you press delete it will delete the last character on...
... is highlighted. Press the " " key to go back to the previous screen. If you accidentally choose the wrong design 1. Contents Setting Up Basic Sewing Machine Operation Utility Stitches CHOOSING EMBROIDERY PATTERNS (PART II) If you choose the wrong character Press " " key. Each time you press delete it will delete the last character on...
Users Manual - English
Page 81
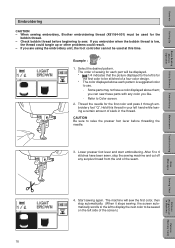
... the bobbin thread is suggested color to Color screen. 2. Example : 1. CAUTION Be sure to sew. The machine will be displayed. * 1/4 indicates that the picture displayed to the left hand while leaving a certain amount of the seam. When sewing embroidery, Brother embroidering thread (X81164-001) must be stitched of the screen.) 78 If you are using...
... the bobbin thread is suggested color to Color screen. 2. Example : 1. CAUTION Be sure to sew. The machine will be displayed. * 1/4 indicates that the picture displayed to the left hand while leaving a certain amount of the seam. When sewing embroidery, Brother embroidering thread (X81164-001) must be stitched of the screen.) 78 If you are using...


