

Users Manual - English
Page 2
... to the symbol "0" position which represents off, then remove plug from the accumulation of burns, fire, electric shock, or injury to break. 12. Use only accessories recommended by the manufacturer as a toy. Never operate this manual. 3. Return the sewing machine to break. 14. Never drop or insert any of electric shock...
... to the symbol "0" position which represents off, then remove plug from the accumulation of burns, fire, electric shock, or injury to break. 12. Use only accessories recommended by the manufacturer as a toy. Never operate this manual. 3. Return the sewing machine to break. 14. Never drop or insert any of electric shock...
Users Manual - English
Page 3
... PRESSER FOOT 18 • A power failure occurs during use CHANGING NEEEDLE 20 • Lubricating and maintaining the machine • Leaving the machine unattended. PRINCIPAL PARTS 3 ACCESSORIES 4 OPTIONS 5 PLEASE READ BEFORE USING SELECTION KEY 6 YOUR SEWING MACHINE OPERATION KEY 8 ADJUSTING SCREEN CONTRAST 9 For safe operation BOBBIN WINDING/LOWER 1. Plug the machine directly...
... PRESSER FOOT 18 • A power failure occurs during use CHANGING NEEEDLE 20 • Lubricating and maintaining the machine • Leaving the machine unattended. PRINCIPAL PARTS 3 ACCESSORIES 4 OPTIONS 5 PLEASE READ BEFORE USING SELECTION KEY 6 YOUR SEWING MACHINE OPERATION KEY 8 ADJUSTING SCREEN CONTRAST 9 For safe operation BOBBIN WINDING/LOWER 1. Plug the machine directly...
Users Manual - English
Page 5
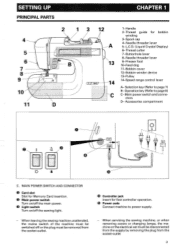
... cutter 7-Buttonhole lever 8-Needle threader lever 9-Presser foot 10-Feed dog 11-Bobbin cover 12-Bobbin winder device 13-Pulley 14-Speed range control lever A- Accessories compartment O 4 C. Main power switch and conne- Selection key (Refer to power supply. - SETTING UP PRINCIPAL PARTS 6 7 8 9 s el 10' 11 CHAPTER 1 12 -)N 13 14 C 1-Handle 2-Thread...
... cutter 7-Buttonhole lever 8-Needle threader lever 9-Presser foot 10-Feed dog 11-Bobbin cover 12-Bobbin winder device 13-Pulley 14-Speed range control lever A- Accessories compartment O 4 C. Main power switch and conne- Selection key (Refer to power supply. - SETTING UP PRINCIPAL PARTS 6 7 8 9 s el 10' 11 CHAPTER 1 12 -)N 13 14 C 1-Handle 2-Thread...
Users Manual - English
Page 7
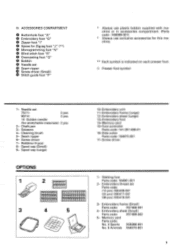
...; Screw driver (Small) 6 Stitch guide foot "P" * Always use plastic bobbin supplied with machine or in accessories compartment. (Parts code : X80309-001) * Always use exclusive accessories for stretchable materials): 2 pcs 2- Seam ripper 6- Embroidery thread set 75/11: 2 pcs 90/14: 2 pcs 14 Golden needle (for this machine. ** Each symbol is indicated on each presser foot. Memory...
...; Screw driver (Small) 6 Stitch guide foot "P" * Always use plastic bobbin supplied with machine or in accessories compartment. (Parts code : X80309-001) * Always use exclusive accessories for stretchable materials): 2 pcs 2- Seam ripper 6- Embroidery thread set 75/11: 2 pcs 90/14: 2 pcs 14 Golden needle (for this machine. ** Each symbol is indicated on each presser foot. Memory...


