
Users Manual - English
Page 3
... of the operation manual to assure correct Sewing thin material 30 installation. Do not store anything on the needle while THREADING 10 sewing. Do not touch the pulley, thread take-up, Setting bobbin 11 needle, or other hot objects. 2. SEWING 1. Always consult the operation manual when replacing or installing any THREAD...
... of the operation manual to assure correct Sewing thin material 30 installation. Do not store anything on the needle while THREADING 10 sewing. Do not touch the pulley, thread take-up, Setting bobbin 11 needle, or other hot objects. 2. SEWING 1. Always consult the operation manual when replacing or installing any THREAD...
Users Manual - English
Page 8
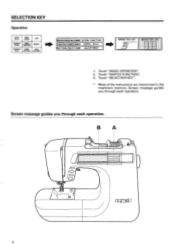
Touch "SELECTION KEY". * Most of the instructions are memorized in the machine's memory. Screen message guides you through each operation. Touch "SWITCH FUNCTION". 3. t 6 SELECTION KEY Operation UTILITY STITCH BASIC SEWING CARD CHARACTER BASIC SEWING OPERATION MEMORY DECORATIVE SEWING STITCH STITCH APPLICATION ADJUSTMENT (PREPARATION BEFORE SEWING) EXTRA FUNCTION ( SWITCH FUNCTION ( USEFUL SKILL PATTERN SELECTION)( ADJUSTMENT OPERATION KEY SELECTION KEY O 1. Touch "BASIC OPERATION". 2. Screen message guides you through each operation.
Touch "SELECTION KEY". * Most of the instructions are memorized in the machine's memory. Screen message guides you through each operation. Touch "SWITCH FUNCTION". 3. t 6 SELECTION KEY Operation UTILITY STITCH BASIC SEWING CARD CHARACTER BASIC SEWING OPERATION MEMORY DECORATIVE SEWING STITCH STITCH APPLICATION ADJUSTMENT (PREPARATION BEFORE SEWING) EXTRA FUNCTION ( SWITCH FUNCTION ( USEFUL SKILL PATTERN SELECTION)( ADJUSTMENT OPERATION KEY SELECTION KEY O 1. Touch "BASIC OPERATION". 2. Screen message guides you through each operation.
Users Manual - English
Page 9
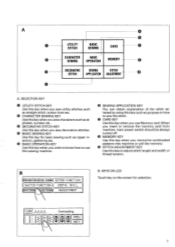
... stitches. O BASIC SEWING KEY Use this key when you wish to know how to adjust stitch length and width or thread tension. KEYS ON LCD Touch key on the screen for basic sewing such as purpose or how to sew the stitch. O SEWING APPLICATION KEY You can obtain explanation of the...
... stitches. O BASIC SEWING KEY Use this key when you wish to know how to adjust stitch length and width or thread tension. KEYS ON LCD Touch key on the screen for basic sewing such as purpose or how to sew the stitch. O SEWING APPLICATION KEY You can obtain explanation of the...
Users Manual - English
Page 11
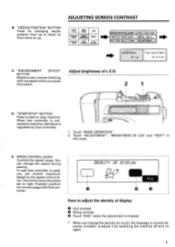
...machine off and on again. 9 "START/STOP" BUTTON Press to up. BUTTON Machine sew reverse stitching with foot controller. Touch "ADJUSTMENT", "BRIGHTNESS OF LCD" and "NEXT" in this button. 2 1 D. "ENFORCEMENT STITCH" Adjust brightness of display O Dull contrast ...• Sharp contrast • Touch "END" when the adjustment is regulated by the speed control lever. You can control maximum speed by foot controller. 1. In case foot controller is used, you press this order. Touch "BASIC OPERATION". 2. ADJUSTING SCREEN CONTRAST B.
...machine off and on again. 9 "START/STOP" BUTTON Press to up. BUTTON Machine sew reverse stitching with foot controller. Touch "ADJUSTMENT", "BRIGHTNESS OF LCD" and "NEXT" in this button. 2 1 D. "ENFORCEMENT STITCH" Adjust brightness of display O Dull contrast ...• Sharp contrast • Touch "END" when the adjustment is regulated by the speed control lever. You can control maximum speed by foot controller. 1. In case foot controller is used, you press this order. Touch "BASIC OPERATION". 2. ADJUSTING SCREEN CONTRAST B.
Users Manual - English
Page 16
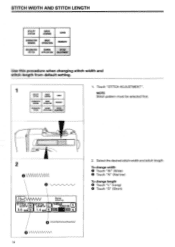
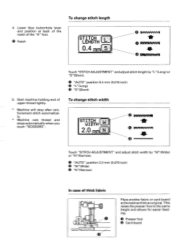
... 0 VAANV\AAAA J STITCH WIDTH lnl ST ITCH LENGTH 3.5 mm N I 1.4 mm 5 Zigzag Stitching THREAD TENSION EC 0000INE 0000 l 2. To change width O Touch "W" (Wide) 4 Touch "N" (Narrow) To change length 4 Touch "L" (Long) O Touch "S" (Short) 14 UTILITY STITCH BASIC SEWING CARD CHARACTER BASIC SEWING OPERATION MEMORY DECORATIVE SEWING STITCH STITCH APPLICATION ADJUSTMENT 1. STITCH WIDTH AND STITCH... ADJUSTMENT Use this procedure when changing stitch width and stitch length from default setting. Select the desired stitch width and stitch length. Touch "STITCH ADJUSTMENT".
... 0 VAANV\AAAA J STITCH WIDTH lnl ST ITCH LENGTH 3.5 mm N I 1.4 mm 5 Zigzag Stitching THREAD TENSION EC 0000INE 0000 l 2. To change width O Touch "W" (Wide) 4 Touch "N" (Narrow) To change length 4 Touch "L" (Long) O Touch "S" (Short) 14 UTILITY STITCH BASIC SEWING CARD CHARACTER BASIC SEWING OPERATION MEMORY DECORATIVE SEWING STITCH STITCH APPLICATION ADJUSTMENT 1. STITCH WIDTH AND STITCH... ADJUSTMENT Use this procedure when changing stitch width and stitch length from default setting. Select the desired stitch width and stitch length. Touch "STITCH ADJUSTMENT".
Users Manual - English
Page 18
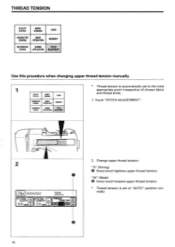
... upper thread tension. * Thread tension is automatically set at "AUTO" position normally. 16 Touch "STITCH ADJUSTMENT". r J VVVVVV Zigzag Stitching STITCH WIDTH f7,71 4.." .' .1 STITCH LENGTH 1THREAD I. ) TENSION C 0.0 rnmEl 2.5 nimEI 000008110000LIL) ...* Thread tension is set to the most appropriate point irrespective of chosen fabric and thread kinds. 1. "S" (Strong) O Every touch tightens upper thread tension. THREAD TENSION UTILITY STITCH BASIC SEWING CARD CHARACTER BASIC SEWING OPERATION MEMORY DECORATIVE SEWING STITCH STITCH APPLICATION ADJUSTMENT Use...
... upper thread tension. * Thread tension is automatically set at "AUTO" position normally. 16 Touch "STITCH ADJUSTMENT". r J VVVVVV Zigzag Stitching STITCH WIDTH f7,71 4.." .' .1 STITCH LENGTH 1THREAD I. ) TENSION C 0.0 rnmEl 2.5 nimEI 000008110000LIL) ...* Thread tension is set to the most appropriate point irrespective of chosen fabric and thread kinds. 1. "S" (Strong) O Every touch tightens upper thread tension. THREAD TENSION UTILITY STITCH BASIC SEWING CARD CHARACTER BASIC SEWING OPERATION MEMORY DECORATIVE SEWING STITCH STITCH APPLICATION ADJUSTMENT Use...

Users Manual - English
Page 19
O Lower thread • Upper thread • Surface O Locks appear on reverse side of fabric. Loosen tension by touching "S" (Strong). O Upper thread • Lower thread 13 Surface O Locks appears on surface of fabric. 17 Tighten tension by touching "W" (Weak). Correct tension O Fabric • Surface • Upper thread O Lower thread Correct tension is important because too much or too little tension will weaken your seams or cause your fabric to pucker.
O Lower thread • Upper thread • Surface O Locks appear on reverse side of fabric. Loosen tension by touching "S" (Strong). O Upper thread • Lower thread 13 Surface O Locks appears on surface of fabric. 17 Tighten tension by touching "W" (Weak). Correct tension O Fabric • Surface • Upper thread O Lower thread Correct tension is important because too much or too little tension will weaken your seams or cause your fabric to pucker.

Users Manual - English
Page 28
... sewing. Selected stitch pattern Choose the desired pattern by using "NEXT" or "PREY" and touch pattern key on the screen. NEXT 26 Thread is automatically trimmed after sewing. 3- Stitch selection 2 3 Buttonhole a PREU ( NEXT 1 4 1- "SEWING APPLICATION" shows application of presser foot (...
... sewing. Selected stitch pattern Choose the desired pattern by using "NEXT" or "PREY" and touch pattern key on the screen. NEXT 26 Thread is automatically trimmed after sewing. 3- Stitch selection 2 3 Buttonhole a PREU ( NEXT 1 4 1- "SEWING APPLICATION" shows application of presser foot (...
Users Manual - English
Page 29
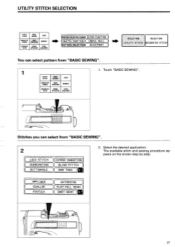
... 1. The available stitch and sewing procedure appears on the screen step by step. ( APPLIQUE SCALLOP PI NTUCK ( GATHERING FLAT FELL SEAM es DART SEAM 7 i (I 27 Touch "BASIC SEWING". Select the desired application. UTILITY STITCH SELECTION UTILITY STITCH BASIC SEWING CARD CHARACTER BASIC SEWING OPERATION MEMORY DECORATIVE SEWING STITCH STITCH APPLICATION ADJUSTMENT...
... 1. The available stitch and sewing procedure appears on the screen step by step. ( APPLIQUE SCALLOP PI NTUCK ( GATHERING FLAT FELL SEAM es DART SEAM 7 i (I 27 Touch "BASIC SEWING". Select the desired application. UTILITY STITCH SELECTION UTILITY STITCH BASIC SEWING CARD CHARACTER BASIC SEWING OPERATION MEMORY DECORATIVE SEWING STITCH STITCH APPLICATION ADJUSTMENT...
Users Manual - English
Page 30
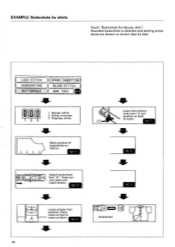
CIE Attach buttonhole • ci foot "A". Place mark on foot to mark on fabrics. EXAMPLE: Buttonhole for shirts Touch "Buttonhole for blouse, shirt". Draw out rear plate and insert button. 1_ Lower presser foot position. Rounded buttonhole is selected and sewing procedures are shown ...
CIE Attach buttonhole • ci foot "A". Place mark on foot to mark on fabrics. EXAMPLE: Buttonhole for shirts Touch "Buttonhole for blouse, shirt". Draw out rear plate and insert button. 1_ Lower presser foot position. Rounded buttonhole is selected and sewing procedures are shown ...

Users Manual - English
Page 31
Touch key you raise presser foot lever further, presser foot is raised to higher position in orderto put heavy material under presser foot easier. 2. When you ... MATERIAL)(SEWING MEDIUM MATERIAL SEWING THIN MATERIAL (SEWING ELASTIC MATERIAL) ONE POINT ADVICE (SEWING FOLDED PART)( SEWING CLIRUE SEWING CORNER 1[SCALE ON NEEDLEPLATE] FREE ARM 1. Touch "BASIC OPERATION". 2. Touch "USEFUL SKILL". 3. Sewing thick material a 1.
Touch key you raise presser foot lever further, presser foot is raised to higher position in orderto put heavy material under presser foot easier. 2. When you ... MATERIAL)(SEWING MEDIUM MATERIAL SEWING THIN MATERIAL (SEWING ELASTIC MATERIAL) ONE POINT ADVICE (SEWING FOLDED PART)( SEWING CLIRUE SEWING CORNER 1[SCALE ON NEEDLEPLATE] FREE ARM 1. Touch "BASIC OPERATION". 2. Touch "USEFUL SKILL". 3. Sewing thick material a 1.
Users Manual - English
Page 34
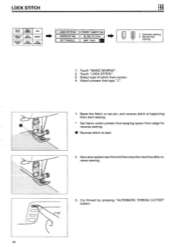
... slow speed near the end then stop the machine after reverse sewing. Select type of stitch from edge for reverse sewing. 0 Reverse stitch at start 2. Touch "LOCK STITCH". 3. Touch "BASIC SEWING". 2.
... slow speed near the end then stop the machine after reverse sewing. Select type of stitch from edge for reverse sewing. 0 Reverse stitch at start 2. Touch "LOCK STITCH". 3. Touch "BASIC SEWING". 2.

Users Manual - English
Page 35
... set 4 mm (0.157 inch) automatically during sewing. To change needle position STW ITCIHDTfiH i 0 • 0.0 mm Touch "STITCH ADJUSTMENT" and adjust the needle position by touching "L" (Long) or "S" (Short) on screen. Touch "STITCH ADJUSTMENT" and adjust the stitch length by touching "W" (Right) or "N" (Left) on screen. O Needle position: 3.5 mm (0.138 inch) • Needle position: 7.0 mm...
... set 4 mm (0.157 inch) automatically during sewing. To change needle position STW ITCIHDTfiH i 0 • 0.0 mm Touch "STITCH ADJUSTMENT" and adjust the needle position by touching "L" (Long) or "S" (Short) on screen. Touch "STITCH ADJUSTMENT" and adjust the stitch length by touching "W" (Right) or "N" (Left) on screen. O Needle position: 3.5 mm (0.138 inch) • Needle position: 7.0 mm...

Users Manual - English
Page 36
... OPERATION MEMORY DECORATIVE SEWING STITCH STITCH APPLICATION ADJUSTMENT LOCK STITCH OVERCASTING ( BUTTONHOLE ZIPPER INSERTION) BLIND STITCH ( BAR TACK )19 2 3 1 Thin or medium material 2. Elastic material 1. Touch "OVERCASTING". 3. Sew fabric applying fabric edge to guide on presser foot "G". 0 Guide G 0 Thin or normal material 0 Needle drop point O 34 Elastic material O O 2. OVERCASTING IN Thick...
... OPERATION MEMORY DECORATIVE SEWING STITCH STITCH APPLICATION ADJUSTMENT LOCK STITCH OVERCASTING ( BUTTONHOLE ZIPPER INSERTION) BLIND STITCH ( BAR TACK )19 2 3 1 Thin or medium material 2. Elastic material 1. Touch "OVERCASTING". 3. Sew fabric applying fabric edge to guide on presser foot "G". 0 Guide G 0 Thin or normal material 0 Needle drop point O 34 Elastic material O O 2. OVERCASTING IN Thick...
Users Manual - English
Page 37
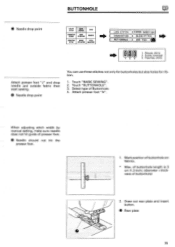
... stitches not only for buttonholes but also holes for ribbon. 1. Select type of presser foot. @ Needle should not hit the presser foot. 1. Touch "BUTTONHOLE". 3. When adjusting stitch width by manual setting, make sure needle does not hit guide of Buttonhole. 4. BUTTONHOLE O Needle drop point UTILITY... just outside fabric then start sewing. Attach presser foot "A". Max. Draw out rear plate and insert button. 0 Rear plate 35 Touch "BASIC SEWING". 2. of buttonhole length is 3 cm (1.2 inch). (diameter +thickness of buttonhole on fabrics. Mark position of buttonhole) 2.
... stitches not only for buttonholes but also holes for ribbon. 1. Select type of presser foot. @ Needle should not hit the presser foot. 1. Touch "BUTTONHOLE". 3. When adjusting stitch width by manual setting, make sure needle does not hit guide of Buttonhole. 4. BUTTONHOLE O Needle drop point UTILITY... just outside fabric then start sewing. Attach presser foot "A". Max. Draw out rear plate and insert button. 0 Rear plate 35 Touch "BASIC SEWING". 2. of buttonhole length is 3 cm (1.2 inch). (diameter +thickness of buttonhole on fabrics. Mark position of buttonhole) 2.
Users Manual - English
Page 38
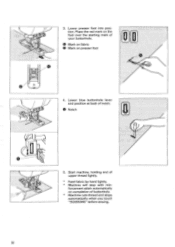
Lower presser foot into position. forcement stitch automatically on presser foot Jul 0 A 4. Start machine, holding end of your buttonhole. O Mark on fabric • Mark on completion of notch. 3. Place the red mark on the foot over the starting mark of upper thread lightly. * Feed fabric by hand lightly. * Machine will stop with rein- Lower blue buttonhole lever and position at back of buttonhole. * Machine cuts thread and stops automatically when you touch "SCISSORS" before sewing. 36 O Notch • Le 5.
Lower presser foot into position. forcement stitch automatically on presser foot Jul 0 A 4. Start machine, holding end of your buttonhole. O Mark on fabric • Mark on completion of notch. 3. Place the red mark on the foot over the starting mark of upper thread lightly. * Feed fabric by hand lightly. * Machine will stop with rein- Lower blue buttonhole lever and position at back of buttonhole. * Machine cuts thread and stops automatically when you touch "SCISSORS" before sewing. 36 O Notch • Le 5.

Users Manual - English
Page 39
...close, adjust the stitch legth by "W" (Wide) or "N" (Narrow). To change stitch width STITCH WIDTH 5.0 mm o 11=31 -6 -6- 0 IICZ===201 Touch "STITCH ADJUSTMENT" and adjust the stitch width by pressing "L" (Long). 1. Insert seam ripper into hole and cut towards the first pin.... Touch "BASIC OPERATION". 2. Touch key you desire. Touch "STITCH ADJUSTMENT" and adjust the stitch length by "L" (Long) or "S" (Short). Insert seam ripper into centre of the bar tack...
...close, adjust the stitch legth by "W" (Wide) or "N" (Narrow). To change stitch width STITCH WIDTH 5.0 mm o 11=31 -6 -6- 0 IICZ===201 Touch "STITCH ADJUSTMENT" and adjust the stitch width by pressing "L" (Long). 1. Insert seam ripper into hole and cut towards the first pin.... Touch "BASIC OPERATION". 2. Touch key you desire. Touch "STITCH ADJUSTMENT" and adjust the stitch length by "L" (Long) or "S" (Short). Insert seam ripper into centre of the bar tack...

Users Manual - English
Page 41
O Crotch end • Lock stitch • Basting O Back side 2. Press seam allowance open and place zipper with basting in middle. Centered application ii 1. Touch "BASIC SEWING". 2. Attach presser foot "I ". O Zipper e0 Basting • Back side 39 Attach presser foot "I " and sew straight stitch until you reach the crotch end ... STITCH BASIC SEWING CARD CHARACTER BASIC SEWING OPERATION MEMORY DECORATIVE SEWING STITCH STITCH APPLICATION ADJUSTMENT LOCK STITCH OVERCASTING BUTTONHOLE (ZIPPER INSERTION BLIND STITCH ) ( BAR TACK 1. Touch "ZIPPER INSERTION". 3.
O Crotch end • Lock stitch • Basting O Back side 2. Press seam allowance open and place zipper with basting in middle. Centered application ii 1. Touch "BASIC SEWING". 2. Attach presser foot "I ". O Zipper e0 Basting • Back side 39 Attach presser foot "I " and sew straight stitch until you reach the crotch end ... STITCH BASIC SEWING CARD CHARACTER BASIC SEWING OPERATION MEMORY DECORATIVE SEWING STITCH STITCH APPLICATION ADJUSTMENT LOCK STITCH OVERCASTING BUTTONHOLE (ZIPPER INSERTION BLIND STITCH ) ( BAR TACK 1. Touch "ZIPPER INSERTION". 3.

Users Manual - English
Page 44
... presser foot "A". 0 0 1. Check first needle dropping point and lower presser foot. O 0.2 cm (0.08 inch) 1 42 Touch "BASIC SEWING". 2. O Plate O Scale • 0.5 cm (0.20 inch) O Length of bar tack 2. BAR TACK UTILITY... SEWING CARD CHARACTER BASIC SEWING OPERATION MEMORY DECORATIVE SEWING STITCH STITCH APPLICATION ADJUSTMENT I LOCK STITCH j1ZI PPER INSERTION) OVERCASTING BLIND STITCH BUTTONHOLE BAR TACK al 1. Touch "BAR TACK". 3. Position pocket as illustrated. 3. Attach presser foot "A" and set size by measuring. * 0.5 - 3 cm (0.20 - 1.2 inch) is suitable...
... presser foot "A". 0 0 1. Check first needle dropping point and lower presser foot. O 0.2 cm (0.08 inch) 1 42 Touch "BASIC SEWING". 2. O Plate O Scale • 0.5 cm (0.20 inch) O Length of bar tack 2. BAR TACK UTILITY... SEWING CARD CHARACTER BASIC SEWING OPERATION MEMORY DECORATIVE SEWING STITCH STITCH APPLICATION ADJUSTMENT I LOCK STITCH j1ZI PPER INSERTION) OVERCASTING BLIND STITCH BUTTONHOLE BAR TACK al 1. Touch "BAR TACK". 3. Position pocket as illustrated. 3. Attach presser foot "A" and set size by measuring. * 0.5 - 3 cm (0.20 - 1.2 inch) is suitable...
Users Manual - English
Page 45
...) O "S"(Short) To change stitch length 4. To change stitch width r STITCH r w 1LIIDTH'. - ) 2.0 mm @ iww-we"-"m 0 IhWAYAWIrSi1Whil -IP- Touch "STITCH ADJUSTMENT" and adjust stitch length by "W"(Wide) or "N"(Narrow). O Presser foot • Card-board Start machine holding end of the "A" foot. 0 Notch... 'PSTI TCH LENGTH 0.4 min 5 5. ItANWAWANAW/WEVAI Touch "STITCH ADJUSTMENT" and adjust stitch width by "L"(Long) or "S"(Short). "AUTO" position 2.0 mm (0.079 inch) • "W"(Wide) • ...
...) O "S"(Short) To change stitch length 4. To change stitch width r STITCH r w 1LIIDTH'. - ) 2.0 mm @ iww-we"-"m 0 IhWAYAWIrSi1Whil -IP- Touch "STITCH ADJUSTMENT" and adjust stitch length by "W"(Wide) or "N"(Narrow). O Presser foot • Card-board Start machine holding end of the "A" foot. 0 Notch... 'PSTI TCH LENGTH 0.4 min 5 5. ItANWAWANAW/WEVAI Touch "STITCH ADJUSTMENT" and adjust stitch width by "L"(Long) or "S"(Short). "AUTO" position 2.0 mm (0.079 inch) • "W"(Wide) • ...


