
Users Manual - English and Spanish
Page 12
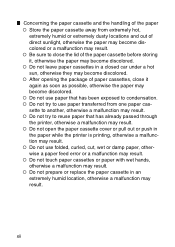
...temperature: 80.6°F / 27 °C) ! " The AC adapter case and the printer may disappear or become discolored. " When the printer is charging or printing. " Do not block the paper output slot. If printed text is written over or stamped, the text may become discolored or deformed. (→... exposed to dry naturally before operating the printer. Do not operate or store this printer in the printer being damaged or malfunctioning. ! Do not use a soft, dry cloth. " Use thermal paper with a dry cotton swab. " Do not touch the printer with wet hands. If condensation occurs,...
...temperature: 80.6°F / 27 °C) ! " The AC adapter case and the printer may disappear or become discolored. " When the printer is charging or printing. " Do not block the paper output slot. If printed text is written over or stamped, the text may become discolored or deformed. (→... exposed to dry naturally before operating the printer. Do not operate or store this printer in the printer being damaged or malfunctioning. ! Do not use a soft, dry cloth. " Use thermal paper with a dry cotton swab. " Do not touch the printer with wet hands. If condensation occurs,...
Users Manual - English and Spanish
Page 13
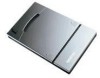
... from extremely hot, extremely humid or extremely dusty locations and out of direct sunlight, otherwise the paper may result. Do not try to condensation. ! Do not prepare or replace the paper cassette in the paper while the printer is printing, otherwise a malfunction may become discolored. ! Be sure to another, otherwise a malfunction may become discolored. ! Do not...
... from extremely hot, extremely humid or extremely dusty locations and out of direct sunlight, otherwise the paper may result. Do not try to condensation. ! Do not prepare or replace the paper cassette in the paper while the printer is printing, otherwise a malfunction may become discolored. ! Be sure to another, otherwise a malfunction may become discolored. ! Do not...

Users Manual - English and Spanish
Page 14
... it by affixing a small piece to people, animals or plants. Do not affix the adhesive-backed paper to an inconspicuous area of the material that the adhesive-backed paper is attached to, the adhesive-backed paper may become discolored, peel off, be difficult to remove, leave adhesive behind or damage the surface that...
... it by affixing a small piece to people, animals or plants. Do not affix the adhesive-backed paper to an inconspicuous area of the material that the adhesive-backed paper is attached to, the adhesive-backed paper may become discolored, peel off, be difficult to remove, leave adhesive behind or damage the surface that...

Users Manual - English and Spanish
Page 16
CONTENTS CONTENTS Introduction i Precautions iii Operating precautions xi CONTENTS 1 General Description 2 Operating Procedures 3 Charging 3 Turning on the printer 5 Preparing the paper 6 Installing the paper cassette 8 Sending data from a Pocket PC or computer ..........10 Feeding paper 12 Maintenance 13 Disposing of this printer 15 Appendix 16 Product specifications 16 Troubleshooting 18 Indicator lights 20 WARRANTY CUSTOMER SERVICE 23 1
CONTENTS CONTENTS Introduction i Precautions iii Operating precautions xi CONTENTS 1 General Description 2 Operating Procedures 3 Charging 3 Turning on the printer 5 Preparing the paper 6 Installing the paper cassette 8 Sending data from a Pocket PC or computer ..........10 Feeding paper 12 Maintenance 13 Disposing of this printer 15 Appendix 16 Product specifications 16 Troubleshooting 18 Indicator lights 20 WARRANTY CUSTOMER SERVICE 23 1

Users Manual - English and Spanish
Page 17
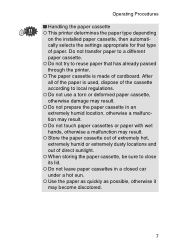
1 General Description Right side Paper cassette cover Paper check window Paper output slot Left side IrDA infrared port Status indicator light Charging indicator light Power button USB port AC adapter connector 2
1 General Description Right side Paper cassette cover Paper check window Paper output slot Left side IrDA infrared port Status indicator light Charging indicator light Power button USB port AC adapter connector 2
Users Manual - English and Spanish
Page 21
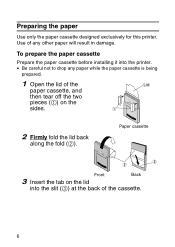
To prepare the paper cassette Prepare the paper cassette before installing it into the slit (3) at the back of the cassette. 6 Paper cassette Front Back 3 Insert the tab on the sides. 2 Firmly fold the lid back along the fold (2). Preparing the paper Use only the paper cassette designed exclusively for this printer. Use of any paper while the paper cassette is being prepared. 1 Open the lid of the Lid paper cassette, and then tear off the two pieces (1) on the lid into the printer. • Be careful not to drop any other paper will result in damage.
To prepare the paper cassette Prepare the paper cassette before installing it into the slit (3) at the back of the cassette. 6 Paper cassette Front Back 3 Insert the tab on the sides. 2 Firmly fold the lid back along the fold (2). Preparing the paper Use only the paper cassette designed exclusively for this printer. Use of any paper while the paper cassette is being prepared. 1 Open the lid of the Lid paper cassette, and then tear off the two pieces (1) on the lid into the printer. • Be careful not to drop any other paper will result in damage.
Users Manual - English and Spanish
Page 22
... locations and out of cardboard. Use the paper as quickly as possible, otherwise it may result. ! The paper cassette is used, dispose of paper. After all of the paper is made of direct sunlight. ! Do not transfer paper to close its lid. ! This printer determines the paper type depending on the installed paper cassette, then automatically selects the settings...
... locations and out of cardboard. Use the paper as quickly as possible, otherwise it may result. ! The paper cassette is used, dispose of paper. After all of the paper is made of direct sunlight. ! Do not transfer paper to close its lid. ! This printer determines the paper type depending on the installed paper cassette, then automatically selects the settings...
Users Manual - English and Spanish
Page 23
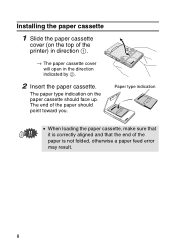
The paper type indication on the top of the printer) in direction 1. → The paper cassette cover will open in the direction indicated by 2. 2 Insert the paper cassette. The end of the paper is not folded, otherwise a paper feed error may result. 8 Installing the paper cassette 1 Slide the paper cassette cover (on the paper cassette should point toward you. Paper type indication • When loading the paper cassette, make sure that it is correctly aligned and that the end of the paper should face up.
The paper type indication on the top of the printer) in direction 1. → The paper cassette cover will open in the direction indicated by 2. 2 Insert the paper cassette. The end of the paper is not folded, otherwise a paper feed error may result. 8 Installing the paper cassette 1 Slide the paper cassette cover (on the paper cassette should point toward you. Paper type indication • When loading the paper cassette, make sure that it is correctly aligned and that the end of the paper should face up.
Users Manual - English and Spanish
Page 24
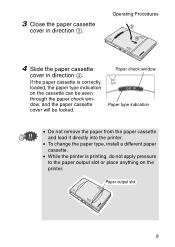
.... Operating Procedures 4 Slide the paper cassette cover in direction 3. Paper check window Paper type indication • Do not remove the paper from the paper cassette and load it directly into the printer. • To change the paper type, install a different paper cassette. • While the printer is correctly loaded, the paper type indication on the printer. Paper output slot 9 3 Close the paper cassette cover in...
.... Operating Procedures 4 Slide the paper cassette cover in direction 3. Paper check window Paper type indication • Do not remove the paper from the paper cassette and load it directly into the printer. • To change the paper type, install a different paper cassette. • While the printer is correctly loaded, the paper type indication on the printer. Paper output slot 9 3 Close the paper cassette cover in...

Users Manual - English and Spanish
Page 27
Feeding paper If a paper feed error occurs, remove the paper according to the following procedure. 1 Turn off the printer and disconnect the AC adapter. 2 Open the paper cassette cover. 3 Remove the paper cassette. 4 Remove any paper from the paper path taking care not to tear the paper. • When pulling out the paper, be sure not to tear it. 12
Feeding paper If a paper feed error occurs, remove the paper according to the following procedure. 1 Turn off the printer and disconnect the AC adapter. 2 Open the paper cassette cover. 3 Remove the paper cassette. 4 Remove any paper from the paper path taking care not to tear the paper. • When pulling out the paper, be sure not to tear it. 12

Users Manual - English and Spanish
Page 28
... that has been slightly dampened with water. ! Paper cassette sensor 13 Cleaning the paper cassette sensor If the paper cassette sensor is located in the left rear of the printer. 1 Clean off the printer and disconnect the AC Adapter. 2 Open the paper cassette cover and remove the paper cassette from the printer by wiping it with a soft, dry...
... that has been slightly dampened with water. ! Paper cassette sensor 13 Cleaning the paper cassette sensor If the paper cassette sensor is located in the left rear of the printer. 1 Clean off the printer and disconnect the AC Adapter. 2 Open the paper cassette cover and remove the paper cassette from the printer by wiping it with a soft, dry...

Users Manual - English and Spanish
Page 29
... cellophane tape to clean the entire surface of cellophane tape to turn off the printer and dis- connect the AC Adapter. 2 Open the paper cassette cover and remove the paper cassette from the pick-up roller. → Any dirt, paper dust, or contaminant on the pick-up roller 3 Affix a piece of the ...roller. 14 ! dure 3 and 4 with the tape. 5 Rotate the pick-up roller is located in the front of the paper cassette compartment and is black in color. 1 Turn off the printer before cleaning it. Be sure to the pick-up roller. 4 Remove the cellophane tape from the...
... cellophane tape to clean the entire surface of cellophane tape to turn off the printer and dis- connect the AC Adapter. 2 Open the paper cassette cover and remove the paper cassette from the pick-up roller. → Any dirt, paper dust, or contaminant on the pick-up roller 3 Affix a piece of the ...roller. 14 ! dure 3 and 4 with the tape. 5 Rotate the pick-up roller is located in the front of the paper cassette compartment and is black in color. 1 Turn off the printer before cleaning it. Be sure to the pick-up roller. 4 Remove the cellophane tape from the...

Users Manual - English and Spanish
Page 31
....6 °F / 25 °C) No. printed age at an ambient temperature of plain thermal paper) 16 3 Appendix Product specifications Printer specifications Printing Indicators Status indicator light (red/green) Charging indicator light (orange) Method Direct thermal printing with a line thermal print head Resolution 300 dpi × 300 dpi 15 seconds/sheet Print speed (standard text on thermal paper with 7 % cover- of Approximately 100 pages can be...
....6 °F / 25 °C) No. printed age at an ambient temperature of plain thermal paper) 16 3 Appendix Product specifications Printer specifications Printing Indicators Status indicator light (red/green) Charging indicator light (orange) Method Direct thermal printing with a line thermal print head Resolution 300 dpi × 300 dpi 15 seconds/sheet Print speed (standard text on thermal paper with 7 % cover- of Approximately 100 pages can be...

Users Manual - English and Spanish
Page 33
...page 20. purchased. Remedy: Make sure that this printer is securely connected to the computer with the USB cable. (→ Refer to page 12.) Symptom: Even though Remedy: Some torn paper may still the misfed paper was issued, the printer does not print. With an IrDA connection: Remedy: Make sure that... there is no obstacle between this printer and the PDA, and check that they are within 7.9" (20 cm) of...
...page 20. purchased. Remedy: Make sure that this printer is securely connected to the computer with the USB cable. (→ Refer to page 12.) Symptom: Even though Remedy: Some torn paper may still the misfed paper was issued, the printer does not print. With an IrDA connection: Remedy: Make sure that... there is no obstacle between this printer and the PDA, and check that they are within 7.9" (20 cm) of...

Users Manual - English and Spanish
Page 34
... opposite side using the same method 19 Refer to the illustration and use the tip of a ballpoint pen to page 6.) Remedy: Make sure that the paper cassette cover is firmly folded along the fold (2). (→ Refer to slide the indicated part in the illustration below have locked up roller. (→ Refer... to page 14.) Remedy: The parts indicated by "A" in the direction of the paper cassette is securely closed . Remedy: Make sure that the lid of the arrow to slide it . Appendix Symptom: The...
... opposite side using the same method 19 Refer to the illustration and use the tip of a ballpoint pen to page 6.) Remedy: Make sure that the paper cassette cover is firmly folded along the fold (2). (→ Refer to slide the indicated part in the illustration below have locked up roller. (→ Refer... to page 14.) Remedy: The parts indicated by "A" in the direction of the paper cassette is securely closed . Remedy: Make sure that the lid of the arrow to slide it . Appendix Symptom: The...

Users Manual - English and Spanish
Page 35
.... Indicator lights " Status indicator light A green light indicates the printer is installed facing the wrong direction. The paper cassette is operating correctly, while red indicates an error has occurred. A paper misfeed occurred. A system error has occurred. There is no more paper. Correctly install a paper cassette containing paper. Indicator light color Green Red Indicator light status Constantly lit...
.... Indicator lights " Status indicator light A green light indicates the printer is installed facing the wrong direction. The paper cassette is operating correctly, while red indicates an error has occurred. A paper misfeed occurred. A system error has occurred. There is no more paper. Correctly install a paper cassette containing paper. Indicator light color Green Red Indicator light status Constantly lit...

Users Manual - English and Spanish
Page 37
Description C-11 A7 Thermal paper (4.1" (105 mm) x 2.9" (74 mm)) C-21 A7 Label (4.1" (105 mm) x 2.9" (74 mm)) C-41 A7 Cut label sheet (1.0" (26.25 mm) x 2.9" (74 mm)) C-42 A7 Cut label sheet (2.1" (52.5 mm) x 2.9" (74 mm)) Count: 50 sheets/cassette (thermal paper) 30 sheets/cassette (all others) 22 MW-100 Accessories Stock No.
Description C-11 A7 Thermal paper (4.1" (105 mm) x 2.9" (74 mm)) C-21 A7 Label (4.1" (105 mm) x 2.9" (74 mm)) C-41 A7 Cut label sheet (1.0" (26.25 mm) x 2.9" (74 mm)) C-42 A7 Cut label sheet (2.1" (52.5 mm) x 2.9" (74 mm)) Count: 50 sheets/cassette (thermal paper) 30 sheets/cassette (all others) 22 MW-100 Accessories Stock No.
Users Manual - English and Spanish
Page 38
.../or alteration/removal of non What is sory Items: 90 days from the original pur- nal purchase date. 23 Appendix Brother® Printer One Year Limited Warranty and Replacement Service (For USA Only) Who is covered: ƒ Accompanying Consumable and Acces- ƒ This limited ...altered or modified in This warranty does not cover: this Product; ƒ If you are not limited to paper cassettes. ƒ Except as otherwise provided herein, Brother warrants that the Machine and the accompanying Consumable and Accessory Items will be free from defects in materials and workmanship...
.../or alteration/removal of non What is sory Items: 90 days from the original pur- nal purchase date. 23 Appendix Brother® Printer One Year Limited Warranty and Replacement Service (For USA Only) Who is covered: ƒ Accompanying Consumable and Acces- ƒ This limited ...altered or modified in This warranty does not cover: this Product; ƒ If you are not limited to paper cassettes. ƒ Except as otherwise provided herein, Brother warrants that the Machine and the accompanying Consumable and Accessory Items will be free from defects in materials and workmanship...

Users Manual - English and Spanish
Page 41
and, # will be changed in any way unless you and Brother sign the same piece of paper in which we (1) refer to this Product and your product an special offers. Your registration with Brother International Corporation, you will help us notify you of enhancements to your bill of ...sale date, (2) describe the change . Important: We recommend that you keep all original packing materials, in the event of product loss covered by insurance; Brother® Printer One Year...
and, # will be changed in any way unless you and Brother sign the same piece of paper in which we (1) refer to this Product and your product an special offers. Your registration with Brother International Corporation, you will help us notify you of enhancements to your bill of ...sale date, (2) describe the change . Important: We recommend that you keep all original packing materials, in the event of product loss covered by insurance; Brother® Printer One Year...

Quick Setup Guide - English and Spanish
Page 1
... your printer online. 5 Print!! Refer to the User's Guide. 3 Install the software for using this sheet) and check that all accessories are included with C-11 thermal paper (50 sheets). Manual structure A User's Guide and a Software Guide are enclosed. 2 Prepare the printer. Printer operation 1 Read the Quick Guide (this printer. Enclosed accessories MW-100 mobile printer Paper cassette filled with this printer. Quick...
... your printer online. 5 Print!! Refer to the User's Guide. 3 Install the software for using this sheet) and check that all accessories are included with C-11 thermal paper (50 sheets). Manual structure A User's Guide and a Software Guide are enclosed. 2 Prepare the printer. Printer operation 1 Read the Quick Guide (this printer. Enclosed accessories MW-100 mobile printer Paper cassette filled with this printer. Quick...


