Network Users Manual - English
Page 38
If the machine finds more than one network use a or b key to h. Go to choose your access point is completed. Press ...m, press a or b to r. If your network, then press OK. h Choose using a or b, and press OK. Go to manually add the SSID name. Press OK. If you want to change the key you chose No, go to l. Go to choose Keep. ...name. (For information how to the wireless device you chose Ad-hoc, go back to q. j Using a or b, choose Infrastructure when instructed. If you have to j. If you chose WPA/WPA2-PSK, go to l. If you chose Open System, go to r. If you...
If the machine finds more than one network use a or b key to h. Go to choose your access point is completed. Press ...m, press a or b to r. If your network, then press OK. h Choose using a or b, and press OK. Go to manually add the SSID name. Press OK. If you want to change the key you chose No, go to l. Go to choose Keep. ...name. (For information how to the wireless device you chose Ad-hoc, go back to q. j Using a or b, choose Infrastructure when instructed. If you have to j. If you chose WPA/WPA2-PSK, go to l. If you chose Open System, go to r. If you...

Network Users Manual - English
Page 39
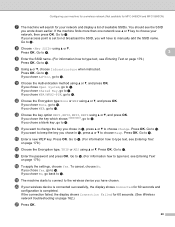
... MFC-5490CN and MFC-5890CN) (For Windows®) You have to manually add the SSID name. If your access point is set to not broadcast the SSID, you chose Ad-hoc, go to l. j Press Infrastructure when instructed. If you will search for your network and display a list of ... l Choose and press the Encryption type None or WEP. If you chose WEP, go to l. c Press MENU. If the machine finds more than one network use a or b key to continue installing drivers and software necessary for operating your device, please choose Install MFL-Pro Suite or Initial Installation / Install...
... MFC-5490CN and MFC-5890CN) (For Windows®) You have to manually add the SSID name. If your access point is set to not broadcast the SSID, you chose Ad-hoc, go to l. j Press Infrastructure when instructed. If you will search for your network and display a list of ... l Choose and press the Encryption type None or WEP. If you chose WEP, go to l. c Press MENU. If the machine finds more than one network use a or b key to continue installing drivers and software necessary for operating your device, please choose Install MFL-Pro Suite or Initial Installation / Install...
Network Users Manual - English
Page 41
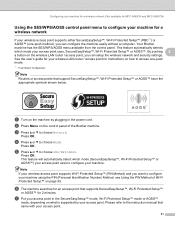
...you want to configure your access point. 31 Please refer to the instruction manual that came with your machine using the PIN (Personal Identification Number) Method, see Using the PIN Method of the Brother machine. Your Brother machine has the SES/WPS/AOSS menu available from the control panel.... SES/WPS/AOSS. a Turn on the machine by your wireless LAN router / access point for 2 minutes. e Press a or b to access one -push method), you can configure the machine easily without a computer. f The machine searches for an access point that support SecureEasySetup™, Wi-Fi ...
...you want to configure your access point. 31 Please refer to the instruction manual that came with your machine using the PIN (Personal Identification Number) Method, see Using the PIN Method of the Brother machine. Your Brother machine has the SES/WPS/AOSS menu available from the control panel.... SES/WPS/AOSS. a Turn on the machine by your wireless LAN router / access point for 2 minutes. e Press a or b to access one -push method), you can configure the machine easily without a computer. f The machine searches for an access point that support SecureEasySetup™, Wi-Fi ...
Network Users Manual - English
Page 43
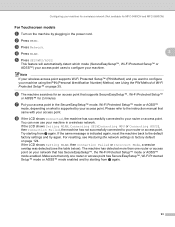
d Press WLAN. 3 e Press SES/WPS/AOSS. Please refer to the instruction manual that only one router or access point on your network that supports SecureEasySetup™, Wi-Fi Protected Setup™ or AOSS™ for 2 minutes. h If the LCD shows ... 124. b Press MENU. Try starting from e again. If the same message is supported by plugging in the power cord. The machine has detected more than one router or access point has SecureEasySetup™, Wi-Fi Protected Setup™ mode or AOSS™ mode enabled and try again.
d Press WLAN. 3 e Press SES/WPS/AOSS. Please refer to the instruction manual that only one router or access point on your network that supports SecureEasySetup™, Wi-Fi Protected Setup™ or AOSS™ for 2 minutes. h If the LCD shows ... 124. b Press MENU. Try starting from e again. If the same message is supported by plugging in the power cord. The machine has detected more than one router or access point has SecureEasySetup™, Wi-Fi Protected Setup™ mode or AOSS™ mode enabled and try again.

Network Users Manual - English
Page 45
...on the control panel of access point / router. Press OK. b Press Menu on the brand of the Brother machine. Note The setting page is used as a Registrar, follow the on-screen instruction. 1 The Registrar is on how to the WPS (Wi-Fi Protected Setup™) setting page and input... the PIN which is one of the connection methods developed by an Enrollee (your browser. (Where "access point's IP address" is the IP address of the device that manages the wireless LAN), you can setup the wireless network and security settings. See the instruction manual that came with your...
...on the control panel of access point / router. Press OK. b Press Menu on the brand of the Brother machine. Note The setting page is used as a Registrar, follow the on-screen instruction. 1 The Registrar is on how to the WPS (Wi-Fi Protected Setup™) setting page and input... the PIN which is one of the connection methods developed by an Enrollee (your browser. (Where "access point's IP address" is the IP address of the device that manages the wireless LAN), you can setup the wireless network and security settings. See the instruction manual that came with your...
Network Users Manual - English
Page 47
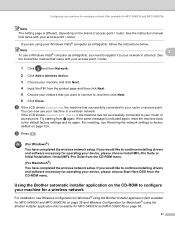
... access point. Configuring your machine for a wireless network (Not available for MFC-5490CN and MFC-5890CN) on page 58. 37 See the instruction manual that you are using the Brother installer application (Not available for MFC-5490CN and MFC-5890CN) Note The setting page is indicated again, reset the machine back to your...
... access point. Configuring your machine for a wireless network (Not available for MFC-5490CN and MFC-5890CN) on page 58. 37 See the instruction manual that you are using the Brother installer application (Not available for MFC-5490CN and MFC-5890CN) Note The setting page is indicated again, reset the machine back to your...

Network Users Manual - English
Page 52
...power and is set to not broadcast the SSID you wish to n. 42 l If your machine. Wireless configuration for Windows® using the Brother installer application (Not available for MFC-5490CN and MFC-5890CN) k The wizard will appear. To continue configuration, click OK and go to ...machine with, and then click Next. 4 Note • "SETUP" is not configured for wireless communication. Choose the access point you can manually add it by clicking the Add button. Follow the on-screen instructions for wireless networks available from your network is the default SSID of the machine.
...power and is set to not broadcast the SSID you wish to n. 42 l If your machine. Wireless configuration for Windows® using the Brother installer application (Not available for MFC-5490CN and MFC-5890CN) k The wizard will appear. To continue configuration, click OK and go to ...machine with, and then click Next. 4 Note • "SETUP" is not configured for wireless communication. Choose the access point you can manually add it by clicking the Add button. Follow the on-screen instructions for wireless networks available from your network is the default SSID of the machine.
Network Users Manual - English
Page 58
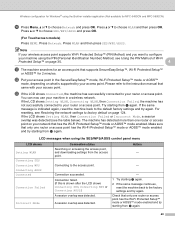
...8482;, Wi-Fi Protected Setup™ or AOSS™ for MFC-5490CN and MFC-5890CN) j Press Menu, a or b to the instruction manual that only one router or access point has the Wi-Fi Protected Setup™ mode or AOSS™ mode enabled and try again. LCD messages when ...Press a or b to your router or access point. Please refer to choose Network and press OK. Wireless configuration for Windows® using the Brother installer application (Not available for 2 minutes. If the same message is shown after the LCD shows Connecting SES, Connecting WPS or Connecting AOSS.) ...
...8482;, Wi-Fi Protected Setup™ or AOSS™ for MFC-5490CN and MFC-5890CN) j Press Menu, a or b to the instruction manual that only one router or access point has the Wi-Fi Protected Setup™ mode or AOSS™ mode enabled and try again. LCD messages when ...Press a or b to your router or access point. Please refer to choose Network and press OK. Wireless configuration for Windows® using the Brother installer application (Not available for 2 minutes. If the same message is shown after the LCD shows Connecting SES, Connecting WPS or Connecting AOSS.) ...

Network Users Manual - English
Page 72
Follow the on-screen instructions for entering the Name (SSID). To continue installation, click OK and go to associate the machine with, and then click Next. 5 Note • "SETUP" is ... the SSID, and then see if the machine and the access point are within range for wireless communication. Wireless Configuration for Macintosh® using the Brother installer application (Not available for MFC-5490CN and MFC-5890CN) k The wizard will appear. Choose the access point you can...
Follow the on-screen instructions for entering the Name (SSID). To continue installation, click OK and go to associate the machine with, and then click Next. 5 Note • "SETUP" is ... the SSID, and then see if the machine and the access point are within range for wireless communication. Wireless Configuration for Macintosh® using the Brother installer application (Not available for MFC-5490CN and MFC-5890CN) k The wizard will appear. Choose the access point you can...

Network Users Manual - English
Page 77
...™ mode or AOSS™ mode, depending on what is supported by your machine using the Brother installer application (Not available for MFC-5490CN and MFC-5890CN) i Confirm the on page 35. Press a or b to the instruction manual that supports SecureEasySetup™, Wi-Fi Protected Setup™ or AOSS™ for an access...
...™ mode or AOSS™ mode, depending on what is supported by your machine using the Brother installer application (Not available for MFC-5490CN and MFC-5890CN) i Confirm the on page 35. Press a or b to the instruction manual that supports SecureEasySetup™, Wi-Fi Protected Setup™ or AOSS™ for an access...
Quick Setup Guide - English
Page 8
... a strong possibility that Voice Mail and the Brother machine will conflict with each other names for receiving faxes? Will you be using this service such as your Brother machine? Choose Manual as your receive mode. See the instructions below . a Press Menu. Press OK. Press... OK. See Voice Mail in Chapter 7 of the User's Guide for instructions on setting up your machine using Voicemail on ...
... a strong possibility that Voice Mail and the Brother machine will conflict with each other names for receiving faxes? Will you be using this service such as your Brother machine? Choose Manual as your receive mode. See the instructions below . a Press Menu. Press OK. Press... OK. See Voice Mail in Chapter 7 of the User's Guide for instructions on setting up your machine using Voicemail on ...
Users Manual - English
Page 19
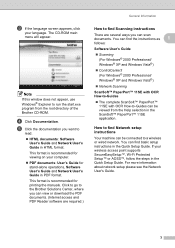
.... You can find Scanning instructions 1 There are several ways you can be connected to find basic setup instructions in PDF format. If your computer. „ PDF documents: User's Guide for printing the manuals. Note If this window does... not appear, use Windows® Explorer to read. „ HTML documents: Software User's Guide and Network User's Guide in the ScanSoft™ PaperPort™ 11SE application. Click to go to the Brother...
.... You can find Scanning instructions 1 There are several ways you can be connected to find basic setup instructions in PDF format. If your computer. „ PDF documents: User's Guide for printing the manuals. Note If this window does... not appear, use Windows® Explorer to read. „ HTML documents: Software User's Guide and Network User's Guide in the ScanSoft™ PaperPort™ 11SE application. Click to go to the Brother...
Users Manual - English
Page 56
...and your telephone on page 42. 40 Do you expect to receive voice calls and faxes automatically? Choose Manual as your receive mode. See Manual on the same line. Brother uses the term "Distinctive Ring" but different telephone companies may have other when receiving incoming calls. See ...External TAD on either Voice Mail or an answering machine with each other names for instructions on page 42. Choose ...
...and your telephone on page 42. 40 Do you expect to receive voice calls and faxes automatically? Choose Manual as your receive mode. See Manual on the same line. Brother uses the term "Distinctive Ring" but different telephone companies may have other when receiving incoming calls. See ...External TAD on either Voice Mail or an answering machine with each other names for instructions on page 42. Choose ...

Users Manual - English
Page 57
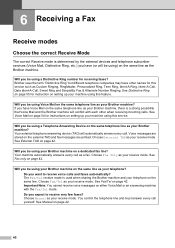
b Press a or b to choose Receive Mode. e Press Stop/Exit. Receiving a Fax To set the receive mode follow the instructions below: a Press Menu. Press OK. c Press a or b to choose Initial Setup. d Press d or c to choose Fax Only, Fax/Tel, External TAD or Manual. The LCD will display the current receive mode. 6 41 Press OK.
b Press a or b to choose Receive Mode. e Press Stop/Exit. Receiving a Fax To set the receive mode follow the instructions below: a Press Menu. Press OK. c Press a or b to choose Initial Setup. d Press d or c to choose Fax Only, Fax/Tel, External TAD or Manual. The LCD will display the current receive mode. 6 41 Press OK.

Users Manual - English
Page 69
... at an extension telephone, you'll need to send Tone signals (for example, for telephone banking), follow the instructions below: a Pick up , the machine will work when the power key is off. If the other party ... want to send you a fax, 7 activate the machine by using Quick Dial numbers. If no one is on page 23.) Fax/Tel mode will return to the Pulse dialing service. If you hang up...Off key to Fax Receive:On so that you can be made either with an external telephone, by dialing manually, or by pressing l 5 1. 53 If you are at the machine, lift the external telephone's handset...
... at an extension telephone, you'll need to send Tone signals (for example, for telephone banking), follow the instructions below: a Pick up , the machine will work when the power key is off. If the other party ... want to send you a fax, 7 activate the machine by using Quick Dial numbers. If no one is on page 23.) Fax/Tel mode will return to the Pulse dialing service. If you hang up...Off key to Fax Receive:On so that you can be made either with an external telephone, by dialing manually, or by pressing l 5 1. 53 If you are at the machine, lift the external telephone's handset...
Users Manual - English
Page 213
R Receive Mode External TAD 40 Fax Only 40 Fax/Tel 40 Manual 40 Redial/Pause 65 Reducing copies 80 incoming faxes 49 Remote Retrieval 50 access code 50 commands 51 getting your faxes 52 Remote Setup See ..., 73 User Settings 73 Resolution copy 179 fax 177 print 183 scan 182 setting for next fax 36 Ring Delay, setting 43 RingMaster 55 S Safety Instructions 115, 120 Scannable area 22 Scanning See Software User's Guide on the CD-ROM Serial Number how to find See inside front cover Shipping the...
R Receive Mode External TAD 40 Fax Only 40 Fax/Tel 40 Manual 40 Redial/Pause 65 Reducing copies 80 incoming faxes 49 Remote Retrieval 50 access code 50 commands 51 getting your faxes 52 Remote Setup See ..., 73 User Settings 73 Resolution copy 179 fax 177 print 183 scan 182 setting for next fax 36 Ring Delay, setting 43 RingMaster 55 S Safety Instructions 115, 120 Scannable area 22 Scanning See Software User's Guide on the CD-ROM Serial Number how to find See inside front cover Shipping the...


