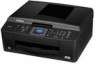

Users Manual - English
Page 8
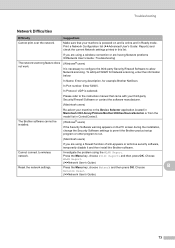
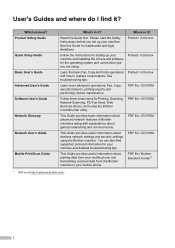
... utility. See this Guide first. Where is it? Please read the Safety Instructions before you are using. You can also find it ? Which manual? This Guide provides basic information about advanced network features of Brother machines along with explanations about general networking and common terms. This Guide provides useful information about printing data...
... utility. See this Guide first. Where is it? Please read the Safety Instructions before you are using. You can also find it ? Which manual? This Guide provides basic information about advanced network features of Brother machines along with explanations about general networking and common terms. This Guide provides useful information about printing data...
Users Manual - English
Page 42
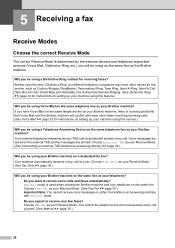
... (See Voice Mail uu page 33 for instructions on setting up your machine using this service.) Will you be using Voice Mail on the same telephone line as your Brother machine? Your machine automatically answers every call yourself. (See Manual uu page 30.) 28 Fax/Tel mode is... a Distinctive Ring number for instructions on setting up your machine using this feature.) Will you be using a Telephone Answering Device on the same telephone line as your Brother machine? Do you expect to receive voice calls and faxes automatically? Choose Manual as your Brother machine, there is a strong...
... (See Voice Mail uu page 33 for instructions on setting up your machine using this service.) Will you be using Voice Mail on the same telephone line as your Brother machine? Your machine automatically answers every call yourself. (See Manual uu page 30.) 28 Fax/Tel mode is... a Distinctive Ring number for instructions on setting up your machine using this feature.) Will you be using a Telephone Answering Device on the same telephone line as your Brother machine? Do you expect to receive voice calls and faxes automatically? Choose Manual as your Brother machine, there is a strong...
Users Manual - English
Page 43
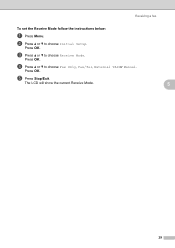
Press OK. e Press Stop/Exit. c Press a or b to choose Fax Only, Fax/Tel, External TAD or Manual. The LCD will show the current Receive Mode. 5 29 Press OK. d Press a or b to choose Receive Mode. Receiving a fax To set the Receive Mode follow the instructions below: a Press Menu. b Press a or b to choose Initial Setup. Press OK.
Press OK. e Press Stop/Exit. c Press a or b to choose Fax Only, Fax/Tel, External TAD or Manual. The LCD will show the current Receive Mode. 5 29 Press OK. d Press a or b to choose Receive Mode. Receiving a fax To set the Receive Mode follow the instructions below: a Press Menu. b Press a or b to choose Initial Setup. Press OK.
Users Manual - English
Page 83
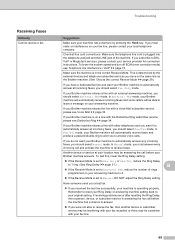
...uu page 74. If your machine is on your fax line, please contact your Brother machine shares a line with other telephones and you want it to Manual, DO NOT adjust the Ring Delay setting. Troubleshooting Suggestions Make sure your machine has... a dial tone by the external devices and telephone subscriber services you have on your fax line. 69 If you should select External TAD mode. If your service provider for connection instructions. If you do not want your Brother...
...uu page 74. If your machine is on your fax line, please contact your Brother machine shares a line with other telephones and you want it to Manual, DO NOT adjust the Ring Delay setting. Troubleshooting Suggestions Make sure your machine has... a dial tone by the external devices and telephone subscriber services you have on your fax line. 69 If you should select External TAD mode. If your service provider for connection instructions. If you do not want your Brother...
Users Manual - English
Page 87
...wireless Investigate the problem using a firewall function of anti-spyware or antivirus security software, temporarily disable it and then install the Brother software. Please refer to run. (Macintosh users) If you are using a wireless connection or are using the WLAN Report.... installation, change the Security Software settings to permit the Brother product setup program or other program to the instruction manual that your machine in the Device Selector application located in Macintosh HD/Library/Printers/Brother/Utilities/DeviceSelector or from the model list in ControlCenter2. ...
...wireless Investigate the problem using a firewall function of anti-spyware or antivirus security software, temporarily disable it and then install the Brother software. Please refer to run. (Macintosh users) If you are using a wireless connection or are using the WLAN Report.... installation, change the Security Software settings to permit the Brother product setup program or other program to the instruction manual that your machine in the Device Selector application located in Macintosh HD/Library/Printers/Brother/Utilities/DeviceSelector or from the model list in ControlCenter2. ...
Advanced Users Manual - English
Page 2
... Scan operations and how to your machine and detailed troubleshooting tips. Follow these instructions for Printing, Scanning, Network Scanning, PC-Fax Send, Web Services (Scan), and using the Brother machine. Which manual? Read this Guide for the operating system and connection type you set up... your machine. Follow the instructions for setting up your machine and installing the drivers and software for trademarks...
... Scan operations and how to your machine and detailed troubleshooting tips. Follow these instructions for Printing, Scanning, Network Scanning, PC-Fax Send, Web Services (Scan), and using the Brother machine. Which manual? Read this Guide for the operating system and connection type you set up... your machine. Follow the instructions for setting up your machine and installing the drivers and software for trademarks...

Advanced Users Manual - English
Page 5
... if you have chosen Set New Default. The machine will keep the new setting until you change the volume through the menu, by following the instructions below: Setting the Ring Volume from High to the next level. Press OK. d Press a or b to choose General Setup. Press OK. b Press...to choose Volume. Volume Settings 1 Ring Volume 1 You can also change it. Press OK. 1 General setup 1 IMPORTANT NOTE In this manual, the LCD messages of the MFC-J430W are used unless specified. Most of ring volume levels, from the menu 1 a Press Menu. Also, you will not lose your...
... if you have chosen Set New Default. The machine will keep the new setting until you change the volume through the menu, by following the instructions below: Setting the Ring Volume from High to the next level. Press OK. d Press a or b to choose General Setup. Press OK. b Press...to choose Volume. Volume Settings 1 Ring Volume 1 You can also change it. Press OK. 1 General setup 1 IMPORTANT NOTE In this manual, the LCD messages of the MFC-J430W are used unless specified. Most of ring volume levels, from the menu 1 a Press Menu. Also, you will not lose your...
Advanced Users Manual - English
Page 19
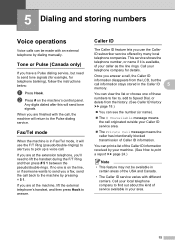
...Caller ID information. Any digits dialed after this will use the Caller ID subscriber service offered by your telephone company for telephone banking), follow the instructions below: a Press Hook. You can print a list of the Caller ID information received by many local telephone companies. If no one of ...call . b Press # on the line, or if someone wants to send you have a Pulse dialing service, but need to the machine by dialing manually. Fax/Tel mode 5 When the machine is on the machine's control panel. Once you to pick up a voice call back to lift the handset ...
...Caller ID information. Any digits dialed after this will use the Caller ID subscriber service offered by your telephone company for telephone banking), follow the instructions below: a Press Hook. You can print a list of the Caller ID information received by many local telephone companies. If no one of ...call . b Press # on the line, or if someone wants to send you have a Pulse dialing service, but need to the machine by dialing manually. Fax/Tel mode 5 When the machine is on the machine's control panel. Once you to pick up a voice call back to lift the handset ...

Quick Setup Guide - English
Page 8
... same telephone line as your receive mode. Choose External TAD as your Brother machine? See the instructions below . Choose Manual as your Brother machine, there is a strong possibility that Voice Mail and the Brother machine will conflict with each other names for instructions on setting up your machine using this service such as your receive mode...
... same telephone line as your receive mode. Choose External TAD as your Brother machine? See the instructions below . Choose Manual as your Brother machine, there is a strong possibility that Voice Mail and the Brother machine will conflict with each other names for instructions on setting up your machine using this service such as your receive mode...
Quick Setup Guide - English
Page 13
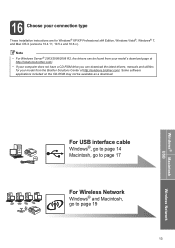
Some software applications included on the CD-ROM may not be found from the Brother Solutions Center at http://solutions.brother.com/. • If your model's download page at http://solutions.brother.com/. For USB interface cable Windows®, go to page 14 Macintosh, go to page 17...Windows® Macintosh USB Wireless Network 16 Choose your connection type These installation instructions are for your model from your computer does not have a CD-ROM drive you can download the latest drivers, manuals and utilities for Windows® XP/XP Professional x64 Edition, Windows Vista®...
Some software applications included on the CD-ROM may not be found from the Brother Solutions Center at http://solutions.brother.com/. • If your model's download page at http://solutions.brother.com/. For USB interface cable Windows®, go to page 14 Macintosh, go to page 17...Windows® Macintosh USB Wireless Network 16 Choose your connection type These installation instructions are for your model from your computer does not have a CD-ROM drive you can download the latest drivers, manuals and utilities for Windows® XP/XP Professional x64 Edition, Windows Vista®...
Quick Setup Guide - English
Page 23
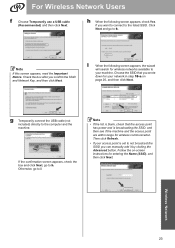
..., go to your machine. Note If this screen appears, read the Important Notice. Note • If the list is blank, check that you can manually add it by clicking the Advanced button. i When the following screen appears, check Yes if you confirm the SSID and Network Key, and then click... and the access point are within range for wireless networks available to i. Then click Refresh. • If your network in step 18-a on -screen instructions for entering the Name (SSID), and then click Next. Check the box after you want to connect to the listed SSID. For Wireless Network Users...
..., go to your machine. Note If this screen appears, read the Important Notice. Note • If the list is blank, check that you can manually add it by clicking the Advanced button. i When the following screen appears, check Yes if you confirm the SSID and Network Key, and then click... and the access point are within range for wireless networks available to i. Then click Refresh. • If your network in step 18-a on -screen instructions for entering the Name (SSID), and then click Next. Check the box after you want to connect to the listed SSID. For Wireless Network Users...
Quick Setup Guide - English
Page 27
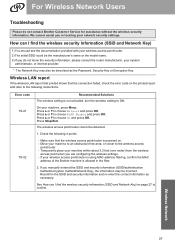
...the wireless access point when you in the filter. 2. If you do not contact Brother Customer Service for assistance without the wireless security information. Error code TS-01 TS-02... 2) The initial SSID could be the manufacturer's name or the model name. 3) If you manually entered the SSID and security information (SSID/authentication method/encryption method/Network Key), the information may ...Wireless Network 27 Press Stop/Exit. Move your machine, press Menu. Check the following instructions. We cannot assist you are configuring the wireless settings. - On your machine to ...
...the wireless access point when you in the filter. 2. If you do not contact Brother Customer Service for assistance without the wireless security information. Error code TS-01 TS-02... 2) The initial SSID could be the manufacturer's name or the model name. 3) If you manually entered the SSID and security information (SSID/authentication method/encryption method/Network Key), the information may ...Wireless Network 27 Press Stop/Exit. Move your machine, press Menu. Check the following instructions. We cannot assist you are configuring the wireless settings. - On your machine to ...

Network Users Manual - English
Page 16
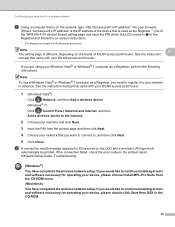
...first WEP key only. 12 If you accept the license agreements. For Macintosh users 3 IMPORTANT • The following instructions will install your wireless network settings before you can manually add it by clicking the Advanced button. Once you are sure that you have provided with this installation. g ...we have previously configured the wireless settings of anti-spyware or antivirus applications, temporarily disable them. If you are using the Brother installer application found on - Follow the on the CD-ROM we recommend that you can print please re-enable your...
...first WEP key only. 12 If you accept the license agreements. For Macintosh users 3 IMPORTANT • The following instructions will install your wireless network settings before you can manually add it by clicking the Advanced button. Once you are sure that you have provided with this installation. g ...we have previously configured the wireless settings of anti-spyware or antivirus applications, temporarily disable them. If you are using the Brother installer application found on - Follow the on the CD-ROM we recommend that you can print please re-enable your...
Network Users Manual - English
Page 17
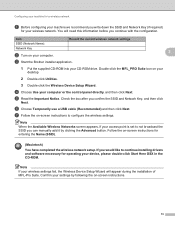
...Brother installer application. 1 Put the supplied CD-ROM into your computer or the control panel directly. e Read the Important Notice. Note When the Available Wireless Networks screen appears, if your access point is set to not broadcast the SSID you can manually add it by following the on-screen instructions...you confirm the SSID and Network Key, and then click Next. d Choose Use your CD-ROM drive. Follow the on -screen instructions to continue installing drivers and software necessary for your desktop. 2 Double-click Utilities. 3 Double-click the Wireless Device Setup Wizard....
...Brother installer application. 1 Put the supplied CD-ROM into your computer or the control panel directly. e Read the Important Notice. Note When the Available Wireless Networks screen appears, if your access point is set to not broadcast the SSID you can manually add it by following the on-screen instructions...you confirm the SSID and Network Key, and then click Next. d Choose Use your CD-ROM drive. Follow the on -screen instructions to continue installing drivers and software necessary for your desktop. 2 Double-click Utilities. 3 Double-click the Wireless Device Setup Wizard....

Network Users Manual - English
Page 19
... CD-ROM into your machine. e Choose Temporarily use an Ethernet (LAN) cable and then click Next. f Follow the on -screen instructions for a wireless network c Start the Brother installer application. Windows® 1 Put the supplied CD-ROM into your language. 2 The CD-ROM main menu will appear automatically...the box after you confirm the wireless setting is set to configure the wireless settings. Follow the on -screen instructions to not broadcast the SSID you can manually add it by clicking the Advanced button. If the model name screen appears, choose your CD-ROM drive....
... CD-ROM into your machine. e Choose Temporarily use an Ethernet (LAN) cable and then click Next. f Follow the on -screen instructions for a wireless network c Start the Brother installer application. Windows® 1 Put the supplied CD-ROM into your language. 2 The CD-ROM main menu will appear automatically...the box after you confirm the wireless setting is set to configure the wireless settings. Follow the on -screen instructions to not broadcast the SSID you can manually add it by clicking the Advanced button. If the model name screen appears, choose your CD-ROM drive....
Network Users Manual - English
Page 24
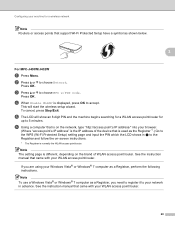
... WLAN access point/router. 20 f Using a computer that is on the brand of the device that came with your WLAN access point/router. See the instruction manual that is the IP address of WLAN access point/router. e The LCD will start the wireless setup wizard. To cancel, press Stop/Exit. Note The...; or Windows® 7 computer as a Registrar, you are using your network in e to your Windows Vista® or Windows® 7 computer as shown below. 3 For MFC-J430W/J432W 3 a Press Menu. Press OK.
... WLAN access point/router. 20 f Using a computer that is on the brand of the device that came with your WLAN access point/router. See the instruction manual that is the IP address of WLAN access point/router. e The LCD will start the wireless setup wizard. To cancel, press Stop/Exit. Note The...; or Windows® 7 computer as a Registrar, you are using your network in e to your Windows Vista® or Windows® 7 computer as shown below. 3 For MFC-J430W/J432W 3 a Press Menu. Press OK.
Network Users Manual - English
Page 26
... your browser. (Where "access point's IP address" is the IP address of WLAN access point/router. See the instruction 3 manual that is used as a Registrar, perform the following instructions. If the connection failed, check the error code on the LCD and a wireless LAN report will automatically be printed.... See the instruction manual that came with your WLAN access point/router. 1 (Windows Vista®) Click , Network, and then Add a wireless device. (Windows® 7) Click...
... your browser. (Where "access point's IP address" is the IP address of WLAN access point/router. See the instruction 3 manual that is used as a Registrar, perform the following instructions. If the connection failed, check the error code on the LCD and a wireless LAN report will automatically be printed.... See the instruction manual that came with your WLAN access point/router. 1 (Windows Vista®) Click , Network, and then Add a wireless device. (Windows® 7) Click...
Software Users Manual - English
Page 21
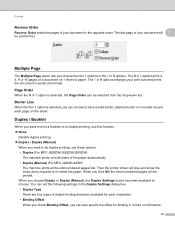
...8226; Duplex Type There are four types of the paper automatically. • Duplex (Manual) (For MFC-J280WJ430W) The machine prints all the odd numbered pages first. When you choose Duplex or Duplex (Manual), the Duplex Settings button becomes available to do duplex printing, use these options. &#...this function. None Disable duplex printing. Duplex / Duplex (Manual) When you can be selected from the drop-down list. The last page of your document will stop and show the instructions required to have a solid border, dashed border or no border around each orientation...
...8226; Duplex Type There are four types of the paper automatically. • Duplex (Manual) (For MFC-J280WJ430W) The machine prints all the odd numbered pages first. When you choose Duplex or Duplex (Manual), the Duplex Settings button becomes available to do duplex printing, use these options. &#...this function. None Disable duplex printing. Duplex / Duplex (Manual) When you can be selected from the drop-down list. The last page of your document will stop and show the instructions required to have a solid border, dashed border or no border around each orientation...
Software Users Manual - English
Page 22
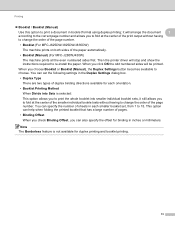
...duplex binding directions available for each orientation. • Booklet Printing Method When Divide into smaller individual booklet sets, it will stop and show the instructions required to choose. When you can set , from 1 to 15. When you to fold at the center of the print output without ...having to change the order of the paper automatically. • Booklet (Manual) (For MFC-J280WJ430W) The machine prints all the even numbered sides first. Note The Borderless feature is selected: This option allows you to print the ...
...duplex binding directions available for each orientation. • Booklet Printing Method When Divide into smaller individual booklet sets, it will stop and show the instructions required to choose. When you can set , from 1 to 15. When you to fold at the center of the print output without ...having to change the order of the paper automatically. • Booklet (Manual) (For MFC-J280WJ430W) The machine prints all the even numbered sides first. Note The Borderless feature is selected: This option allows you to print the ...


