Owners Manual
Page 125
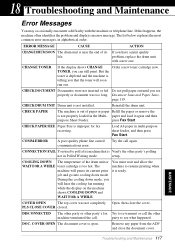
... down mode. COVER OPEN The top cover was too long. DOC. MAINTENANCE Troubleshooting and Maintenance 117 ERROR MESSAGE CAUSE ACTION CHANGE DRUM SOON The drum unit is too hot. press Fax Start. CHECK PAPER SIZE Paper Size is open. Load A4 paper in Polled Waiting mode....and Paper Jams, page 119. CHECK DRUM UNIT Drum unit is ready. TONER, you will soon run out. Remove any paper from the ADF and close the cover. 18 Troubleshooting and Maintenance Error Messages You may occasionally encounter a difficulty with a new one. The machine to re-transmit or ...
... down mode. COVER OPEN The top cover was too long. DOC. MAINTENANCE Troubleshooting and Maintenance 117 ERROR MESSAGE CAUSE ACTION CHANGE DRUM SOON The drum unit is too hot. press Fax Start. CHECK PAPER SIZE Paper Size is open. Load A4 paper in Polled Waiting mode....and Paper Jams, page 119. CHECK DRUM UNIT Drum unit is ready. TONER, you will soon run out. Remove any paper from the ADF and close the cover. 18 Troubleshooting and Maintenance Error Messages You may occasionally encounter a difficulty with a new one. The machine to re-transmit or ...
Owners Manual
Page 126
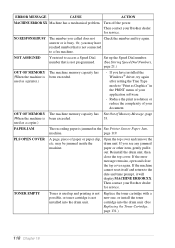
... paper clip, Open the top cover and remove the etc. Replace the toner cartridge with a new one, or install the toner cartridge into the drum unit. If you may be jammed inside the drum unit. PLS OPEN COVER A page, piece of Memory Message, page 53. If the error message ...machine. NOT ASSIGNED You tried to the date and time prompt, it out. PAPER JAM The recording paper is not programmed. Then contact your Brother dealer for service. ERROR MESSAGE CAUSE ACTION MACHINE ERROR XX Machine has a mechanical problem. Turn off the power. Or, you have reached ...
... paper clip, Open the top cover and remove the etc. Replace the toner cartridge with a new one, or install the toner cartridge into the drum unit. If you may be jammed inside the drum unit. PLS OPEN COVER A page, piece of Memory Message, page 53. If the error message ...machine. NOT ASSIGNED You tried to the date and time prompt, it out. PAPER JAM The recording paper is not programmed. Then contact your Brother dealer for service. ERROR MESSAGE CAUSE ACTION MACHINE ERROR XX Machine has a mechanical problem. Turn off the power. Or, you have reached ...

Owners Manual
Page 128
Paper is jammed near the Drum Unit or in the Multi-purpose Sheet Feeder 1 Push down the paper lever to pull the jammed paper upward and out of the feeder. 2 Open the top cover and check that a torn piece of paper does not remain inside the machine. 3 Close the top cover. Paper is Jammed near drum unit 120 Chapter 18 Paper is Jammed in the Fuser Unit 1 Open the top cover by pulling the lever toward you. 2 Remove the drum unit. 3 Gently pull out the jammed paper. 4 Reinstall the drum unit. 5 Close the top cover.
Paper is jammed near the Drum Unit or in the Multi-purpose Sheet Feeder 1 Push down the paper lever to pull the jammed paper upward and out of the feeder. 2 Open the top cover and check that a torn piece of paper does not remain inside the machine. 3 Close the top cover. Paper is Jammed near drum unit 120 Chapter 18 Paper is Jammed in the Fuser Unit 1 Open the top cover by pulling the lever toward you. 2 Remove the drum unit. 3 Gently pull out the jammed paper. 4 Reinstall the drum unit. 5 Close the top cover.
Owners Manual
Page 130
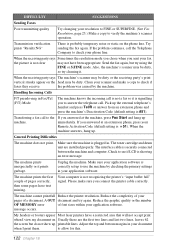
...pages have a restricted area that will not accept print. Please make a copy to use the machine by the machine. My headers or footers appear Most laser printers have text missing. to the machine. The machine knows the incoming call to allow for this. 122 Chapter 18 Make sure the machine is.... Pick up to check if faxes they receive the problem was caused by checking the primary settings in Fax/Tel (F/T) Mode. The toner cartridge and drum unit are the first two lines and last two lines, leaves 62 the screen but try again. Your computer is #51). A OUT document and...
...pages have a restricted area that will not accept print. Please make a copy to use the machine by the machine. My headers or footers appear Most laser printers have text missing. to the machine. The machine knows the incoming call to allow for this. 122 Chapter 18 Make sure the machine is.... Pick up to check if faxes they receive the problem was caused by checking the primary settings in Fax/Tel (F/T) Mode. The toner cartridge and drum unit are the first two lines and last two lines, leaves 62 the screen but try again. Your computer is #51). A OUT document and...
Owners Manual
Page 131
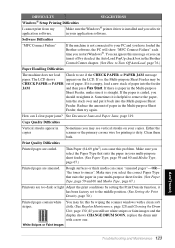
... so, the Multi-purpose Sheet Feeder may be CHECK PAPER or PAPER out of paper in your PC and you have loaded the Brother software, the PC will show "MFC Connect Failure" each time you can I cannot print from my application software. If the paper is installed and you should straighten it... and Cleaning the Drum Unit, page 130.) If you may fix this problem. The LCD shows appears on your multi-purpose sheet feeder. (See Paper Type, page 59 and 60 and Media Type, page 67.) Printed pages are curled. Sometimes it off by wiping the scanner windows with a new one. Reduce the...
... so, the Multi-purpose Sheet Feeder may be CHECK PAPER or PAPER out of paper in your PC and you have loaded the Brother software, the PC will show "MFC Connect Failure" each time you can I cannot print from my application software. If the paper is installed and you should straighten it... and Cleaning the Drum Unit, page 130.) If you may fix this problem. The LCD shows appears on your multi-purpose sheet feeder. (See Paper Type, page 59 and 60 and Media Type, page 67.) Printed pages are curled. Sometimes it off by wiping the scanner windows with a new one. Reduce the...
Owners Manual
Page 132
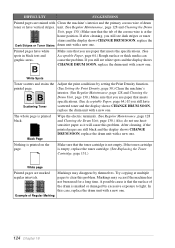
...scatters and stains the printed page. After cleaning, if the printed pages are still black and the display shows CHANGE DRUM SOON, replace the drum unit with a new one . If the toner cartridge is marked or damaged by themselves. If you use heatsensitive paper as it will cause... position. Make sure that you still see dark stripes or toner stains and the display shows CHANGE DRUM SOON, replace the Dark Stripes or Toner Stains drum unit with a new one . DIFFICULTY SUGGESTIONS Printed pages are marked regular intervals. Black Page Wipe the electric terminals. (See Regular...
...scatters and stains the printed page. After cleaning, if the printed pages are still black and the display shows CHANGE DRUM SOON, replace the drum unit with a new one . If the toner cartridge is marked or damaged by themselves. If you use heatsensitive paper as it will cause... position. Make sure that you still see dark stripes or toner stains and the display shows CHANGE DRUM SOON, replace the Dark Stripes or Toner Stains drum unit with a new one . DIFFICULTY SUGGESTIONS Printed pages are marked regular intervals. Black Page Wipe the electric terminals. (See Regular...
Owners Manual
Page 133
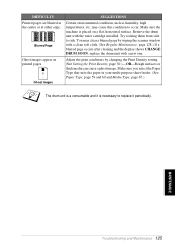
...window with a clean soft cloth. (See Regular Maintenance, page 128.) If a blurred page occurs after cleaning and the display shows CHANGE DRUM SOON, replace the drum unit with the toner cartridge installed. may clear a blurred page by changing the Print Density setting. (See Setting the Print Density, page... suits the paper in your multi-purpose sheet feeder. (See Paper Type, page 59 and 60 and Media Type, page 67.) The drum unit is a consumable and it is placed on printed pages. MAINTENANCE Troubleshooting and Maintenance 125 DIFFICULTY Printed pages are blurred at the centre ...
...window with a clean soft cloth. (See Regular Maintenance, page 128.) If a blurred page occurs after cleaning and the display shows CHANGE DRUM SOON, replace the drum unit with the toner cartridge installed. may clear a blurred page by changing the Print Density setting. (See Setting the Print Density, page... suits the paper in your multi-purpose sheet feeder. (See Paper Type, page 59 and 60 and Media Type, page 67.) The drum unit is a consumable and it is placed on printed pages. MAINTENANCE Troubleshooting and Maintenance 125 DIFFICULTY Printed pages are blurred at the centre ...
Owners Manual
Page 134
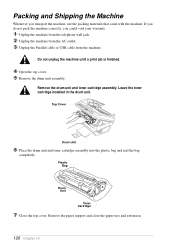
... and toner cartridge assembly. Top Cover Drum Unit 6 Place the drum unit and toner cartridge assembly into the plastic bag and seal the bag completely. Plastic Bag Drum Unit Toner Cartridge 7 Close the top cover. Remove the paper support and close the paper tray and extension. 126 Chapter 18... Leave the toner cartridge installed in the drum unit. Packing and Shipping the Machine Whenever you could void your warranty. 1 Unplug the machine from the telephone wall jack. 2 Unplug the ...
... and toner cartridge assembly. Top Cover Drum Unit 6 Place the drum unit and toner cartridge assembly into the plastic bag and seal the bag completely. Plastic Bag Drum Unit Toner Cartridge 7 Close the top cover. Remove the paper support and close the paper tray and extension. 126 Chapter 18... Leave the toner cartridge installed in the drum unit. Packing and Shipping the Machine Whenever you could void your warranty. 1 Unplug the machine from the telephone wall jack. 2 Unplug the ...
Owners Manual
Page 135
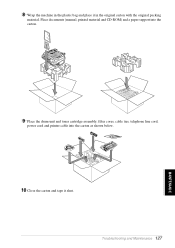
8 Wrap the machine in the original carton with the original packing material. Place documents (manual, printed material and CD-ROM) and a paper support into the carton. 9 Place the drum unit and toner cartridge assembly, filter cores, cable ties, telephone line cord, power cord and printer cable into the carton as shown below. 10 Close the carton and tape it in the plastic bag and place it shut. Troubleshooting and Maintenance 127 MAINTENANCE
8 Wrap the machine in the original carton with the original packing material. Place documents (manual, printed material and CD-ROM) and a paper support into the carton. 9 Place the drum unit and toner cartridge assembly, filter cores, cable ties, telephone line cord, power cord and printer cable into the carton as shown below. 10 Close the carton and tape it in the plastic bag and place it shut. Troubleshooting and Maintenance 127 MAINTENANCE

Owners Manual
Page 136
... You can keep the machine in optimum condition by cleaning it on a lint free cloth. Avoid using thinners or other organic solvents to clean the drum unit during this routine.
... You can keep the machine in optimum condition by cleaning it on a lint free cloth. Avoid using thinners or other organic solvents to clean the drum unit during this routine.
Owners Manual
Page 137
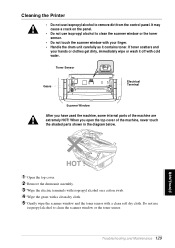
When you have used the machine, some internal parts of the machine, never touch the shaded parts shown in the diagram below. Troubleshooting and Maintenance 129 If toner scatters and your finger. • Handle the drum unit carefully as it off with cold water. Toner Sensor Gears Electrical...are extremely HOT! Do not use isopropyl alcohol to remove dirt from the control panel. MAINTENANCE 1 Open the top cover. 2 Remove the drum unit assembly. 3 Wipe the electric terminals with isopropyl alcohol on the panel. • Do not use isopropyl alcohol to clean the scanner window...
When you have used the machine, some internal parts of the machine, never touch the shaded parts shown in the diagram below. Troubleshooting and Maintenance 129 If toner scatters and your finger. • Handle the drum unit carefully as it off with cold water. Toner Sensor Gears Electrical...are extremely HOT! Do not use isopropyl alcohol to remove dirt from the control panel. MAINTENANCE 1 Open the top cover. 2 Remove the drum unit assembly. 3 Wipe the electric terminals with isopropyl alcohol on the panel. • Do not use isopropyl alcohol to clean the scanner window...
Owners Manual
Page 138
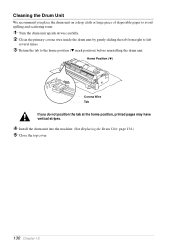
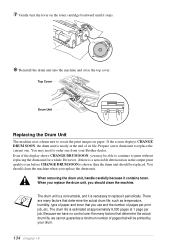
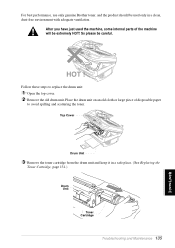
...the home position, printed pages may have vertical stripes. 4 Install the drum unit into the machine. (See Replacing the Drum Unit, page 134.) 5 Close the top cover. 130 Chapter 18 Home Position (w) Corona Wire Tab If you place the drum unit on a drop cloth or large piece of disposable paper to ...avoid spilling and scattering toner. 1 Turn the drum unit upside down carefully. 2 Clean the primary corona wire inside the drum unit by gently sliding the tab from right to left several times. 3 Return the tab to the home position (w mark position...
...the home position, printed pages may have vertical stripes. 4 Install the drum unit into the machine. (See Replacing the Drum Unit, page 134.) 5 Close the top cover. 130 Chapter 18 Home Position (w) Corona Wire Tab If you place the drum unit on a drop cloth or large piece of disposable paper to ...avoid spilling and scattering toner. 1 Turn the drum unit upside down carefully. 2 Clean the primary corona wire inside the drum unit by gently sliding the tab from right to left several times. 3 Return the tab to the home position (w mark position...
Owners Manual
Page 140
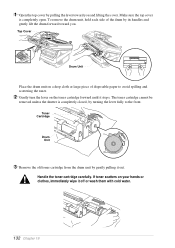
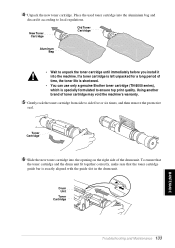
... turn the lever on the toner cartridge forward until it stops. Top Cover Drum Unit Place the drum unit on your hands or clothes, immediately wipe it out. Toner Cartridge Drum Unit 3 Remove the old toner cartridge from the drum unit by gently pulling it off or wash them with cold water. 132 Chapter... 18 If toner scatters on a drop cloth or large piece of the drum by its handles and gently lift the drum forward toward you . Handle the toner cartridge carefully. 1 Open the top cover by pulling the lever toward you and lifting the...
... turn the lever on the toner cartridge forward until it stops. Top Cover Drum Unit Place the drum unit on your hands or clothes, immediately wipe it out. Toner Cartridge Drum Unit 3 Remove the old toner cartridge from the drum unit by gently pulling it off or wash them with cold water. 132 Chapter... 18 If toner scatters on a drop cloth or large piece of the drum by its handles and gently lift the drum forward toward you . Handle the toner cartridge carefully. 1 Open the top cover by pulling the lever toward you and lifting the...
Owners Manual
Page 141
... for a long period of time, the toner life is shortened. • You can use only a genuine Brother toner cartridge (TN-8000 series), which is exactly aligned with the guide slot in the drum unit. Place the used toner cartridge into the aluminium bag and discard it into the opening on the...the toner cartridge from side to side five or six times, and then remove the protective seal. To ensure that the toner cartridge and the drum unit fit together correctly, make sure that the toner cartridge guide bar is specially formulated to local regulations. 4 Unpack the new toner cartridge. New...
... for a long period of time, the toner life is shortened. • You can use only a genuine Brother toner cartridge (TN-8000 series), which is exactly aligned with the guide slot in the drum unit. Place the used toner cartridge into the aluminium bag and discard it into the opening on the...the toner cartridge from side to side five or six times, and then remove the protective seal. To ensure that the toner cartridge and the drum unit fit together correctly, make sure that the toner cartridge guide bar is specially formulated to local regulations. 4 Unpack the new toner cartridge. New...
Owners Manual
Page 142
...the print images on the toner cartridge backward until it periodically. You may be printed by your Brother dealer. However, if there is a noticeable deterioration in the output print quality even before CHANGE DRUM SOON is estimated at approximately 8,000 pages at the end of pages that will be able ...to continue to order one . The drum life is shown, then the drum unit should clean the machine when you may need to print without replacing the drum unit for a while. Because we cannot guarantee a minimum number of its life. If...
...the print images on the toner cartridge backward until it periodically. You may be printed by your Brother dealer. However, if there is a noticeable deterioration in the output print quality even before CHANGE DRUM SOON is estimated at approximately 8,000 pages at the end of pages that will be able ...to continue to order one . The drum life is shown, then the drum unit should clean the machine when you may need to print without replacing the drum unit for a while. Because we cannot guarantee a minimum number of its life. If...
Owners Manual
Page 143
...on an old cloth or large piece of the machine will be careful. So please be extremely HOT! Top Cover Drum Unit 3 Remove the toner cartridge from the drum unit and keep it in a clean, dust-free environment with adequate ventilation. After you have just used only in... the Toner Cartridge, page 131.) Drum Unit Toner Cartridge Troubleshooting and Maintenance 135 MAINTENANCE Follow these steps to avoid spilling and scattering the toner. For best performance, use only genuine Brother toner, and the product should be used the machine, some internal parts of disposable paper to replace ...
...on an old cloth or large piece of the machine will be careful. So please be extremely HOT! Top Cover Drum Unit 3 Remove the toner cartridge from the drum unit and keep it in a clean, dust-free environment with adequate ventilation. After you have just used only in... the Toner Cartridge, page 131.) Drum Unit Toner Cartridge Troubleshooting and Maintenance 135 MAINTENANCE Follow these steps to avoid spilling and scattering the toner. For best performance, use only genuine Brother toner, and the product should be used the machine, some internal parts of disposable paper to replace ...
Owners Manual
Page 144
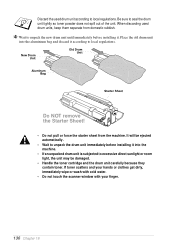
... Sheet! • Do not pull or force the starter sheet from domestic rubbish. 4 Wait to local regulations. Place the old drum unit into the machine. • If an unpacked drum unit is subjected to excessive direct sunlight or room light, the unit may be ejected automatically. • Wait to unpack the... wipe or wash with cold water. • Do not touch the scanner window with your finger. 136 Chapter 18 When discarding used drum unit according to seal the drum unit tightly so toner powder does not spill out of the unit. It will be damaged. • Handle the toner cartridge and ...
... Sheet! • Do not pull or force the starter sheet from domestic rubbish. 4 Wait to local regulations. Place the old drum unit into the machine. • If an unpacked drum unit is subjected to excessive direct sunlight or room light, the unit may be ejected automatically. • Wait to unpack the... wipe or wash with cold water. • Do not touch the scanner window with your finger. 136 Chapter 18 When discarding used drum unit according to seal the drum unit tightly so toner powder does not spill out of the unit. It will be damaged. • Handle the toner cartridge and ...
Owners Manual
Page 145
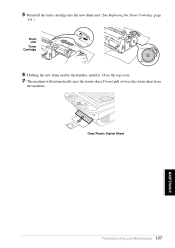
5 Reinstall the toner cartridge into the new drum unit. (See Replacing the Toner Cartridge, page 131.) Drum Unit Toner Cartridge 6 Holding the new drum unit by the handles, install it. Close the top cover. 7 The machine will automatically eject the starter sheet. Do not pull or force the starter sheet from the machine. Clear Plastic Starter Sheet Troubleshooting and Maintenance 137 MAINTENANCE
5 Reinstall the toner cartridge into the new drum unit. (See Replacing the Toner Cartridge, page 131.) Drum Unit Toner Cartridge 6 Holding the new drum unit by the handles, install it. Close the top cover. 7 The machine will automatically eject the starter sheet. Do not pull or force the starter sheet from the machine. Clear Plastic Starter Sheet Troubleshooting and Maintenance 137 MAINTENANCE
Owners Manual
Page 150
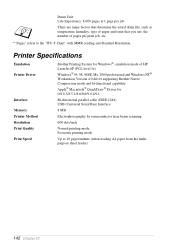
...Printer Driver Interface Memory Printer Method Resolution Print Quality Print Speed Brother Printing System for Windows®, emulation mode of pages per job There are many factors that determine the actual drum life, such as temperature, humidity, type of paper and ... Version 4.0 driver supporting Brother Native Compression mode and bi-directional capability Apple® Macintosh® QuickDraw® Driver for OS 8.5/8.5.1/8.6/9.0/9.0.4/9.1 Bi-directional parallel cable (IEEE-1284) USB (Universal Serial Bus) Interface 8 MB Electrophotography by semiconductor laser beam scanning 600 dots/...
...Printer Driver Interface Memory Printer Method Resolution Print Quality Print Speed Brother Printing System for Windows®, emulation mode of pages per job There are many factors that determine the actual drum life, such as temperature, humidity, type of paper and ... Version 4.0 driver supporting Brother Native Compression mode and bi-directional capability Apple® Macintosh® QuickDraw® Driver for OS 8.5/8.5.1/8.6/9.0/9.0.4/9.1 Bi-directional parallel cable (IEEE-1284) USB (Universal Serial Bus) Interface 8 MB Electrophotography by semiconductor laser beam scanning 600 dots/...

Owners Manual
Page 152
... (including consequential) caused by reliance on telephone number 0161 931 2258 or fax number 0161 931 2218. (For UK only) Model Name Description Laser Fax Toner TN-8000 Laser Fax Drum DR-8000 144 Chapter 20 Brother reserves the right to make changes without notice. Trademarks Multi-Function Link Pro is a registered trademark of... notice in the U.S. These are registered trademarks of ScanSoft, Inc. Macintosh is a registered trademark, and iMac is mentioned in this product are registered trademarks of International Business Machines Corporation.
... (including consequential) caused by reliance on telephone number 0161 931 2258 or fax number 0161 931 2218. (For UK only) Model Name Description Laser Fax Toner TN-8000 Laser Fax Drum DR-8000 144 Chapter 20 Brother reserves the right to make changes without notice. Trademarks Multi-Function Link Pro is a registered trademark of... notice in the U.S. These are registered trademarks of ScanSoft, Inc. Macintosh is a registered trademark, and iMac is mentioned in this product are registered trademarks of International Business Machines Corporation.


