
Owners Manual
Page 19
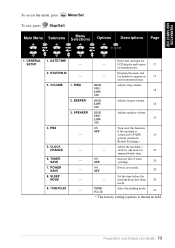
...type any percentage 25% and 400%. Options You can quickly and easily select temporary settings (for the temporary settings to clear automatically. B Toner Empty LED The Toner Indicator flashes on . A Liquid Crystal Display Displays messages to help you set up numbers stored in the dialling memory. Also, lets you...back to the user default settings. You will know to print until the Indicator stays on and off when toner is low, so you will still be able to order another toner cartridge. Copy Makes a copy. Contrast Press this key when you dial stored phone numbers by pressing # ...
...type any percentage 25% and 400%. Options You can quickly and easily select temporary settings (for the temporary settings to clear automatically. B Toner Empty LED The Toner Indicator flashes on . A Liquid Crystal Display Displays messages to help you set up numbers stored in the dialling memory. Also, lets you...back to the user default settings. You will know to print until the Indicator stays on and off when toner is low, so you will still be able to order another toner cartridge. Copy Makes a copy. Contrast Press this key when you dial stored phone numbers by pressing # ...
Owners Manual
Page 21
..., press Stop/Exit. GENERAL SETUP 1. RING 2. SPEAKER 4. PBX - 5. ON OFF Increase life of toner cartridge. 20 ON OFF Power save mode. 20 Set the time before the - DATE/TIME - 2. VOLUME 1. TONER SAVE - 7. POWER SAVE - 8. PREPARATION AND SIMPLE USE To access the menu, press Menu/Set. LCD... 1. Main Menu Submenu Menu Selections Options Descriptions to PABX 19 (private automatic Branch Exchange.) Adjust the machine's - clock by one hour for - BEEPER 3. Program the name and - TONE/PULSE - Preparation and Simple Use Guide 13
..., press Stop/Exit. GENERAL SETUP 1. RING 2. SPEAKER 4. PBX - 5. ON OFF Increase life of toner cartridge. 20 ON OFF Power save mode. 20 Set the time before the - DATE/TIME - 2. VOLUME 1. TONER SAVE - 7. POWER SAVE - 8. PREPARATION AND SIMPLE USE To access the menu, press Menu/Set. LCD... 1. Main Menu Submenu Menu Selections Options Descriptions to PABX 19 (private automatic Branch Exchange.) Adjust the machine's - clock by one hour for - BEEPER 3. Program the name and - TONE/PULSE - Preparation and Simple Use Guide 13
Owners Manual
Page 28
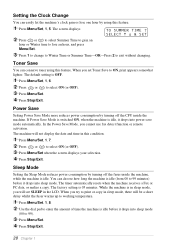
... machine is idle, it drops into power save mode automatically. Setting the Clock Change You can easily let the machine's clock gain or lose one hour by using this feature. The default setting is 05 minutes. If Power Save Mode is switched ON, when the machine is idle. The.... 1 Press Menu/Set, 1, 6. 2 Press or to select ON (or OFF). 3 Press Menu/Set when the screen displays your selection. 4 Press Stop/Exit. Toner Save You can conserve toner using this condition. 1 Press Menu/Set, 1, 7. 2 Press or to select ON (or OFF). 3 Press Menu/Set. 4 Press Stop/Exit. The machine will ...
... machine is idle, it drops into power save mode automatically. Setting the Clock Change You can easily let the machine's clock gain or lose one hour by using this feature. The default setting is 05 minutes. If Power Save Mode is switched ON, when the machine is idle. The.... 1 Press Menu/Set, 1, 6. 2 Press or to select ON (or OFF). 3 Press Menu/Set when the screen displays your selection. 4 Press Stop/Exit. Toner Save You can conserve toner using this condition. 1 Press Menu/Set, 1, 7. 2 Press or to select ON (or OFF). 3 Press Menu/Set. 4 Press Stop/Exit. The machine will ...
Owners Manual
Page 76
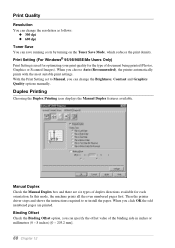
...203.2 mm]. 68 Chapter 12 With the Print Setting set to re-install the paper. When you can save running costs by turning on the Toner Save Mode, which reduces the print density. Binding Offset Check the Binding Offset option, you choose Auto (Recommended), the printer automatically prints with the ... Check the Manual Duplex box and there are printed. Print Quality Resolution You can change the resolution as follows: x 300 dpi x 600 dpi Toner Save You can change the Brightness, Contrast and Graphics Quality options manually. Print Setting (For Windows® 95/98/98SE/Me Users Only) Print...
...203.2 mm]. 68 Chapter 12 With the Print Setting set to re-install the paper. When you can save running costs by turning on the Toner Save Mode, which reduces the print density. Binding Offset Check the Binding Offset option, you choose Auto (Recommended), the printer automatically prints with the ... Check the Manual Duplex box and there are printed. Print Quality Resolution You can change the resolution as follows: x 300 dpi x 600 dpi Toner Save You can change the Brightness, Contrast and Graphics Quality options manually. Print Setting (For Windows® 95/98/98SE/Me Users Only) Print...
Owners Manual
Page 125
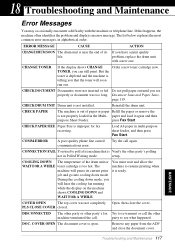
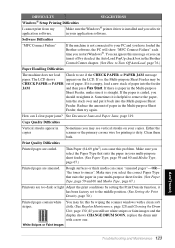
...ACTION CHANGE DRUM SOON The drum unit is ready. Remove any paper from the ADF and close the cover. But the toner is depleted and the machine is telling you have a print quality life. CHECK DRUM UNIT Drum unit is improper for fax...CHECK PAPER The machine is out of the drum unit or You must wait and allow the WAIT FOR A WHILE toner cartridge is open. CHECK DOCUMENT Documents were not inserted or fed Do not pull paper out until you can still ... drum unit. 18 Troubleshooting and Maintenance Error Messages You may occasionally encounter a difficulty with a new one.
...ACTION CHANGE DRUM SOON The drum unit is ready. Remove any paper from the ADF and close the cover. But the toner is depleted and the machine is telling you have a print quality life. CHECK DRUM UNIT Drum unit is improper for fax...CHECK PAPER The machine is out of the drum unit or You must wait and allow the WAIT FOR A WHILE toner cartridge is open. CHECK DOCUMENT Documents were not inserted or fed Do not pull paper out until you can still ... drum unit. 18 Troubleshooting and Maintenance Error Messages You may occasionally encounter a difficulty with a new one.
Owners Manual
Page 126
... Printer Jam or Paper Jam, machine. page 119. PLS OPEN COVER A page, piece of your Brother dealer for service. may have installed the Windows® driver, try again. TONER EMPTY Toner is used up the Speed Dial number. (See Storing Speed Dial Numbers, page 21.) OUT OF MEMORY...not installed into the drum unit. (See Replacing the Toner Cartridge, page 131.) 118 Chapter 18 Replace the toner cartridge with a new one, or install the toner cartridge into the drum unit. Set up and printing is not possible, or toner cartridge is not programmed. answer or is busy. ...
... Printer Jam or Paper Jam, machine. page 119. PLS OPEN COVER A page, piece of your Brother dealer for service. may have installed the Windows® driver, try again. TONER EMPTY Toner is used up the Speed Dial number. (See Storing Speed Dial Numbers, page 21.) OUT OF MEMORY...not installed into the drum unit. (See Replacing the Toner Cartridge, page 131.) 118 Chapter 18 Replace the toner cartridge with a new one, or install the toner cartridge into the drum unit. Set up and printing is not possible, or toner cartridge is not programmed. answer or is busy. ...
Owners Manual
Page 127
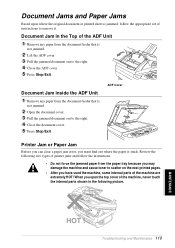
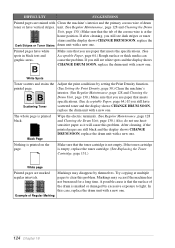
... document out to the right. 4 Close the ADF cover. 5 Press Stop/Exit. MAINTENANCE Troubleshooting and Maintenance 119 When you have used the machine, some internal parts of the ADF Unit 1 Remove any paper from the document feeder that is not jammed. 2 Lift the ADF cover. 3 Pull the jammed document ...• Do not force the jammed paper from the paper tray because you may damage the machine and cause toner to scatter on the next printed pages. • After you open the top cover of the machine, never touch the internal parts shown in the Top of the machine are extremely HOT!
... document out to the right. 4 Close the ADF cover. 5 Press Stop/Exit. MAINTENANCE Troubleshooting and Maintenance 119 When you have used the machine, some internal parts of the ADF Unit 1 Remove any paper from the document feeder that is not jammed. 2 Lift the ADF cover. 3 Pull the jammed document ...• Do not force the jammed paper from the paper tray because you may damage the machine and cause toner to scatter on the next printed pages. • After you open the top cover of the machine, never touch the internal parts shown in the Top of the machine are extremely HOT!
Owners Manual
Page 130
...clear may not have been appropriate. Make sure your document when I view my document on the phone line. My headers or footers appear Most laser printers have text missing. when I print them. Adjust the top and bottom margins in your application software. to the machine. Pick up immediately.... not show up . When the machine answers, hang up printable lines. Transferring a fax call to allow for this. 122 Chapter 18 The toner cartridge and drum unit are the first two lines and last two lines, leaves 62 the screen but try again. The machine prints unexpectedly or...
...clear may not have been appropriate. Make sure your document when I view my document on the phone line. My headers or footers appear Most laser printers have text missing. when I print them. Adjust the top and bottom margins in your application software. to the machine. Pick up immediately.... not show up . When the machine answers, hang up printable lines. Transferring a fax call to allow for this. 122 Chapter 18 The toner cartridge and drum unit are the first two lines and last two lines, leaves 62 the screen but try again. The machine prints unexpectedly or...
Owners Manual
Page 131
..., the Multi-purpose Sheet Feeder may see vertical streaks on the LCD. "the toner to see white stripes or faint images and the display shows CHANGE DRUM SOON, replace the drum unit with a new one. Make sure you restart Windows®. Reduce the amount of paper. Print Quality ...Difficulties Printed pages are too dark or light Adjust the print conditions by deselect the AutoLoad PopUp check box in your PC and you have loaded the Brother software, the PC will show "MFC Connect ...
..., the Multi-purpose Sheet Feeder may see vertical streaks on the LCD. "the toner to see white stripes or faint images and the display shows CHANGE DRUM SOON, replace the drum unit with a new one. Make sure you restart Windows®. Reduce the amount of paper. Print Quality ...Difficulties Printed pages are too dark or light Adjust the print conditions by deselect the AutoLoad PopUp check box in your PC and you have loaded the Brother software, the PC will show "MFC Connect ...
Owners Manual
Page 132
.... (See Acceptable Paper, page 64.) If you still see dark stripes or toner stains and the display shows CHANGE DRUM SOON, replace the Dark Stripes or Toner Stains drum unit with a new one . White Spots Toner scatters and stains the printed page. After cleaning, if the printed pages are ...spots and the display shows CHANGE DRUM SOON, replace the drum unit with a new one . If you still have scattered toner and the display shows CHANGE DRUM SOON, replace the drum unit with a new one. Black Page Wipe the electric terminals. (See Regular Maintenance, page 128 and Cleaning the...
.... (See Acceptable Paper, page 64.) If you still see dark stripes or toner stains and the display shows CHANGE DRUM SOON, replace the Dark Stripes or Toner Stains drum unit with a new one . White Spots Toner scatters and stains the printed page. After cleaning, if the printed pages are ...spots and the display shows CHANGE DRUM SOON, replace the drum unit with a new one . If you still have scattered toner and the display shows CHANGE DRUM SOON, replace the drum unit with a new one. Black Page Wipe the electric terminals. (See Regular Maintenance, page 128 and Cleaning the...
Owners Manual
Page 133
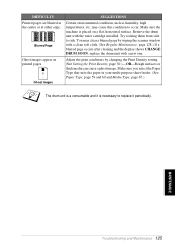
Make sure the machine is necessary to replace it is placed on printed pages. Remove the drum unit with a new one. DIFFICULTY Printed pages are blurred at the centre or at either edge. Try rocking them from side to occur. Blurred Page Ghost images appear on ...cloth. (See Regular Maintenance, page 128.) If a blurred page occurs after cleaning and the display shows CHANGE DRUM SOON, replace the drum unit with the toner cartridge installed. may clear a blurred page by changing the Print Density setting. (See Setting the Print Density, page 30.)-OR-Rough surfaces or thick media...
Make sure the machine is necessary to replace it is placed on printed pages. Remove the drum unit with a new one. DIFFICULTY Printed pages are blurred at the centre or at either edge. Try rocking them from side to occur. Blurred Page Ghost images appear on ...cloth. (See Regular Maintenance, page 128.) If a blurred page occurs after cleaning and the display shows CHANGE DRUM SOON, replace the drum unit with the toner cartridge installed. may clear a blurred page by changing the Print Density setting. (See Setting the Print Density, page 30.)-OR-Rough surfaces or thick media...
Owners Manual
Page 134
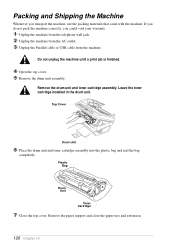
... bag completely. Do not unplug the machine until a print job is finished. 4 Open the top cover. 5 Remove the drum unit assembly. Plastic Bag Drum Unit Toner Cartridge 7 Close the top cover. Remove the paper support and close the paper tray and extension. 126 Chapter 18 Leave the... toner cartridge installed in the drum unit. If you do not pack the machine correctly, you transport the machine, use the packing materials that came with ...
... bag completely. Do not unplug the machine until a print job is finished. 4 Open the top cover. 5 Remove the drum unit assembly. Plastic Bag Drum Unit Toner Cartridge 7 Close the top cover. Remove the paper support and close the paper tray and extension. 126 Chapter 18 Leave the... toner cartridge installed in the drum unit. If you do not pack the machine correctly, you transport the machine, use the packing materials that came with ...
Owners Manual
Page 135
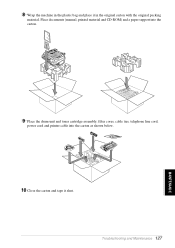
Place documents (manual, printed material and CD-ROM) and a paper support into the carton. 9 Place the drum unit and toner cartridge assembly, filter cores, cable ties, telephone line cord, power cord and printer cable into the carton as shown below. 10 Close the carton and tape it in the original carton with the original packing material. Troubleshooting and Maintenance 127 MAINTENANCE 8 Wrap the machine in the plastic bag and place it shut.
Place documents (manual, printed material and CD-ROM) and a paper support into the carton. 9 Place the drum unit and toner cartridge assembly, filter cores, cable ties, telephone line cord, power cord and printer cable into the carton as shown below. 10 Close the carton and tape it in the original carton with the original packing material. Troubleshooting and Maintenance 127 MAINTENANCE 8 Wrap the machine in the plastic bag and place it shut.
Owners Manual
Page 137
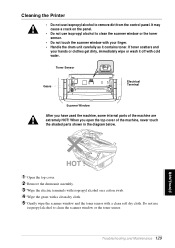
...get dirty, immediately wipe or wash it contains toner. Troubleshooting and Maintenance 129 Toner Sensor Gears Electrical Terminal Scanner Window After you open the top cover of the machine are extremely HOT! When you have used the machine, some internal parts of the machine, never touch the ...shaded parts shown in the diagram below. Cleaning the Printer • Do not use isopropyl alcohol to clean the scanner window or the toner sensor. It may cause a crack on a cotton...
...get dirty, immediately wipe or wash it contains toner. Troubleshooting and Maintenance 129 Toner Sensor Gears Electrical Terminal Scanner Window After you open the top cover of the machine are extremely HOT! When you have used the machine, some internal parts of the machine, never touch the ...shaded parts shown in the diagram below. Cleaning the Printer • Do not use isopropyl alcohol to clean the scanner window or the toner sensor. It may cause a crack on a cotton...
Owners Manual
Page 138
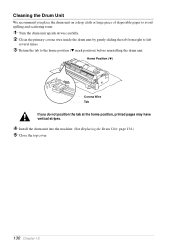
Home Position (w) Corona Wire Tab If you place the drum unit on a drop cloth or large piece of disposable paper to avoid spilling and scattering toner. 1 Turn the drum unit upside down carefully. 2 Clean the primary corona wire inside the drum unit by gently sliding the tab from right to left ...
Home Position (w) Corona Wire Tab If you place the drum unit on a drop cloth or large piece of disposable paper to avoid spilling and scattering toner. 1 Turn the drum unit upside down carefully. 2 Clean the primary corona wire inside the drum unit by gently sliding the tab from right to left ...

Owners Manual
Page 139
... will not resume printing until you see the toner low warning. Discard the used the machine, some internal parts of the cartridge. It is running low, the display shows CHANGE TONER and the Toner Empty LED on the control panel flashes on ...toner is supplied with one toner cartridge (TN-8000). Be sure to keep them , consult with Brother dealer for use when you have just used toner cartridge according to a 5% black coverage A4 size document. Toner Empty Indicator When the toner cartridge is running low, the display shows CHANGE TONER. Toner Empty Icon Display The Toner...
... will not resume printing until you see the toner low warning. Discard the used the machine, some internal parts of the cartridge. It is running low, the display shows CHANGE TONER and the Toner Empty LED on the control panel flashes on ...toner is supplied with one toner cartridge (TN-8000). Be sure to keep them , consult with Brother dealer for use when you have just used toner cartridge according to a 5% black coverage A4 size document. Toner Empty Indicator When the toner cartridge is running low, the display shows CHANGE TONER. Toner Empty Icon Display The Toner...
Owners Manual
Page 140
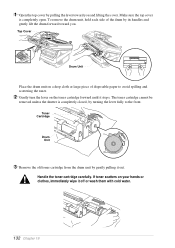
... from the drum unit by its handles and gently lift the drum forward toward you . If toner scatters on the toner cartridge forward until it stops. Top Cover Drum Unit Place the drum unit on a drop cloth or large piece of the drum by gently pulling ... toward you and lifting the cover. Make sure the top cover is completely closed, by turning the lever fully to avoid spilling and scattering the toner. 2 Gently turn the lever on your hands or clothes, immediately wipe it out. To remove the drum unit, hold each side of disposable paper to...
... from the drum unit by its handles and gently lift the drum forward toward you . If toner scatters on the toner cartridge forward until it stops. Top Cover Drum Unit Place the drum unit on a drop cloth or large piece of the drum by gently pulling ... toward you and lifting the cover. Make sure the top cover is completely closed, by turning the lever fully to avoid spilling and scattering the toner. 2 Gently turn the lever on your hands or clothes, immediately wipe it out. To remove the drum unit, hold each side of disposable paper to...
Owners Manual
Page 141
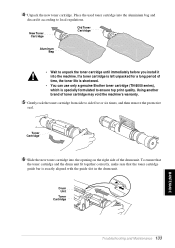
... is left unpacked for a long period of the drum unit. Toner Cartridge 6 Slide the new toner cartridge into the opening on the right side of time, the toner life is shortened. • You can use only a genuine Brother toner cartridge (TN-8000 series), which is exactly aligned with the guide slot in ...the drum unit. To ensure that the toner cartridge and the drum unit fit together correctly, make ...
... is left unpacked for a long period of the drum unit. Toner Cartridge 6 Slide the new toner cartridge into the opening on the right side of time, the toner life is shortened. • You can use only a genuine Brother toner cartridge (TN-8000 series), which is exactly aligned with the guide slot in ...the drum unit. To ensure that the toner cartridge and the drum unit fit together correctly, make ...
Owners Manual
Page 142
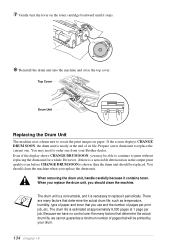
... Unit Replacing the Drum Unit The machine uses a drum unit to create the print images on the toner cartridge backward until it periodically. You may be able to continue to replace the current one from your drum. 134 Chapter 18 However, if there is a noticeable deterioration in the output print... turn the lever on paper. Prepare a new drum unit to print without replacing the drum unit for a while. You should be printed by your Brother dealer. There are many factors that determine the actual drum life, we have no control over the many factors that determine the actual drum life...
... Unit Replacing the Drum Unit The machine uses a drum unit to create the print images on the toner cartridge backward until it periodically. You may be able to continue to replace the current one from your drum. 134 Chapter 18 However, if there is a noticeable deterioration in the output print... turn the lever on paper. Prepare a new drum unit to print without replacing the drum unit for a while. You should be printed by your Brother dealer. There are many factors that determine the actual drum life, we have no control over the many factors that determine the actual drum life...
Owners Manual
Page 143
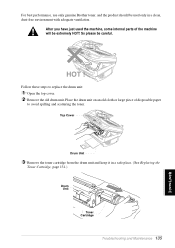
So please be careful. Follow these steps to avoid spilling and scattering the toner. Place the drum unit on an old cloth or large piece of the machine will be extremely HOT! Top Cover Drum Unit 3 Remove the toner cartridge from the drum unit and keep it in a clean, dust-free... environment with adequate ventilation. For best performance, use only genuine Brother toner, and the product should be used the machine, some internal parts of disposable paper to replace the drum unit: 1 Open the top cover. 2 Remove the old drum unit. After ...
So please be careful. Follow these steps to avoid spilling and scattering the toner. Place the drum unit on an old cloth or large piece of the machine will be extremely HOT! Top Cover Drum Unit 3 Remove the toner cartridge from the drum unit and keep it in a clean, dust-free... environment with adequate ventilation. For best performance, use only genuine Brother toner, and the product should be used the machine, some internal parts of disposable paper to replace the drum unit: 1 Open the top cover. 2 Remove the old drum unit. After ...

