
Network Users Manual (Internet Fax and Fax to Server) - English
Page 8
... your machine, an E-mail address for your machine, the mail server(s) IP address, mailbox name and password for your systems Administrator. For details of these items, please contact your Brother machine. You must configure your Brother machine to configure this information, see Setup Internet (from your machine, your network and mail server. 1 Internet...
... your machine, an E-mail address for your machine, the mail server(s) IP address, mailbox name and password for your systems Administrator. For details of these items, please contact your Brother machine. You must configure your Brother machine to configure this information, see Setup Internet (from your machine, your network and mail server. 1 Internet...

Network Users Manual (Internet Fax and Fax to Server) - English
Page 39
...Name or IP Address. POP3 Server 3 This field displays the node name or IP address of the POP3 server (incoming E-mail server) used by the Brother machine. d Press a or b to k. Press OK. h Enter the account name for SMTP authentication. Press OK. c Press a or b to... 64 characters). Press OK. g Enter the POP3 server address (up to choose Setup IFAX. i Enter the account password for SMTP authentication. Press OK. 3 j Enter the account password again. k Press Stop/Exit. This address is necessary for the Internet fax features to choose LAN. h Press Stop/...
...Name or IP Address. POP3 Server 3 This field displays the node name or IP address of the POP3 server (incoming E-mail server) used by the Brother machine. d Press a or b to k. Press OK. h Enter the account name for SMTP authentication. Press OK. c Press a or b to... 64 characters). Press OK. g Enter the POP3 server address (up to choose Setup IFAX. i Enter the account password for SMTP authentication. Press OK. 3 j Enter the account password again. k Press Stop/Exit. This address is necessary for the Internet fax features to choose LAN. h Press Stop/...

Network Users Manual (Internet Fax and Fax to Server) - English
Page 41
... Setup Internet. d Press a or b to choose LAN. Press OK. Press OK. 3 c Press a or b to choose Setup IFAX. Press OK. f Enter the user password assigned to 32 characters). a Press Menu. c Press a or b to choose Setup IFAX. Press OK. d Press a or b to choose On or Off. Press OK. g Press... or disable the APOP (Authenticated Post Office Protocol). Please note that will login to the POP3 server (up to the machine that this password is case sensitive. Press OK. Note To set for the POP3 server account where the internet print jobs are to choose Mailbox Pwd....
... Setup Internet. d Press a or b to choose LAN. Press OK. Press OK. 3 c Press a or b to choose Setup IFAX. Press OK. f Enter the user password assigned to 32 characters). a Press Menu. c Press a or b to choose Setup IFAX. Press OK. d Press a or b to choose On or Off. Press OK. g Press... or disable the APOP (Authenticated Post Office Protocol). Please note that will login to the POP3 server (up to the machine that this password is case sensitive. Press OK. Note To set for the POP3 server account where the internet print jobs are to choose Mailbox Pwd....
Network Users Manual (Internet Fax and Fax to Server) - English
Page 54
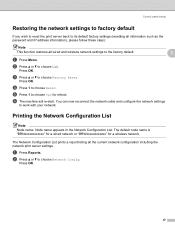
... network settings to factory default 3 If you wish to reset the print server back to its default factory settings (resetting all information such as the password and IP address information), please follow these steps: Note This function restores all the current network configuration including the network print server settings. The Network...
... network settings to factory default 3 If you wish to reset the print server back to its default factory settings (resetting all information such as the password and IP address information), please follow these steps: Note This function restores all the current network configuration including the network print server settings. The Network...

Software Users Manual - English
Page 12
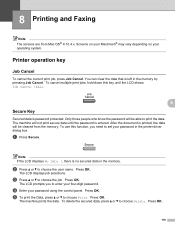
... Printer operation keys 1 1 Job Cancel 1 To cancel the current print job, press Job Cancel. Only those people who know the password will be cleared. To use this key until the password is left in the memory. If you turn the power switch Off, the secured data saved in the printer driver dialog... choose Delete. To cancel multiple print jobs, hold down this function, you print the secured data, it will be able to set your four-digit password and press OK. After the document is printed, the data will not print secure data until the LCD shows Job Cancel (ALL). The LCD displays...
... Printer operation keys 1 1 Job Cancel 1 To cancel the current print job, press Job Cancel. Only those people who know the password will be cleared. To use this key until the password is left in the memory. If you turn the power switch Off, the secured data saved in the printer driver dialog... choose Delete. To cancel multiple print jobs, hold down this function, you print the secured data, it will be able to set your four-digit password and press OK. After the document is printed, the data will not print secure data until the LCD shows Job Cancel (ALL). The LCD displays...

Software Users Manual - English
Page 28
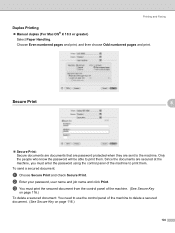
...machine to delete a secured document. (See Secure Key on any document). Only 1 the people who know the password will print the date and time on or off. c You must enter the password using the control panel of the machine to print them . Printing „ Secure Print Secure documents are documents ...quick print setting on your document from the Printer Function menu and check Secure Print. To send a secured document: a Select Secure Print from your password, user name and job name and click OK. b Enter your computer's system clock and the PC login user name or the text you to ...
...machine to delete a secured document. (See Secure Key on any document). Only 1 the people who know the password will print the date and time on or off. c You must enter the password using the control panel of the machine to print them . Printing „ Secure Print Secure documents are documents ...quick print setting on your document from the Printer Function menu and check Secure Print. To send a secured document: a Select Secure Print from your password, user name and job name and click OK. b Enter your computer's system clock and the PC login user name or the text you to ...

Software Users Manual - English
Page 35
...Photo or Gray Scale images. „ Halftone Screen Lock Stops other applications from the drop-down list for your secured document that are password protected when they are secured at the machine, you to secure documents that you send to the machine from the drop-down box. &#...recommend Toner Save to On, print appears lighter. Thin Recycled Paper „ Job Spooling Secure Print allows you must have a Password and Job Name. „ Password Choose the password for your machine. The default setting is Off. Since the documents are sent to the machine. c You can change settings...
...Photo or Gray Scale images. „ Halftone Screen Lock Stops other applications from the drop-down list for your secured document that are password protected when they are secured at the machine, you to secure documents that you send to the machine from the drop-down box. &#...recommend Toner Save to On, print appears lighter. Thin Recycled Paper „ Job Spooling Secure Print allows you must have a Password and Job Name. „ Password Choose the password for your machine. The default setting is Off. Since the documents are sent to the machine. c You can change settings...

Software Users Manual - English
Page 49
Scanning • For users who do not have administrator rights: Enter the administrator password and click OK. 2 42
Scanning • For users who do not have administrator rights: Enter the administrator password and click OK. 2 42
Software Users Manual - English
Page 86
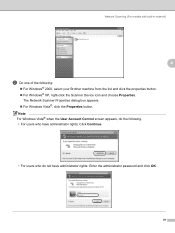
... built-in network) 4 b Do one of the following . • For users who do the following : „ For Windows® 2000, select your Brother machine from the list and click the properties button. „ For Windows® XP, right-click the Scanner Device icon and choose Properties. Note For...User Account Control screen appears, do not have administrator rights: Click Continue. • For users who have administrator rights: Enter the administrator password and click OK. 79 The Network Scanner Properties dialog box appears. „ For Windows Vista®, click the Properties button.
... built-in network) 4 b Do one of the following . • For users who do the following : „ For Windows® 2000, select your Brother machine from the list and click the properties button. „ For Windows® XP, right-click the Scanner Device icon and choose Properties. Note For...User Account Control screen appears, do not have administrator rights: Click Continue. • For users who have administrator rights: Enter the administrator password and click OK. 79 The Network Scanner Properties dialog box appears. „ For Windows Vista®, click the Properties button.
Software Users Manual - English
Page 93
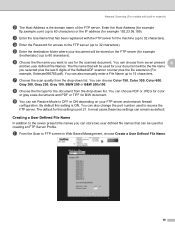
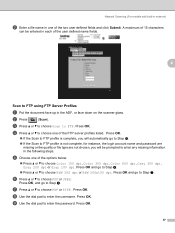
... OFF or ON depending on the FTP server (for the machine (up to 32 characters). Network Scanning (For models with the FTP server for example /brother/abc/) (up to 60 characters). h Choose the file type for example ftp.example.com) (up to 15 characters. Creating a User Defined File Name ...be used to FTP screen in network) b The Host Address is ON. The default for your FTP server and network firewall configuration. d Enter the Password for access to the FTP server (up to the seven present file names you selected plus the last 6 digits of the FTP server. g Choose ...
... OFF or ON depending on the FTP server (for the machine (up to 32 characters). Network Scanning (For models with the FTP server for example /brother/abc/) (up to 60 characters). h Choose the file type for example ftp.example.com) (up to 15 characters. Creating a User Defined File Name ...be used to FTP screen in network) b The Host Address is ON. The default for your FTP server and network firewall configuration. d Enter the Password for access to the FTP server (up to the seven present file names you selected plus the last 6 digits of the FTP server. g Choose ...
Software Users Manual - English
Page 94
... to FTP profile is complete, you will be entered in each of the user defined name fields. 4 Scan to FTP. d Press a or b to enter the password. Press OK and go to Step f. „ Press a or b to Step h. Press OK, and go to Step j. „ If the Scan to FTP profile is... not complete, for instance, the login account name and password are missing or the quality or file type are not chosen, you will automatically go to choose B&W 200 dpi or B&W 200x100 dpi. Press OK. 87...
... to FTP profile is complete, you will be entered in each of the user defined name fields. 4 Scan to FTP. d Press a or b to enter the password. Press OK and go to Step f. „ Press a or b to Step h. Press OK, and go to Step j. „ If the Scan to FTP profile is... not complete, for instance, the login account name and password are missing or the quality or file type are not chosen, you will automatically go to choose B&W 200 dpi or B&W 200x100 dpi. Press OK. 87...

Software Users Manual - English
Page 96
... Step p. Press OK. Enter the file name you want to use and press OK. 4 Press Start and go to step o o Press a or b to enter the password.
... Step p. Press OK. Enter the file name you want to use and press OK. 4 Press Start and go to step o o Press a or b to enter the password.
Software Users Manual - English
Page 97
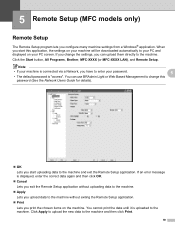
...Start button, All Programs, Brother, MFC-XXXX (or MFC-XXXX LAN), and Remote Setup. When you start uploading data to the machine and then click Print. 90 Note • If your machine is connected via a Network, you have to enter your password. 5 • The default password is displayed, enter the ... the machine without uploading data to the machine. „ Apply Lets you print the chosen items on your PC screen. 5 Remote Setup (MFC models only) 5 Remote Setup 5 The Remote Setup program lets you start this application, the settings on the machine. Click Apply to upload...
...Start button, All Programs, Brother, MFC-XXXX (or MFC-XXXX LAN), and Remote Setup. When you start uploading data to the machine and then click Print. 90 Note • If your machine is connected via a Network, you have to enter your password. 5 • The default password is displayed, enter the ... the machine without uploading data to the machine. „ Apply Lets you print the chosen items on your PC screen. 5 Remote Setup (MFC models only) 5 Remote Setup 5 The Remote Setup program lets you start this application, the settings on the machine. Click Apply to upload...
Software Users Manual - English
Page 119
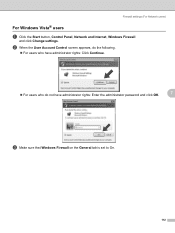
b When the User Account Control screen appears, do the following. „ For users who have administrator rights: Click Continue. „ For users who do not have administrator rights: Enter the administrator password and click OK. 7 c Make sure that Windows Firewall on the General tab is set to On. 112 Firewall settings (For Network users) For Windows Vista® users 7 a Click the Start button, Control Panel, Network and Internet, Windows Firewall and click Change settings.
b When the User Account Control screen appears, do the following. „ For users who have administrator rights: Click Continue. „ For users who do not have administrator rights: Enter the administrator password and click OK. 7 c Make sure that Windows Firewall on the General tab is set to On. 112 Firewall settings (For Network users) For Windows Vista® users 7 a Click the Start button, Control Panel, Network and Internet, Windows Firewall and click Change settings.
Software Users Manual - English
Page 123
... secured data in the memory. After the document is printed, the data will be able to print the data. To use this key until the password is password protected. Note If the LCD displays No Data !, there is left in the printer driver dialog box. c Press a or b to choose Print. d ... user name. The LCD prompts you need to enter your operating system. The LCD displays job selections. Press OK. Only those people who know the password will not print secure data until the LCD shows Job Cancel (ALL). 8 Secure Key 8 Secured data is entered. Press OK. 116 The machine ...
... secured data in the memory. After the document is printed, the data will be able to print the data. To use this key until the password is password protected. Note If the LCD displays No Data !, there is left in the printer driver dialog box. c Press a or b to choose Print. d ... user name. The LCD prompts you need to enter your operating system. The LCD displays job selections. Press OK. Only those people who know the password will not print secure data until the LCD shows Job Cancel (ALL). 8 Secure Key 8 Secured data is entered. Press OK. 116 The machine ...
Software Users Manual - English
Page 131
...control panel of the machine to print them . c You must enter the password using the control panel of the machine to the machine. Only the people who know the password will be able to print them . b Enter your password, user name and job name and click Print. To send a secured document:... pages and print, and then choose Odd numbered pages and print. Secure Print 8 8 „ Secure Print: Secure documents are documents that are password protected when they are secured at the machine, you must print the secured document from the control panel of the machine. (See Secure Key on...
...control panel of the machine to print them . c You must enter the password using the control panel of the machine to the machine. Only the people who know the password will be able to print them . b Enter your password, user name and job name and click Print. To send a secured document:... pages and print, and then choose Odd numbered pages and print. Secure Print 8 8 „ Secure Print: Secure documents are documents that are password protected when they are secured at the machine, you must print the secured document from the control panel of the machine. (See Secure Key on...

Software Users Manual - English
Page 147
...; Job Name Choose the Job name from modifying the Halftone settings. Since the documents are secured at the machine, you to secure documents that are password protected when they are sent to the machine. „ Resolution You can change the resolution as follows: • 300 dpi • 600 dpi... • HQ 1200 „ Toner Save You can increase the quality of the machine. The secured document must enter the password using this feature. If you sent to the machine. The default setting is on. „ High Quality Image Printing You can conserve toner using ...
...; Job Name Choose the Job name from modifying the Halftone settings. Since the documents are secured at the machine, you to secure documents that are password protected when they are sent to the machine. „ Resolution You can change the resolution as follows: • 300 dpi • 600 dpi... • HQ 1200 „ Toner Save You can increase the quality of the machine. The secured document must enter the password using this feature. If you sent to the machine. The default setting is on. „ High Quality Image Printing You can conserve toner using ...

Software Users Manual - English
Page 191
... the machine (up to 32 characters). Enter the Host Address (for example ftp.example.com) (up to 60 characters) or the IP address (for example /brother/abc/) (up to 32 characters). e Enter the destination folder where your document will be up to 60 characters). 184 b The Host Address is the domain... name of the machine and can be displayed on the FTP server (for example 192.23.56.189). d Enter the Password for access to the FTP server for the Username that was registered (up to 15 characters.
... the machine (up to 32 characters). Enter the Host Address (for example ftp.example.com) (up to 60 characters) or the IP address (for example /brother/abc/) (up to 32 characters). e Enter the destination folder where your document will be up to 60 characters). 184 b The Host Address is the domain... name of the machine and can be displayed on the FTP server (for example 192.23.56.189). d Enter the Password for access to the FTP server for the Username that was registered (up to 15 characters.

Software Users Manual - English
Page 193
c Press a or b to choose Scan to choose B&W 200 dpi or B&W 200x100 dpi. Press OK and go to enter the password. g Press a or b to choose PDF or JPEG. b Press (Scan). f Press a or b to choose PDF or TIFF. Press OK. Press OK. 186 Network Scanning b Enter a file ... glass. Press OK and go to Step j. 11 „ If the Scan to FTP profile is not complete, for instance, the login account name and password are missing or the quality or file type are not chosen, you will automatically go to choose one of the options below: „ Press a or...
c Press a or b to choose Scan to choose B&W 200 dpi or B&W 200x100 dpi. Press OK and go to enter the password. g Press a or b to choose PDF or JPEG. b Press (Scan). f Press a or b to choose PDF or TIFF. Press OK. Press OK. 186 Network Scanning b Enter a file ... glass. Press OK and go to Step j. 11 „ If the Scan to FTP profile is not complete, for instance, the login account name and password are missing or the quality or file type are not chosen, you will automatically go to choose one of the options below: „ Press a or...

Software Users Manual - English
Page 195
... FTP process again from the beginning a. 11 188 Note If you want to change the file name, go to Step n. o Press a or b to enter the password. Press OK. p The LCD shows Connecting. l Use the dial pad to choose . Network Scanning j Press a or b to enter the username. Note If a timeout or any...
... FTP process again from the beginning a. 11 188 Note If you want to change the file name, go to Step n. o Press a or b to enter the password. Press OK. p The LCD shows Connecting. l Use the dial pad to choose . Network Scanning j Press a or b to enter the username. Note If a timeout or any...

