Network Users Manual - English
Page 49
...sure that came with your access point. or WLAN Enable? To cancel, press Stop/Exit. (For DCP-593CW, DCP-595CW, DCP-597CW and MFC-495CW) When Network I/F switched to Wireless is indicated again, reset the machine back to the default factory settings and try starting from d again...Wi-Fi Protected Setup™ or AOSS™ for DCP-365CN, DCP-395CN and MFC-295CN) e (For DCP-373CW, DCP-375CW, DCP-377CW, MFC-253CW, MFC-255CW and MFC-257CW) When Change to the instruction manual that only one access point/router on your network with the SecureEasySetup™ mode, the Wi-Fi Protected...
...sure that came with your access point. or WLAN Enable? To cancel, press Stop/Exit. (For DCP-593CW, DCP-595CW, DCP-597CW and MFC-495CW) When Network I/F switched to Wireless is indicated again, reset the machine back to the default factory settings and try starting from d again...Wi-Fi Protected Setup™ or AOSS™ for DCP-365CN, DCP-395CN and MFC-295CN) e (For DCP-373CW, DCP-375CW, DCP-377CW, MFC-253CW, MFC-255CW and MFC-257CW) When Change to the instruction manual that only one access point/router on your network with the SecureEasySetup™ mode, the Wi-Fi Protected...
Network Users Manual - English
Page 51
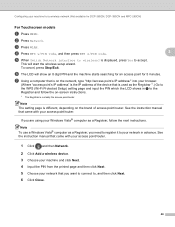
... searches for an access point that supports SecureEasySetup™, Wi-Fi Protected Setup™ or AOSS™ for DCP-365CN, DCP-395CN and MFC-295CN) For Touchscreen models 3 a Press MENU. If the LCD shows No Access Point, the machine has not detected your access point/router on...This will automatically detect which mode (SecureEasySetup™, Wi-Fi Protected Setup™ or AOSS™) your access point uses to the instruction manual that only one access point/router on your network with the SecureEasySetup™ mode, the Wi-Fi Protected Setup™ mode or AOSS™ ...
... searches for an access point that supports SecureEasySetup™, Wi-Fi Protected Setup™ or AOSS™ for DCP-365CN, DCP-395CN and MFC-295CN) For Touchscreen models 3 a Press MENU. If the LCD shows No Access Point, the machine has not detected your access point/router on...This will automatically detect which mode (SecureEasySetup™, Wi-Fi Protected Setup™ or AOSS™) your access point uses to the instruction manual that only one access point/router on your network with the SecureEasySetup™ mode, the Wi-Fi Protected Setup™ mode or AOSS™ ...
Network Users Manual - English
Page 54
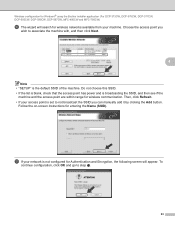
... MFC-295CN) g Using a computer that came with your access point/router. 1 Click and then Network. 2 Click Add a wireless device. 3 Choose your machine and click Next. 4 Input the PIN from the printed page and then click Next. 5 Choose your network that is used as a Registrar, perform following instructions... to the WPS (Wi-Fi Protected Setup™) setting page and input the PIN which the LCD shows in advance. See the instruction manual that came with your router or access point. Configuring your machine for a wireless network (Not available for operating your device, please ...
... MFC-295CN) g Using a computer that came with your access point/router. 1 Click and then Network. 2 Click Add a wireless device. 3 Choose your machine and click Next. 4 Input the PIN from the printed page and then click Next. 5 Choose your network that is used as a Registrar, perform following instructions... to the WPS (Wi-Fi Protected Setup™) setting page and input the PIN which the LCD shows in advance. See the instruction manual that came with your router or access point. Configuring your machine for a wireless network (Not available for operating your device, please ...
Network Users Manual - English
Page 55
...network (Not available for 5 minutes. If you want to connect to, and then click Next. 6 Click Close. 46 c Press WLAN. See the instruction manual that came with your access point/router. 1 Click and then Network. 2 Click Add a wireless device. 3 Choose your machine and click Next. 4.... 3 e When Switch Network interface to the Registrar and follow the next instructions. This will show an 8 digit PIN and the machine starts searching for an access point for DCP-365CN, DCP-395CN and MFC-295CN) For Touchscreen models 3 a Press MENU. To cancel, press Stop/Exit....
...network (Not available for 5 minutes. If you want to connect to, and then click Next. 6 Click Close. 46 c Press WLAN. See the instruction manual that came with your access point/router. 1 Click and then Network. 2 Click Add a wireless device. 3 Choose your machine and click Next. 4.... 3 e When Switch Network interface to the Registrar and follow the next instructions. This will show an 8 digit PIN and the machine starts searching for an access point for DCP-365CN, DCP-395CN and MFC-295CN) For Touchscreen models 3 a Press MENU. To cancel, press Stop/Exit....
Network Users Manual - English
Page 62
... communication. Follow the on-screen instructions for entering the Name (SSID). Wireless configuration for Windows® using the Brother installer application (For DCP-373CW, DCP-375CW, DCP-377CW, DCP-593CW, DCP-595CW, DCP-597CW, MFC-495CW and MFC-795CW) j The wizard will appear. Choose the access point you can manually add it by clicking the...
... communication. Follow the on-screen instructions for entering the Name (SSID). Wireless configuration for Windows® using the Brother installer application (For DCP-373CW, DCP-375CW, DCP-377CW, DCP-593CW, DCP-595CW, DCP-597CW, MFC-495CW and MFC-795CW) j The wizard will appear. Choose the access point you can manually add it by clicking the...
Network Users Manual - English
Page 68
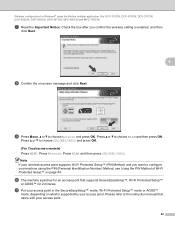
... machine using the Brother installer application (For DCP-373CW, DCP-375CW, DCP-377CW, DCP-593CW, DCP-595CW, DCP-597CW, MFC-495CW and MFC-795CW) g Read the Important Notice. Press a or b to choose Network and press OK. Please refer to choose WLAN and then press OK. Press Network. Press a or b to the instruction manual that supports...
... machine using the Brother installer application (For DCP-373CW, DCP-375CW, DCP-377CW, DCP-593CW, DCP-595CW, DCP-597CW, MFC-495CW and MFC-795CW) g Read the Important Notice. Press a or b to choose Network and press OK. Please refer to choose WLAN and then press OK. Press Network. Press a or b to the instruction manual that supports...

Network Users Manual - English
Page 86
.... Choose the access point you can manually add it by clicking the Add button. Wireless Configuration for Macintosh using the Brother installer application (For DCP-373CW, DCP-375CW, DCP-377CW, DCP-593CW, DCP-595CW, DCP-597CW, MFC-495CW and MFC-795CW) j The wizard will appear. Follow the on-screen instructions for wireless communication. To continue...
.... Choose the access point you can manually add it by clicking the Add button. Wireless Configuration for Macintosh using the Brother installer application (For DCP-373CW, DCP-375CW, DCP-377CW, DCP-593CW, DCP-595CW, DCP-597CW, MFC-495CW and MFC-795CW) j The wizard will appear. Follow the on-screen instructions for wireless communication. To continue...
Network Users Manual - English
Page 92
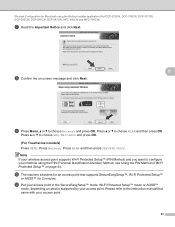
...Fi Protected Setup™ (PIN Method) and you want to configure your machine using the Brother installer application (For DCP-373CW, DCP-375CW, DCP-377CW, DCP-593CW, DCP-595CW, DCP-597CW, MFC-495CW and MFC-795CW) g Read the Important Notice and click Next. 5 h Confirm the on-screen ... SecureEasySetup™ mode, Wi-Fi Protected Setup™ mode or AOSS™ mode, depending on page 44. Press a or b to the instruction manual that supports SecureEasySetup™, Wi-Fi Protected Setup™ or AOSS™ for Macintosh using the PIN (Personal Identification Number) Method, see Using ...
...Fi Protected Setup™ (PIN Method) and you want to configure your machine using the Brother installer application (For DCP-373CW, DCP-375CW, DCP-377CW, DCP-593CW, DCP-595CW, DCP-597CW, MFC-495CW and MFC-795CW) g Read the Important Notice and click Next. 5 h Confirm the on-screen ... SecureEasySetup™ mode, Wi-Fi Protected Setup™ mode or AOSS™ mode, depending on page 44. Press a or b to the instruction manual that supports SecureEasySetup™, Wi-Fi Protected Setup™ or AOSS™ for Macintosh using the PIN (Personal Identification Number) Method, see Using ...
Users Manual - English
Page 17
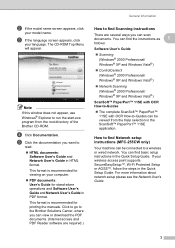
...Click the documentation you want to -Guides can scan documents. You can find Scanning instructions 1 There are required.) General Information How to a wireless or wired network. You can find Network setup instructions (MFC-255CW only) 1 Your machine can view or download the PDF documents. (Internet access... be viewed from the root directory of the Brother CD-ROM. For more information about network setup please see the Network User's Guide. 3 This format is recommended for printing the manuals. How to find basic setup instructions in PDF format. If your computer. „...
...Click the documentation you want to -Guides can scan documents. You can find Scanning instructions 1 There are required.) General Information How to a wireless or wired network. You can find Network setup instructions (MFC-255CW only) 1 Your machine can view or download the PDF documents. (Internet access... be viewed from the root directory of the Brother CD-ROM. For more information about network setup please see the Network User's Guide. 3 This format is recommended for printing the manuals. How to find basic setup instructions in PDF format. If your computer. „...
Users Manual - English
Page 49
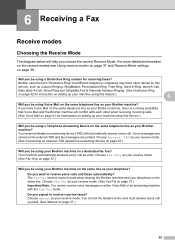
...Ring" but different telephone companies may have Voice Mail on the same telephone line as your Brother machine, there is used when sharing the Brother machine and your telephone on the same line. Choose Manual as a fax. Do you want to receive very few faxes? Choose Fax Only as ...-A-Call, Smart Ring and SimpleBiz Fax & Alternate Number Ringing. (See Distinctive Ring on page 42 for instructions on setting up your machine using this service.) Will you be using your Brother machine on a dedicated fax line? Will you choose the correct Receive Mode. Do you expect to receive...
...Ring" but different telephone companies may have Voice Mail on the same telephone line as your Brother machine, there is used when sharing the Brother machine and your telephone on the same line. Choose Manual as a fax. Do you want to receive very few faxes? Choose Fax Only as ...-A-Call, Smart Ring and SimpleBiz Fax & Alternate Number Ringing. (See Distinctive Ring on page 42 for instructions on setting up your machine using this service.) Will you be using your Brother machine on a dedicated fax line? Will you choose the correct Receive Mode. Do you expect to receive...
Users Manual - English
Page 50
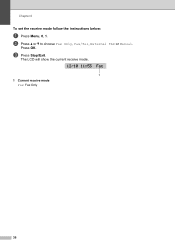
Chapter 6 To set the receive mode follow the instructions below: 6 a Press Menu, 0, 1. The LCD will show the current receive mode. 12/10 11:53 Fax 1 1 Current receive mode Fax: Fax Only 36 b Press a or b to choose Fax Only, Fax/Tel, External TAD or Manual. Press OK. c Press Stop/Exit.
Chapter 6 To set the receive mode follow the instructions below: 6 a Press Menu, 0, 1. The LCD will show the current receive mode. 12/10 11:53 Fax 1 1 Current receive mode Fax: Fax Only 36 b Press a or b to choose Fax Only, Fax/Tel, External TAD or Manual. Press OK. c Press Stop/Exit.

Users Manual - English
Page 68
... up to six small Groups, or you can set up a Group. Rates may want to one large Group. You can have finished adding numbers. You can store these long dialing sequences by dividing...message to store Group. Press OK. Setup Group:G0_ d To add Speed Dial numbers follow the instructions below: For example, for the Group. To take advantage of low rates, you can use ...and a or b to 6). For example, to store them as Speed Dial numbers. Before you can even include manual dialing using the dial pad. Press OK. You can add numbers to a Group, you need to change a...
... up to six small Groups, or you can set up a Group. Rates may want to one large Group. You can have finished adding numbers. You can store these long dialing sequences by dividing...message to store Group. Press OK. Setup Group:G0_ d To add Speed Dial numbers follow the instructions below: For example, for the Group. To take advantage of low rates, you can use ...and a or b to 6). For example, to store them as Speed Dial numbers. Before you can even include manual dialing using the dial pad. Press OK. You can add numbers to a Group, you need to change a...
Users Manual - English
Page 113
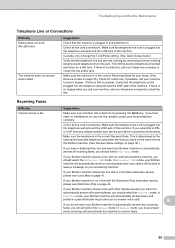
...all line cord connections. Then lift the external telephone's handset and listen for connection instructions. If there is determined by the external devices and telephone subscriber services you have on the same line as the Brother machine. (See Receive Mode settings on page 35.) Check for your setup. ... is in the correct Receiving Mode for a dial tone. If your Brother machine shares a line with the Distinctive Ring subscriber service, please see Voice Mail on page 41. In Manual mode, you should select the Manual mode. If there is still no dial tone, ask your telephone company...
...all line cord connections. Then lift the external telephone's handset and listen for connection instructions. If there is determined by the external devices and telephone subscriber services you have on the same line as the Brother machine. (See Receive Mode settings on page 35.) Check for your setup. ... is in the correct Receiving Mode for a dial tone. If your Brother machine shares a line with the Distinctive Ring subscriber service, please see Voice Mail on page 41. In Manual mode, you should select the Manual mode. If there is still no dial tone, ask your telephone company...
Users Manual - English
Page 177
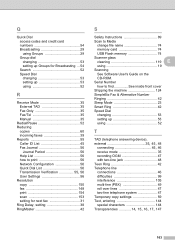
...23 Smart Ring 42 Speed Dial changing 53 setting up 53 using 52 R Receive Mode 35 External TAD 35 Fax Only 35 Fax/Tel 35 Manual 35 Redial/Pause 52 Reducing copies 60 incoming faxes 39 Reports 55 Caller ID List 45 Fax Journal 56 Journal Period 56 Help List 56... numbers 54 Broadcasting 29 using Groups 29 Group dial changing 53 setting up Groups for next fax 31 Ring Delay, setting 38 RingMaster 42 S Safety Instructions 89 Scan to print 56 Network Configuration 56 Quick Dial List 56 Transmission Verification 55, 56 User Settings 56 Resolution copy 150 fax 148 print...
...23 Smart Ring 42 Speed Dial changing 53 setting up 53 using 52 R Receive Mode 35 External TAD 35 Fax Only 35 Fax/Tel 35 Manual 35 Redial/Pause 52 Reducing copies 60 incoming faxes 39 Reports 55 Caller ID List 45 Fax Journal 56 Journal Period 56 Help List 56... numbers 54 Broadcasting 29 using Groups 29 Group dial changing 53 setting up Groups for next fax 31 Ring Delay, setting 38 RingMaster 42 S Safety Instructions 89 Scan to print 56 Network Configuration 56 Quick Dial List 56 Transmission Verification 55, 56 User Settings 56 Resolution copy 150 fax 148 print...
Quick Setup Guide - Spanish
Page 29
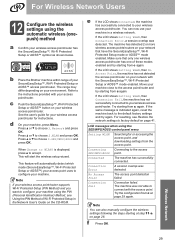
...Try the configuration from c again. Wireless Network 29 b Place the Brother machine within range of your machine, press Menu. The range may differ...Wi-Fi Protected Setup or AOSS™) your machine. You can also manually configure the wireless settings following the steps starting from c again. For ...one of these modes enabled and try starting from c on page 26. e If the LCD shows Connected, the machine has successfully connected to factory default on your wireless access point/router supports Wi-Fi Protected Setup (PIN Method) and you want to the instructions...
...Try the configuration from c again. Wireless Network 29 b Place the Brother machine within range of your machine, press Menu. The range may differ...Wi-Fi Protected Setup or AOSS™) your machine. You can also manually configure the wireless settings following the steps starting from c again. For ...one of these modes enabled and try starting from c on page 26. e If the LCD shows Connected, the machine has successfully connected to factory default on your wireless access point/router supports Wi-Fi Protected Setup (PIN Method) and you want to the instructions...

Quick Setup Guide - English
Page 8
... a or b to Off. (See Turning off Distinctive Ring in Chapter 7 of the User's Guide for instructions on setting up your receive mode. Choose Manual as your Brother machine on the same telephone line as your machine using your Brother machine on the same line. Will you be using your receive mode. Will you be...
... a or b to Off. (See Turning off Distinctive Ring in Chapter 7 of the User's Guide for instructions on setting up your receive mode. Choose Manual as your Brother machine on the same telephone line as your machine using your Brother machine on the same line. Will you be using your receive mode. Will you be...
Quick Setup Guide - English
Page 31
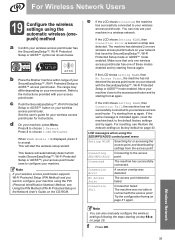
...Identification Number) Method, see Restore the network settings to the instructions provided with the SecureEasySetup™, Wi-Fi Protected Setup or AOSS..., and downloading settings from the access point. You can also manually configure the wireless settings following the steps starting from c again....your wireless access point/router. Make sure that only one wireless access point/router has one of these modes enabled and try starting from c ... the PIN Method of your machine, press Menu. b Place the Brother machine within range of Wi-Fi Protected Setup in a wireless network....
...Identification Number) Method, see Restore the network settings to the instructions provided with the SecureEasySetup™, Wi-Fi Protected Setup or AOSS..., and downloading settings from the access point. You can also manually configure the wireless settings following the steps starting from c again....your wireless access point/router. Make sure that only one wireless access point/router has one of these modes enabled and try starting from c ... the PIN Method of your machine, press Menu. b Place the Brother machine within range of Wi-Fi Protected Setup in a wireless network....


